VLAN、Trunk,以太通道及DHCP
VLAN、Trunk,以太通道及DHCP
1 案例1:Vlan的划分
1.1 问题
VLAN(虚拟局域网)是对连接到的第二层交换机端口的网络用户的逻辑分段,不受网络用户的物理位置限制而根据用户需求进行网络分段。一个VLAN可以在一个交换机或者跨交换机实现。VLAN可以根据网络用户的位置、作用、部门或者根据网络用户所使用的应用程序和协议来进行分组。基于交换机的虚拟局域网能够为局域网解决冲突域、广播域、带宽问题。
- 按企业部门规划vlan
1.2 方案
在交换机上创建vlan2、vlan3,参照如下网络拓扑如图-1所示:

图-1
1.3 步骤
实现此案例需要按照如下步骤进行。
步骤一:客户端与交换机相连
1)为了使同vlan在交换机上可以通信,需要给同vlan客户端配置同网段IP地址,如图-2、图-3所示
图-2
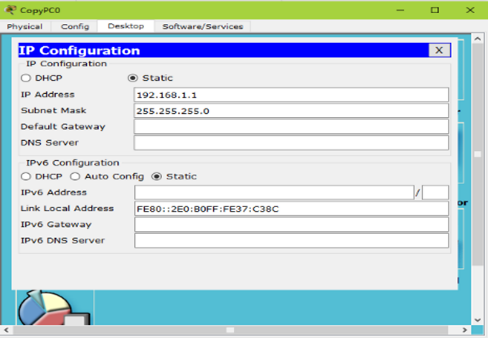
图-3
分别配置为192.168.1.1、192.169.1.2;192.168.2.1、192.168.2.2;192.168.3.1、192.168.3.2;
2)在交换机上创建vlan2 和vlan3并将指定的接口划分到相对应的vlan下
- Switch >enable
- Switch#configure terminal
- Switch(config)#vlan 2
- Switch(config-vlan)#exit
- Switch(config)#vlan 3
- Switch(config-vlan)#exit
- Switch(config)#interface fastEthernet 0/3
- Switch(config-if)#switchport access vlan 2
- Switch(config-if)#exit
- Switch(config)#interface fastEthernet 0/4
- Switch(config-if)#switchport access vlan 2
- Switch(config-if)#exit
- Switch(config)#interface fastEthernet 0/5
- Switch(config-if)#switchport access vlan 3
- Switch(config-if)#exit
- Switch(config)#interface fastEthernet 0/6
- Switch(config-if)#switchport access vlan 3
3)在交换机上查看vlan信息,可以看到创建的vlan以及vlan下的接口
- Switch>enable
- Switch#show vlan
- VLAN Name Status Ports
- ---- -------------------------------- --------- -------------------------------
- 1 default active Fa0/1, Fa0/2, Fa0/7, Fa0/8
- Fa0/9, Fa0/10, Fa0/11, Fa0/12
- Fa0/13, Fa0/14, Fa0/15, Fa0/16
- Fa0/17, Fa0/18, Fa0/19, Fa0/20
- Fa0/21, Fa0/22, Fa0/23, Fa0/24
- 2 VLAN0002 active Fa0/3, Fa0/4
- 3 VLAN0003 active Fa0/5, Fa0/6
- 1002 fddi-default act/unsup
- 1003 token-ring-default act/unsup
- 1004 fddinet-default act/unsup
- 1005 trnet-default act/unsup
- VLAN Type SAID MTU Parent RingNo BridgeNo Stp BrdgMode Trans1 Trans2
- ---- ----- ---------- ----- ------ ------ -------- ---- -------- ------ ------
- 1 enet 100001 1500 - - - - - 0 0
- 2 enet 100002 1500 - - - - - 0 0
- 3 enet 100003 1500 - - - - - 0 0
- 1002 fddi 101002 1500 - - - - - 0 0
- 1003 tr 101003 1500 - - - - - 0 0
- 1004 fdnet 101004 1500 - - - ieee - 0 0
- 1005 trnet 101005 1500 - - - ibm - 0 0
- Remote SPAN VLANs
- ------------------------------------------------------------------------------
- Primary Secondary Type Ports
- ------- --------- ----------------- ------------------------------------------
4)在客户端测试网络的连通性
在192.168.1.0/24的客户机上测试1.0网段的连通性
- PC1>ping 192.168.1.2
- Pinging 192.168.1.2 with 32 bytes of data:
- Reply from 192.168.1.2: bytes=32 time=11ms TTL=128
- Reply from 192.168.1.2: bytes=32 time=1ms TTL=128
- Reply from 192.168.1.2: bytes=32 time=1ms TTL=128
- Reply from 192.168.1.2: bytes=32 time=4ms TTL=128
- Ping statistics for 192.168.1.2:
- Packets: Sent = 4, Received = 4, Lost = 0 (0% loss),
- Approximate round trip times in milli-seconds:
- Minimum = 1ms, Maximum = 11ms, Average = 4ms
5)在192.168.2.0/24的客户机上测试2.0网段的连通性
- PC>ping 192.168.2.2
- Pinging 192.168.2.2 with 32 bytes of data:
- Reply from 192.168.2.2: bytes=32 time=1ms TTL=128
- Reply from 192.168.2.2: bytes=32 time=0ms TTL=128
- Reply from 192.168.2.2: bytes=32 time=0ms TTL=128
- Reply from 192.168.2.2: bytes=32 time=0ms TTL=128
- Ping statistics for 192.168.2.2:
- Packets: Sent = 4, Received = 4, Lost = 0 (0% loss),
- Approximate round trip times in milli-seconds:
- Minimum = 0ms, Maximum = 1ms, Average = 0ms
6)在192.168.3.0/24的客户机上测试3.0网段的连通性
- PC>ping 192.168.3.2
- Pinging 192.168.3.2 with 32 bytes of data:
- Reply from 192.168.3.2: bytes=32 time=1ms TTL=128
- Reply from 192.168.3.2: bytes=32 time=0ms TTL=128
- Reply from 192.168.3.2: bytes=32 time=0ms TTL=128
- Reply from 192.168.3.2: bytes=32 time=1ms TTL=128
- Ping statistics for 192.168.3.2:
- Packets: Sent = 4, Received = 4, Lost = 0 (0% loss),
- Approximate round trip times in milli-seconds:
- Minimum = 0ms, Maximum = 1ms, Average = 0ms
2 案例2:配置trunk中继链路
2.1 问题
在两台交换机上分别创建vlan2、vlan3,参照如下网络拓扑图-4将端口加入到指定的vlan并配置IP址,实现跨交换机的同vlan主机的通信。

图-4
2.2 方案
分别在sw1和sw2上创建vlan2和vlan3并把相应的接口划分到对应的vlan并为客户端配置IP地址,IP地址具有唯一性所以同一局域网络中不能存在相同的IP,另所有的接口默认为vlan1,所以不配置trunk中继链路vlan1也是可以跨交换机通信的。
2.3 步骤
实现此案例需要按照如下步骤进行
步骤一:为客户端配置IP,分别为交换机sw1和sw2创建vlan并把相应的接口划到相对应的vlan下
1)参照图-4为客户端分别配置相对应网段的IP
2)为交换机创建vlan2、vlan3 并把相应的接口划到vlan下
- Switch >enable
- Switch#configure terminal
- Switch(config)#hostname SW1
- SW1 (config)#Switch(config-vlan)#exit
- SW1 (config)#vlan 3
- SW1 (config-vlan)#exit
- SW1 (config)#interface fastEthernet 0/3
- SW1 (config-if)#switchport access vlan 2
- SW1 (config-if)#exit
- SW1 (config)#interface fastEthernet 0/4
- SW1 (config-if)#switchport access vlan 2
- SW1 (config-if)#exit
- SW1 (config)#interface fastEthernet 0/5
- SW1 (config-if)#switchport access vlan 3
- SW1 (config-if)#exit
- SW1 (config)#interface fastEthernet 0/6
- SW1 (config-if)#switchport access vlan 3
- Switch >enable
- Switch#configure terminal
- Enter configuration commands, one per line. End with CNTL/Z.
- Switch(config)#hostname SW2
- SW2 (config)#Switch(config-vlan)#exit
- SW2 (config)#vlan 3
- SW2 (config-vlan)#exit
- SW2 (config)#interface fastEthernet 0/3
- SW2(config-if)#switchport access vlan 2
- SW2 (config-if)#exit
- SW2 (config)#interface fastEthernet 0/4
- SW2 (config-if)#switchport access vlan 2
- SW2 (config-if)#exit
- SW2 (config)#interface fastEthernet 0/5
- SW2 (config-if)#switchport access vlan 3
- SW2 (config-if)#exit
- SW2 (config)#interface fastEthernet 0/6
- SW2 (config-if)#switchport access vlan 3
3)分别查看SW1和SW2交换机上的vlan信息
- SW1#show vlan
- VLAN Name Status Ports
- ---- -------------------------------- --------- -------------------------------
- 1 default active Fa0/1, Fa0/2, Fa0/8, Fa0/9
- Fa0/10, Fa0/11, Fa0/12, Fa0/13
- Fa0/14, Fa0/15, Fa0/16, Fa0/17
- Fa0/18, Fa0/19, Fa0/20, Fa0/21
- Fa0/22, Fa0/23, Fa0/24
- 2 VLAN0002 active Fa0/3, Fa0/4
- 3 VLAN0003 active Fa0/5, Fa0/6
- 1002 fddi-default act/unsup
- 1003 token-ring-default act/unsup
- 1004 fddinet-default act/unsup
- 1005 trnet-default act/unsup
- VLAN Type SAID MTU Parent RingNo BridgeNo Stp BrdgMode Trans1 Trans2
- ---- ----- ---------- ----- ------ ------ -------- ---- -------- ------ ------
- 1 enet 100001 1500 - - - - - 0 0
- 2 enet 100002 1500 - - - - - 0 0
- 3 enet 100003 1500 - - - - - 0 0
- 1002 fddi 101002 1500 - - - - - 0 0
- 1003 tr 101003 1500 - - - - - 0 0
- 1004 fdnet 101004 1500 - - - ieee - 0 0
- 1005 trnet 101005 1500 - - - ibm - 0 0
- Remote SPAN VLANs
- ------------------------------------------------------------------------------
- Primary Secondary Type Ports
- ------- --------- ----------------- ------------------------------------------
- SW1#
- SW2#show vlan
- VLAN Name Status Ports
- ---- -------------------------------- --------- -------------------------------
- 1 default active Fa0/1, Fa0/2, Fa0/8, Fa0/9
- Fa0/10, Fa0/11, Fa0/12, Fa0/13
- Fa0/14, Fa0/15, Fa0/16, Fa0/17
- Fa0/18, Fa0/19, Fa0/20, Fa0/21
- Fa0/22, Fa0/23, Fa0/24
- 2 VLAN0002 active Fa0/3, Fa0/4
- 3 VLAN0003 active Fa0/5, Fa0/6
- 1002 fddi-default act/unsup
- 1003 token-ring-default act/unsup
- 1004 fddinet-default act/unsup
- 1005 trnet-default act/unsup
- VLAN Type SAID MTU Parent RingNo BridgeNo Stp BrdgMode Trans1 Trans2
- ---- ----- ---------- ----- ------ ------ -------- ---- -------- ------ ------
- 1 enet 100001 1500 - - - - - 0 0
- 2 enet 100002 1500 - - - - - 0 0
- 3 enet 100003 1500 - - - - - 0 0
- 1002 fddi 101002 1500 - - - - - 0 0
- 1003 tr 101003 1500 - - - - - 0 0
- 1004 fdnet 101004 1500 - - - ieee - 0 0
- 1005 trnet 101005 1500 - - - ibm - 0 0
- Remote SPAN VLANs
- ------------------------------------------------------------------------------
- Primary Secondary Type Ports
- ------- --------- ----------------- ------------------------------------------
- SW2#
步骤二:为交换机配置trunk中继链接路
1)分别进入两台交换机相连接的f0/7接口配置trunk中继链路
- SW1>enable
- SW1#configure terminal
- SW1(config)#interface fastEthernet 0/7
- SW1(config-if)#switchport mode trunk
- SW2#enable
- SW2#configure terminal
- SW2(config)#interface fastEthernet 0/7
- SW2(config-if)#switchport mode trunk
- SW2(config-if)#
2)测试2.0网段和3.0网段跨交换机通信
- PC>ping 192.168.2.3
- Pinging 192.168.2.3 with 32 bytes of data:
- Reply from 192.168.2.3: bytes=32 time=1ms TTL=128
- Reply from 192.168.2.3: bytes=32 time=0ms TTL=128
- Reply from 192.168.2.3: bytes=32 time=0ms TTL=128
- Reply from 192.168.2.3: bytes=32 time=0ms TTL=128
- Ping statistics for 192.168.2.3:
- Packets: Sent = 4, Received = 4, Lost = 0 (0% loss),
- Approximate round trip times in milli-seconds:
- Minimum = 0ms, Maximum = 1ms, Average = 0ms
- PC>ping 192.168.3.3
- Pinging 192.168.3.3 with 32 bytes of data:
- Reply from 192.168.3.3: bytes=32 time=1ms TTL=128
- Reply from 192.168.3.3: bytes=32 time=0ms TTL=128
- Reply from 192.168.3.3: bytes=32 time=0ms TTL=128
- Reply from 192.168.3.3: bytes=32 time=0ms TTL=128
- Ping statistics for 192.168.3.3:
- Packets: Sent = 4, Received = 4, Lost = 0 (0% loss),
- Approximate round trip times in milli-seconds:
- Minimum = 0ms, Maximum = 1ms, Average = 0ms
3 案例3:以太通道配置
3.1 问题
企业需要增加带宽和网络可用性,以太通道可以同时满足这两个条件,而又无需购买新设备。
3.2 方案
在某些环境下,为了在现有条件下增加带宽而不增加额外的设备,以太通道是可用技术之一。以太通道为交换机提供了端口捆绑的技术,允许两个交换机之间通过两个或多个端口并行连接,同时传输数据,以提供更高的带宽。
企业网络模拟拓扑环境如图-5所示:

图-5
3.3 步骤
实现此案例需要按照如下步骤进行。
步骤一:在交换机A上分别配置以太通道
太通道的配置模式与Trunk类似,也有开启、企望等。同样的,在生产环境下都是强制设置以太通道处于on的状态,而不是让它们自动协商。
- sw1(config)# interface range fastEthernet 0/7 – 9
- Switch(config-if-range)#switchport mode trunk
- sw1(config-if-range)#channel-group 1 mode on
- sw1(config-if-range)#
步骤二:在交换机B上分别配置以太通道
- sw2(config)# interface range fastEthernet 0/7 – 9
- Switch(config-if-range)#switchport mode trunk
- sw2(config-if-range)#channel-group 1 mode on
- sw2(config-if-range)#
步骤三:在交换机A上查看以太通通道配置
- sw1# show etherchannel 1 summary
- Flags: D - down P - in port-channel
- I - stand-alone s - suspended
- H - Hot-standby (LACP only)
- R - Layer3 S - Layer2
- U - in use f - failed to allocate aggregator
- u - unsuitable for bundling
- w - waiting to be aggregated
- d - default port
- Number of channel-groups in use: 1
- Number of aggregators: 1
- Group Port-channel Protocol Ports
- ------+-------------+-----------+---------------------------------
- 1 Po1(SU) - Fa0/7(P) Fa0/8(P) Fa0/9(P)
根据输出最后一行小括号中的提示,可以获知以太通道是二层的(S)、正在被使用的(U),端口Fa0/7、Fa0/8和Fa09在以太通道中(P)。
步骤四:创建以太通道后,系统会增加一个名称为Port-channel 1的端口,可以通过show running-config命令查看到其信息
- sw2#show running-config
- Building configuration...
- Current configuration : 1308 bytes
- !
- version 12.2
- no service timestamps log datetime msec
- no service timestamps debug datetime msec
- no service password-encryption
- !
- hostname tarena-sw2
- !
- !
- .. ..
- interface Port-channel 1 //以太通道信息
- switchport mode trunk
- !
- .. ..
4 案例4:DHCP服务配置
4.1 问题
大型企业网络客户机数量较多,客记机IP地址配置如果都为静态配置存在如下问题:
- 增加网络管理员工作量
- 静态手动配置容易输入错误
- 静态手动配置容易冲突
4.2 方案
在路由器上配置DHCP服务为客户端自动分配IP地址如图-6所示:
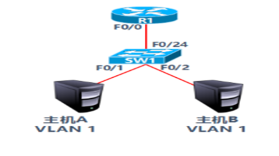
图-6
- VLAN 1:192.168.1.0/24
- 网关192.168.1.254
- 首选DNS为202.106.0.20
- 预留IP地址打印服务器:192.168.1.1
- 预留IP地址文件服务器:192.168.1.100
4.3 步骤
实现此案例需要按照如下步骤进行。
步骤一:路由器R1配置DHCP服务
1)配置路由器接口IP
- R1(config)#interface fastEthernet 0/0
- R1(config-if)#ip address 192.168.1.254 255.255.255.0
- R1(config-if)#no shutdown
2)DHCP服务配置
- R1(config)#ip dhcp pool vlan11)
- R1(dhcp-config)#network 192.168.1.0 255.255.255.0
- R1(dhcp-config)#default-router 192.168.1.254
- R1(dhcp-config)#dns-server 202.106.0.20
- R1(config)#ip dhcp excluded-address 192.168.1.1
- R1(config)#ip dhcp excluded-address 192.168.1.100
3)设置主机A的IP配置为自动获取如图-7所示:
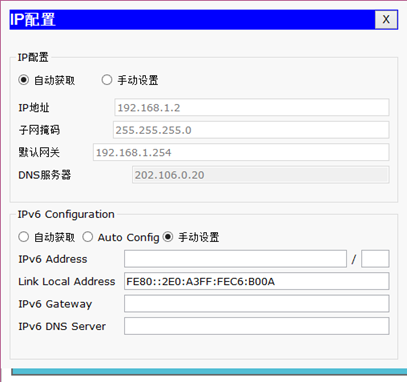
图-7
VLAN、Trunk,以太通道及DHCP的更多相关文章
- Cisco基础(一):Vlan的划分、配置trunk中继链路、以太通道配置、DHCP服务配置
一.Vlan的划分 目标: VLAN(虚拟局域网)是对连接到的第二层交换机端口的网络用户的逻辑分段,不受网络用户的物理位置限制而根据用户需求进行网络分段.一个VLAN可以在 一个交换机或者跨交换机实现 ...
- 2.1-VLAN/TRUNK/VTP
2.1-VLAN/TRUNK/VTP 注意:配置VLAN时要退出VLAN配置模式才会执行 如果VLAN被删除或者shutdown,那么属于这个vlan的接口将被阻塞(灯一直是橙色,变不了绿色) ...
- 配置网卡为vlan trunk
http://www.microhowto.info/tutorials/802.1q.html Configure an Ethernet interface as a VLAN trunk hos ...
- vlan trunk配置
vlan trunk配置 Trunk:中继干道 作用:一条链路能承载多个vlan的流量,并对不同vlan的流量进行不同标记 trunk能够使vlan跨越交换机 PT配置 配置vlan:两台交换机同样的 ...
- CCNA 之 八 交换基础 VLAN TRUNK VTP
交换基础 主要知识点: 二层交换基础 Vlan的概念 Trunk的概念 VTP 二层交换基本配置 首先来看下园区网分层结构 交换机的主要功能: Address learning 学习MAC地址 会维护 ...
- 虚拟机 vlan trunk 特性
1. 功能 1)允许不同vlan的network下的虚拟机之间通信.一般情况下,虚拟机只能在相同vlan的网络下通信. 2)允许虚拟机发送vlan报文. 2. 组网图 虚拟机出来的tap设备连接到tb ...
- vtp——vlan trunk protcal
server模式——服务器模式,在该模式下可以建立vlan,删除vlan,该模式下的vlan可以下发到其他的交换机 client模式——客户端模式,被动模式.交换机可以接受从server模式下传来的v ...
- 实验13:VLAN/TRUNK/VTP/
实验10-1: 划分VLAN Ø 实验目的通过本实验,读者可以掌握如下技能:(1) 熟悉VLAN 的创建(2) 把交换机接口划分到特定VLAN Ø 实验拓扑 实验步骤要配置VLAN,首先要 ...
- vlan trunk vtp端口聚合
第一步:端口聚合(两端都需要做相同的操作) 第二步:在服务器端配置为服务器模式 第四步:在服务器端添加vlan 第五步:在两端分别将不同的端口添加到不同的vlan
随机推荐
- MFC Camera 摄像头预览 拍照
windows 上开发摄像头程序,比较容易的方式是 OpenCV ,几行代码就能显示出来,但是简单的容易搞,有点难度定制化需求的就不这么容易了.所以说还是要从,最基础的 DirectShow 开始搞起 ...
- docker 学习之路 将docker容器变为镜像并上传
环境 ubunt 16.4 去hub.docker.com上注册一个账号,并在账号中注册一个公有public或者私有仓库private 步骤如下 如上图 点击该处进入创建docker库页面 除了名字之 ...
- 基于 HTML + WebGL 结合 23D 的疫情地图实时大屏 PC 版
前言 2019年12月以来,湖北省武汉市陆续发现了多例肺炎病例,现已证实为一种新型冠状病毒感染引起的急性呼吸道传染病并蔓延全国,肺炎疫情牵动人心,人们每天起来第一件事变成了关注疫情进展,期望这场天灾早 ...
- Java基础(五):数组
数组,一种应用非常广泛的数据结构,简单地来说就是一组类型相同且无序的元素的存储在固定长度且有序的内存空间. 创建一个数组 在Java中,我们可以通过[]去声明一个指定类型的数组 int[] a; // ...
- 环境篇:Docker
环境篇:Docker www.docker.com Docker 是什么? Docker 是一个开源的应用容器引擎,基于Go语言并遵从Apache协议的开源,让开发者可以打包他们的应用以及依赖包到一个 ...
- for循环与串行化、并行化Stream流性能对比
第四章 并行化Stream流 关注公众号(CoderBuff)回复"stream"获取<Java8 Stream编码实战>PDF完整版. <Java8 Strea ...
- Cisco 综合配置(三)
要求: 1.PC1 PC2使用DHCP,获取IP ,VLAN为10 和20,网关在Core Switch 2上2.DHCP和web server VLAN为100,网关在Core Switch 1上3 ...
- kali的安装详解--摘自官方
官方网址:https://www.kali.org/docs/virtualization/install-vmware-workstation-player-kali-guest-vm/ 在VMwa ...
- hdu6026 dijkstra
题目链接:http://icpc.njust.edu.cn/Problem/Hdu/6026/ 题意大致是:给定一个图,要求删边使他变成树,使得每个点到0的距离就是原图中0到这个点的最短路径.其实就是 ...
- hdu3973 AC's String 线段树+字符串hash
题目链接:http://icpc.njust.edu.cn/Problem/Hdu/3973/ 题意是:给出一个模式串,再给出一些串组成一个集合,操作分为两种,一种是替换模式串中的一个字符,还有一种是 ...