Spark源码分析之Checkpoint的过程
概述
checkpoint 的机制保证了需要访问重复数据的应用 Spark 的DAG执行图可能很庞大,task 中计算链可能会很长,这时如果 task 中途运行出错,那么 task 的整个需要重算非常耗时,因此,有必要将计算代价较大的 RDD checkpoint 一下,当下游 RDD 计算出错时,可以直接从 checkpoint 过的 RDD 那里读取数据继续算。
我们先来看一个例子,checkpoint的使用:
import org.apache.spark.SparkContext

import org.apache.spark.SparkContext._

import org.apache.spark.SparkConf

object CheckPointTest {

   def main(args: Array[String]) {

    val sc: SparkContext = SparkContext.getOrCreate(new   SparkConf().setAppName("ck").setMaster("local[2]"))

    sc.setCheckpointDir("/Users/kinge/ck")

    val rdd: RDD[(String, Int)] = sc.textFile("").map{x=>(x,) }.reduceByKey(_+_)

    rdd.checkpoint()

    rdd.count()

    rdd.groupBy(x=>x._2).collect().foreach(println)

   }

}
checkpoint流程分析
checkpoint初始化
我们可以看到最先调用了SparkContext的setCheckpointDir 设置了一个checkpoint 目录
我们跟进这个方法看一下
/**

   * Set the directory under which RDDs are going to be checkpointed. The directory must

   * be a HDFS path if running on a cluster.

   */

  def setCheckpointDir(directory: String) {

    // If we are running on a cluster, log a warning if the directory is local.

    // Otherwise, the driver may attempt to reconstruct the checkpointed RDD from

    // its own local file system, which is incorrect because the checkpoint files

    // are actually on the executor machines.

    if (!isLocal && Utils.nonLocalPaths(directory).isEmpty) {

      logWarning("Checkpoint directory must be non-local " +

        "if Spark is running on a cluster: " + directory)

    }

   //利用hadoop的api创建了一个hdfs目录

    checkpointDir = Option(directory).map { dir =>

      val path = new Path(dir, UUID.randomUUID().toString)

      val fs = path.getFileSystem(hadoopConfiguration)

      fs.mkdirs(path)

      fs.getFileStatus(path).getPath.toString

    }

  }
这个方法挺简单的,就创建了一个目录,接下来我们看RDD核心的checkpoint 方法,跟进去
def checkpoint(): Unit = RDDCheckpointData.synchronized {

    if (context.checkpointDir.isEmpty) {

      throw new SparkException("Checkpoint directory has not been set in the SparkContext")

    } else if (checkpointData.isEmpty) {

      checkpointData = Some(new ReliableRDDCheckpointData(this))

    }

  }
这个方法没有返回值,逻辑只有一个判断,checkpointDir刚才设置过了,不为空,然后创建了一个ReliableRDDCheckpointData,我们来看ReliableRDDCheckpointData
/**

 * An implementation of checkpointing that writes the RDD data to reliable storage.

 * This allows drivers to be restarted on failure with previously computed state.

 */

private[spark] class ReliableRDDCheckpointData[T: ClassTag](@transient rdd: RDD[T])

  extends RDDCheckpointData[T](rdd) with Logging {

   。。。。。

}
这个ReliableRDDCheckpointData的父类RDDCheckpointData我们再继续看它的父类
/**

*   RDD 需要经过

*    [ Initialized  --> CheckpointingInProgress--> Checkpointed ]

*    这几个阶段才能被 checkpoint。

*/

private[spark] object CheckpointState extends Enumeration {

  type CheckpointState = Value

  val Initialized, CheckpointingInProgress, Checkpointed = Value

}

private[spark] abstract class RDDCheckpointData[T: ClassTag](@transient rdd: RDD[T])

  extends Serializable {

  import CheckpointState._

  // The checkpoint state of the associated RDD.

  protected var cpState = Initialized

  。。。。。。

}
[ Initialized --> CheckpointingInProgress--> Checkpointed ]
这几个阶段才能被 checkpoint。
这类里面有一个枚举来标识CheckPoint的状态,第一次初始化时是Initialized。
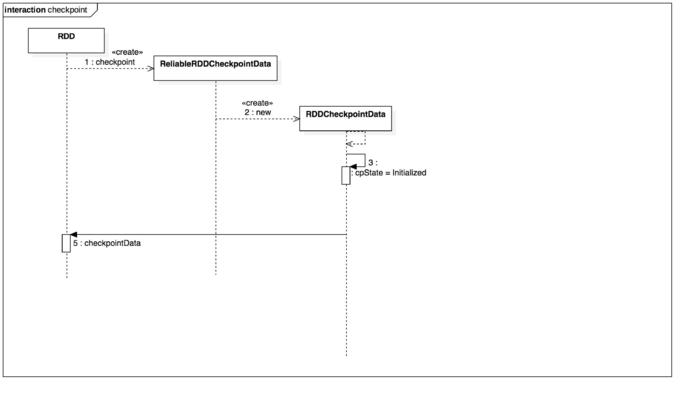
checkpoint这个一步已经完成了,回到我们的RDD成员变量里
checkpointData这个变量指向的RDDCheckpointData的实例。Checkpoint初始化时序图:
checkpoint什么时候写入数据
我们知道一个spark job运行最终会调用SparkContext的runJob方法将任务提交给Executor去执行,我们来看runJob
def runJob[T, U: ClassTag](

      rdd: RDD[T],

      func: (TaskContext, Iterator[T]) => U,

      partitions: Seq[Int],

      resultHandler: (Int, U) => Unit): Unit = {

    if (stopped.get()) {

      throw new IllegalStateException("SparkContext has been shutdown")

    }

    val callSite = getCallSite

    val cleanedFunc = clean(func)

    logInfo("Starting job: " + callSite.shortForm)

    if (conf.getBoolean("spark.logLineage", false)) {

      logInfo("RDD's recursive dependencies:\n" + rdd.toDebugString)

    }

    dagScheduler.runJob(rdd, cleanedFunc, partitions, callSite, resultHandler, localProperties.get)

    progressBar.foreach(_.finishAll())

    rdd.doCheckpoint()

  }
最后一行代码调用了doCheckpoint,在dagScheduler将任务提交给集群运行之后,我来看这个doCheckpoint方法
private[spark] def doCheckpoint(): Unit = {

    RDDOperationScope.withScope(sc, "checkpoint", allowNesting = false, ignoreParent = true) {

      if (!doCheckpointCalled) {

        doCheckpointCalled = true

        if (checkpointData.isDefined) {

          checkpointData.get.checkpoint()

        } else {

          //遍历依赖的rdd,调用每个rdd的doCheckpoint方法

          dependencies.foreach(_.rdd.doCheckpoint())

        }

      }

    }

  }
checkpointData不为空时,调用checkpointData的checkpoint()方法。还记得checkpointData类型是什么吗?就是RDDCheckpointData ,我们来看它的checkpoint方法,以下final def checkpoint(): Unit = {
// Guard against multiple threads checkpointing the same RDD by
// atomically flipping the state of this RDDCheckpointData
RDDCheckpointData.synchronized {
if (cpState == Initialized) {
//1、标记当前状态为正在checkpoint中
cpState = CheckpointingInProgress
} else {
return
}
}
//2 这里调用的是子类的doCheckpoint()
val newRDD = doCheckpoint()
// 3 标记checkpoint已完成,清空RDD依赖
RDDCheckpointData.synchronized {
cpRDD = Some(newRDD)
cpState = Checkpointed
rdd.markCheckpointed()
}
}
这个方法开始做checkpoint操作了,将doCheckpoint交给子类去实现checkpoint的逻辑,我们去看子类怎么实现doCheckpoint
protected override def doCheckpoint(): CheckpointRDD[T] = {

    // Create the output path for the checkpoint

    val path = new Path(cpDir)

    val fs = path.getFileSystem(rdd.context.hadoopConfiguration)

    if (!fs.mkdirs(path)) {

      throw new SparkException(s"Failed to create checkpoint path $cpDir")

    }

    //需要的配置文件(如 core-site.xml 等)broadcast 到其他 worker 节点的 blockManager。

    val broadcastedConf = rdd.context.broadcast(

      new SerializableConfiguration(rdd.context.hadoopConfiguration))

   //向集群提交一个Job去执行checkpoint操作,将RDD序列化到HDFS目录上

    rdd.context.runJob(rdd, ReliableCheckpointRDD.writeCheckpointFile[T](cpDir, broadcastedConf) _)

    // 为该 rdd 生成一个新的依赖,设置该 rdd 的 parent rdd 为

    //CheckpointRDD,该 CheckpointRDD 负责以后读取在文件系统上的

   //checkpoint 文件,生成该 rdd 的 partition。

    val newRDD = new ReliableCheckpointRDD[T](rdd.context, cpDir)

    if (newRDD.partitions.length != rdd.partitions.length) {

      throw new SparkException(

        s"Checkpoint RDD $newRDD(${newRDD.partitions.length}) has different " +

          s"number of partitions from original RDD $rdd(${rdd.partitions.length})")

    }

    // 是否清除checkpoint文件如果超出引用的资源范围

    if (rdd.conf.getBoolean("spark.cleaner.referenceTracking.cleanCheckpoints", false)) {

      rdd.context.cleaner.foreach { cleaner =>

        cleaner.registerRDDCheckpointDataForCleanup(newRDD, rdd.id)

      }

    }

    logInfo(s"Done checkpointing RDD ${rdd.id} to $cpDir, new parent is RDD ${newRDD.id}")

//  将新产生的RDD返回给父类

    newRDD

  }
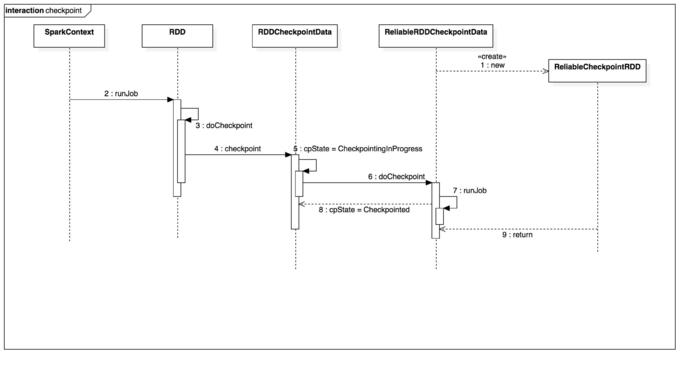
上面的代码最终会返回新的CheckpointRDD ,父类将它赋值给成员变量cpRDD,最终标记当前状态为Checkpointed并清空当前RDD的依赖链。到此Checkpoint的数据就被序列化到HDFS上了。
Checkpoint 写数据时序图
checkpoint什么时候读取数据
我们知道Task是spark运行任务的最小单元,当Task执行失败的时候spark会重新计算,这里Task进行计算的地方就是读取checkpoint的入口。我们可以看一下ShuffleMapTask 里的计算方法runTask,如下
override def runTask(context: TaskContext): MapStatus = {

     。。。。。。。

    try {

      val manager = SparkEnv.get.shuffleManager

      writer = manager.getWriter[Any, Any](dep.shuffleHandle, partitionId, context)

    //调用rdd.iterator,迭代每个partition里的数据,计算并写入磁盘

      writer.write(rdd.iterator(partition, context).asInstanceOf[Iterator[_ <: Product2[Any, Any]]])

      writer.stop(success = true).get

    } catch {

      case e: Exception =>

        try {

          if (writer != null) {

            writer.stop(success = false)

          }

        } catch {

          case e: Exception =>

            log.debug("Could not stop writer", e)

        }

        throw e

    }

  }
这是spark真正调用计算方法的逻辑runTask调用 rdd.iterator() 去计算该 rdd 的 partition 的,我们来看RDD的iterator()
final def iterator(split: Partition, context: TaskContext): Iterator[T] = {

    if (storageLevel != StorageLevel.NONE) {

      SparkEnv.get.cacheManager.getOrCompute(this, split, context, storageLevel)

    } else {

      computeOrReadCheckpoint(split, context)

    }

  }
这里会继续调用computeOrReadCheckpoint,我们看该方法
**

   * Compute an RDD partition or read it from a checkpoint if the RDD is checkpointing.

   */

  private[spark] def computeOrReadCheckpoint(split: Partition, context: TaskContext): Iterator[T] =

  {

    if (isCheckpointedAndMaterialized) {

      firstParent[T].iterator(split, context)

    } else {

      compute(split, context)

    }

  }
rdd.iterator()去计算该 rdd 的 partition 的时候,会调用 computeOrReadCheckpoint(split: Partition)去查看该 rdd 是否被 checkpoint 过了,如果是,就调用该 rdd 的 parent rdd 的 iterator() 也就是 CheckpointRDD.iterator(),否则直接调用该RDD的compute, 那么我们就跟进CheckpointRDD的compute/**
* Read the content of the checkpoint file associated with the given partition.
*/
override def compute(split: Partition, context: TaskContext): Iterator[T] = {
val file = new Path(checkpointPath, ReliableCheckpointRDD.checkpointFileName(split.index))
ReliableCheckpointRDD.readCheckpointFile(file, broadcastedConf, context)
}
这里就两行代码,意思是从Path上读取我们的CheckPoint数据,看一下readCheckpointFile
/**

   * Read the content of the specified checkpoint file.

   */

  def readCheckpointFile[T](

      path: Path,

      broadcastedConf: Broadcast[SerializableConfiguration],

      context: TaskContext): Iterator[T] = {

    val env = SparkEnv.get

  // 用hadoop API 读取HDFS上的数据

    val fs = path.getFileSystem(broadcastedConf.value.value)

    val bufferSize = env.conf.getInt("spark.buffer.size", )

    val fileInputStream = fs.open(path, bufferSize)

    val serializer = env.serializer.newInstance()

    val deserializeStream = serializer.deserializeStream(fileInputStream)

    // Register an on-task-completion callback to close the input stream.

    context.addTaskCompletionListener(context => deserializeStream.close())

    //反序列化数据后转换为一个Iterator

    deserializeStream.asIterator.asInstanceOf[Iterator[T]]
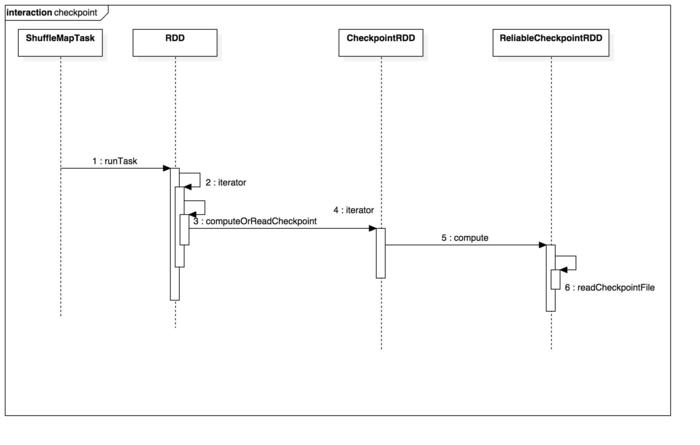
CheckpointRDD 负责读取文件系统上的文件,生成该 rdd 的 partition。这就解释了为什么要为调用了checkpoint的RDD 添加一个 parent CheckpointRDD的原因。
到此,整个checkpoint的流程就结束了。
Checkpoint 读取数据时序图
Spark源码分析之Checkpoint的过程的更多相关文章
- Spark 源码分析 -- task实际执行过程
Spark源码分析 – SparkContext 中的例子, 只分析到sc.runJob 那么最终是怎么执行的? 通过DAGScheduler切分成Stage, 封装成taskset, 提交给Task ...
- Spark源码分析 – 汇总索引
http://jerryshao.me/categories.html#architecture-ref http://blog.csdn.net/pelick/article/details/172 ...
- spark 源码分析之四 -- TaskScheduler的创建和启动过程
在 spark 源码分析之二 -- SparkContext 的初始化过程 中,第 14 步 和 16 步分别描述了 TaskScheduler的 初始化 和 启动过程. 话分两头,先说 TaskSc ...
- Spark源码分析之八:Task运行(二)
在<Spark源码分析之七:Task运行(一)>一文中,我们详细叙述了Task运行的整体流程,最终Task被传输到Executor上,启动一个对应的TaskRunner线程,并且在线程池中 ...
- spark 源码分析之十九 -- Stage的提交
引言 上篇 spark 源码分析之十九 -- DAG的生成和Stage的划分 中,主要介绍了下图中的前两个阶段DAG的构建和Stage的划分. 本篇文章主要剖析,Stage是如何提交的. rdd的依赖 ...
- spark源码分析以及优化
第一章.spark源码分析之RDD四种依赖关系 一.RDD四种依赖关系 RDD四种依赖关系,分别是 ShuffleDependency.PrunDependency.RangeDependency和O ...
- Spark源码分析(三)-TaskScheduler创建
原创文章,转载请注明: 转载自http://www.cnblogs.com/tovin/p/3879151.html 在SparkContext创建过程中会调用createTaskScheduler函 ...
- Spark源码分析环境搭建
原创文章,转载请注明: 转载自http://www.cnblogs.com/tovin/p/3868718.html 本文主要分享一下如何构建Spark源码分析环境.以前主要使用eclipse来阅读源 ...
- 【转】Spark源码分析之-deploy模块
原文地址:http://jerryshao.me/architecture/2013/04/30/Spark%E6%BA%90%E7%A0%81%E5%88%86%E6%9E%90%E4%B9%8B- ...
随机推荐
- ChemDraw常用到的几种技巧
ChemDraw对于化学学习的重要性相当于CAD和建筑学.PS和设计,所以如果你是一名生化相关的工作人员,拥有ChemDraw并掌握ChemDraw的使用方法十分必要!这是一款对于我们研究化学的人来说 ...
- HEVC compressGOP 接口
HEVC编码调用compressGOP()来实现一个GOPSize 图像序列的编码.在reference code里,真正做compressGOP编码之前,需要存GOPSize帧YUV在m_cList ...
- linux,crontab定时任务中为脚本指定使用参数,crontab的脚本中是否可以带参数
需求描述: 今天在写脚本的时候,脚本的运行需要给出几个参数,那么就考虑 在crontab写定时任务的时候,是否也是能够在脚本中,增加参数呢, 因为以前没有这么用过,所以呢,就进行一次测试. 测试过程: ...
- Python 数据类型:字典
一.字典简介 1. 字典由键值对组成,每个键与值用冒号隔开,每对用逗号分割,整体放在花括号中,如 {"name": "Tom", "age" ...
- PHP常用必备函数
array_change_key_case — 返回字符串键名全为小写或大写的数组 array_chunk — 将一个数组分割成多个 array_combine — 创建一个数组,用一个数组的值作为其 ...
- JS时间格式化函数
Date.prototype.format = function (format) { var o = { "M+": this.getMonth() + 1, //month & ...
- 《转》python学习(7) -列表
转自 http://www.cnblogs.com/BeginMan/p/3153842.html 一.序列类型操作符 1.切片[]和[:] 2.成员关系操作符(in ,not in ) 1: s1 ...
- 【GIT】Git Flow最佳实践
Git Flow 工作流一共包含五种分支: 两个长期分支: 主分支 master:用于存放对外发布的版本,任何时候在这个分支拿到的,都是稳定的分布版 开发分支 develop:用于日常开发,存放最新的 ...
- C/C++对Lu系统内置动态对象进行运算符重载
欢迎访问Lu程序设计 C/C++对Lu系统内置动态对象进行运算符重载 1 说明 要演示本文的例子,你必须下载Lu32脚本系统.本文的例子需要lu32.dll.lu32.lib.C格式的头文件lu32. ...
- delphi中Case语法的使用方法
Case 语句If...Then…Else 语句适合选项较少的情况,如果有很多选项的话利用If 语句就比较麻烦,在这种情况下,Case 语句就容易多了.Case 语句的语法如下: case <表 ...