CAS (2) —— Mac下配置CAS到Tomcat(客户端)
CAS (2) —— Mac下配置CAS到Tomcat(客户端)
tomcat版本: tomcat-8.0.29
jdk版本: jdk1.8.0_65
cas版本: cas4.1.2
cas-client-3.4.1
参考来源:
Tomcat (1) —— Mac下配置Tomcat Https/SSL
【高可用HA】Apache (2) —— Mac下安装多个Apache Tomcat实例
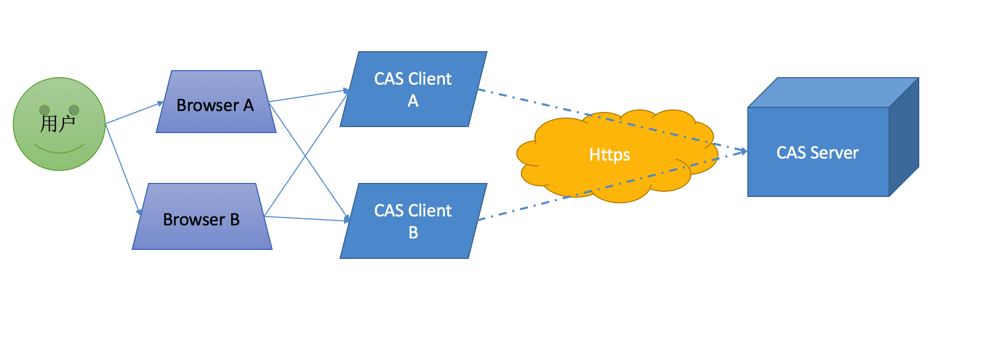
目标架构
下载
首先登陆jasig网站http://downloads.jasig.org/,下载相应的cas版本。
由于网站只提供源码包而不提供发布包,所以需要自己下载来编译。
cas会为不同的客户端消费者提供client包,这里我们选择java-client作为演示。
编译客户端所需要的jar
java-cas-client-cas-client-3.4.1 Richard$ mvn clean install -Dmaven.test.skip
然后下载供测试的客户端示例代码(jasig在github上为我们提供了一个简易的客户端demo)
$ git clone https://github.com/UniconLabs/cas-sample-java-webapp.git
配置
客户端
设置
参照以下文章为Tomcat配置好Https
Tomcat (1) —— Mac下配置Tomcat Https/SSL
【高可用HA】Apache (2) —— Mac下安装多个Apache Tomcat实例
编译部署
然后编译我们的示例项目
:cas-sample-java-webapp Richard$ mvn clean install -Dmaven.test.skip
pom.xml
<project xmlns="http://maven.apache.org/POM/4.0.0" xmlns:xsi="http://www.w3.org/2001/XMLSchema-instance"

xsi:schemaLocation="http://maven.apache.org/POM/4.0.0 http://maven.apache.org/xsd/maven-4.0.0.xsd">

<modelVersion>4.0.0</modelVersion>

<groupId>iamlabs.unicon.net</groupId>

<artifactId>cas-sample-java-webapp</artifactId>

<version>0.0.1-SNAPSHOT</version>

<packaging>war</packaging>

<name>CAS Example Java Web App</name>

<description>A sample web application that exercises the CAS protocol features via the Java CAS Client.</description>

<build>

	<finalName>cas-sample-java-webapp</finalName>

	<plugins>

		<plugin>

			<groupId>org.apache.maven.plugins</groupId>

			<artifactId>maven-compiler-plugin</artifactId>

			<version>2.5.1</version>

			<configuration>

				<source>1.6</source>

				<target>1.6</target>

			</configuration>

		</plugin>

	</plugins>

</build>

<dependencies>

	<dependency>

		<groupId>commons-logging</groupId>

		<artifactId>commons-logging</artifactId>

		<version>1.1.1</version>

	</dependency>

	<dependency>

		<groupId>log4j</groupId>

		<artifactId>log4j</artifactId>

		<version>1.2.16</version>

	</dependency>

	<dependency>

		<groupId>org.opensaml</groupId>

		<artifactId>opensaml1</artifactId>

		<version>1.1</version>

	</dependency>

	<dependency>

		<groupId>javax.servlet</groupId>

		<artifactId>javax.servlet-api</artifactId>

		<version>3.1.0</version>

		<scope>provided</scope>

	</dependency>

	<dependency>

		<groupId>org.jasig.cas.client</groupId>

		<artifactId>cas-client-core</artifactId>

  		<version>3.2.1</version>

		<exclusions>

			<exclusion>

				<groupId>javax.servlet</groupId>

				<artifactId>servlet-api</artifactId>

			</exclusion>

		</exclusions>

	</dependency>

	<dependency>

		<groupId>commons-codec</groupId>

		<artifactId>commons-codec</artifactId>

		<version>1.6</version>

	</dependency>

	<dependency>

		<groupId>org.apache.santuario</groupId>

		<artifactId>xmlsec</artifactId>

		<version>1.4.3</version>

	</dependency>

</dependencies>
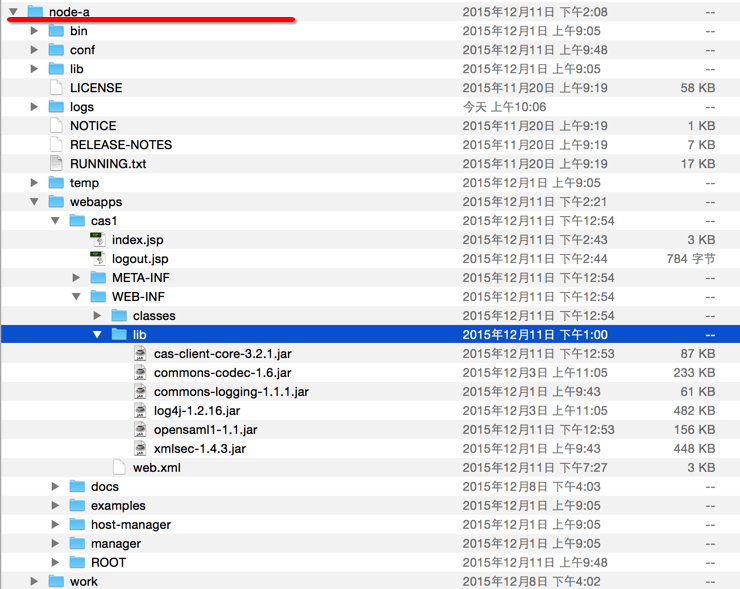
将编译生成的war包部署到我们的Tomcat容器中:
项目主要包括两个页面
index.jsp(供登陆)
<%@page contentType="text/html"%>

<%@page pageEncoding="UTF-8"%>

<%@ page import="java.util.Map" %>

<%@ page import="java.util.Iterator" %>

<%@ page import="java.util.List" %>

<%@ page import="org.jasig.cas.client.authentication.AttributePrincipal" %>

<!DOCTYPE HTML PUBLIC "-//W3C//DTD HTML 4.01 Transitional//EN"

	"http://www.w3.org/TR/html4/loose.dtd">

<html>

<head>

    <meta http-equiv="Content-Type" content="text/html; charset=UTF-8">

    <title>CAS Example Java Web App</title>

</head>

<body>

<h1>CAS Example Java Web App</h1>

<p>A sample web application that exercises the CAS protocol features via the Java CAS Client.</p>

<hr>

<p><b>Authenticated User Id:</b> <a href="../cas1/logout.jsp" title="Click here to log out"><%= request.getRemoteUser() %></a></p>

<%

if (request.getUserPrincipal() != null) {

  AttributePrincipal principal = (AttributePrincipal) request.getUserPrincipal();

  /*

  final String password = principal.getPassword();

  if (password != null) {

    out.println("<p><b>User Credentials:</b> " + password + "</p>");

  }

  */

  final Map attributes = principal.getAttributes();

  if (attributes != null) {

    Iterator attributeNames = attributes.keySet().iterator();

    out.println("<b>Attributes:</b>");

    if (attributeNames.hasNext()) {

      out.println("<hr><table border='3pt' width='100%'>");

      out.println("<th colspan='2'>Attributes</th>");

      out.println("<tr><td><b>Key</b></td><td><b>Value</b></td></tr>");

      for (; attributeNames.hasNext();) {

        out.println("<tr><td>");

        String attributeName = (String) attributeNames.next();

        out.println(attributeName);

        out.println("</td><td>");

        final Object attributeValue = attributes.get(attributeName);

        if (attributeValue instanceof List) {

          final List values = (List) attributeValue;

          out.println("<strong>Multi-valued attribute: " + values.size() + "</strong>");

          out.println("<ul>");

          for (Object value: values) {

            out.println("<li>" + value + "</li>");

          }

          out.println("</ul>");

        } else {

          out.println(attributeValue);

        }

        out.println("</td></tr>");

      }

      out.println("</table>");

    } else {

      out.print("No attributes are supplied by the CAS server.</p>");

    }

  } else {

    out.println("<pre>The attribute map is empty. Review your CAS filter configurations.</pre>");

  }

} else {

    out.println("<pre>The user principal is empty from the request object. Review the wrapper filter configuration.</pre>");

}

%>

</body>

</html>
logout.jsp(注销)
<%@page contentType="text/html"%>

<%@page pageEncoding="UTF-8"%>

<%@ page import="java.util.Map" %>

<%@ page import="java.util.Iterator" %>

<%@ page import="org.jasig.cas.client.authentication.AttributePrincipal" %>

<!DOCTYPE HTML PUBLIC "-//W3C//DTD HTML 4.01 Transitional//EN"

	"http://www.w3.org/TR/html4/loose.dtd">

<%

	session.invalidate();

%>

<html>

<head>

    <meta http-equiv="Content-Type" content="text/html; charset=UTF-8">

    <title>CAS Example Java Web App</title>

</head>

<body>

	<h1>CAS Example Java Web App</h1>

    <p>Application session is now invalidated. You may also issue a request to "/cas/logout" to destroy the CAS SSO Session as well.</p>

    <hr>

	<a href="../cas1/index.jsp">Back to Home</a>

</body>

</html>
配置CAS Authentication Filter
web.xml
<?xml version="1.0" encoding="UTF-8"?>

<web-app version="2.4" xmlns="http://java.sun.com/xml/ns/j2ee" xmlns:xsi="http://www.w3.org/2001/XMLSchema-instance"

xsi:schemaLocation="http://java.sun.com/xml/ns/j2ee http://java.sun.com/xml/ns/j2ee/web-app_2_4.xsd">

<filter>

	<filter-name>CAS Authentication Filter</filter-name>

	<filter-class>org.jasig.cas.client.authentication.AuthenticationFilter</filter-class>

	<!-- <filter-class>org.jasig.cas.client.authentication.Saml11AuthenticationFilter</filter-class> -->

	<!-- <filter-class>org.jasig.cas.client.authentication.AuthenticationFilter</filter-class> -->

	<init-param>

		<param-name>casServerLoginUrl</param-name>

		<param-value>https://sso.hoau.com:8433/cas/login</param-value>

	</init-param>

	<init-param>

		<param-name>serverName</param-name>

		<param-value>https://app1.hoau.com:8413</param-value>

	</init-param>

</filter>

<filter>

	<filter-name>CAS Validation Filter</filter-name>

	<filter-class>org.jasig.cas.client.validation.Cas20ProxyReceivingTicketValidationFilter</filter-class>

	<!-- <filter-class>org.jasig.cas.client.validation.Saml11TicketValidationFilter</filter-class> -->

	<!-- <filter-class>org.jasig.cas.client.validation.Cas20ProxyReceivingTicketValidationFilter</filter-class>	-->

	<init-param>

		<param-name>casServerUrlPrefix</param-name>

		<param-value>https://sso.hoau.com:8433/cas</param-value>

	</init-param>

	<init-param>

		<param-name>serverName</param-name>

		<param-value>https://app1.hoau.com:8413</param-value>

	</init-param>

	<init-param>

		<param-name>redirectAfterValidation</param-name>

		<param-value>true</param-value>

	</init-param>

	<init-param>

		<param-name>useSession</param-name>

		<param-value>true</param-value>

	</init-param>

	<init-param>

		<param-name>acceptAnyProxy</param-name>

		<param-value>true</param-value>

	</init-param>

	<!--

	<init-param>

		<param-name>proxyReceptorUrl</param-name>

		<param-value>/cas1/proxyUrl</param-value>

	</init-param>

	<init-param>

		<param-name>proxyCallbackUrl</param-name>

		<param-value>https://app1.hoau.com:8413/cas1/index.jsp</param-value>

	</init-param>

	-->

</filter>

<filter>

	<filter-name>CAS HttpServletRequest Wrapper Filter</filter-name>

	<filter-class>org.jasig.cas.client.util.HttpServletRequestWrapperFilter</filter-class>

</filter>

<filter-mapping>

	<filter-name>CAS Validation Filter</filter-name>

	<url-pattern>/*</url-pattern>

</filter-mapping>

<filter-mapping>

	<filter-name>CAS Authentication Filter</filter-name>

	<url-pattern>/*</url-pattern>

</filter-mapping>

<filter-mapping>

	<filter-name>CAS HttpServletRequest Wrapper Filter</filter-name>

	<url-pattern>/*</url-pattern>

</filter-mapping>

<welcome-file-list>

	<welcome-file>

        index.jsp

</welcome-file>

</welcome-file-list>

</web-app>
* 以上web.xml配置中有四处需要注意的地方
cas目标服务器登陆页面的配置
 <init-param>

 	<param-name>casServerLoginUrl</param-name>

 	<param-value>https://sso.hoau.com:8433/cas/login</param-value>

 </init-param>
本机服务器的地址(即当前node-a)
 <init-param>

 	<param-name>serverName</param-name>

 	<param-value>https://app1.hoau.com:8413</param-value>

 </init-param>
"Cas20ProxyReceivingTicketValidationFilter"
2.x和3.x以前也有其他的Ticket校验方式,这里官方推荐用Cas20Proxy
 <filter>

 <filter-name>CAS Validation Filter</filter-name>

 <filter-class>org.jasig.cas.client.validation.Cas20ProxyReceivingTicketValidationFilter</filter-class>

 <init-param>

 	<param-name>casServerUrlPrefix</param-name>

 	<param-value>https://sso.hoau.com:8433/cas</param-value>

 </init-param>

 <init-param>

 	<param-name>serverName</param-name>

 	<param-value>https://app1.hoau.com:8413</param-value>

 </init-param>
暂时将proxyReceptorUrl和proxyCallbackUrl注释掉,因为这里没有使用代理
 <!--

 <init-param>

 	<param-name>proxyReceptorUrl</param-name>

 	<param-value>/cas1/proxyUrl</param-value>

 </init-param>

 <init-param>

 	<param-name>proxyCallbackUrl</param-name>

 	<param-value>https://app1.hoau.com:8413/cas1/index.jsp</param-value>

 </init-param>

 -->
测试
尝试访问
https://app1.hoau.com:8413/cas1
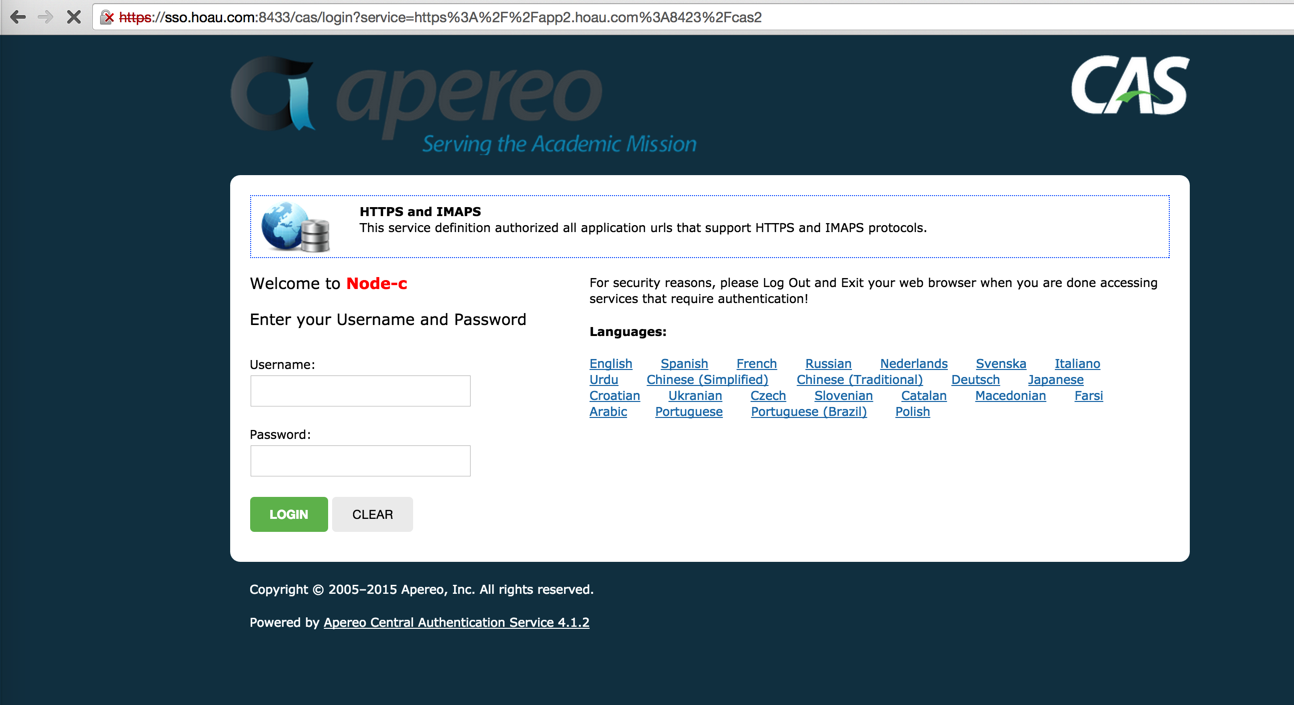
* 抱歉此处配图为node-b的
并使用我们在数据库里面预埋的数据"test01/psw01"登陆
使用相同方式将cas2部署到node-b节点,并指向cas的SSO服务器
*扩展
我们清空浏览器的cache和cookie,按照下列步骤操作
访问"https://app1.hoau.com:8413/cas1"
系统会将我们重定向到"https://sso.hoau.com:8433/cas/login"。
输入用户名密码"test01/psw01"
登陆成功
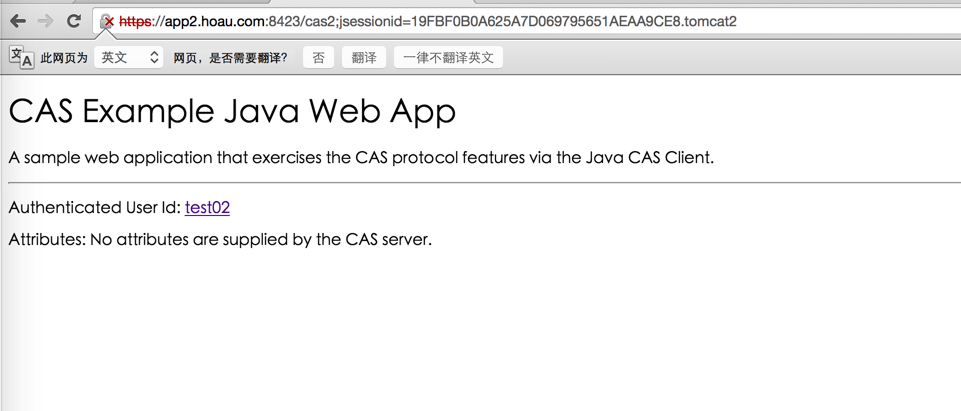
访问"https://app2.hoau.com:8423/cas2"
系统会自动登陆使用用户名密码"test01/psw01"。
问题来了
这就是达到了SSO的效果,但是为什么是这样,原理是什么
结束
CAS (2) —— Mac下配置CAS到Tomcat(客户端)的更多相关文章
- CAS (1) —— Mac下配置CAS到Tomcat(服务端)
CAS (1) -- Mac下配置CAS到Tomcat(服务端) tomcat版本: tomcat-8.0.29 jdk版本: jdk1.8.0_65 cas版本: cas4.1.2 cas-clie ...
- CAS (3) —— Mac下配置CAS客户端经代理访问Tomcat CAS
CAS (3) -- Mac下配置CAS客户端经代理访问Tomcat CAS tomcat版本: tomcat-8.0.29 jdk版本: jdk1.8.0_65 nginx版本: nginx-1.9 ...
- CAS (8) —— Mac下配置CAS到JBoss EAP 6.4(6.x)的Standalone模式(服务端)
CAS (8) -- Mac下配置CAS到JBoss EAP 6.4(6.x)的Standalone模式(服务端) jboss版本: jboss-eap-6.4-CVE-2015-7501 jdk版本 ...
- CAS (7) —— Mac下配置CAS 4.x的JPATicketRegistry(服务端)
CAS (7) -- Mac下配置CAS 4.x集群及JPATicketRegistry(服务端) tomcat版本: tomcat-8.0.29 jdk版本: jdk1.8.0_65 cas版本: ...
- CAS (1) —— Mac下配置CAS到Tomcat(服务端)(转)
tomcat版本: tomcat-8.0.29 jdk版本: jdk1.8.0_65 cas版本: cas4.1.2cas-client-3.4.1 参考来源: CAS实现单点登录(SSO)经典完整教 ...
- Mac下配置git环境和客户端SourceTree+Git常用命令大全(Mac 10.12)
前言: 如果不想折腾,直接下载GitHub桌面端,高度集成git,不需要学习git的任何命令. https://desktop.github.com/ 一.配置git环境 1.上官网https://g ...
- Tomcat (1) —— Mac下配置Tomcat Https/SSL
Tomcat (1) -- Mac下配置Tomcat Https/SSL tomcat版本: tomcat-8.0.29 jdk版本: jdk1.8.0_65 参考来源: SSL/TLS Config ...
- 【高可用HA】Nginx (1) —— Mac下配置Nginx Http负载均衡(Load Balancer)之101实例
[高可用HA]Nginx (1) -- Mac下配置Nginx Http负载均衡(Load Balancer)之101实例 nginx版本: nginx-1.9.8 参考来源: nginx.org [ ...
- 【高可用HA】Apache (4) —— Mac下配置Apache Httpd负载均衡(Load Balancer)之mod_jk
Mac下配置Apache Httpd负载均衡(Load Balancer)之mod_jk httpd版本: httpd-2.4.17 jk版本: tomcat-connectors-1.2.41 参考 ...
随机推荐
- hduoj------确定比赛名次
拓扑排序结合代码的完整理解 确定比赛名次 Time Limit: 2000/1000 MS (Java/Others) Memory Limit: 65536/32768 K (Java/Oth ...
- 【LeetCode】128. Longest Consecutive Sequence
Longest Consecutive Sequence Given an unsorted array of integers, find the length of the longest con ...
- VI打开和编辑多个文件的命令
http://www.05112.org/school/xtrm/linux/2013/0625/4280.htmlVI打开和编辑多个文件的命令 可分两种情况: 1.在同一窗口中打开多个文件: v ...
- python学习笔记011——闭包
1 定义 定义:在计算机科学中,闭包是词法闭包的简称,是引用了自由变量的函数 简单地说:闭包就是能够读取其他函数内部变量的函数,闭包是将函数内部和函数外部连接起来的桥梁.——来源百度百科 2 描述 形 ...
- 转 ShowSlow+Yslow页面前端性能测试环境搭建
----//工具介绍 Yslow:YSlow是Yahoo发布的一款基于FireFox的插件. YSlow可以对网站的页面进行分析,并告诉你为了提高网站性能,如何基于某些规则而进行优化. ShowSlo ...
- 基于Linux的USB 主/从设备之间通讯的三种方式
转载:http://archive.eet-china.com/www.eet-china.com/ART_8800323770_617693_TA_eda530e7.HTM 随着简单易用的USB接口 ...
- nodejs request gb2312乱码的问题
http://www.cnblogs.com/linka/p/6658055.html https://cnodejs.org/topic/53142ef833dbcb076d007230 // np ...
- introduction to anaconda
一.安装好anaconda后进行更新 说明:在windows环境中的操作,在linux环境中请参考具体书籍. 1.进入cmd命令行 执行 conda update conda conda update ...
- phpexcel单元格内换行
我说的这个换行不是字多了,自动换行的那种,是在特定位置添加换行符 代码如下: $objPHPExcel->setActiveSheetIndex(0) ->setCellValue('A4 ...
- Python 计算两个IP段之间的有效IP地址
Can anyone think of an algorithm to put all of the addresses between two others and put them in a li ...