android 原生 MediaPlayer 和 MediaCodec 的区别和联系(三)

- native raw video format:这由 MediaCodecInfo.CodecCapabilities.COLOR_FormatSurface 标记,并且它可以和输入输出缓冲区一起使用。
- flexible YUV buffers(例如MediaCodecInfo.CodecCapabilities.COLOR_FormatYUV420Flexible):通过使用getInput/OutputImage(int) ,它们可以与输入/输出 Surface 一起使用,也可以在 ByteBuffer 模式下使用。
- other, specific formats:这些通常仅在 ByteBuffer 模式下受支持。某些颜色格式是供应商特定的。 其他在MediaCodecInfo.CodecCapabilities中定义。 对于等效于灵活格式的颜色格式,您仍然可以使用getInput/OutputImage(int)。
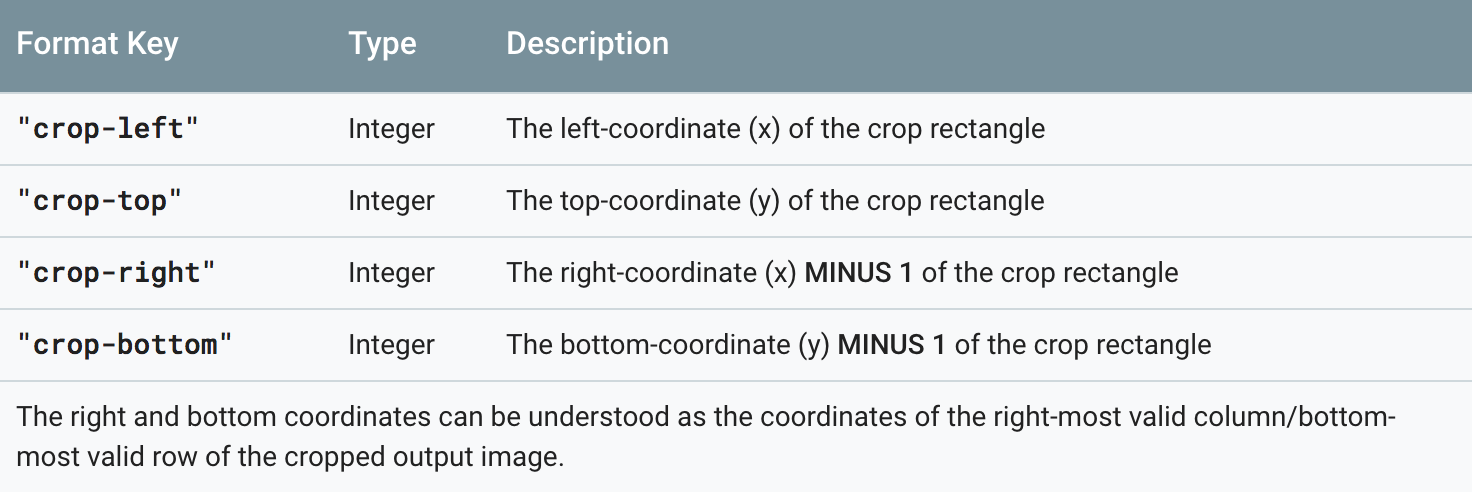
 MediaFormat format = decoder.getOutputFormat(…);

 int width = format.getInteger(MediaFormat.KEY_WIDTH);

 if (format.containsKey("crop-left") && format.containsKey("crop-right")) {

     width = format.getInteger("crop-right") + 1 - format.getInteger("crop-left");

 }

 int height = format.getInteger(MediaFormat.KEY_HEIGHT);

 if (format.containsKey("crop-top") && format.containsKey("crop-bottom")) {

     height = format.getInteger("crop-bottom") + 1 - format.getInteger("crop-top");

 }



 MediaCodec codec = MediaCodec.createByCodecName(name);

 MediaFormat mOutputFormat; // member variable

 codec.setCallback(new MediaCodec.Callback() {

   @Override

   void onInputBufferAvailable(MediaCodec mc, int inputBufferId) {

     ByteBuffer inputBuffer = codec.getInputBuffer(inputBufferId);

     // fill inputBuffer with valid data

     …

     codec.queueInputBuffer(inputBufferId, …);

   }

   @Override

   void onOutputBufferAvailable(MediaCodec mc, int outputBufferId, …) {

     ByteBuffer outputBuffer = codec.getOutputBuffer(outputBufferId);

     MediaFormat bufferFormat = codec.getOutputFormat(outputBufferId); // option A

     // bufferFormat is equivalent to mOutputFormat

     // outputBuffer is ready to be processed or rendered.

     …

     codec.releaseOutputBuffer(outputBufferId, …);

   }

   @Override

   void onOutputFormatChanged(MediaCodec mc, MediaFormat format) {

     // Subsequent data will conform to new format.

     // Can ignore if using getOutputFormat(outputBufferId)

     mOutputFormat = format; // option B

   }

   @Override

   void onError(…) {

     …

   }

 });

 codec.configure(format, …);

 mOutputFormat = codec.getOutputFormat(); // option B

 codec.start();

 // wait for processing to complete

 codec.stop();

 codec.release();
 MediaCodec codec = MediaCodec.createByCodecName(name);

 codec.configure(format, …);

 MediaFormat outputFormat = codec.getOutputFormat(); // option B

 codec.start();

 for (;;) {

   int inputBufferId = codec.dequeueInputBuffer(timeoutUs);

   if (inputBufferId >= 0) {

     ByteBuffer inputBuffer = codec.getInputBuffer(…);

     // fill inputBuffer with valid data

     …

     codec.queueInputBuffer(inputBufferId, …);

   }

   int outputBufferId = codec.dequeueOutputBuffer(…);

   if (outputBufferId >= 0) {

     ByteBuffer outputBuffer = codec.getOutputBuffer(outputBufferId);

     MediaFormat bufferFormat = codec.getOutputFormat(outputBufferId); // option A

     // bufferFormat is identical to outputFormat

     // outputBuffer is ready to be processed or rendered.

     …

     codec.releaseOutputBuffer(outputBufferId, …);

   } else if (outputBufferId == MediaCodec.INFO_OUTPUT_FORMAT_CHANGED) {

     // Subsequent data will conform to new format.

     // Can ignore if using getOutputFormat(outputBufferId)

     outputFormat = codec.getOutputFormat(); // option B

   }

 }

 codec.stop();

 codec.release();
 MediaCodec codec = MediaCodec.createByCodecName(name);

 codec.configure(format, …);

 codec.start();

 ByteBuffer[] inputBuffers = codec.getInputBuffers();

 ByteBuffer[] outputBuffers = codec.getOutputBuffers();

 for (;;) {

   int inputBufferId = codec.dequeueInputBuffer(…);

   if (inputBufferId >= 0) {

     // fill inputBuffers[inputBufferId] with valid data

     …

     codec.queueInputBuffer(inputBufferId, …);

   }

   int outputBufferId = codec.dequeueOutputBuffer(…);

   if (outputBufferId >= 0) {

     // outputBuffers[outputBufferId] is ready to be processed or rendered.

     …

     codec.releaseOutputBuffer(outputBufferId, …);

   } else if (outputBufferId == MediaCodec.INFO_OUTPUT_BUFFERS_CHANGED) {

     outputBuffers = codec.getOutputBuffers();

   } else if (outputBufferId == MediaCodec.INFO_OUTPUT_FORMAT_CHANGED) {

     // Subsequent data will conform to new format.

     MediaFormat format = codec.getOutputFormat();

   }

 }

 codec.stop();

 codec.release();
流末端处理(End-of-stream Handling)
- 不渲染缓冲区:调用releaseOutputBuffer(bufferId, false)。
- 使用默认时间戳呈现缓冲区:调用releaseOutputBuffer(bufferId, true)。
- 使用特定时间戳呈现缓冲区:调用releaseOutputBuffer(bufferId, timestamp)。
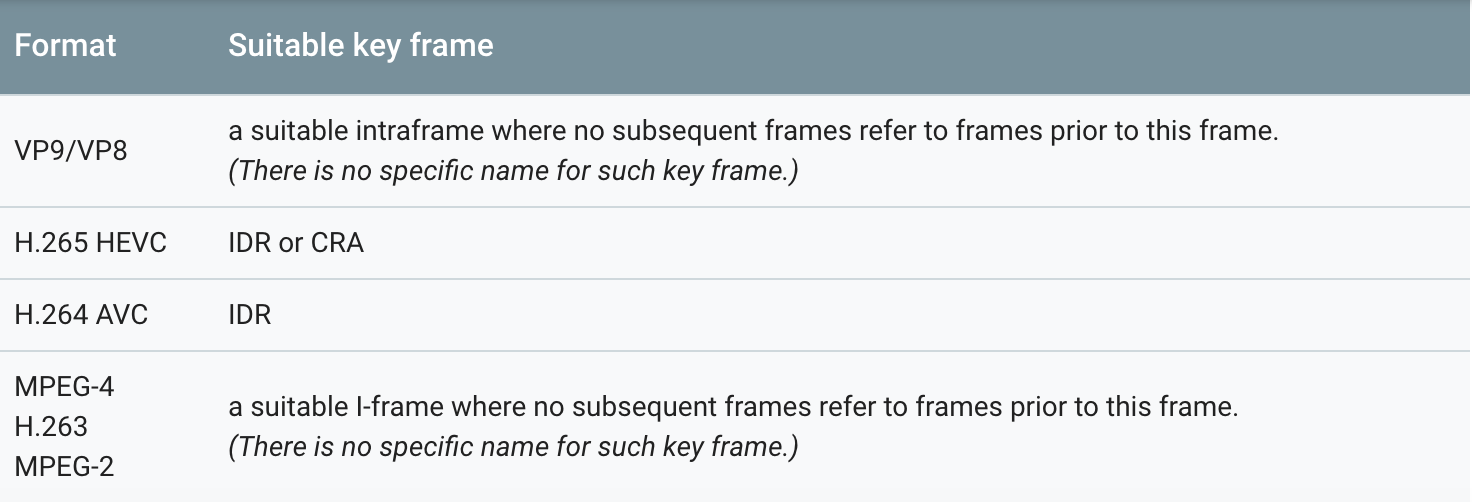
- 可恢复的错误:如果isRecoverable()返回 true,则调用stop(),configure(…)和start()进行恢复。
- 瞬态错误:如果iisTransient()返回 true,则资源暂时不可用,并且可以在以后重试该方法。
- 致命错误:如果isRecoverable()和isTransient()都返回 false,则CodecException是致命的,并且必须重置(reset )或释放编解码器(released)。
android 原生 MediaPlayer 和 MediaCodec 的区别和联系(三)的更多相关文章
- Android 原生 MediaPlayer 和 MediaCodec 的区别和联系(二)
目录: (3)Android 官方网站 对 MediaPlayer的介绍 正文: Android 官方网站 对 MediaPlayer的介绍 MediaPlayer pub ...
- Android MediaPlayer 和 MediaCodec 的区别和联系(一)
目录: (1)概念解释 : 硬解.软解 (2)Intel关于Android MediaCodec的相关说明 正文: 一.硬解.软解 (1)概念: a.硬 ...
- Android原生编解码接口 MediaCodec 之——踩坑
版权声明:本文为博主原创文章,遵循 CC 4.0 BY-SA 版权协议,转载请附上原文出处链接和本声明.本文链接:https://blog.csdn.net/gb702250823/article/d ...
- Android中style和theme的区别
在学习Xamarin android的过程中,最先开始学习的还是熟练掌握android的六大布局-LinearLayout .RelativeLayout.TableLayout.FrameLayou ...
- Android进阶(二十七)Android原生扰人烦的布局
Android原生扰人烦的布局 在开发Android应用时,UI布局是一件令人烦恼的事情.下面主要讲解一下Android中的界面布局. 一.线性布局(LinearLayout) 线性布局分为: (1) ...
- 像写Flutter一样开发Android原生应用
要问到Flutter和Android原生App,在开发是有何区别,编程方式是绕不开的话题.Flutter采用声明式编程,Android原生开发则采用命令式编程. 声明式编程 VS. 命令式编程 我们首 ...
- 拓展 Android 原生 CountDownTimer 倒计时
拓展 Android 原生 CountDownTimer 倒计时 [TOC] CountDownTimer 在系统的CountDownTimer上进行的修改,主要是拓展了功能,当然也保留了系统默认的模 ...
- Android原生json和fastjson的简单使用
android原生操作json数据 主要是两个类 JSONObject 操作对象 JONSArray操作json数组 对象转json //创建学生对象 Student student=new ...
- Android原生游戏开发:使用JustWeEngine开发微信打飞机
使用JustWeEngine开发微信打飞机: 作者博客: 博客园 引擎地址:JustWeEngine 示例代码:EngineDemo JustWeEngine? JustWeEngine是托管在Git ...
随机推荐
- 平衡树 替罪羊树(Scapegoat Tree)
替罪羊树(Scapegoat Tree) 入门模板题 洛谷oj P3369 题目描述 您需要写一种数据结构(可参考题目标题),来维护一些数,其中需要提供以下操作: 插入xx数 删除xx数(若有多个相同 ...
- CentOS开放端口号
#vi /etc/sysconfig/iptables 在打开的文件中增加一份端口配置信息: A INPUT -p tcp -m state --state NEW -m tcp --dport 81 ...
- 解决图片浮动调节不了的问题(使用vertical-align属性)
vertical-align: middle; vertical-align 属性设置元素的垂直对齐方式. baseline 默认.元素放置在父元素的基线上.sub 垂直对齐文本的下标.super ...
- DFT,可测试性设计--概念理解
工程会接触DFT.需要了解DFT知识,但不需要深入. 三种基本的测试(概念来自参考文档): 1. 边界扫描测试:Boundary Scan Test: 测试目标是IO-PAD,利用JTAG接口互连以方 ...
- Maven报错:maven-archetype-webapp:RELEASE from any of the configured repositories
今天学习maven,在控制台下新建maven项目没有问题,但是在STS(eclipse)下创建maven项目老是报错,郁闷死了: ----------------------------------- ...
- Linux文件夹打包发送到本地
tar -cvf script.tar scriptsz script.tar 具体: sz/rz命令: 一般来说,linux服务器大多是通过ssh来进行远程的登陆和管理的,如何在命令方式下上传和 ...
- jmap查看内存使用情况与生成heapdump--转
http://www.webspherechina.net/home/space.php?uid=191&do=blog&id=7572 如果想分析自己的JAVA Applicatio ...
- spring cloud连载第二篇之Spring Cloud Config
Spring Cloud Config Spring Cloud Config为分布式服务提供了服务侧和客户侧的外部配置支持.通过Spring Cloud Config你可以有一个统一的地方来管理所有 ...
- Shell脚本编写1
1.shell操作系统与外部最主要的接口就叫做shell.shell是操作系统最外面的一层.shell管理你与操作系统之间的交互:等待你输入,向操作系统解释你的输入,并且处理各种各样的操作系统的输出结 ...
- PL/SQL之包
1.包的定义 一个包由两个独立的部分组成--包头和包体.给部分被单独地存放在数据字典中. .1定义包头 语法: CREATE [OR REPLACE] PACKAGE [schema.] packag ...
