Socket网络编程--简单Web服务器(5)
这一小节我们将实现服务器对get和post的请求进行对cgi程序的调用。对于web服务器以前的章节已经实现了对get和post请求的调用接口,接下来给出对应接口的实现。
 int WebServer::ServerGetFunction(int cli_fd,char *path,char *args)

 {

     ServerExecuteCGI(cli_fd,path,args);

     return ;

 }

 int WebServer::ServerPostFunction(int cli_fd,char *path,char *args)

 {

     ServerExecuteCGI(cli_fd,path,args);

     return ;

 }

 int WebServer::ServerExecuteCGI(int cli_fd,char *path,char *args)

 {

     char query_env[];

     char type[]="text/html";

     pid_t pid;

     int status;

     int cgi_output[];

     int cgi_input[];

     if(pipe(cgi_output)<)

     {

         Page_500(cli_fd);

         return ;

     }

     if(pipe(cgi_input)<)

     {

         Page_500(cli_fd);

         return ;

     }

     if((pid=fork())<)

     {

         Page_500(cli_fd);

         return ;

     }

     if(pid==)//child

     {

         dup2(cgi_output[],);//cgi的输出端绑定文件描述符为1的输出端

         dup2(cgi_input[],);

         close(cgi_output[]);

         close(cgi_input[]);

         sprintf(query_env,"QUERY_STRING=%s",args);

         putenv(query_env);

         execl(path,path,args);

         exit();

     }

     else //parent

     {

         char c;

         close(cgi_output[]);//取消绑定

         close(cgi_input[]);

         Page_Headers(cli_fd,type,);

         while(read(cgi_output[],&c,)>)

             send(cli_fd,&c,,);

         close(cgi_output[]);

         close(cgi_input[]);

     }

     waitpid(pid,&status,);

     return ;

 }
然后我们写一个hello.c的文件然后编译成hello可执行文件(要保证权限是可执行的)
 #include <stdio.h>

 #include <stdlib.h>

 int main(int argc,char **args)

 {

     char *data;

     printf("Hello\n");

     printf("%s:%s\n",args[],args[]);

     data=getenv("QUERY_STRING");

     printf("query_string::%s\n",data);

     return ;

 }
然后在浏览器输入以下网址,然后查看执行结果

成功的执行c程序了。下面就做一个完整的例子,做一个用于登录的例子。
 <html>

     <head>

         <title>Test</title>

         <meta http-equiv="Content-Type" content="text/html ; charset=utf-8">

         <link rel="stylesheet" href="style.css" type="text/css"/>

         <script language="javascript" src="javascript.js"></script>

     </head>

     <body>

         <div class="ceshi">图片</div><img src="ab.jpg"></img>

         <input name="button" type="button" value="Click!" onclick=hi();></input>

         <hr>

         <br>使用post方式<br>

         <form method="post" name="frm1" action="hello">

             <label>用户名:</label>

             <input type="text" name="username" />

             <br>

             <label>密码:</label>

             <input type="password" name="password" />

             <br>

             <input type="submit" name="commit" value="登陆"/>

             <br>

         </form>

         <hr>

         <br>使用get方式<br>

         <form method="get" name="frm1" action="hello">

             <label>用户名:</label>

             <input type="text" name="username" />

             <br>

             <label>密码:</label>

             <input type="password" name="password" />

             <br>

             <input type="submit" name="commit" value="登陆"/>

             <br>

         </form>

     </body>

 </html>
然后在当前目录下有个hello.c程序
 #include <stdio.h>

 #include <stdlib.h>

 #include <string.h>

 int split(char **arr,char *str,const char*del)

 {

     char *s=NULL;

     int i=;

     s=strtok(str,del);

     while(s!=NULL)

     {

         *arr++=s;

         s=strtok(NULL,del);

         i++;

     }

     return i;

 }

 void split_key(char *ch,char *key,char *value)

 {

     int len;

     int i;

     int j;

     len=strlen(ch);

     j=;

     for(i=;i<len;i++)

     {

         if(ch[i]=='=')

         {

             i++;

             break;

         }

         key[j]=ch[i];

         j++;

     }

     key[j]=;

     j=;

     for(;i<len;i++)

     {

         value[j]=ch[i];

         j++;

     }

     value[j]=;

     return ;

 }

 int main(int argc,char **args)

 {

     char *data;

     char *myargs[];

     int cnt=;

     int i;

     char key[],value[];

     char username[],password[];

     memset(myargs,,sizeof(myargs));

     cnt=split(myargs,args[],"&");

     for(i=;i<cnt;i++)

     {

         split_key(myargs[i],key,value);

         if(strcmp(key,"username")==)

             strcpy(username,value);

         if(strcmp(key,"password")==)

             strcpy(password,value);

     }

     //这里可以写上完整的网页

     if(strcmp(username,"admin")== && strcmp(password,"")==)

     {

         printf("<p>登陆成功</p>");

     }

     else

     {

         printf("<p>登陆失败</p>");

     }

     return ;

 }
ServerRequest函数修改了一些BUG后的代码
 int WebServer::ServerRequest(int cli_fd)

 {

     char buf[];

     int size=;

     int i,j;

     char method[];//用于保存请求方式

     char url[];

     char path[];

     char args[];

     struct stat st;

     int cgi;//cgi 为0 表示get普通方法 1表示get带参方法  2表示post方法

     pid_t pid;

     memset(buf,,sizeof(buf));

     cgi=;

     //获取第一行请求信息 一般格式为: GET / HTTP/1.1

     //                               POST / HTTP/1.1

     size=get_line(cli_fd,buf,sizeof(buf));

     //cout<<"\t\t"<<buf<<endl;

     i=,j=;

     //截取第一个单词

     while(!isspace(buf[j]) && (i<sizeof(method)-))

     {

         method[i]=buf[j];

         i++;j++;

     }

     method[i]='\0';

     //取第一个与第二个单词之间的空格

     while(isspace(buf[j]) && (j<sizeof(buf)))

         j++;

     if(strcasecmp(method,"GET") && strcasecmp(method,"POST"))

     {

         Page_501(cli_fd);

         return -;

     }

     if(strcasecmp(method,"GET")==)

     {

     //    cout<<"此次请求的方式是GET方法"<<endl;

         cgi=;

     }

     else if(strcasecmp(method,"POST")==)

     {

     //    cout<<"此次请求的方式是POST方法"<<endl;

         cgi=;

     }

     //截取第二个单词

     i=;

     int flag=;

     while(!isspace(buf[j]) && (i<sizeof(url)-) && (j<sizeof(buf)))

     {

         if(buf[j]=='?')

         {

             flag=;

             j++;

             url[i]='\0';

             i=;

             cgi=(cgi==?:);

             continue;

         }

         if(flag==)

         {

             url[i]=buf[j];

             i++;j++;

         }

         else if(flag==)

         {

             args[i]=buf[j];

             i++;j++;

         }

     }

     if(flag==)

         url[i]='\0';

     else

         args[i]='\0';

     sprintf(path,"www%s",url);//这个是web服务器的主目录,这个以后可以处理成读取配置文件,这里就先写固定的www目录

     if(path[strlen(path)-]=='/')

         strcat(path,"index.html");//同上

     //cout<<"============>此次请求的地址为:"<<path<<":"<<args<<endl;

     //根据文件名,获取该文件的文件信息。如果为-1,表示获取该文件失败

     if(stat(path,&st)==-)

     {

         while((size>) && strcmp("\n",buf))//去除掉多余的请求头信息

             size=get_line(cli_fd,buf,sizeof(buf));

         Page_404(cli_fd);

     }

     else

     {

         if(S_ISDIR(st.st_mode))//判断url地址,如果是个目录,那么就访问该目录的index.html

         {

             strcat(path,"/index.html");

             if(stat(path,&st)==-)

             {

                 Page_404(cli_fd);

             }

         }

         if(!S_ISDIR(st.st_mode)&&((st.st_mode & S_IXUSR) || (st.st_mode & S_IXGRP) || (st.st_mode & S_IXOTH)))//判断该url地址所对应的文件是否是可执行,并且是否有权限

         {

             //是一个cgi程序

             if(strcasecmp(method,"GET")==)

                 cgi=;

             else if(strcasecmp(method,"POST")==)

                 cgi=;

             else

                 cgi=;

         }

         cout<<"访问:"<<path<<endl;

         if(cgi==)//如果cgi为0,那么就表示该url所对应的文件不是cgi程序,而是一个简单的静态页面

         {

             pid = fork();

             if(pid==)

             {

                 ServerCatHttpPage(cli_fd,path,st.st_size);

             }

         }

         else if(cgi==)//get方法带参数

         {

             pid=fork();

             if(pid==)

             {

                 while((size>) && strcmp("\n",buf))//去除掉多余的请求头信息

                     size=get_line(cli_fd,buf,sizeof(buf));

                 ServerGetFunction(cli_fd,path,urldecode(args));

             }

         }

         else if(cgi==)//post方法

         {

             pid=fork();

             if(pid==)

             {

                 int content_length=;

                 while((size>) && strcmp("\n",buf))//去除掉多余的请求头信息

                 {

                     size=get_line(cli_fd,buf,sizeof(buf));

                     buf[]='\0';

                     if(strcasecmp(buf,"Content-Length:")==)

                     {

                         content_length=atoi(&(buf[]));

                     }

                 }

                 if(content_length==)

                 {

                     Page_400(cli_fd);

                     return ;

                 }

                 char c;

                 j=;

                 for(int i=;i<content_length;i++)

                 {

                     recv(cli_fd,&c,,);

                     args[j]=c;

                     j++;

                 }

                 args[j]=;

                 ServerPostFunction(cli_fd,path,urldecode(args));

             }

         }

     }

     close(cli_fd);

     return ;

 }
运行时的界面
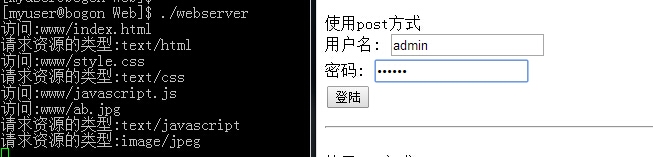
用户名密码正确时

用户名密码错误时

同理GET方法的请求也是可以了。
上面实现的程序是使用c原来来写的实现cgi,听说perl的cgi很出名,那么接下来就实现对perl-cgi的支持。首先要安装perl,一般的Linux都有自带,接下来就需要一个perl的cgi库,安装的方式为 yum install perl-CGI 进行安装。 安装成功与否运行下面脚本就知道了。
 #!/usr/bin/perl -Tw

 use strict;

 use CGI;

 my($cgi) = new CGI;

 #print $cgi->header('text/html');

 print $cgi->start_html(-title => "Example CGI script",

         -BGCOLOR => 'red');

 print $cgi->h1("CGI Example");

 print $cgi->p, "This is an example of CGI\n";

 print $cgi->p, "Parameters given to this script:\n";

 print "<UL>\n";

 foreach my $param ($cgi->param)

 {

     print "<LI>", "$param ", $cgi->param($param), "\n";

 }

 print "</UL>";

 print $cgi->end_html, "\n";
注意如果要保证我们的Webserver可以通过execl进行调用的话,还要修改cgi脚本程序的执行权限(chomd)

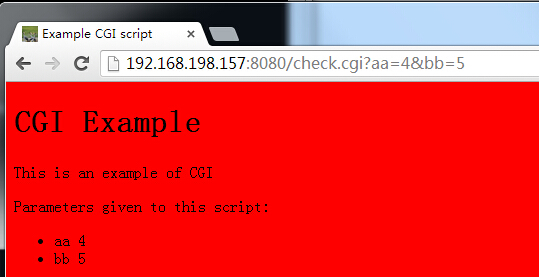
下面这个是带参数的结果图
如果想要c语言的语法,但是对于网页格式有太多的没有必要的HTML标签,这里可是使用一个cgi的库,可以加快cgi程序的开发,Fastcgi模块(http://www.fastcgi.com/devkit/doc/fastcgi-prog-guide/ap_guida.htm)
到这里我们的web服务器易筋经实现最基本的功能了,可以做很多事了。我们的webserver编译后大小才22K而已。
本文地址: http://www.cnblogs.com/wunaozai/p/3946486.html
Socket网络编程--简单Web服务器(5)的更多相关文章
- Socket网络编程--简单Web服务器(6)
本来是想实现ssl连接的,但是弄了好久都不成功,就索性不做了,等以后有能力再做了.所以这一小节就是本次的最后一节了.就简单的说几个注意点. 1.加个配置文件 使用单例模式,使用一个类,该类保存一些信息 ...
- Socket网络编程--简单Web服务器(1)
这一次的Socket系列准备讲Web服务器.就是编写一个简单的Web服务器,具体怎么做呢?我也不是很清楚流程,所以我找来了一个开源的小的Web服务器--tinyhttpd.这个服务器才500多行的代码 ...
- Socket网络编程--简单Web服务器(2)
上一小节通过阅读开源的Web服务器--tinyhttpd.大概知道了一次交互的请求信息和应答信息的具体过程.接下来我就自己简单的实现一个Web服务器. 下面这个程序只是实现一个简单的框架出来.这次先实 ...
- Socket网络编程--简单Web服务器(3)
上一小节已经实现了浏览器发送请求,然后服务器给出应答信息,然后浏览器显示出服务器发送过来的网页.一切看起来都是那么的美好.这一小节就准备实现可以根据地址栏url的不同来返回指定的网页.目前还不考虑带参 ...
- Socket网络编程--简单Web服务器(4)
上一小节已经实现了对图片的传输,接下来就是判断文件是否为js,css,png等格式.我们增加一个函数用于判断格式 int WebServer::get_filetype(char *type,char ...
- C++ socket 网络编程 简单聊天室
操作系统里的进程通讯方式有6种:(有名/匿名)管道.信号.消息队列.信号量.内存(最快).套接字(最常用),这里我们来介绍用socket来实现进程通讯. 1.简单实现一个单向发送与接收 这是套接字的工 ...
- C#中使用Socket实现简单Web服务器
上一篇博客中介绍了怎样使用socket访问web服务器.关键有两个: 熟悉Socket编程: 熟悉HTTP协议. 上一篇主要是通过socket来模拟浏览器向(任何)Web服务器发送(HTTP)请求,重 ...
- Java Web 基础(一) 基于TCP的Socket网络编程
一.Socket简单介绍 Socket通信作为Java网络通讯的基础内容,集中了异常.I/O流模式等众多知识点.学习Socket通信,既能够了解真正的网络通讯原理,也能够增强对I/O流模式的理解. 1 ...
- python之Socket网络编程
什么是网络? 网络是由节点和连线构成,表示诸多对象及其相互联系.在数学上,网络是一种图,一般认为专指加权图.网络除了数学定义外,还有具体的物理含义,即网络是从某种相同类型的实际问题中抽象出来的模型.在 ...
随机推荐
- rocketMQ基本架构简介
1.RocketMQ 简介: RocketMQ前身是阿里研发的一个队列模型的消息中间件,后开源给apache基金会成为了apache的顶级开源项目,具有高性能.高可靠.高实时.分布式特点. 2.Roc ...
- hdu 3065 病毒侵袭持续中【AC自动机】
<题目链接> 题目大意: 小t非常感谢大家帮忙解决了他的上一个问题.然而病毒侵袭持续中.在小t的不懈努力下,他发现了网路中的“万恶之源”.这是一个庞大的病毒网站,他有着好多好多的病毒,但是 ...
- 什么?作为程序员的你还不知道怎么访问 Google
今天就一个目的,让你可以FQ成功,其他人我不知道,但就程序员来说,不能使用 Google 那真是一大损失,当然还有对所有人适用的 YouTobu 这个视频网站,资源多的没话说,别的不说,学习英语很方便 ...
- 获取img的高
我们可以通过css设置图片的width,然后通过 clientWidth获取图片的宽,但是这个宽似乎是css里面定义的width值,但是对于图片的高,使用 clientHeight 来获取似乎是有些问 ...
- Python3 里面的线程池
from concurrent.futures import ThreadPoolExecutor,ProcessPoolExecutor import time def task(i): print ...
- 从新安装SQLserver 过程中报错问题合集
1.安装SQL SERVER2008 到安装支持文件就闪退? 分析:这个是由于安装目录没有删除干净导致的,我遗漏了一个文件夹:microsoft Management console文件夹没有删除的原 ...
- [BZOJ2650]积木
[BZOJ2650]积木 题目大意: 有一排\(n\)个积木,第\(i\)个积木的高度为\(h_i\),定义混乱值为相邻两个积木高度之差的绝对值之和乘上系数\(c\).可以花费\(t^2\)的代价将一 ...
- GDB高级调试
一.多线程调试 多线程调试可能是问得最多的.其实,重要就是下面几个命令: info thread 查看当前进程的线程. thread <ID> 切换调试的线程为指定ID的线程. break ...
- Unsupported major.minor version ,
一.错误现象: 当改变了jdk版本时,在编译java时,会遇到Unsupported major.minor version错误. 错误信息如下 : Unsupported major.minor ...
- X5功能目录排序
在UI/system/config/functionSequecce.xml下面. <?xml version="1.0" encoding="utf-8" ...