java框架之Spring(1)-入门
介绍
概述
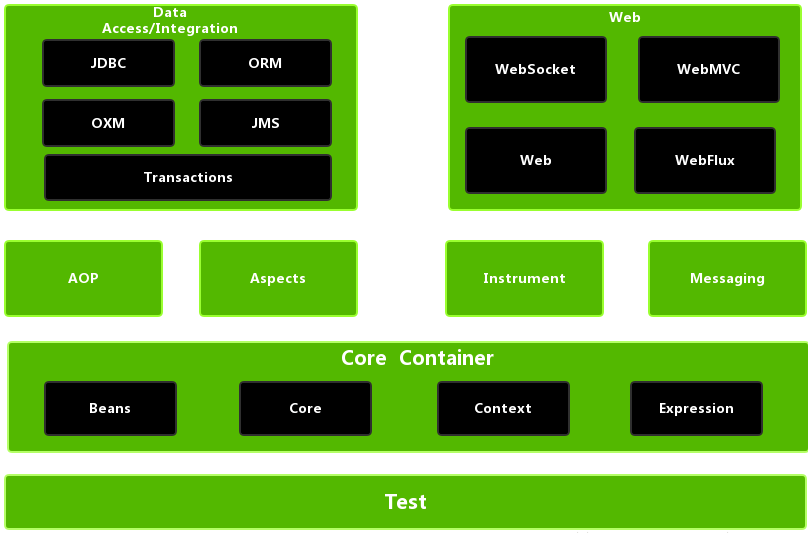
Spring 是一个开放源代码的设计层面框架,它解决的是业务逻辑层和其他各层的松耦合问题,因此它将面向接口的编程思想贯穿整个系统应用。Spring 是于 2003 年兴起的一个轻量级的 Java 开发框架,由 Rod Johnson 创建。简单来说,Spring 是一个分层的 JavaSE/EE full-stack (一站式) 轻量级开源框架。

下载
入门
IoC
控制反转(Inversion of Control,缩写为 IoC),是面向对象编程中的一种设计原则,可以用来减低计算机代码之间的耦合度。其中最常见的方式叫做依赖注入(Dependency Injection,简称 DI),还有一种方式叫“依赖查找”(Dependency Lookup)。通过控制反转,对象在被创建的时候,由一个调控系统内所有对象的外界实体,将其所依赖的对象的引用传递给它。也可以说,依赖被注入到对象中。
- 理解 IoC 和 DI :
-
IoC :控制反转,将对象的创建权交给了 Spring。
DI :依赖注入,前提必须有 IoC 的环境,Spring 管理一个类时将类依赖的属性注入(设置)进来,就是 DI 的过程。
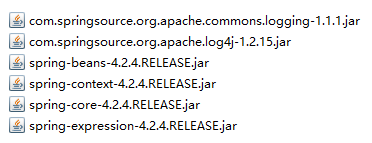
引入jar包

添加配置文件
在 src 下添加名为 'applicationContext.xml' 的配置文件,内容如下:
<?xml version="1.0" encoding="utf-8" ?>
<beans xmlns="http://www.springframework.org/schema/beans"
       xmlns:xsi="http://www.w3.org/2001/XMLSchema-instance"
       xsi:schemaLocation="
        http://www.springframework.org/schema/beans http://www.springframework.org/schema/beans/spring-beans.xsd">
<!--配置文件约束在 spring-framework-4.2.4.RELEASE\docs\spring-framework-reference\html\xsd-configuration.html 下可以找到-->
</beans>
简单使用
package com.zze.dao;

public interface UserDao {
    void  save();
}
com.zze.dao.UserDao
package com.zze.dao.impl;

import com.zze.dao.UserDao;

public class UserDaoImpl implements UserDao {
    @Override
    public void save() {
        System.out.println("from UserDaoImpl.save()");
    }
}
com.zze.dao.impl.UserDaoImpl
<?xml version="1.0" encoding="utf-8" ?>
<beans xmlns="http://www.springframework.org/schema/beans"
       xmlns:xsi="http://www.w3.org/2001/XMLSchema-instance"
       xsi:schemaLocation="
        http://www.springframework.org/schema/beans http://www.springframework.org/schema/beans/spring-beans.xsd">
<!--配置文件约束在 spring-framework-4.2.4.RELEASE\docs\spring-framework-reference\html\xsd-configuration.html 下可以找到-->
    <bean id="userDao" class="com.zze.dao.impl.UserDaoImpl"></bean>
</beans>
applicationContext.xml
/**
 * 原有方式创建 Bean
 */
@Test
public void test1(){
    UserDao userDao = new UserDaoImpl();
    userDao.save();
}

/**
 * 从 Spring 中获取 Bean
 */
@Test
public void test2(){
    ApplicationContext applicationContext = new ClassPathXmlApplicationContext("applicationContext.xml");
    UserDao userDao = (UserDao) applicationContext.getBean("userDao");
    userDao.save();
}
test
Spring的工厂类
BeanFactory :老版本的工厂类,调用 getBean 时才会生成类的实例。
ApplicationContext :新版本的工厂类,加载配置文件时就会将 Spring 管理的类实例化。
- ClassPathXmlApplicationContext :加载类路径下的配置文件。
- FileSystemXmlApplicationContext :加载文件系统下的配置文件。
配置相关
Bean标签
属性:
- id :使用了唯一约束,不能出现特殊字符。
- name :没有使用唯一约束(理论上是可以出现重复的,但是实际开发中是不能出现的),可以出现特殊字符。
- init-method :初始化时执行该方法(在构造方法之后)。
- destroy-method :销毁时执行该方法(默认情况下 Spring 创建的 Bean 是单例的,在工厂类 ApplicationContext 实例 Close 时执行)。
- scope :配置 Bean 的作用范围。
scope 有如下几个可选值:
singleton :默认值,Spring 会采用单例模式创建这个对象。
prototype :多例的。
request :应用在 web 项目中,Spring 创建这个类对象后,将这个对象存放到 request 范围中。
session :应用在 web 项目中,Spring 创建这个类对象后,将这个对象存放的 session 范围中。
globalsession :应用在 web 项目中,必须在 porlet 环境下使用。
Spring的属性注入
为方便下面测试,先新建如下类:
package com.zze.bean;

public class Department {
    public Department() {
    }

    public Department(String name) {
        this.name = name;
    }

    private String name;

    public String getName() {
        return name;
    }

    public void setName(String name) {
        this.name = name;
    }

    @Override
    public String toString() {
        return "Department{" +
                "name='" + name + '\'' +
                '}';
    }
}
com.zze.bean.Department
package com.zze.bean;

public class User {

    public User() {
    }

    public User(String name, Integer age, Department department) {
        this.name = name;
        this.age = age;
        this.department = department;
    }

    private String name;
    private Integer age;
    private Department department;

    public String getName() {
        return name;
    }

    public void setName(String name) {
        this.name = name;
    }

    public Integer getAge() {
        return age;
    }

    public void setAge(Integer age) {
        this.age = age;
    }

    public Department getDepartment() {
        return department;
    }

    public void setDepartment(Department department) {
        this.department = department;
    }

    @Override
    public String toString() {
        return "User{" +
                "name='" + name + '\'' +
                ", age=" + age +
                ", department=" + department +
                '}';
    }
}
com.zze.bean.User
构造方法注入
<bean name="department" class="com.zze.bean.Department">
    <constructor-arg name="name" value="信息部"/>
</bean>

<bean name="user" class="com.zze.bean.User">
    <constructor-arg name="name" value="李四"/>
    <constructor-arg name="age" value="30"/>
    <constructor-arg name="department" ref="department"/>
</bean>
@Test
public void test1() {
    ApplicationContext applicationContext = new ClassPathXmlApplicationContext("applicationContext.xml");
    Object user = applicationContext.getBean("user");

    System.out.println(user);
    /*
    User{name='李四', age=30, department=Department{name='信息部'}}
     */
}
test
set方法注入
<bean name="department" class="com.zze.bean.Department">
    <property name="name" value="信息部"/>
</bean>

<bean name="user" class="com.zze.bean.User">
    <property name="name" value="张三"/>
    <property name="age" value="12"/>
    <property name="department" ref="department"/>
</bean>
@Test
public void test2() {
    ApplicationContext applicationContext = new ClassPathXmlApplicationContext("applicationContext.xml");
    Object user = applicationContext.getBean("user");
    System.out.println(user);
    /*
    User{name='张三', age=12, department=Department{name='信息部'}}
     */
}
test
p名称空间注入
<!--
    在 Spring 2.5 之后支持。
    需在 beans 标签中添加属性 xmlns:p="http://www.springframework.org/schema/p" 来引入 p 名称空间
-->
<bean name="department" class="com.zze.bean.Department" p:name="信息部"/>

<bean name="user" class="com.zze.bean.User" p:name="张三" p:age="21" p:department-ref="department"/>
@Test
public void test3() {
    ApplicationContext applicationContext = new ClassPathXmlApplicationContext("applicationContext.xml");
    Object user = applicationContext.getBean("user");
    System.out.println(user);
    /*
    User{name='张三', age=21, department=Department{name='信息部'}}
     */
}
test
SpEL注入
<!--
    在 Spring 3.0 之后支持。
-->
<bean name="department" class="com.zze.bean.Department">
    <property name="name" value="#{'推广部'}"/>
</bean>

<bean name="user" class="com.zze.bean.User">
    <property name="name" value="#{'李四'}"/>
    <!--在表达式中可以有计算操作,并且可以直接调用对象属性及方法-->
    <property name="age" value="#{10+22}"/>
    <property name="department" ref="department"/>
</bean>
@Test
public void test4() {
    ApplicationContext applicationContext = new ClassPathXmlApplicationContext("applicationContext.xml");
    Object user = applicationContext.getBean("user");
    System.out.println(user);
    /*
    User{name='李四', age=32, department=Department{name='推广部'}}
     */
}
test
- 注入 Array 类型:
-
package com.zze.bean;

import java.util.Arrays;

public class Customer {
    private String name;
    private String[] hobbies;

    public String getName() {
        return name;
    }

    public void setName(String name) {
        this.name = name;
    }

    public String[] getHobbies() {
        return hobbies;
    }

    public void setHobbies(String[] hobbies) {
        this.hobbies = hobbies;
    }

    @Override
    public String toString() {
        return "Customer{" +
                "name='" + name + '\'' +
                ", hobbies=" + Arrays.toString(hobbies) +
                '}';
    }
}
com.zze.bean.Customer
<!--
    List 和 Set 的注入方式与 Array 一致
-->
<bean name="customer" class="com.zze.bean.Customer">
    <property name="name" value="二狗"/>
    <property name="hobbies">
        <list>
            <value>吃饭</value>
            <value>睡觉</value>
            <value>打豆豆</value>
        </list>
    </property>
</bean>
@Test public void test5() { ApplicationContext applicationContext = new ClassPathXmlApplicationContext("applicationContext.xml"); Object user = applicationContext.getBean("customer"); System.out.println(user); /* Customer{name='二狗', hobbies=[吃饭, 睡觉, 打豆豆]} */ }test
- 注入 Map 类型:
-
package com.zze.bean;

import java.util.Map;

public class TestBean {
    private Map<String, Object> map;

    public Map<String, Object> getMap() {
        return map;
    }

    public void setMap(Map<String, Object> map) {
        this.map = map;
    }

    @Override
    public String toString() {
        return "TestBean{" +
                "map=" + map +
                '}';
    }
}
com.zze.bean.TestBean
<bean id="testBean" class="com.zze.bean.TestBean">
    <property name="map">
        <map>
            <entry key="1" value="a"/>
            <entry key="2" value="b"/>
            <entry key="3" value="c"/>
        </map>
    </property>
</bean>
@Test public void test6(){ ApplicationContext applicationContext = new ClassPathXmlApplicationContext("applicationContext.xml"); Object testBean = applicationContext.getBean("testBean"); System.out.println(testBean); /* TestBean{map={1=a, 2=b, 3=c}} */ }test
分模块配置
第一种方式是在创建工厂实例时一次性加载所有指定的配置文件,例:
ApplicationContext applicationContext = new ClassPathXmlApplicationContext("applicationContext1.xml","applicationContext2.xml");
第二种方式是通过配置文件中的 import 标签引入其它的配置文件,例:
<import resource="com/zze/dao/applicationContext-dao.xml"/>
java框架之Spring(1)-入门的更多相关文章
- java框架篇---spring AOP 实现原理
什么是AOP AOP(Aspect-OrientedProgramming,面向方面编程),可以说是OOP(Object-Oriented Programing,面向对象编程)的补充和完善.OOP引入 ...
- java框架之Spring(2)-注解配置IOC&AOP配置
注解配置IoC 准备 1.要使用注解方式配置 IoC,除了之前引入的基础 jar 包,还需要引入 spring-aop 支持包,如下: 2.在 applicationContext.xml 中引入 c ...
- java框架之SpringBoot(1)-入门
简介 Spring Boot 用来简化 Spring 应用开发,约定大于配置,去繁从简,just run 就能创建一个独立的.产品级别的应用. 背景: J2EE 笨重的开发.繁多的配置.低下的开发效率 ...
- 【Java框架型项目从入门到装逼】第一节 - Spring框架 IOC的丧心病狂解说
大家好,好久不见,今天我们来一起学习一下关于Spring框架的IOC技术. 控制反转--Spring通过一种称作控制反转(IoC)的技术促进了松耦合.当应用了IoC,一个对象依赖的其它对象会通过被动的 ...
- 【Java框架型项目从入门到装逼】第二节 - Spring框架 AOP的丧心病狂解说,你喜欢露娜的月下无限连吗?
继续上一节的内容,多几个jar包: aop技术是面向切面编程思想,作为OOP的延续思想添加到企业开发中,用于弥补OOP开发过程中的缺陷而提出的编程思想.AOP底层也是面向对象:只不过面向的不是普通的O ...
- 【Java框架型项目从入门到装逼】第七节 - 学生管理系统项目搭建
本次的教程是打算用Spring,SpringMVC以及传统的jdbc技术来制作一个简单的增删改查项目,对用户信息进行增删改查,就这么简单. 1.新建项目 首先,打开eclipse,新建一个web项目. ...
- java框架之MyBatis(1)-入门&动态代理开发
前言 学MyBatis的原因 1.目前最主流的持久层框架为 Hibernate 与 MyBatis,而且国内公司目前使用 Mybatis 的要比 Hibernate 要多. 2.Hibernate 学 ...
- java框架之SpringMVC(1)-入门&整合MyBatis
前言 SpringMVC简介 SpringMVC 是一个类似于 Struts2 表现层的框架,属于 SpringFramework 的后续产品. 学习SpringMVC的原因 SpringMVC 与 ...
- java框架篇---spring IOC 实现原理
IOC(DI):其实这个Spring架构核心的概念没有这么复杂,更不像有些书上描述的那样晦涩.java程序员都知道:java程序中的每个业务逻辑至少需要两个或以上的对象来协作完成,通常,每个对象在使用 ...
随机推荐
- Git操作自动触发企业微信机器人webhook
[本文出自天外归云的博客园] 背景 在git做一些merge或push的操作,我们希望可以自动在企业微信群发送自定义的通知. 服务代码 这里选用php作为网络服务的开发语言,关键的代码如下(githo ...
- bootstrap的css和html设计规范
1,css设计规范 http://www.runoob.com/bootstrap/bootstrap-css-codeguide-html.html 2,html设计规范 http://www.ru ...
- AES和RSA加解密的Python用法
AES AES 是一种对称加密算法,用key对一段text加密,则用同一个key对密文解密, from Crypto import Random from Crypto.Hash import SHA ...
- TIJ -- CountDownLatch
1. 2. Class : CountDownLatchDemo package lime.thinkingInJava._021._007._001; import java.sql.Time; i ...
- puppet(3) 变量、数据类型、表达式、条件判断语句-if、case、selector、unless
puppet(4) 变量.数据类型.表达式.条件判断语句-if.case.selector语句 puppet变量: 1.名称必须以$开头:赋值使用=,支持追加赋值+=: 2.每个变量都有两种引用格式: ...
- 卸载ie
今天卸载ie11失败,最后使用下面这个命令实现了卸载,记录下 IE11卸载命令如下: FORFILES /P %WINDIR%\servicing\Packages /M Microsoft-Wind ...
- Linux系统挂载windows共享目录报错mount error(121):remote error I/O error
经查,这是由于NFS(Network File System)即网络文件系统服务器有多个版本,V2.V3.V4.而且各版本同时运行,因此挂载时需要说明版本号 mount -o username='pk ...
- 将Windows 8.1 系统窗口背景设置成淡绿色?
1.右键点击开始→运行. 2.在运行中输入: regedit 按回车键之后,打开注册表编辑器. 3.依次定位到:HKEY_CURRENT_USER\Control Panel\Colors. 4.然后 ...
- postgresql修改数据库编码
update pg_database set encoding = pg_char_to_encoding('UTF8') where datname = 'your_database'; 先用 \e ...
- php代码画足球场
用代码画了个足球场 原图: 代码画出的效果图: 代码如下: // 创建一个 200X200 的图像 $img = imagecreate(800, 500); // 分配颜色 $bg = imagec ...
