Spring Boot 启动(二) Environment 加载
Spring Boot 启动(二) Environment 加载
Spring 系列目录(https://www.cnblogs.com/binarylei/p/10198698.html)
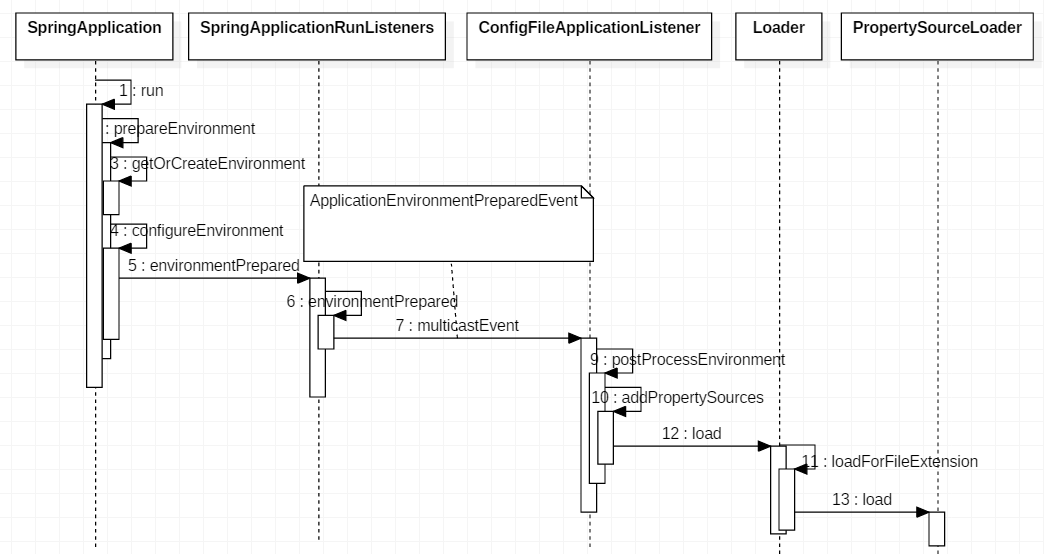
上一节中讲解了 SpringApplication 启动的整个流程,本节关注第二步 prepareEnvironment,尤其是配置文件的加载。
一、prepareEnvironment 加载流程分析
public ConfigurableApplicationContext run(String... args) {

	// 1. listeners 用户监听容器的运行,默认实现为 EventPublishingRunListener

	SpringApplicationRunListeners listeners = getRunListeners(args);

	ApplicationArguments applicationArguments = new DefaultApplicationArguments(args);

	// 2. 初始化环境变量 environment

	ConfigurableEnvironment environment = prepareEnvironment(listeners, applicationArguments);

}

private ConfigurableEnvironment prepareEnvironment(SpringApplicationRunListeners listeners,

		ApplicationArguments applicationArguments) {

	// 1. 根据 webApplicationType 创建相应的 Environment

	ConfigurableEnvironment environment = getOrCreateEnvironment();

	// 2. 配置 Environment,主要有三点:一是 ConversionService;二是数据源,包括命令行参数;三是 Profiles

	configureEnvironment(environment, applicationArguments.getSourceArgs());

	// 3. 激活 environmentPrepared 事件,主要是加载 application.yml 等配置文件

	//    ConfigFileApplicationListener#ApplicationEnvironmentPreparedEvent

	listeners.environmentPrepared(environment);

	bindToSpringApplication(environment);

	if (!this.isCustomEnvironment) {

		environment = new EnvironmentConverter(getClassLoader())

				.convertEnvironmentIfNecessary(environment, deduceEnvironmentClass());

	}

	// ??? 以后再研究

	ConfigurationPropertySources.attach(environment);

	return environment;

}
根据 webApplicationType 类型创建相应的 Environment,分为 StandardEnvironment、StandardServletEnvironment、StandardReactiveWebEnvironment。
configureEnvironment 主要有三点:一是 ConversionService;二是数据源,包括命令行参数;三是 Profiles
激活 environmentPrepared 事件,主要是加载 application.yml 等配置文件
2.1 getOrCreateEnvironment
对于 StandardServletEnvironment 的 servletContextInitParams 和 servletConfigInitParams 两个 web 的数据源,会先用 StubPropertySource 占位,等初始化 web 容器时再替换。详见:https://www.cnblogs.com/binarylei/p/10291323.html
2.2 configureEnvironment
protected void configureEnvironment(ConfigurableEnvironment environment,

		String[] args) {

	// 1. 设置 ConversionService

	if (this.addConversionService) {

		ConversionService conversionService = ApplicationConversionService.getSharedInstance();

		environment.setConversionService((ConfigurableConversionService) conversionService);

	}

	// 2. 加载 defaultProperties 和 CommandLinePropertySource(main 参数) 信息

	configurePropertySources(environment, args);

	// 3. 设置 environment 的 Profiles(additionalProfiles + spring.profile.active/default)

	configureProfiles(environment, args);

}
configurePropertySources 添加在 Spring Framework 基础上添加了两个新的据源,一是自定义的 defaultProperties;二是 CommandLinePropertySource(main 参数)
configureProfiles 在原有的剖面上添加自定义的剖面 additionalProfiles,注意 additionalProfiles 在前,Spring Framework 默认的剖面在后。
2.3 environmentPrepared
listeners.environmentPrepared(environment) 主要是加载配置文件,其中 listeners 是通过 spring.factories 配置的 SpringApplicationRunListener,默认实现是 EventPublishingRunListener。
@Override

public void environmentPrepared(ConfigurableEnvironment environment) {

	this.initialMulticaster.multicastEvent(new ApplicationEnvironmentPreparedEvent(

			this.application, this.args, environment));

}
environmentPrepared 触发了 ApplicationEnvironmentPreparedEvent 事件,这个事件是在 spring.factories 配置的监听器 ConfigFileApplicationListener 处理的。
二、ConfigFileApplicationListener
2.1 ConfigFileApplicationListener 处理流程
public class ConfigFileApplicationListener

		implements EnvironmentPostProcessor, SmartApplicationListener, Ordered {

				@Override

	public void onApplicationEvent(ApplicationEvent event) {

		// 1. Environment 加载完成触发 ApplicationEnvironmentPreparedEvent

		if (event instanceof ApplicationEnvironmentPreparedEvent) {

			onApplicationEnvironmentPreparedEvent((ApplicationEnvironmentPreparedEvent) event);

		}

		// 2. ApplicationContext 加载完成触发 ApplicationPreparedEvent

		if (event instanceof ApplicationPreparedEvent) {

			onApplicationPreparedEvent(event);

		}

	}

}
本例中触发了 ApplicationEnvironmentPreparedEvent 事件。
private void onApplicationEnvironmentPreparedEvent(

		ApplicationEnvironmentPreparedEvent event) {

	// 1. 委托给 EnvironmentPostProcessor 处理,也是通过 spring.factories 配置

	List<EnvironmentPostProcessor> postProcessors = loadPostProcessors();

	// 2. ConfigFileApplicationListener 本身也实现了 EnvironmentPostProcessor 接口

	postProcessors.add(this);

	// 3. spring 都都通过 AnnotationAwareOrderComparator 控制执行顺序

	AnnotationAwareOrderComparator.sort(postProcessors);

	// 4. 执行 EnvironmentPostProcessor

	for (EnvironmentPostProcessor postProcessor : postProcessors) {

		postProcessor.postProcessEnvironment(event.getEnvironment(), event.getSpringApplication());

	}

}
在 spring.factories 配置文件中默认定义了三个 EnvironmentPostProcessor 的实现类:
# Environment Post Processors

org.springframework.boot.env.EnvironmentPostProcessor=\

org.springframework.boot.cloud.CloudFoundryVcapEnvironmentPostProcessor,\

org.springframework.boot.env.SpringApplicationJsonEnvironmentPostProcessor,\

org.springframework.boot.env.SystemEnvironmentPropertySourceEnvironmentPostProcessor
优先级 SystemEnvironmentPropertySourceEnvironmentPostProcessor > SpringApplicationJsonEnvironmentPostProcessor
SystemEnvironmentPropertySourceEnvironmentPostProcessor对 systemEnvironment 属性进行了包装。SpringApplicationJsonEnvironmentPostProcessor解析 spring.application.json 或 SPRING_APPLICATION_JSON 配置的 json 字符串。
同时 ConfigFileApplicationListener 也实现了 EnvironmentPostProcessor 接口。我们重点关注的是 ConfigFileApplicationListener 是如何加载配置文件的,其它的 EnvironmentPostProcessor 暂时忽略。跟踪 ConfigFileApplicationListener#postProcessEnvironment 方法,最终加载配置文件委托给了其内部类 Loader 完成。
protected void addPropertySources(ConfigurableEnvironment environment,

		ResourceLoader resourceLoader) {

	// 1. 加载随机数据源 ${random.int} ${random.long} ${random.uuid}

	RandomValuePropertySource.addToEnvironment(environment);

	// 2. 加载配置文件

	new Loader(environment, resourceLoader).load();

}
三、Loader 加载配置文件
3.1 Spring Boot 默认目录及配置文件名
Spring Boot 默认的配置文件的目录及配置文件名称如下:
// 1. 配置文件默认的目录,解析时会倒置,所以 Spring Boot 默认 jar 包的配置文件会覆盖 jar 中的配置文件

private static final String DEFAULT_SEARCH_LOCATIONS = "classpath:/,classpath:/config/,file:./,file:./config/";

public static final String INCLUDE_PROFILES_PROPERTY = "spring.profiles.include";

// 2. 配置文件默认的文件名

private static final String DEFAULT_NAMES = "application";

public static final String CONFIG_NAME_PROPERTY = "spring.config.name";
3.2 profiles 解析配置文件的顺序
先了解一起 Spring FrameWork 和 Spring Boot 的 profiles 的概念。
| 配置 | Spring | 类 | 说明 |
|---|---|---|---|
| spring.profiles.active | Spring FrameWork | AbstractEnvironment | 激活的剖面 |
| spring.profiles.default | Spring FrameWork | AbstractEnvironment | 默认剖面 |
| additionalProfiles | Spring Boot | SpringApplication | 自定义激活的剖面 |
| spring.profiles.include | Spring Boot | ConfigFileApplicationListener | 自定义激活的剖面 |
在启动 SpringApplication#prepareEnvironment 时已经激活了 additionalProfiles + Spring FrameWork 剖面,注意剖面的顺序。 ConfigFileApplicationListener 引入 spring.profiles.include
private void initializeProfiles() {

	// 1. null

	this.profiles.add(null);

	// spring.profiles.include + spring.profiles.active 配置的剖面

	Set<Profile> activatedViaProperty = getProfilesActivatedViaProperty();

	// 2. environment.getActiveProfiles() 过滤 activatedViaProperty 之后的剖面

	//    目前看只有 SpringApplication 配置的 additionalProfiles

	this.profiles.addAll(getOtherActiveProfiles(activatedViaProperty));

	// 3. spring.profiles.include + spring.profiles.active

	//    addActiveProfiles 方法只能调用一次,前提是 activatedViaProperty 不为空

	addActiveProfiles(activatedViaProperty);

	// 4. spring.profiles.default

	if (this.profiles.size() == 1) {

		for (String defaultProfileName : this.environment.getDefaultProfiles()) {

			Profile defaultProfile = new Profile(defaultProfileName, true);

			this.profiles.add(defaultProfile);

		}

	}

}
Spring Boot 配置文件 Profiles(application-dev.properties) 的解析顺序如下:
- 首先解析 null,也就是 application.properties 或 application.yml 文件
- spring.profiles.include/active 属性配置之外的剖面先解析,一般是 activatedViaProperty 或其它编程式配置的 Profiles
- spring.profiles.include 定义的剖面,第三和第四的顺序在 getProfilesActivatedViaProperty 中定义
- spring.profiles.active 定义的剖面
- spring.profiles.default 如果没有激活的剖面,默认 default,即没有 2、3、4 项
注意:实际读取配置文件的顺序和解析的相反,下面会详细说明。
还有一种情况是在配置文件 application.properties 中定义了 spring.profiles.include/active 属性的情况。加载到配置文件后需要判断是否定义了以上两个属性,如果定义了,也需要加载该剖面对应的配置文件。
private void load(PropertySourceLoader loader, String location, Profile profile,

		DocumentFilter filter, DocumentConsumer consumer) {

	// 省略...

	List<Document> loaded = new ArrayList<>();

	for (Document document : documents) {

		if (filter.match(document)) {

			// 1. spring.profiles.active,如果已经定义了该方法就不会再执行了

			addActiveProfiles(document.getActiveProfiles());

			// 2. spring.profiles.include

			addIncludedProfiles(document.getIncludeProfiles());

			loaded.add(document);

		}

	}

}

// 毫无疑问,如果配置文件中定义了 spring.profiles.include 则需要先解析这些剖面,再解析其余的剖面

private void addIncludedProfiles(Set<Profile> includeProfiles) {

	LinkedList<Profile> existingProfiles = new LinkedList<>(this.profiles);

	this.profiles.clear();

	// 1. 先解析配置文件中定义的 spring.profiles.include,当然如果已经解析了则需要排除

	this.profiles.addAll(includeProfiles);

	this.profiles.removeAll(this.processedProfiles);

	// 2. 再解析剩余的剖面

	this.profiles.addAll(existingProfiles);

}
总结,(1) 剖面最终的读取顺序如下:
- spring.profiles.active 配置的剖面
- spring.profiles.include 配置的剖面
- 编程式配置的剖面,如 SpringApplicaiton#etAdditionalProfiles 或 environment#addActiveProfile
- 如果未定义激活的剖面,则 spring.profiles.default
- 默认的配置文件,如 application.properties
- 如果 1-5 项定义了多个,则后面定义的剖面覆盖前面的剖面,如 spring.profiles.active=dev,test 则 test 覆盖 dev
(2) 文件名定义的读取顺序如下:
- spring.config.name 定义了配置文件名,默认为 applicaiton,可以定义多个,如果有多个则后面的覆盖前面的
(3) 目录定义的读取顺序如下:
spring.config.location 定义配置文件所在目录,默认为
classpath:/,classpath:/config/,file:./,file:./config/也就是后面的覆盖前面的配置,也就是 jar 包外的配置覆盖 jar 包内的配置。注意 spring.config.location 如果指定了文件名则 spring.config.name 不会生效。spring.config.additional-location 上面的配置会覆盖 Spring Boot 的默认配置目录,而本配置项则是在默认配置项上追加,先读取 spring.config.additional-location 再读取默认的目录。当然如果显示的定义了 spring.config.location 就只会读取这一项。
3.3 配置文件解析
public void load() {

	// 所有的要解析的 profiles,注意读取配置文件的时候可以会增加

	// 因为配置文件中可能又定义了 spring.profiles.include 属性

	this.profiles = new LinkedList<>();

	// 已经解析过的 profiles,可以避免循环解析

	this.processedProfiles = new LinkedList<>();

	this.activatedProfiles = false;

	this.loaded = new LinkedHashMap<>();

	// 1. this.profiles 集合定义了 profile 解析顺序

	initializeProfiles();

	while (!this.profiles.isEmpty()) {

		Profile profile = this.profiles.poll();

		if (profile != null && !profile.isDefaultProfile()) {

			addProfileToEnvironment(profile.getName());

		}

		// 2. 具体解析配置文件到 this.loaded 中

		load(profile, this::getPositiveProfileFilter,

				addToLoaded(MutablePropertySources::addLast, false));

		this.processedProfiles.add(profile);

	}

	// 3. 解析后 environment#getActiveProfles 可能和配置文件的顺序 processedProfiles 不一致

	resetEnvironmentProfiles(this.processedProfiles);

	// 4. 默认的配置文件中定义了剖面,则要看这个配置文件定义的剖面是否激活

	//    即 application.properties 定义了 spring.profile=dev,dev 如果被激活则加载

	load(null, this::getNegativeProfileFilter,

			addToLoaded(MutablePropertySources::addFirst, true));

	// 5. 加载配置文件到 environment 中,注意读取配置文件的顺序和解析的相反

	addLoadedPropertySources();

}
- initializeProfiles 加载所有的剖面,解析时会按上面提到的顺序进行解析
- load 具体解析配置文件到 this.loaded 中
- addLoadedPropertySources 加载配置文件到 environment 中,注意读取配置文件的顺序和解析的相反
配置文件属性那一种剖面有三种定义方式:
- 文件名指定:application-dev.properties 属于 dev 剖面
- 文件名为 application.properties 但文件配置了 spring.profile=dev 属性也属于 dev 剖面
- 以上两种都指定了,即文件名为 application-dev.properties 的同时文件配置属性 spring.profile=dev
Spring Boot 针对以上三种情况均有支持。load 方法加载配置文件,最终调用 loadForFileExtension 方法。
private void loadForFileExtension(PropertySourceLoader loader, String prefix,

		String fileExtension, Profile profile,

		DocumentFilterFactory filterFactory, DocumentConsumer consumer) {

	DocumentFilter defaultFilter = filterFactory.getDocumentFilter(null);

	DocumentFilter profileFilter = filterFactory.getDocumentFilter(profile);

	// 1. application-dev.properties

	if (profile != null) {

		String profileSpecificFile = prefix + "-" + profile + fileExtension;

		// application-dev.properties 这二个 load 最多只可能有一个生效 (gh-340)

		load(loader, profileSpecificFile, profile, defaultFilter, consumer);

		// application-dev.properties && spring.profile=dev

		load(loader, profileSpecificFile, profile, profileFilter, consumer);

		// Try profile specific sections in files we've already processed

		for (Profile processedProfile : this.processedProfiles) {

			if (processedProfile != null) {

				String previouslyLoaded = prefix + "-" + processedProfile

						+ fileExtension;

				load(loader, previouslyLoaded, profile, profileFilter, consumer);

			}

		}

	}

	// 2. application.properties && spring.profile=dev

	load(loader, prefix + fileExtension, profile, profileFilter, consumer);

}
DocumentFilter 判断文件中是否定义了 spring.profile 的剖面
private DocumentFilter getPositiveProfileFilter(Profile profile) {

	return (Document document) -> {

		// profile==null 则文件中不能定义 spring.profile

		if (profile == null) {

			return ObjectUtils.isEmpty(document.getProfiles());

		}

		// profile!=null 则配置文件中定义的 spring.profile 包含该 profile

		// 且该配置文件定义的 spring.profile 被激活了

		return ObjectUtils.containsElement(document.getProfiles(), profile.getName())

				&& this.environment.acceptsProfiles(Profiles.of(document.getProfiles()));

	};

}
另外这里的 PropertySourceLoader 也是通过 spring.factories 定义的,默认为 PropertiesPropertySourceLoader 和 YamlPropertySourceLoader 两种。
每天用心记录一点点。内容也许不重要,但习惯很重要!
Spring Boot 启动(二) Environment 加载的更多相关文章
- spring boot 启动 开启注解 加载 bean
业务描述:创建一个cache类然后交给spring 管理. @Component @Scope("singleton") public class Cache { public C ...
- Spring Boot自定义配置与加载
Spring Boot自定义配置与加载 application.properties主要用来配置数据库连接.日志相关配置等.除了这些配置内容之外,还可以自定义一些配置项,如: my.config.ms ...
- Spring:启动项目时加载数据库数据(总结)
在项目中需要启动程序时,要将数据库的用户信息表加载到内存中,找到一下几种方式. 1.实现ApplicationListener接口,重写onApplicationEvent方法,可以在项目启动的时候执 ...
- Spring Boot 2程序不能加载 com.mysql.jdbc.Driver 问题
用Spring Boot Starter 向导生成了一个很简单SpringBoot程序, 用到了 MySQL, 总是下面不能加载 Mysql driver class 错误. Cannot load ...
- Spring Boot 静态资源能加载css 不能加载js
Spring Boot 配置拦截器的时候默认 是放行 静态资源 , 也就是说不需要进行配置 registry.addResourceHandler("/**") .addResou ...
- 1.Spring项目启动时,加载相关初始化配置
Spring项目启动时,会加载一些常用的配置: 1.加载spring上下文 SpringApplicationContextUtils.initApplicationContext(event.get ...
- spring容器启动完成后加载自定义逻辑
业务需求中,可能会有一些逻辑需要在应用启动完成后,例如字典缓存,资源池初始化等等,代码如下 public class InitApplication implements ApplicationCon ...
- spring boot的静态资源加载
1.spring boot默认资源处理 Spring Boot 默认为我们提供了静态资源处理,使用 WebMvcAutoConfiguration 中的配置各种属性. spring boot默认加载文 ...
- spring boot注解 --@spring-boot-devtools 自动加载修改的文件和类
spriing boot中有一个注解,是自动加载修改后的类或者文件. 使用方法为: spring-boot-devtools=true 需要引入devtools包依赖: <dependency& ...
- spring boot开发 静态资源加载不出来
spring boot 1.5 版本之前 不拦截静态资源 springboot 2.x版本 拦截静态资源 private static final String[] CLASSPATH_RESOURC ...
随机推荐
- No input file specified.
no input file specified 解决方法 2018年02月23日 14:25:07 tiramisuer8023 阅读数:36607 版权声明:本文为博主原创文章,未经博主允许不得 ...
- windows环境python2.7安装MySQLdb
我电脑是64位,并且安装python不是默认路径,使用pip和mysql-python的exe文件安装都失败了. 后在网上找到一种安装方法,记录下. 确保安装了wheel,我的2.7默认安装了 pip ...
- for批处理skip参数不支持变量延迟!n!的解决办法
a.txt 文件a第1行 文件a第2行 文件a第3行 b.txt 文件b第1行 文件b第2行 文件b第3行 合并ab .bat @echo off REM 把两个文件逐行合并成一列 set n=0 f ...
- *浅解嵌入式中的BootLoader
本文只作为本人学习过程中的记录及时不时的突发奇想偶记.鄙人菜鸟一只,文中如有错误或疏漏,若读者肯不吝赐教,在下感激零涕.文章一直不断更新中 一.何为Bootloader 在嵌入式系统中,Bootloa ...
- 如何让Excel单元格中的名字分散对齐
1 操作方式 开始->对齐方式->对齐->水平对齐->分散对齐(缩进) 2 优势 不会破坏数据的有效性
- Ubuntu 16.04 安装Mysql数据库
系统环境 Ubuntu 16.04; 安装步骤 1.通过以下环境安装mysql服务端与客户端软件 sudo apt-get install mysql-server apt-get isntall m ...
- 记一次sshd启动报错,Failed to start OpenSSH server daemon.
sshd -t [root@mysql5-slave proj]# sshd -t @@@@@@@@@@@@@@@@@@@@@@@@@@@@@@@@@@@@@@@@@@@@@@@@@@@@@@@@@@ ...
- LTE学习笔记(一)——背景知识
一.标准化组织 无线通信技术的演进离不开一些标准化组织. 1.ITU(International Telecommunication Union) 国际电信联盟,主要任务是制定标准,分配无线频谱资源, ...
- 1、根"/"目录结构
1.目录结构 FSH [root@localhost /]# tree -L . ├── bin -> usr/bin #普通用户使用的命令 ├── boot #存放系统启动相关文件,例如ker ...
- delphi 字符串string转流TStream
function StringToFile(mString : string; mFileName : TFileName) : Boolean;var vFileChar : file of Cha ...