Shiro Shiro Web Support and EnvironmentLoaderListener
Shiro Shiro Web Support
主要参考: http://shiro.apache.org/web.html 还有涛哥的
作为资源控制访问的事情,主要使用在网络后台方面,所以了解了本地的测试之后,了解web方面的还是比较的很有必要的,本文主要讲解如何简单的定义一个web项目,然后简单的了解实现的方式是怎么样的!
配置 shiro.ini 放置在 resource目录下面至于这些配置的到底是什么意思,这个不是我们关注的重点,随便看看就知道了,一会慢慢的深入了就知道了这个到底是啥子意思了。
[main]

#默认是/login.jsp

authc.loginUrl=/login

roles.unauthorizedUrl=/unauthorized

perms.unauthorizedUrl=/unauthorized

logout.redirectUrl=/login

[users]

zhang=123,admin

wang=123

[roles]

admin=user:*,menu:*

[urls]

/logout2=logout

/login=anon

/logout=anon

/unauthorized=anon

/static/**=anon

/authenticated=authc

/role=authc,roles[admin]

/permission=authc,perms["user:create"]- 1
maven配置
<dependencies>

        <dependency>

            <groupId>junit</groupId>

            <artifactId>junit</artifactId>

            <version>4.9</version>

            <scope>test</scope>

        </dependency>

        <dependency>

            <groupId>commons-logging</groupId>

            <artifactId>commons-logging</artifactId>

            <version>1.1.3</version>

        </dependency>

        <dependency>

            <groupId>org.apache.shiro</groupId>

            <artifactId>shiro-core</artifactId>

            <version>1.2.2</version>

        </dependency>

        <dependency>

            <groupId>org.apache.shiro</groupId>

            <artifactId>shiro-web</artifactId>

            <version>1.2.2</version>

        </dependency>

        <dependency>

            <groupId>mysql</groupId>

            <artifactId>mysql-connector-java</artifactId>

            <version>5.1.25</version>

        </dependency>

        <dependency>

            <groupId>com.alibaba</groupId>

            <artifactId>druid</artifactId>

            <version>0.2.23</version>

        </dependency>

        <dependency>

            <groupId>javax.servlet</groupId>

            <artifactId>javax.servlet-api</artifactId>

            <version>3.0.1</version>

            <scope>provided</scope>

        </dependency>

    </dependencies>
然后就是web项目的重点配置web.xml
这个加载的顺序listener加载完了才是其他的过滤器啊等等,因为从字面的意思就可以知道了,用于监听容器的启动与关闭事件,所以我们猜,都知道shrio的入口就像之前使用测试文件加载一样从这个Listener中加载配置文件的信息。所以本节研究的重点就是这里啦。
<!--- shiro 1.2 -->

    <listener>

        <listener-class>org.apache.shiro.web.env.EnvironmentLoaderListener</listener-class>

    </listener>

    <context-param>

        <param-name>shiroEnvironmentClass</param-name>

        <param-value>org.apache.shiro.web.env.IniWebEnvironment</param-value><!-- 默认先从/WEB-INF/shiro.ini,如果没有找classpath:shiro.ini -->

    </context-param>

    <context-param>

        <param-name>shiroConfigLocations</param-name>

        <param-value>classpath:shiro.ini</param-value>

    </context-param>

    <filter>

        <filter-name>shiroFilter</filter-name>

        <filter-class>org.apache.shiro.web.servlet.ShiroFilter</filter-class>

    </filter>

    <filter-mapping>

        <filter-name>shiroFilter</filter-name>

        <url-pattern>/*</url-pattern>

    </filter-mapping>
EnvironmentLoaderListener
public class EnvironmentLoaderListener extends EnvironmentLoader implements ServletContextListener {

    /**

     * Initializes the Shiro {@code WebEnvironment} and binds it to the {@code ServletContext} at application

     * startup for future reference.

     * @param sce the ServletContextEvent triggered upon application startup

     *创建一个WebEnvironment 绑定在ServletContext上,这里调用的是父类的方法。

     */

    public void contextInitialized(ServletContextEvent sce) {

        initEnvironment(sce.getServletContext());

    }

    /**

     * Destroys any previously created/bound {@code WebEnvironment} instance created by

     * the {@link #contextInitialized(javax.servlet.ServletContextEvent)} method.

     *

     * @param sce the ServletContextEvent triggered upon application shutdown

     */

    public void contextDestroyed(ServletContextEvent sce) {

        destroyEnvironment(sce.getServletContext());

    }

}其实主要的都是有父类创建的EnvironmentLoader主要就是创建一个WebEnvironment的实例,然后调用初始化的方法!这个类的信息不是很清楚需要了解继承结构。
//主要为了生成管家!

public class EnvironmentLoader {

    /**

     * Servlet Context config param for specifying the {@link WebEnvironment} implementation class to use:

     * WebEnvironment 的实现类,主要负责解析Ini文件,生成管家

     */

    public static final String ENVIRONMENT_CLASS_PARAM = "shiroEnvironmentClass";

    /**

     * Servlet Context config param for the resource path to use for configuring the {@link WebEnvironment} instance:

     * 配置文件的位置,在web.xml中可以指定

     */

    public static final String CONFIG_LOCATIONS_PARAM = "shiroConfigLocations";

    /**

    *唯一的Key放置在ServletContext中

    **/

    public static final String ENVIRONMENT_ATTRIBUTE_KEY =

           EnvironmentLoader.class.getName() + ".ENVIRONMENT_ATTRIBUTE_KEY";

    /**

     * Initializes Shiro's {@link WebEnvironment} instance for the specified {@code ServletContext}

     *加载的起点

     */

    public WebEnvironment initEnvironment(ServletContext servletContext) throws IllegalStateException {

         //比较的严谨

        if (servletContext.getAttribute(ENVIRONMENT_ATTRIBUTE_KEY) != null) {

            throw new IllegalStateException(msg);

        }

        servletContext.log("Initializing Shiro environment");

        log.info("Starting Shiro environment initialization.");

        long startTime = System.currentTimeMillis();

        try {

            //创建这个WebEnvironment,放置在servletContext中,全局共享

            WebEnvironment environment = createEnvironment(servletContext);

            servletContext.setAttribute(ENVIRONMENT_ATTRIBUTE_KEY, environment);

            return environment;

        } catch (RuntimeException ex) {

            log.error("Shiro environment initialization failed", ex);

            servletContext.setAttribute(ENVIRONMENT_ATTRIBUTE_KEY, ex);

            throw ex;

        } catch (Error err) {

            log.error("Shiro environment initialization failed", err);

            servletContext.setAttribute(ENVIRONMENT_ATTRIBUTE_KEY, err);

            throw err;

        }

    }

    /**

     * Return the WebEnvironment implementation class to use, either the default

     * {@link IniWebEnvironment} or a custom class if specified.

     * 可以在配置文件中配置WebEnvironment的实现类,默认为IniWebEnvironment 扩展很好啊!

     * 不过一般都不会改变的,通过反射来创建这个实例

     */

    protected Class<?> determineWebEnvironmentClass(ServletContext servletContext) {

        String className = servletContext.getInitParameter(ENVIRONMENT_CLASS_PARAM);

        if (className != null) {

            try {

                return ClassUtils.forName(className);

            } catch (UnknownClassException ex) {

                throw new ConfigurationException();

            }

        } else {

            return IniWebEnvironment.class;

        }

    }

    /**

     * Instantiates a {@link WebEnvironment} based on the specified ServletContext.

     */

    protected WebEnvironment createEnvironment(ServletContext sc) {

        Class<?> clazz = determineWebEnvironmentClass(sc);//选择CLSS

        if (!MutableWebEnvironment.class.isAssignableFrom(clazz)) {

            throw new ConfigurationException("Custom WebEnvironment class [" + clazz.getName() +

                    "] is not of required type [" + WebEnvironment.class.getName() + "]");

        }

        String configLocations = sc.getInitParameter(CONFIG_LOCATIONS_PARAM);

        boolean configSpecified = StringUtils.hasText(configLocations);

        if (configSpecified && !(ResourceConfigurable.class.isAssignableFrom(clazz))) {

            throw new ConfigurationException(msg);

        }

        MutableWebEnvironment environment = (MutableWebEnvironment)

                               ClassUtils.newInstance(clazz);

                               //反射实例

        environment.setServletContext(sc);

        if (configSpecified && (environment instanceof ResourceConfigurable)) {

            ((ResourceConfigurable) environment).setConfigLocations(configLocations);

             //设置配置文件路径

        }

        customizeEnvironment(environment);//子类可以重写定制

        LifecycleUtils.init(environment);//初始化WebEnvironment,加载配置文件信息

        return environment;

    }

    protected void customizeEnvironment(WebEnvironment environment) {

    }

    /**

     * Destroys the {@link WebEnvironment} for the given servlet context.

     */

    public void destroyEnvironment(ServletContext servletContext) {

        servletContext.log("Cleaning up Shiro Environment");

        try {

            Object environment = servletContext.getAttribute(ENVIRONMENT_ATTRIBUTE_KEY);

            LifecycleUtils.destroy(environment);

        } finally {

            servletContext.removeAttribute(ENVIRONMENT_ATTRIBUTE_KEY);

        }

    }

}
WebEnvironment 继承结构图简单 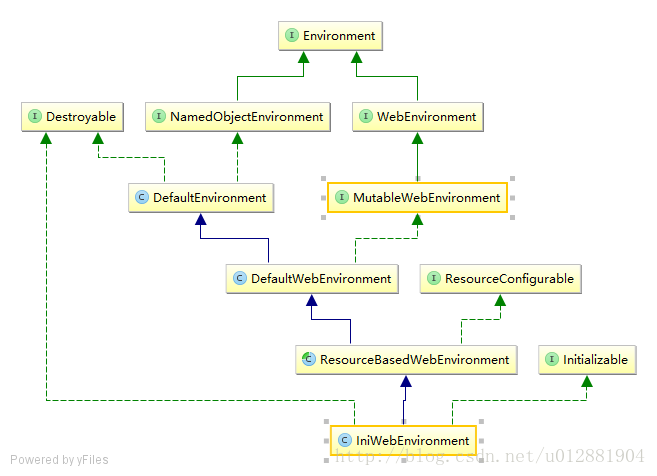
复杂继承结构图 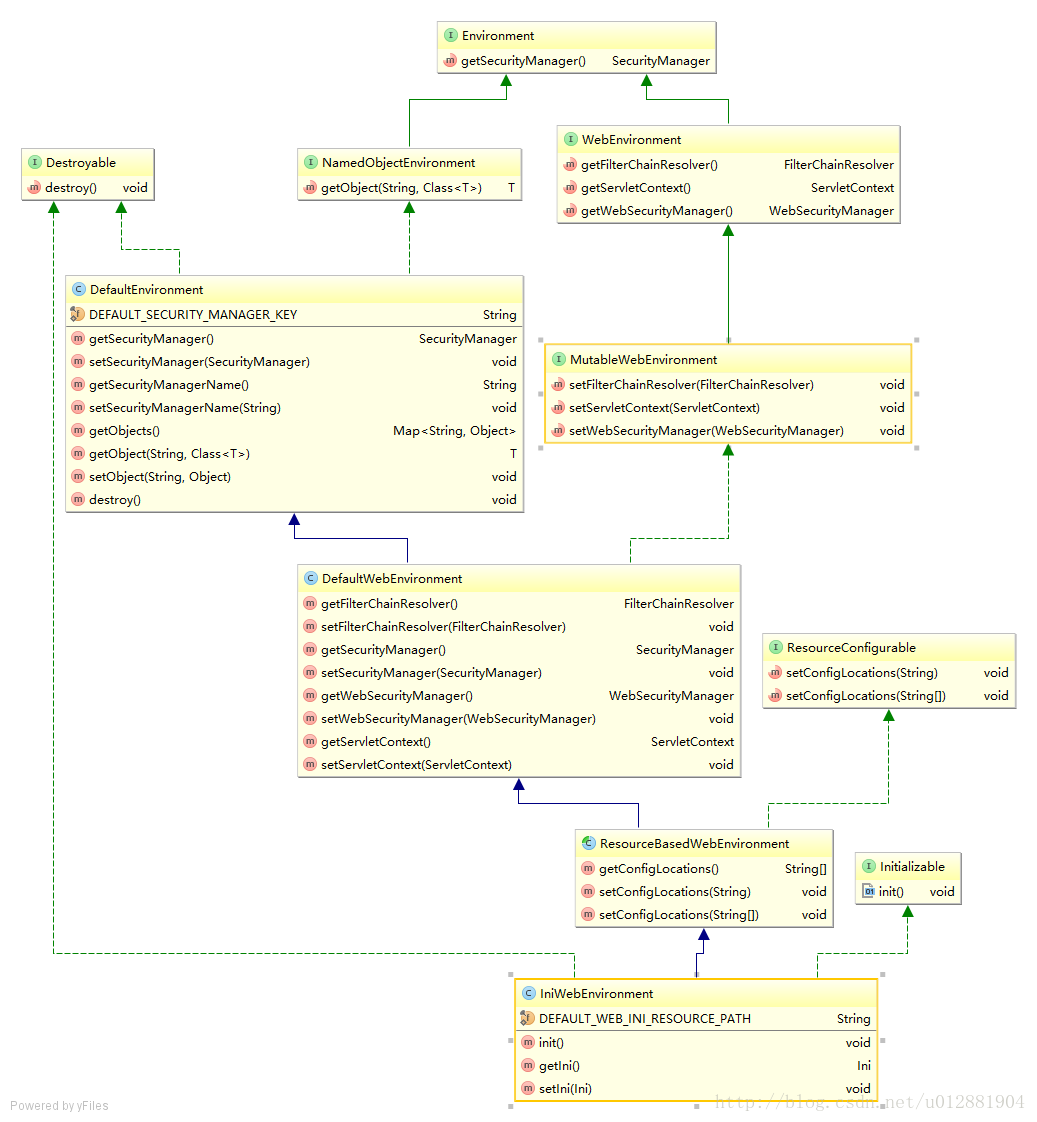
默认的实现是最后一个,就是我们的末端。先把最上面的接口了解清楚之后在一一的进行处了解,慢慢的去理解思想,shiro很喜欢用模板方法,不懂的自己去看看设计模式。
Environment
public interface Environment {

    /**

     * Returns the application's {@code SecurityManager} instance.

     *

     * @return the application's {@code SecurityManager} instance.

     */

    SecurityManager getSecurityManager();

}
NamedObjectEnvironment
public interface NamedObjectEnvironment extends Environment {

    /**

     * 这个接口的意思应该是从一个Map<String,Object>中取一个类型安全的东西!

     * 由于擦除了类型~

     */

    <T> T getObject(String name, Class<T> requiredType) throws RequiredTypeException;

}
WebEnvironment
/**

 * A web-specific {@link Environment} instance, used in web applications.

 *

 * @since 1.2

 */

public interface WebEnvironment extends Environment {

    /**

     * Returns the web application's {@code FilterChainResolver} if one has been configured or {@code null} if one

     * is not available.

     *这里使用了Filter的责任链设计模式,这里是返回一个责任链的解析器,过滤器肯定必须使用涩!

     */

    FilterChainResolver getFilterChainResolver();

    ServletContext getServletContext();

    /**

     * Returns the web application's security manager instance.

     *这个应该和之前的管家类似,增加了一点功能吧!

     */

    WebSecurityManager getWebSecurityManager();

}

//过滤器链是不是和filter很相似!

public interface FilterChainResolver {

    /**

     * Returns the filter chain that should be executed for the given request, or {@code null} if the

     * original chain should be used.

     * <p/>

     * This method allows a implementation to define arbitrary security {@link javax.servlet.Filter Filter}

     * chains for any given request or URL pattern.

     * @param originalChain the original {@code FilterChain} intercepted by the ShiroFilter implementation.

     * @return the filter chain that should be executed for the given request, or {@code null} if the

     *         original chain should be used.

     */

    FilterChain getChain(ServletRequest request, ServletResponse response, FilterChain originalChain);

}

//是否使用Session Http的session

public interface WebSecurityManager extends SecurityManager {

    /**

     * Security information needs to be retained from request to request, so Shiro makes use of a

     * session for this. Typically, a security manager will use the servlet container's HTTP session

     * but custom session implementations, for example based on EhCache, may also be used. This

     * method indicates whether the security manager is using the HTTP session or not.

     *是不是使用Http会话,坑了使用redis或者EhCache之类的缓存服务器

     */

    boolean isHttpSessionMode();

}
MutableWebEnvironment用户放入web环境下的信息,管家啊之类的!
//Mutable 可以变化的,用来注入的信息

public interface MutableWebEnvironment extends WebEnvironment {

    void setFilterChainResolver(FilterChainResolver filterChainResolver);

    void setServletContext(ServletContext servletContext);

    void setWebSecurityManager(WebSecurityManager webSecurityManager);

}
DefaultEnvironment就是把实例的的信息字段放置在找Map中,按照类型安全的获取值!
/**

 * Simple/default {@code Environment} implementation that stores Shiro objects as key-value pairs in a

 * {@link java.util.Map Map} instance.  The key is the object name, the value is the object itself.

 * 将shiro的一些重要的数据放在Map中

 * @since 1.2

 */

public class DefaultEnvironment implements NamedObjectEnvironment, Destroyable {

    public static final String DEFAULT_SECURITY_MANAGER_KEY = "securityManager";

    protected final Map<String, Object> objects;

    private String securityManagerName;

    //线程安全

    public DefaultEnvironment() {

        this(new ConcurrentHashMap<String, Object>());

    }

    /**

     * Creates a new instance with the specified backing map.

     */

    @SuppressWarnings({"unchecked"})

    public DefaultEnvironment(Map<String, ?> seed) {

        this.securityManagerName = DEFAULT_SECURITY_MANAGER_KEY;

        if (seed == null) {

            throw new IllegalArgumentException("Backing map cannot be null.");

        }

        this.objects = (Map<String, Object>) seed;

    }

    public SecurityManager getSecurityManager() throws IllegalStateException {

        SecurityManager securityManager = lookupSecurityManager();

        if (securityManager == null) {

        }

        return securityManager;

    }

    public void setSecurityManager(SecurityManager securityManager) {

        if (securityManager == null) {

            throw new IllegalArgumentException("Null");

        }

        String name = getSecurityManagerName();

        setObject(name, securityManager);

    }

    /**

     * 从Map中找到保存的备份管家的

     */

    protected SecurityManager lookupSecurityManager() {

        String name = getSecurityManagerName();

        return getObject(name, SecurityManager.class);

    }

    public String getSecurityManagerName() {

        return securityManagerName;

    }

    public void setSecurityManagerName(String securityManagerName) {

        this.securityManagerName = securityManagerName;

    }

    /**

     * Returns the live (modifiable) internal objects collection.

     *返回可以修改的objects,因为这个是线程安全的。

     */

    public Map<String,Object> getObjects() {

        return this.objects;

    }

    /**

    *返回类型安全的Map中的值

    **/

    @SuppressWarnings({"unchecked"})

    public <T> T getObject(String name, Class<T> requiredType) throws RequiredTypeException {

        if (name == null) {

            throw new NullPointerException("name parameter cannot be null.");

        }

        if (requiredType == null) {

            throw new NullPointerException("requiredType parameter cannot be null.");

        }

        Object o = this.objects.get(name);

        if (o == null) {

            return null;

        }

        if (!requiredType.isInstance(o)) {

            String msg = "Object named '" + name + "' is not of required type [" + requiredType.getName() + "].";

            throw new RequiredTypeException(msg);

        }

        return (T)o;

    }

    public void setObject(String name, Object instance) {

        if (name == null) {

            throw new NullPointerException();

        }

        if (instance == null) {

            this.objects.remove(name);

        } else {

            this.objects.put(name, instance);

        }

    }

    public void destroy() throws Exception {

        LifecycleUtils.destroy(this.objects.values());

    }

}
- 1
DefaultWebEnvironment 写得分工明确,写的非常的好的!而且各种的接口设计也是非常的合理的。各种需要可以制定的成员变量全部都是处理为接口的!
/**

 * Default {@link WebEnvironment} implementation based on a backing {@link Map} instance.

 *主要是基于祖上的Map进行处理的,这个是Web所以增加了ServletContext 成员变量,分工很明确啊

 *然后返回Web性质的管家进行处理断言!很严谨哦,还有设置过滤链

 * @since 1.2

 */

public class DefaultWebEnvironment extends DefaultEnvironment implements MutableWebEnvironment {

    private static final String DEFAULT_FILTER_CHAIN_RESOLVER_NAME = "filterChainResolver";

    private ServletContext servletContext;

    public DefaultWebEnvironment() {

        super();

    }

    public FilterChainResolver getFilterChainResolver() {

        return getObject(DEFAULT_FILTER_CHAIN_RESOLVER_NAME, FilterChainResolver.class);

    }

    public void setFilterChainResolver(FilterChainResolver filterChainResolver) {

        setObject(DEFAULT_FILTER_CHAIN_RESOLVER_NAME, filterChainResolver);

    }

    @Override

    public SecurityManager getSecurityManager() throws IllegalStateException {

        return getWebSecurityManager();

    }

    @Override

    public void setSecurityManager(SecurityManager securityManager) {

        assertWebSecurityManager(securityManager);

        super.setSecurityManager(securityManager);

    }

    //写的非常的严谨

    public WebSecurityManager getWebSecurityManager() {

        SecurityManager sm = super.getSecurityManager();

        assertWebSecurityManager(sm);

        return (WebSecurityManager)sm;

    }

    public void setWebSecurityManager(WebSecurityManager wsm) {

        super.setSecurityManager(wsm);

    }

    private void assertWebSecurityManager(SecurityManager sm) {

        if (!(sm instanceof WebSecurityManager)) {

            String msg = "SecurityManager instance must be a " + WebSecurityManager.class.getName() + " instance.";

            throw new IllegalStateException(msg);

        }

    }

    public ServletContext getServletContext() {

        return this.servletContext;

    }

    public void setServletContext(ServletContext servletContext) {

        this.servletContext = servletContext;

    }

}
- 1
ResourceConfigurable这个接口更加的直接,设置配置文件的路径,是不是感觉越来越近了,找到熟悉的感觉了。
public interface ResourceConfigurable {

    /**

     * Convenience method that accepts a comma-delimited string of config locations (resource paths).

     *

     * @param locations comma-delimited list of config locations (resource paths).

     */

    void setConfigLocations(String locations);

    /**

     * Sets the configuration locations (resource paths) that will be used to configure the instance.

     *

     * @param locations the configuration locations (resource paths) that will be used to configure the instance.

     */

    void setConfigLocations(String[] locations);

}- 1
ResourceBasedWebEnvironment 就是设置一个路径的位置而已!
/**

 * Abstract implementation for {@code WebEnvironment}s that can be initialized via resource paths (config files).

 *一个类的单一任务的原则,在这里体现的淋淋尽致

 * @since 1.2

 */

public abstract class ResourceBasedWebEnvironment extends DefaultWebEnvironment implements ResourceConfigurable {

    private String[] configLocations;

    public String[] getConfigLocations() {

        return configLocations;

    }

    public void setConfigLocations(String locations) {

        if (!StringUtils.hasText(locations)) {

            throw new IllegalArgumentException("Null/empty locations argument not allowed.");

        }

        //使用,进行分割的Utils方法

        String[] arr = StringUtils.split(locations);

        setConfigLocations(arr);

    }

    public void setConfigLocations(String[] configLocations) {

        this.configLocations = configLocations;

    }

}IniWebEnvironment这里主要瑟得到管家和过滤的实例信息。
1. 查找并加载 shiro.ini 配置文件,首先从自身成员变量里查找,然后从 web.xml 中查找,然后从 /WEB-INF 下查找,然后从 classpath 下查找,若均未找到,则直接报错。
2. 当找到了 ini 配置文件后就开始解析,此时构造了一个 Bean 容器(相当于一个轻量级的 IOC 容器),最终的目标是为了创建 WebSecurityManager 对象与 FilterChainResolver 对象,创建过程使用了 Abstract Factory 模式:
/**

 * {@link WebEnvironment} implementation configured by an {@link Ini} instance or {@code Ini} resource locations.

 *

 * @since 1.2

 */

public class IniWebEnvironment extends ResourceBasedWebEnvironment implements Initializable, Destroyable {

    public static final String DEFAULT_WEB_INI_RESOURCE_PATH = "/WEB-INF/shiro.ini";

    /**

     * The Ini that configures this WebEnvironment instance.

     */

    private Ini ini;

    /**

     * 这个方法被调用了之后和之前的一样的去创建,Ini类信息,然后在Configure() 创建一个工厂,

     *得到工厂getInstance一样的

     * Initializes this instance by resolving any potential (explicit or resource-configured) {@link Ini}

     * configuration and calling {@link #configure() configure} for actual instance configuration.

     */

    public void init() {

        Ini ini = getIni();

        String[] configLocations = getConfigLocations();

        if (log.isWarnEnabled() && !CollectionUtils.isEmpty(ini) &&

                configLocations != null && configLocations.length > 0) {

                    IniWebEnvironment.class.getName());

        }

        //先去实例的,没有再去找配置的,没有再去找默认的

        if (CollectionUtils.isEmpty(ini)) {

            log.debug("Checking any specified config locations.");

            ini = getSpecifiedIni(configLocations);

        }

        if (CollectionUtils.isEmpty(ini)) {

            log.debug(" Trying default config locations.");

            ini = getDefaultIni();

        }

        //这里很正常吧,没有配置的异常!

        if (CollectionUtils.isEmpty(ini)) {

            String msg = "not found or discovered to be empty/unconfigured.";

            throw new ConfigurationException(msg);

        }

        setIni(ini);

        configure();//这里是寻找工厂的

    }

    protected void configure() {

        //之前定义的Map哦!,是用来处理一些信息的

        this.objects.clear();

        //先去创建工厂,然后得到实例~

        WebSecurityManager securityManager = createWebSecurityManager();

        setWebSecurityManager(securityManager);

        //创建过滤链

        FilterChainResolver resolver = createFilterChainResolver();

        if (resolver != null) {

            setFilterChainResolver(resolver);

        }

    }

    protected Ini getSpecifiedIni(String[] configLocations) throws ConfigurationException {

        Ini ini = null;

        if (configLocations != null && configLocations.length > 0) {

            if (configLocations.length > 1) {

            }

            //required, as it is user specified:

            ini = createIni(configLocations[0], true);

        }

        return ini;

    }

    protected Ini getDefaultIni() {

        Ini ini = null;

        String[] configLocations = getDefaultConfigLocations();

        if (configLocations != null) {

            for (String location : configLocations) {

                ini = createIni(location, false);

                    break;

                }

            }

        }

        return ini;

    }

    protected Ini createIni(String configLocation, boolean required) throws ConfigurationException {

        Ini ini = null;

        if (configLocation != null) {

            ini = convertPathToIni(configLocation, required);

        }

        if (required && CollectionUtils.isEmpty(ini)) {

        }

        return ini;

    }

    //这里得到?从配置中得到信息后怎么处理?

    protected FilterChainResolver createFilterChainResolver() {

        FilterChainResolver resolver = null;

        Ini ini = getIni();

        if (!CollectionUtils.isEmpty(ini)) {

            //only create a resolver if the 'filters' or 'urls' sections are defined:

            Ini.Section urls = ini.getSection(IniFilterChainResolverFactory.URLS);

            Ini.Section filters = ini.getSection(IniFilterChainResolverFactory.FILTERS);

            if (!CollectionUtils.isEmpty(urls) || !CollectionUtils.isEmpty(filters)) {

                //either the urls section or the filters section was defined.  Go ahead and create the resolver:

                IniFilterChainResolverFactory factory = new IniFilterChainResolverFactory(ini, this.objects);

                resolver = factory.getInstance();

            }

        }

        return resolver;

    }

    //创建工厂,然后在得到实例!和之前的差不多,这个getbean有点可以哦!

    protected WebSecurityManager createWebSecurityManager() {

        WebIniSecurityManagerFactory factory;

        Ini ini = getIni();

        if (CollectionUtils.isEmpty(ini)) {

            factory = new WebIniSecurityManagerFactory();

        } else {

            factory = new WebIniSecurityManagerFactory(ini);

        }

        WebSecurityManager wsm = (WebSecurityManager)factory.getInstance();

        //SHIRO-306 - get beans after they've been created (the call was before the factory.getInstance() call,

        //which always returned null.

        Map<String, ?> beans = factory.getBeans();

        if (!CollectionUtils.isEmpty(beans)) {

            this.objects.putAll(beans);

        }

        return wsm;

    }

    protected String[] getDefaultConfigLocations() {

        return new String[]{

                DEFAULT_WEB_INI_RESOURCE_PATH,

                IniFactorySupport.DEFAULT_INI_RESOURCE_PATH

        };

    }

    private Ini convertPathToIni(String path, boolean required) {

        //TODO - this logic is ugly - it'd be ideal if we had a Resource API to polymorphically encaspulate this behavior

        Ini ini = null;

        if (StringUtils.hasText(path)) {

            InputStream is = null;

            //SHIRO-178: Check for servlet context resource and not only resource paths:

            if (!ResourceUtils.hasResourcePrefix(path)) {

                is = getServletContextResourceStream(path);

            } else {

                try {

                    is = ResourceUtils.getInputStreamForPath(path);

                } catch (IOException e) {

                    if (required) {

                        throw new ConfigurationException(e);

                    } else {

                        if (log.isDebugEnabled()) {

                            log.debug("Unable to load optional path '" + path + "'.", e);

                        }

                    }

                }

            }

            if (is != null) {

                ini = new Ini();

                ini.load(is);

            } else {

                if (required) {

                    throw new ConfigurationException("Unable to load resource path '" + path + "'");

                }

            }

        }

        return ini;

    }

    //TODO - this logic is ugly - it'd be ideal if we had a Resource API to polymorphically encaspulate this behavior

    private InputStream getServletContextResourceStream(String path) {

        InputStream is = null;

        path = WebUtils.normalize(path);

        ServletContext sc = getServletContext();

        if (sc != null) {

            is = sc.getResourceAsStream(path);

        }

        return is;

    }

    /**

     * Returns the {@code Ini} instance reflecting this WebEnvironment's configuration.

     */

    public Ini getIni() {

        return this.ini;

    }

    public void setIni(Ini ini) {

        this.ini = ini;

    }

}
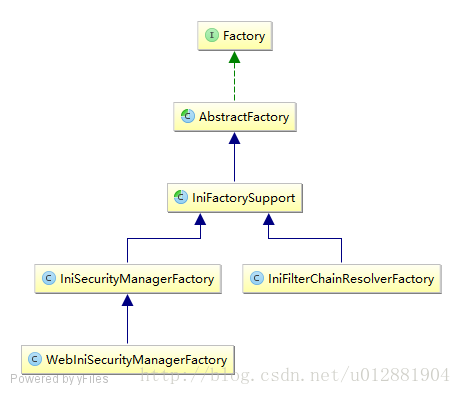
看看继承图 我记得之前我们的工厂的图没有WebIniSecurityManagerFactory 和 IniFilterChainResolverFactory
这个一定看到过的!
WebSecurityManager wsm = (WebSecurityManager)factory.getInstance();
看这个创造的顺序慢慢的一步步的处理~
 protected void configure() {

        this.objects.clear();

        WebSecurityManager securityManager = createWebSecurityManager();

        setWebSecurityManager(securityManager);

        FilterChainResolver resolver = createFilterChainResolver();

        if (resolver != null) {

            setFilterChainResolver(resolver);

        }

    }
其中有两个 Factory 需要关注:
- WebIniSecurityManagerFactory 用于创建 WebSecurityManager。
- IniFilterChainResolverFactory 用于创建 FilterChainResolver。
通过以上分析,相信 EnvironmentLoaderListener 已经不再神秘了,无非就是在容器启动时创建 WebEnvironment 对象,并由该对象来读取 Shiro 配置文件,创建WebSecurityManager 与 FilterChainResolver 对象,它们都在后面将要出现的 ShiroFilter 中起到了重要作用。
从 web.xml 中同样可以得知,ShiroFilter 是整个 Shiro 框架的门面,因为它拦截了所有的请求,后面是需要 Authentication(认证)还是需要 Authorization(授权)都由它说了算。
Shiro Shiro Web Support and EnvironmentLoaderListener的更多相关文章
- Apache Shiro学习-2-Apache Shiro Web Support
Apache Shiro Web Support 1. 配置 将 Shiro 整合到 Web 应用中的最简单方式是在 web.xml 的 Servlet ContextListener 和 Fil ...
- 基于Spring + Spring MVC + Mybatis + shiro 高性能web构建
一直想写这篇文章,前段时间 痴迷于JavaScript.NodeJs.AngularJS,做了大量的研究,对前后端交互有了更深层次的认识. 今天抽个时间写这篇文章,我有预感,这将是一篇很详细的文章,详 ...
- shiro与Web项目整合-Spring+SpringMVC+Mybatis+Shiro(八)
Jar包
- Shiro学习笔记四(Shiro集成WEB)
这两天由于家里出了点事情,没有准时的进行学习.今天补上之前的笔记 -----没有学不会的技术,只有不停找借口的人 学习到的知识点: 1.Shiro 集成WEB 2.基于角色的权限控制 3.基于权限的控 ...
- Shiro集成web环境[Springboot]-认证与授权
Shiro集成web环境[Springboot]--认证与授权 在登录页面提交登陆数据后,发起请求也被ShiroFilter拦截,状态码为302 <form action="${pag ...
- Shiro集成web环境[Springboot]-基础使用
Shiro集成web环境[Springboot] 1.shiro官网查找依赖的jar,其中shiro-ehcache做授权缓存时使用,另外还需要导入ehcache的jar包 <dependenc ...
- Apache Shiro在web开发安全框架中的应用
前阶段就hadoop的分享了一些内容,希望对新手入门的朋友有点帮助吧!对于hadoop新手入门的,还是比较推荐大快搜索的DKHadoop发行版,三节点标准版还是值得拥有的(三节点的标准版是可以免费下载 ...
- Shiro的Web项目配置(转)
Shiro的Web项目配置 一 shiro的学习 二 shiro的java客户端配置 三 关于权限的一些问题 一 shiro的学习 官网和张开涛博客 二 shiro的java客户端配置 1.在web. ...
- Shiro在Web环境下集成Spring的大致工作流程
1,Shiro提供了对Web环境的支持,其通过一个 ShiroFilter 入口来拦截需要安全控制的URL,然后进行相应的控制. ①配置的 ShiroFilter 实现类为:org.spri ...
随机推荐
- 精彩的linux shell 命令
1. Star Wars (telnet) telnet是基于Telnet协议的远程登录客户端程序,经常用来远程登录服务器.除此还可以用它来观看星球大战: telnet towel.blinken ...
- 牛刀小试MySQL学习—MySQL 双主
双主其实说白了也是一个replication,只是推出一些新的拓扑结构 主-主的复制有两种模式: 主动-主动模式下的主-主复制(Master-Master in Active-Active Mod ...
- [bzoj3450]Tyvj1952 Easy[概率dp]
和之前一样考虑这个音符时x还是o,如果是x,是否是新的连续一段,对答案的贡献是多少$(a^2-{(a-1)}^2)$,然后递推就可以了. #include <bits/stdc++.h> ...
- [bzoj3697]采药人的路径_点分治
采药人的路径 bzoj-3697 题目大意:给你一个n个节点的树,每条边分为阴性和阳性,求满足条件的链的个数,使得这条链上阴性的边的条数等于阳性的边的条数,且这条链上存在一个节点,这个节点到一个端点的 ...
- 网易杭研后台技术中心的博客 -MYSQL :OOM
http://backend.blog.163.com/blog/#m=0&t=3&c=mysql
- JS 仿淘宝幻灯片 非完整版 小案例
仿淘宝幻灯片,基础版,后期效果是要做到每次点击小圆点,切换都无缝 <!DOCTYPE html PUBLIC "-//W3C//DTD HTML 4.01//EN" &quo ...
- 菜鸟nginx源代码剖析数据结构篇(十) 自旋锁ngx_spinlock
菜鸟nginx源代码剖析数据结构篇(十) 自旋锁ngx_spinlock Author:Echo Chen(陈斌) Email:chenb19870707@gmail.com Blog:Blog.cs ...
- jenkins任务失败重新构建插件Naginator Plugin
1.下载插件Naginator Plugin 2. 如何配置失败任务自动重试 安装Naginator+Plugin后,新建一个任务,在构建后操作 选择 "Retry build after ...
- 自定义列标题 case when
set@schoolid=41;select l.StartTime,l.EndTime,c.EntranceYear as 入学级,cg.Grade as 年级,c.ClassName as 班级名 ...
- IE6、IE7的兼容问题
通常,网页的兼容问题,就是IE6\IE7的问题.表现为错位.换行,不支持CSS3等. 而其中,错位.换行,原因往往在于没有指明元素的width.height. 一般银瓦不告诉他.