Android学习——利用RecyclerView编写聊天界面
1、待会儿会用到RecyclerView,首先在app/build.gradle(注意有两个build.gradle,选择app下的那个)当中添加依赖库,如下:
 dependencies {

     compile fileTree(dir: 'libs', include: ['*.jar'])

     compile 'com.android.support:appcompat-v7:24.2.1'

     compile 'com.android.support:recyclerview-v7:24.2.1'

     testCompile 'junit:junit:4.12'

     androidTestCompile('com.android.support.test.espresso:espresso-core:2.2.2', {

         exclude group: 'com.android.support', module: 'support-annotations'

     })

 }
添加完之后记得点击Sync Now进行同步。
2、开始编写主界面,修改activity_main.xml中的代码,如下:
 <?xml version="1.0" encoding="utf-8"?>

 <LinearLayout xmlns:android="http://schemas.android.com/apk/res/android"

     android:id="@+id/activity_main"

     android:orientation="vertical"

     android:layout_width="match_parent"

     android:layout_height="match_parent"

     android:background="#d8e0e8"

     >

     <android.support.v7.widget.RecyclerView

         android:id="@+id/msg_recycler_view"

         android:layout_width="match_parent"

         android:layout_height="0dp"

         android:layout_weight="1"

         />

     <LinearLayout

         android:layout_width="match_parent"

         android:layout_height="wrap_content">

         <EditText

             android:id="@+id/input_text"

             android:layout_width="0dp"

             android:layout_height="wrap_content"

             android:layout_weight="1"

             android:hint="Type something here"

             android:maxLines="2"

             />

         <Button

             android:id="@+id/send"

             android:layout_width="wrap_content"

             android:layout_height="wrap_content"

             android:text="send"

             />

     </LinearLayout>

 </LinearLayout>
RecyclerView用于显示聊天的消息内容(因为不是内置在系统SDK中的,所以需要把完整的包路径写出来);
放置一个EditView用于输入消息,一个Button用于发送消息。
3、定义消息的实体类,新建Msg,代码如下:
 public class Msg {

     public static final int TYPE_RECEIVED=0;

     public static final int TYPE_SENT=1;

     private String content;

     private int type;

     public Msg(String content,int type){

         this.content=content;

         this.type=type;

     }

     public String getContent(){

         return content;

     }

     public int getType(){

         return type;

     }

 }
Msg只有两个字段,content表示消息的内容,type表示消息的类型(二值可选,一个是TYPE_RECRIVED,一个是TYPE_SENT)。
4、接着编写RecyclerView子项的布局,新建msg_item.xml,代码如下:
 <?xml version="1.0" encoding="utf-8"?>

 <LinearLayout xmlns:android="http://schemas.android.com/apk/res/android"

     android:orientation="vertical"

     android:layout_width="match_parent"

     android:layout_height="wrap_content"

     android:padding="10dp"

     >

     <LinearLayout

         android:id="@+id/left_layout"

         android:layout_width="283dp"

         android:layout_height="106dp"

         android:layout_gravity="left"

         android:background="@drawable/zuo"

         android:weightSum="1">

         <TextView

             android:id="@+id/left_msg"

             android:layout_width="match_parent"

             android:layout_height="wrap_content"

             android:layout_gravity="center"

             android:layout_margin="10dp"

             />

     </LinearLayout>

     <LinearLayout

         android:id="@+id/right_layout"

         android:layout_width="229dp"

         android:layout_height="109dp"

         android:layout_gravity="right"

         android:background="@drawable/you"

         >

         <TextView

             android:id="@+id/right_msg"

             android:layout_width="wrap_content"

             android:layout_height="wrap_content"

             android:layout_gravity="center"

             android:layout_margin="10dp"

             />

     </LinearLayout>

 </LinearLayout>
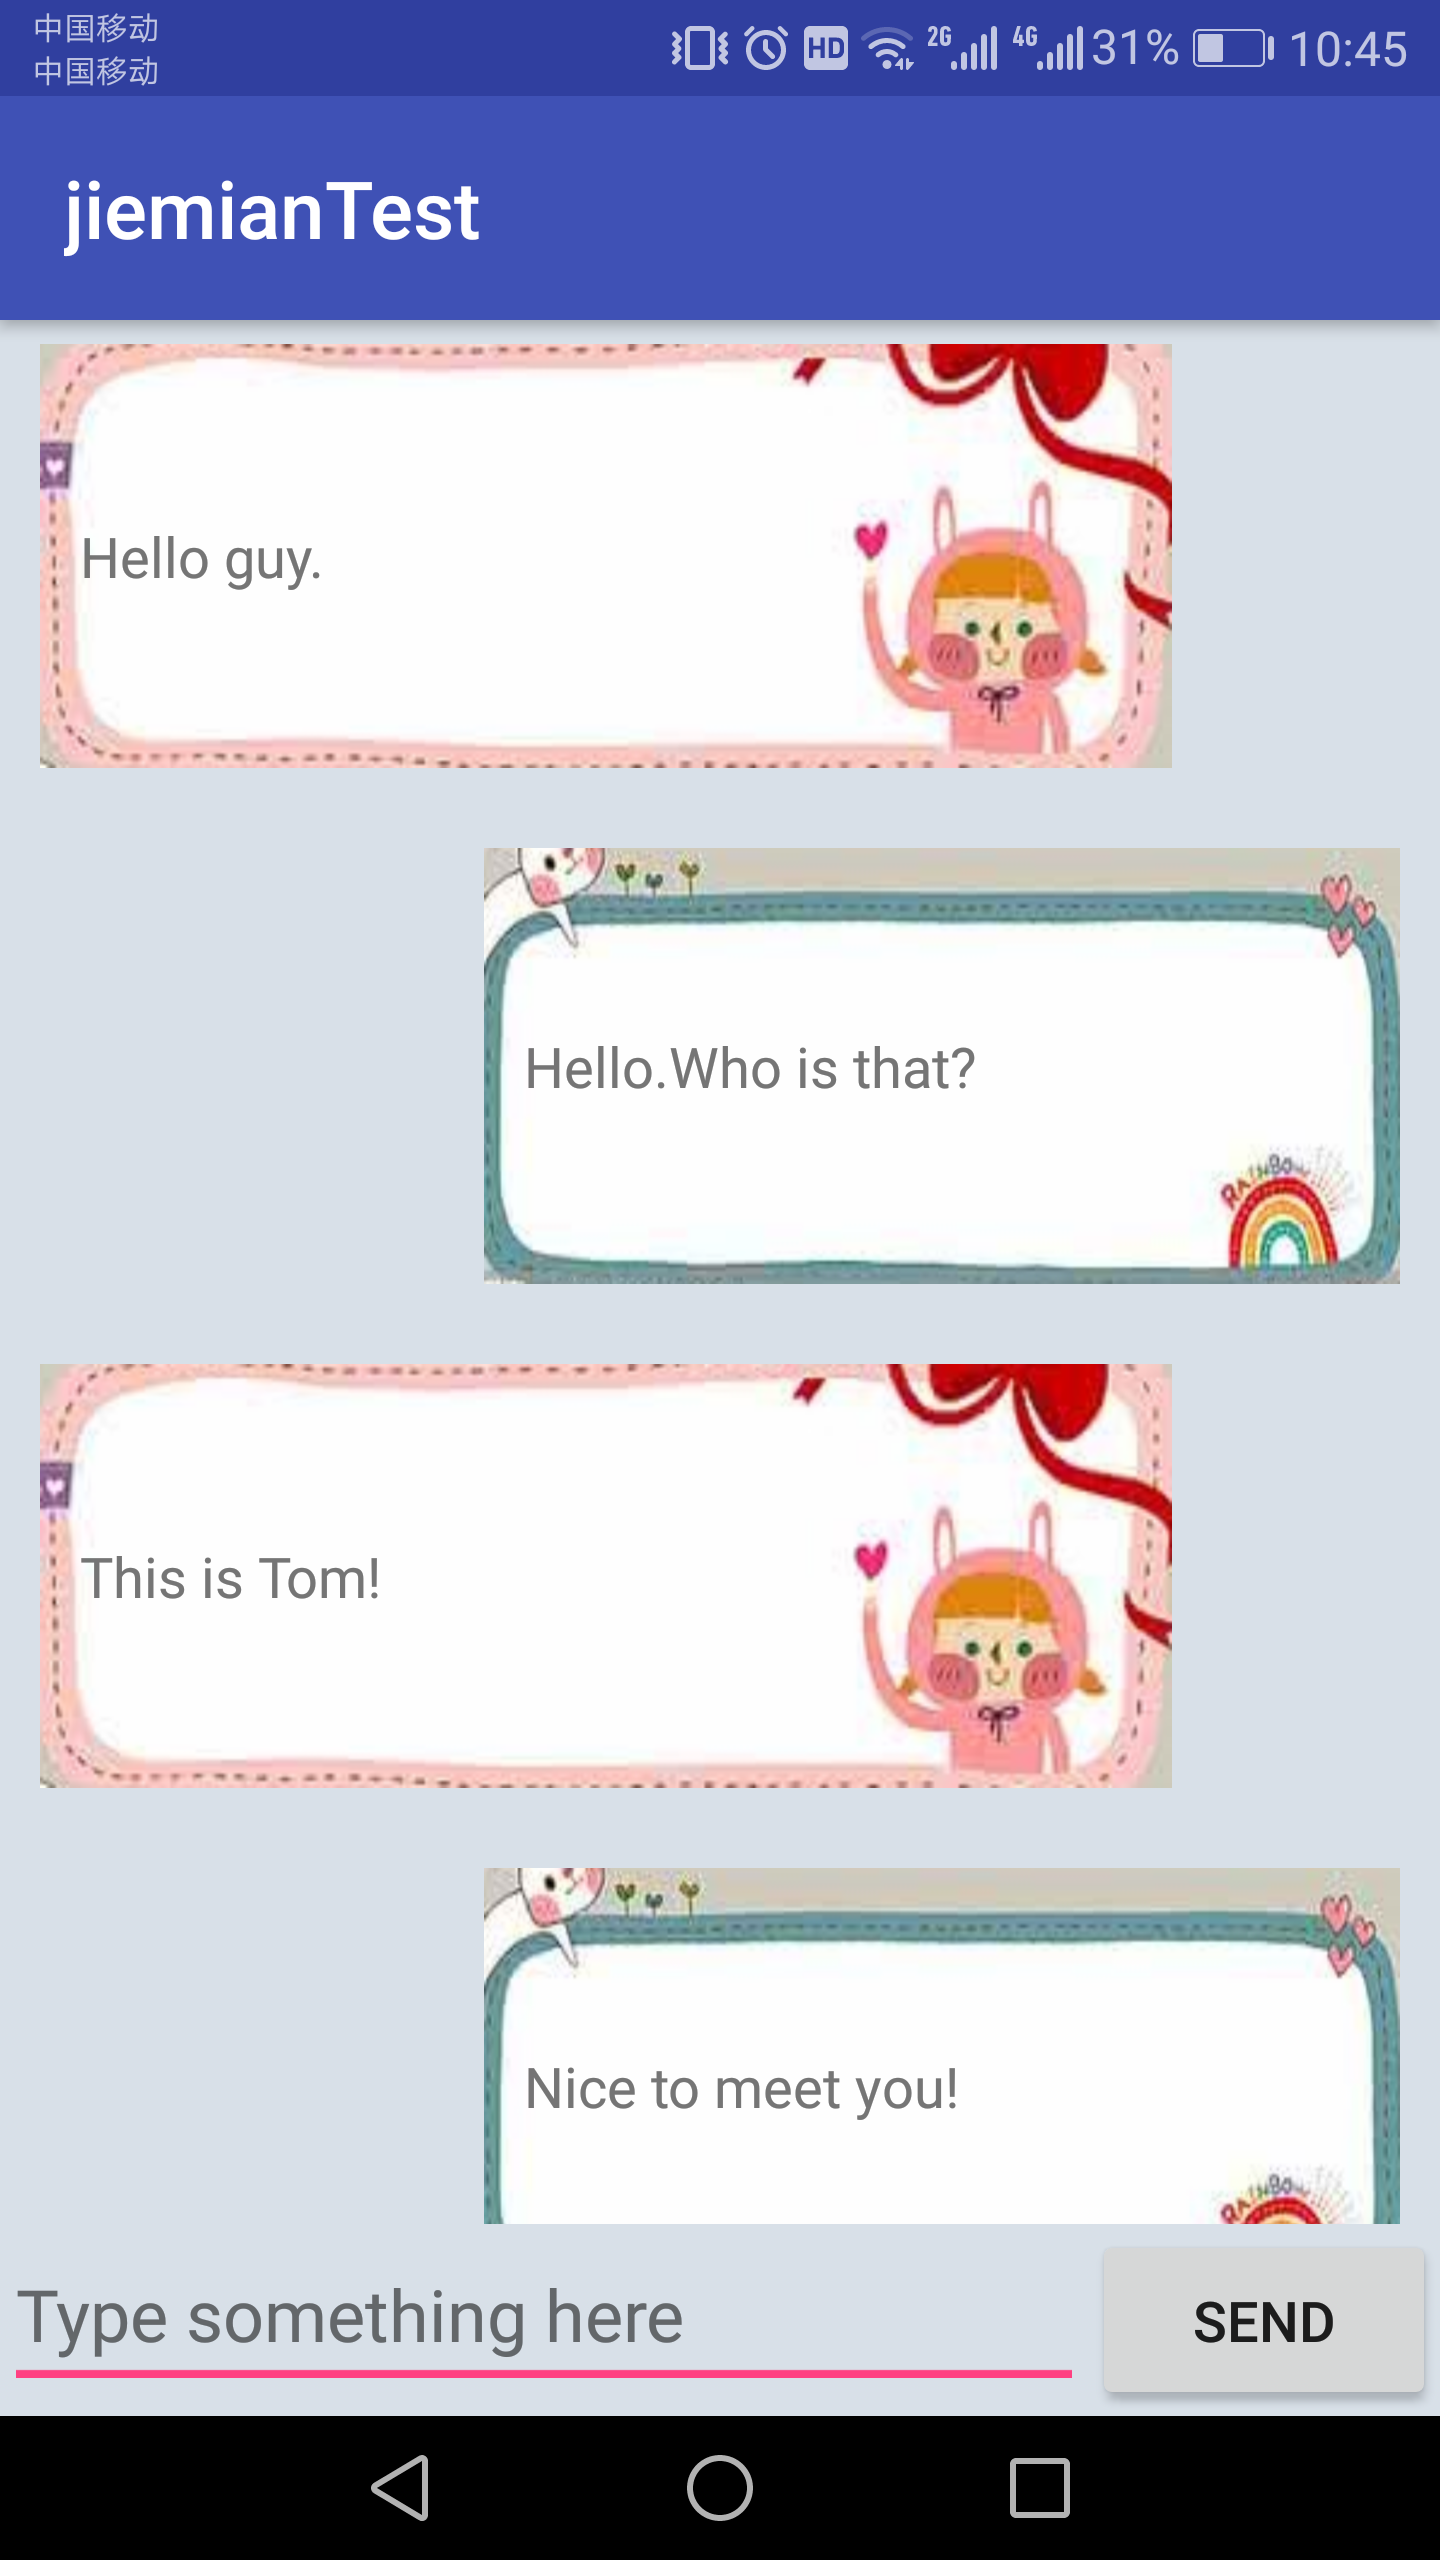
收到的消息局左对齐,发出的消息居右对齐,并用相应的图片作为背景。
5、创建RecyclerView的适配器类,新建MsgAdapter,代码如下:
 public class MsgAdapter extends RecyclerView.Adapter<MsgAdapter.ViewHolder> {

     private List<Msg> mMsgList;

     static class ViewHolder extends RecyclerView.ViewHolder{

         LinearLayout leftLayout;

         LinearLayout rightLayout;

         TextView leftMsg;

         TextView rightMsg;

         public ViewHolder(View view){

             super(view);

             leftLayout=(LinearLayout)view.findViewById(R.id.left_layout);

             rightLayout=(LinearLayout)view.findViewById(R.id.right_layout);

             leftMsg=(TextView)view.findViewById(R.id.left_msg);

             rightMsg=(TextView)view.findViewById(R.id.right_msg);

         }

     }

     public MsgAdapter(List<Msg> msgList){

         mMsgList=msgList;

     }

     @Override

     public ViewHolder onCreateViewHolder(ViewGroup parent,int viewType){               //onCreateViewHolder()用于创建ViewHolder实例

         View view= LayoutInflater.from(parent.getContext()).inflate(R.layout.msg_item,parent,false);

         return new ViewHolder(view);                                                   //把加载出来的布局传到构造函数中,再返回

     }

     @Override

     public void onBindViewHolder(ViewHolder Holder,int position){                     //onBindViewHolder()用于对RecyclerView子项的数据进行赋值,会在每个子项被滚动到屏幕内的时候执行

         Msg msg=mMsgList.get(position);

         if(msg.getType()==Msg.TYPE_RECEIVED){                                         //增加对消息类的判断,如果这条消息是收到的,显示左边布局,是发出的,显示右边布局

             Holder.leftLayout.setVisibility(View.VISIBLE);

             Holder.rightLayout.setVisibility(View.GONE);

             Holder.leftMsg.setText(msg.getContent());

         }else if(msg.getType()==Msg.TYPE_SENT) {

             Holder.rightLayout.setVisibility(View.VISIBLE);

             Holder.leftLayout.setVisibility(View.GONE);

             Holder.rightMsg.setText(msg.getContent());

         }

     }

     @Override

     public int getItemCount(){

         return mMsgList.size();

     }

 }
6、最后修改MainActivity中的代码,来为RecyclerView初始化一些数据,并给发送按钮加入事件响应,代码如下:
 public class MainActivity extends AppCompatActivity {

     private List<Msg> msgList=new ArrayList<>();

     private EditText inputText;

     private Button send;

     private RecyclerView msgRecyclerView;

     private MsgAdapter adapter;

     @Override

     protected void onCreate(Bundle savedInstanceState) {

         super.onCreate(savedInstanceState);

         setContentView(R.layout.activity_main);

         initMsgs();                                                         //初始化消息数据

         inputText=(EditText)findViewById(R.id.input_text);

         send=(Button)findViewById(R.id.send);

         msgRecyclerView=(RecyclerView)findViewById(R.id.msg_recycler_view);

         LinearLayoutManager layoutManager=new LinearLayoutManager(this);    //LinearLayoutLayout即线性布局,创建对象后把它设置到RecyclerView当中

         msgRecyclerView.setLayoutManager(layoutManager);

         adapter=new MsgAdapter(msgList);                                    //创建MsgAdapter的实例并将数据传入到MsgAdapter的构造函数中

         msgRecyclerView.setAdapter(adapter);

         send.setOnClickListener(new View.OnClickListener(){                 //发送按钮点击事件

             @Override

             public void onClick(View v){

                 String content=inputText.getText().toString();              //获取EditText中的内容

                 if(!"".equals(content)){                                    //内容不为空则创建一个新的Msg对象,并把它添加到msgList列表中

                     Msg msg=new Msg(content,Msg.TYPE_SENT);

                     msgList.add(msg);

                     adapter.notifyItemInserted(msgList.size()-1);           //调用适配器的notifyItemInserted()用于通知列表有新的数据插入,这样新增的一条消息才能在RecyclerView中显示
                     msgRecyclerView.scrollToPosition(msgList.size()-1);     //调用scrollToPosition()方法将显示的数据定位到最后一行,以保证可以看到最后发出的一条消息

                     inputText.setText("");                                  //调用EditText的setText()方法将输入的内容清空

                 }

             }

         });

     }

     private void initMsgs(){

         Msg msg1=new Msg("Hello guy.",Msg.TYPE_RECEIVED);

         msgList.add(msg1);

         Msg msg2=new Msg("Hello.Who is that?",Msg.TYPE_SENT);

         msgList.add(msg2);

         Msg msg3=new Msg("This is Tom!",Msg.TYPE_RECEIVED);

         msgList.add(msg3);

     }

 }
运行程序,效果如下:

Android学习——利用RecyclerView编写聊天界面的更多相关文章
- Android学习系列(23)--App主界面实现
在上篇文章<Android学习系列(22)--App主界面比较>中我们浅略的分析了几个主界面布局,选了一个最大众化的经典布局.今天我们就这个经典布局,用代码具体的实现它. 1.预览图先看下 ...
- Android学习之基础知识五—编写聊天界面
第一步:在app/build.grandle添加RecyclerView依赖库 第二步:在activity_main.xml文件中编写主界面:聊天.发送框.发送按钮三个部分 第三步:编写Message ...
- RecyclerView 作为聊天界面,被键盘遮挡的解决办法
最近项目在重构,使用 RecyclerView 替换了 ListView 作为 IM 的聊天界面.然后遇到了一个问题就是当键盘弹出来的时候,键盘会遮挡住 RecyclerView 的一部分,造成聊天内 ...
- Android—简单的仿QQ聊天界面
最近仿照QQ聊天做了一个类似界面,先看下界面组成(画面不太美凑合凑合呗,,,,):
- Android学习之RecyclerView
RecyclerView是android-support-v7-21版本号中新增的一个Widget,官方介绍RecyclerView 是 ListView 的升级版本号,更加先进和灵活. 开发环境 - ...
- Android学习之RecyclerView初探究
•RecyclerView基本用法 RecyclerView是新增的控件,为了让 RecyclerView 在所有 Android 版本上都能使用; Android 团队将 RecyclerView ...
- Android学习系列(22)--App主界面比较
本文算是一篇漫谈,谈一谈当前几个流行应用的主界面布局,找个经典的布局我们自己也来实现一个.不是为了追求到底有多难,而是为了明白我们确实需要这么做. 走个题,android的UI差异化市场依然很大,依然 ...
- Android开发——利用Cursor+CursorAdapter实现界面实时更新
好久没有更新博客了.不是没时间写,而是太懒.而且感觉有些东西没有时间总结,之之后再想写,就想不起来了.晚上新发现一点东西,所以就及时写下来. 最近利用业余时间在看Android的Download模块, ...
- android 学习之RecyclerView
RecyclerView:ListView的升级版,它提供了更好的性能而且更容易使用.该控件是一个可以装载大量的视图集合,并且可以非常效率的进行回收和滚动.当你list中的元素经常动态改变时可以使用R ...
随机推荐
- ApplicationLoader登录失败
报错:Please sign in with an app-specific password. You can create one at appleid.apple.com 是因为帐号开启了双重认 ...
- 想要远程服务器长时间挂机不断开ssh连接的技巧
使用top命令挂着就好了,top命令执行的“查看系统进程和资源占用”的任务会一直输出动态的数据,一直有数据传输就不会因为长时间挂机而断开ssh链接了,尤其针对于海外服务器,因为高延迟经常出现挂机久了自 ...
- 01 c++常见面试题总结
https://www.cnblogs.com/yjd_hycf_space/p/7495640.html C++常见的面试题 http://c.tedu.cn/workplace/217749. ...
- apache+php连接数据库
######## 安装APACHE ##############安装apr/usr/src/apache+php/tar xf apr-1.5.2.tar.gzcd apr-1.5.2./config ...
- 继续聊WPF
下面看一个Tick控件的例子,这只是演示,Tick单独使用没有意义. <TickBar Height="15" Width="180" Ticks=&qu ...
- 2019-04-18 Python Base 1
C:\Users\Jeffery1u>python Python 3.7.3 (default, Mar 27 2019, 17:13:21) [MSC v.1915 64 bit (AMD64 ...
- Junit在SSH中的集成测试
测试Spring容器 在Junit的测试类中,继承AbstractJUnit4SpringContextTests就可以进行Spring容器测试, 例如下面测试用例, @RunWith(SpringJ ...
- Easyphp让其他电脑访问
1.将httpd.conf中的Listen 127.0.0.1:80,修改为Listen 80. 2.重启
- springcloud 中文文档
spring cloud 中文文档:https://springcloud.cc/spring-cloud-dalston.html spring cloud 中文网:https://springcl ...
- Linux查看 kennel , 物理CPU个数、核数、逻辑CPU个数
other article on my list: 查看进程 https://i.cnblogs.com/PostDone.aspx?postid=9231604&actiontip=%E4% ...
