Spring AMQP + Rabbit 配置多数据源消息队列
一般在稍微大一点的项目中,需要配置多个数据库数据源,最简单的方式是用 Spring 来实现,只需要继承 AbstractRoutingDataSource 类,实现 determineCurrentLookupKey 方法,再配合使用 ThreadLocal 就可以实现。
但是如何实现 MQ 的多数据源呢?假设有部署在不同服务器上的两个消息队列,或者是同一服务器,不同 vhost 的消息队列,在一个项目中,我如何自由地选择从哪个队列收发消息呢?下面说说用 Spring AMQP + Rabbit 的实现过程及踩过的坑。
最开始的单数据源的实现很简单,网上有好多博文可以参考,官网也有介绍。主要就是创建一个 xml 的配置文件,添加各种必要的配置,声明 connection-factory、rabbitListenerContainerFactory、rabbitTemplate、queue、exchange、binding 等等。然后用 RabbitTemplate 来发消息,用 @RabbitListener 注解来监听,用 queue 指定队列来收消息,这里就不赘述了。主要说一下,在现有的基础上实现多数据源的收发。
先说配置方面,为了对比,下面先给出单数据源配置:
<?xml version="1.0" encoding="UTF-8"?>

<beans xmlns="http://www.springframework.org/schema/beans"

       xmlns:xsi="http://www.w3.org/2001/XMLSchema-instance"

       xmlns:rabbit="http://www.springframework.org/schema/rabbit"

       xsi:schemaLocation="http://www.springframework.org/schema/beans

       http://www.springframework.org/schema/beans/spring-beans.xsd

       http://www.springframework.org/schema/rabbit

       http://www.springframework.org/schema/rabbit/spring-rabbit.xsd">

    <rabbit:connection-factory id="rabbitConnectionFactory" host="${rabbit.host}" port="${rabbit.port}" username="${rabbit.username}" password="${rabbit.password}"

       requested-heartbeat="30" virtual-host="${rabbit.vhost}" channel-cache-size="50"/>

    <bean id="rabbitListenerContainerFactory"

          class="org.springframework.amqp.rabbit.config.SimpleRabbitListenerContainerFactory">

        <property name="connectionFactory" ref="rabbitConnectionFactory"/>

        <property name="concurrentConsumers" value="16"/>

        <property name="maxConcurrentConsumers" value="50"/>

    </bean>

    <rabbit:admin id="rabbitAdmin" connection-factory="rabbitConnectionFactory"/>

    <!-- queue declare -->

    <rabbit:queue durable="true" auto-delete="false" exclusive="false" name="queue.test"/>

    <!-- bind queue to exchange -->

    <rabbit:direct-exchange name="exchange" auto-delete="false" durable="true">

        <rabbit:bindings>

            <rabbit:binding queue="queue.test" key="rkey.test"></rabbit:binding>

        </rabbit:bindings>

    </rabbit:direct-exchange>

    <rabbit:template id="rabbitTemplate" connection-factory="rabbitConnectionFactory" retry-template="retryTemplate" reply-timeout="60000"/>

    <bean id="retryTemplate" class="org.springframework.retry.support.RetryTemplate">

        <property name="backOffPolicy">

            <bean class="org.springframework.retry.backoff.ExponentialBackOffPolicy">

                <property name="initialInterval" value="500"/>

                <property name="multiplier" value="10.0"/>

                <property name="maxInterval" value="10000"/>

            </bean>

        </property>

    </bean>

</beans>
为了实现双数据源,查阅了很多资料,最初实现的配置如下:
<?xml version="1.0" encoding="UTF-8"?>

<beans xmlns="http://www.springframework.org/schema/beans"

       xmlns:xsi="http://www.w3.org/2001/XMLSchema-instance"

       xmlns:rabbit="http://www.springframework.org/schema/rabbit"

       xsi:schemaLocation="http://www.springframework.org/schema/beans

       http://www.springframework.org/schema/beans/spring-beans.xsd

       http://www.springframework.org/schema/rabbit

       http://www.springframework.org/schema/rabbit/spring-rabbit.xsd">

    <rabbit:connection-factory id="rabbitConnectionFactory" host="${rabbit.host}" port="${rabbit.port}" username="${rabbit.username}"

            password="${rabbit.password}" requested-heartbeat="30" virtual-host="${rabbit.vhost}" channel-cache-size="50"/>

    <!-- 添加了一个连接工厂,参数从 properties 文件中取 -->

    <rabbit:connection-factory id="rabbitConnectionFactory1" host="${rabbit.host1}" port="${rabbit.port1}" username="${rabbit.username1}"

       password="${rabbit.password1}" requested-heartbeat="30" virtual-host="${rabbit.vhost1}" channel-cache-size="50"/>

    <!-- 添加 SimpleRoutingConnectionFactory 配置,将两个 Connection factory 配置好-->

    <bean id="connectionFactory" class="org.springframework.amqp.rabbit.connection.SimpleRoutingConnectionFactory">

        <property name="targetConnectionFactories">

            <map>

                <entry key="rabbitConnectionFactory" value-ref="rabbitConnectionFactory"/>

                <entry key="rabbitConnectionFactory1" value-ref="rabbitConnectionFactory1"/>

            </map>

        </property>

    </bean>

    <rabbit:admin id="rabbitAdmin" connection-factory="connectionFactory"/>

    <!-- 由于增加了一个连接工厂,ContainerFactory 的连接工厂改为新增的 ConnectionFactory  -->

    <bean id="rabbitListenerContainerFactory"

          class="org.springframework.amqp.rabbit.config.SimpleRabbitListenerContainerFactory">

        <!-- <property name="connectionFactory" ref="rabbitConnectionFactory"/> -->

        <property name="connectionFactory" ref="connectionFactory"/>

        <property name="concurrentConsumers" value="16"/>

        <property name="maxConcurrentConsumers" value="50"/>

    </bean>

    <!-- queue declare,增加一个消息队列 -->

    <rabbit:queue durable="true" auto-delete="false" exclusive="false" name="queue.test"/>

    <rabbit:queue durable="true" auto-delete="false" exclusive="false" name="queue.test1"/>

    <!-- bind queue to exchange -->

    <rabbit:direct-exchange name="exchange" auto-delete="false" durable="true">

        <rabbit:bindings>

            <rabbit:binding queue="queue.test" key="rkey.test"></rabbit:binding>

            <rabbit:binding queue="queue.test1" key="rkey.test1"></rabbit:binding>

        </rabbit:bindings>

    </rabbit:direct-exchange>

    <!-- connection-factory 改为新增的 ConnectionFactory -->

    <rabbit:template id="rabbitTemplate" connection-factory="connectionFactory" retry-template="retryTemplate" reply-timeout="60000"/>

    <bean id="retryTemplate" class="org.springframework.retry.support.RetryTemplate">

        <property name="backOffPolicy">

            <bean class="org.springframework.retry.backoff.ExponentialBackOffPolicy">

                <property name="initialInterval" value="500"/>

                <property name="multiplier" value="10.0"/>

                <property name="maxInterval" value="10000"/>

            </bean>

        </property>

    </bean>

</beans>
改动都写在注释里了,主要就是增加了一个连接工厂的配置,其他配置做了一些相应的适配。
发消息的时候,需要指定连接工厂,也就是说,你要往哪个消息服务器发:
    @Test

    public void testSendMsg() {

        SimpleResourceHolder.bind(rabbitTemplate.getConnectionFactory(), "rabbitConnectionFactory");

        rabbitTemplate.convertAndSend("exchange", "rkey.test", "test");

        SimpleResourceHolder.unbind(rabbitTemplate.getConnectionFactory());

        SimpleResourceHolder.bind(rabbitTemplate.getConnectionFactory(), "rabbitConnectionFactory1");

        rabbitTemplate.convertAndSend("exchange", "rkey.test1", "test1");

        SimpleResourceHolder.unbind(rabbitTemplate.getConnectionFactory());

    }
在发消息之前调用 SimpleResourceHolder.bind 绑定要使用的工厂,发完之后,调用 unbind 解除绑定。将上述代码封装为两个工具类,更好。
然后,有一个大坑在前面。。。如何收消息?
发消息要绑定连接工厂,指明往哪个消息服务器上发,收的时候,同样得指定要从哪个消息服务器上收。最开始没想到这点,以为只要指定队列名称就可以,如下:
    @RabbitListener(queues = "queue.test")

    public void receiveMsg(Message message) {

        String msg = new String(message.getBody());

        System.out.println(msg);

    }
然并卵,报了异常:
java.lang.IllegalStateException: Cannot determine target ConnectionFactory for lookup key [null]

    at org.springframework.amqp.rabbit.connection.AbstractRoutingConnectionFactory.determineTargetConnectionFactory(AbstractRoutingConnectionFactory.java:116) ~[spring-rabbit-1.5.1.RELEASE.jar:na]

    at org.springframework.amqp.rabbit.connection.AbstractRoutingConnectionFactory.createConnection(AbstractRoutingConnectionFactory.java:94) ~[spring-rabbit-1.5.1.RELEASE.jar:na]

    at org.springframework.amqp.rabbit.connection.ConnectionFactoryUtils$1.createConnection(ConnectionFactoryUtils.java:80) ~[spring-rabbit-1.5.1.RELEASE.jar:na]

    at org.springframework.amqp.rabbit.connection.ConnectionFactoryUtils.doGetTransactionalResourceHolder(ConnectionFactoryUtils.java:130) ~[spring-rabbit-1.5.1.RELEASE.jar:na]

    at org.springframework.amqp.rabbit.connection.ConnectionFactoryUtils.getTransactionalResourceHolder(ConnectionFactoryUtils.java:67) ~[spring-rabbit-1.5.1.RELEASE.jar:na]

    at org.springframework.amqp.rabbit.listener.BlockingQueueConsumer.start(BlockingQueueConsumer.java:456) ~[spring-rabbit-1.5.1.RELEASE.jar:na]

    at org.springframework.amqp.rabbit.listener.SimpleMessageListenerContainer$AsyncMessageProcessingConsumer.run(SimpleMessageListenerContainer.java:1158) ~[spring-rabbit-1.5.1.RELEASE.jar:na]

    at java.lang.Thread.run(Thread.java:745) [na:1.8.0_45]
这个问题不好解决,查了很多资料都没用,比如这种方式:https://stackoverflow.com/questions/42784471/spring-amqp-mix-simpleroutingconnectionfactory-with-rabbitlistener 。
无奈之下,只能试着看看 Spring 的 AMQP 怎么实现,看看有没有解决的办法,最开始想的是继承 Spring 的某个类来实现。然而,看来看去,很是头大,没有结果。
最后无意间点到了 @RabbitListener 这个注解中,发现了有一个属性,瞬间感觉很兴奋,如下图:
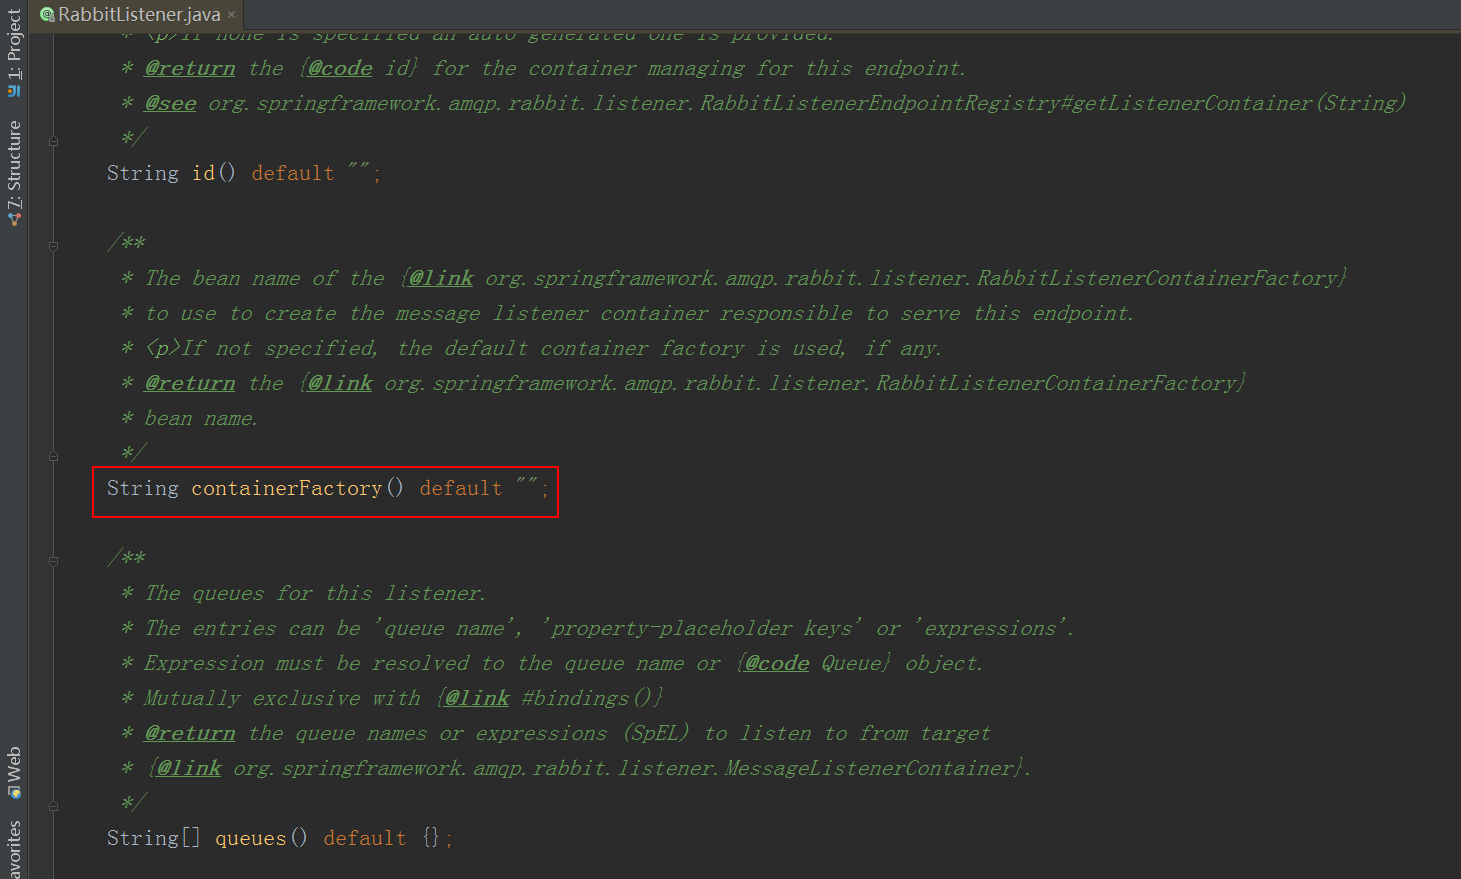
看了下注释,这里可以指定一个 containerFactory,感觉可以试试。首先只有一个 containerFactory,那就加一个吧。为了看的比较清晰,我把第一次添加的注释去掉了,于是配置成了这样:
<?xml version="1.0" encoding="UTF-8"?>

<beans xmlns="http://www.springframework.org/schema/beans"

       xmlns:xsi="http://www.w3.org/2001/XMLSchema-instance"

       xmlns:rabbit="http://www.springframework.org/schema/rabbit"

       xsi:schemaLocation="http://www.springframework.org/schema/beans

       http://www.springframework.org/schema/beans/spring-beans.xsd

       http://www.springframework.org/schema/rabbit

       http://www.springframework.org/schema/rabbit/spring-rabbit.xsd">

    <rabbit:connection-factory id="rabbitConnectionFactory" host="${rabbit.host}" port="${rabbit.port}" username="${rabbit.username}"

            password="${rabbit.password}" requested-heartbeat="30" virtual-host="${rabbit.vhost}" channel-cache-size="50"/>

    <rabbit:connection-factory id="rabbitConnectionFactory1" host="${rabbit.host1}" port="${rabbit.port1}" username="${rabbit.username1}"

       password="${rabbit.password1}" requested-heartbeat="30" virtual-host="${rabbit.vhost1}" channel-cache-size="50"/>

    <bean id="connectionFactory" class="org.springframework.amqp.rabbit.connection.SimpleRoutingConnectionFactory">

        <property name="targetConnectionFactories">

            <map>

                <entry key="rabbitConnectionFactory" value-ref="rabbitConnectionFactory"/>

                <entry key="rabbitConnectionFactory1" value-ref="rabbitConnectionFactory1"/>

            </map>

        </property>

    </bean>

    <rabbit:admin id="rabbitAdmin" connection-factory="rabbitConnectionFactory"/>

    <!-- 添加一个 rabbitAdmin-->

    <rabbit:admin id="rabbitAdmin1" connection-factory="rabbitConnectionFactory1"/>

    <!-- 把原有的 ContainerFactory 的连接工厂改为 rabbitConnectionFactory-->

    <bean id="rabbitListenerContainerFactory"

          class="org.springframework.amqp.rabbit.config.SimpleRabbitListenerContainerFactory">

        <property name="connectionFactory" ref="rabbitConnectionFactory"/>

        <property name="concurrentConsumers" value="16"/>

        <property name="maxConcurrentConsumers" value="50"/>

    </bean>

    <!-- 添加一个 ContainerFactory, 连接工厂为 rabbitConnectionFactory1-->

    <bean id="rabbitListenerContainerFactory1"

          class="org.springframework.amqp.rabbit.config.SimpleRabbitListenerContainerFactory">

        <property name="connectionFactory" ref="rabbitConnectionFactory1"/>

        <property name="concurrentConsumers" value="16"/>

        <property name="maxConcurrentConsumers" value="50"/>

    </bean>

    <rabbit:queue durable="true" auto-delete="false" exclusive="false" name="queue.test"/>

    <rabbit:queue durable="true" auto-delete="false" exclusive="false" name="queue.test1"/>

    <rabbit:direct-exchange name="exchange" auto-delete="false" durable="true">

        <rabbit:bindings>

            <rabbit:binding queue="queue.test" key="rkey.test"></rabbit:binding>

            <rabbit:binding queue="queue.test1" key="rkey.test1"></rabbit:binding>

        </rabbit:bindings>

    </rabbit:direct-exchange>

    <rabbit:template id="rabbitTemplate" connection-factory="connectionFactory" retry-template="retryTemplate" reply-timeout="60000"/>

    <bean id="retryTemplate" class="org.springframework.retry.support.RetryTemplate">

        <property name="backOffPolicy">

            <bean class="org.springframework.retry.backoff.ExponentialBackOffPolicy">

                <property name="initialInterval" value="500"/>

                <property name="multiplier" value="10.0"/>

                <property name="maxInterval" value="10000"/>

            </bean>

        </property>

    </bean>

</beans>
收消息的时候指定 container factory 即可:
    @RabbitListener(queues = "queue.test", containerFactory = "rabbitListenerContainerFactory")

    public void receiveMsg(Message message) {

        String msg = new String(message.getBody());

        System.out.println(msg);

    }
测试通过!
以上配置、解决办法是尝试过多次以后得出的,所以还是要有耐心,多尝试。
由于在网上没有找到解决办法,只有自己摸索着解决,如果大家有其他解决方案,欢迎留言讨论!
Spring AMQP + Rabbit 配置多数据源消息队列的更多相关文章
- Spring Boot + Mybatis 配置多数据源
Spring Boot + Mybatis 配置多数据源 Mybatis拦截器,字段名大写转小写 package com.sgcc.tysj.s.common.mybatis; import java ...
- spring读写分离(配置多数据源)[marked]
我们今天的主角是AbstractRoutingDataSource,在Spring2.0.1发布之后,引入了AbstractRoutingDataSource,使用该类可以实现普遍意义上的多数据源管理 ...
- [教程] Spring+Mybatis环境配置多数据源
一.简要概述 在做项目的时候遇到需要从两个数据源获取数据,项目使用的Spring + Mybatis环境,看到网上有一些关于多数据源的配置,自己也整理学习一下,然后自动切换实现从不同的数据源获取数据功 ...
- spring、spring boot中配置多数据源
在项目开发的过程中,有时我们有这样的需求,需要去调用别的系统中的数据,那么这个时候系统中就存在多个数据源了,那么我们如何来解决程序在运行的过程中到底是使用的那个数据源呢? 假设我们系统中存在2个数据源 ...
- Spring + JMS + ActiveMQ实现简单的消息队列(监听器异步实现)
首先声明:以下内容均是在网上找别人的博客综合学习而成的,可能会发现某些代码与其他博主的相同,由于参考的文章比较多,这里对你们表示感谢,就不一一列举,如果有侵权的地方,请通知我,我可以把该文章删除. 1 ...
- spring+activemq实战之配置监听多队列实现不同队列消息消费
摘选:https://my.oschina.net/u/3613230/blog/1457227 摘要: 最近在项目开发中,需要用到activemq,用的时候,发现在同一个项目中point-to-po ...
- 消息队列 RabbitMQ 与 Spring 整合使用
一.什么是 RabbitMQ RabbitMQ 是实现 AMQP(高级消息队列协议)的消息中间件的一种,最初起源于金融系统,用于在分布式系统中存储转发消息,在易用性.扩展性.高可用性等方面表现不俗.消 ...
- RabbitMQ AMQP (高级消息队列协议)
目录 RabbitMQ AMQP (高级消息队列协议) Message Queue 简介 概念 基本组成 场景及作用 AMQP简介 模型架构 基础组件 AMQP-RabbitMQ 简介 模型 特性 参 ...
- 消息队列之JMS和AMQP对比
https://blog.csdn.net/hpttlook/article/details/23391967 AMQP & JMS对比 初次接触消息队列时,在网上搜索,总是会提到如JMS.A ...
随机推荐
- win10 uwp 分治法
其实我想说Path,因为最近在做一个简单的分治. 算法涉及到了一个平面几何的知识.就是三角形p1p2p3的面积等于以下行列式的二分之一: 而且当点P3 在射线P1P2的左侧的时候,表达式为正,右侧表达 ...
- linux 守护进程编程
概述: Daemon运行在后台也称作"后台服务进程". 它是没有控制终端与之相连的进程.它独立于控制终端.通常周期的执行某种任务. 守护进程脱离终端是为了避免进程在执行过程中的信息 ...
- 浅谈Django的生命周期和CBF和FBC
Django的生命周期和CBF和FBC 对于所有的web框架来说本质就是一个socket服务端,浏览器是socket客户端,客户端和服务端通信,字符串(Http协议):请求头和请求体 响应头+响应体 ...
- 【前端】windows64位必备软件清单
目录 一.前言 二.日常必备 三.前端相关 四.个人习惯 一.前言 重做系统以后,安装各种软件就是挺烦人的一件事. 特地整理成文章,并且将相关软件上传到了百度网盘,省的以后再各种找资源了. 百度网盘下 ...
- ClassLoader 工作机制
ClassLoader 采用上级委托接待机制加载 class JVM 平台提供三层 ClassLoader 1.Bootstrap ClassLoader:主要加载 JVM 自身工作需要的类 2.Ex ...
- Integrates Git with Sublime 3 to pull or push to Github by using Sublime plugin Git
1. Git must be installed, Sublime plugin "Git" only connects Sublime with Git. Download UR ...
- LeetCode 112. Path Sum (二叉树路径之和)
Given a binary tree and a sum, determine if the tree has a root-to-leaf path such that adding up all ...
- Linux上安装二进制文件MySQL详解
前言:昨天晚上搞了很久,终于搞清楚mysql的安装配置了,我真是太low了.当我在云服务器上登进Mysql时,真是高兴哈哈,咱一步一步来,彻底搞懂Mysql的安装配置. 我的安装环境: 阿里云服务器 ...
- 2017 ICPC 广西邀请赛1005 CS Course
CS Course Time Limit: 4000/2000 MS (Java/Others) Memory Limit: 32768/32768 K (Java/Others)Total S ...
- Interviewe
Interviewe Time Limit: 2000/1000 MS (Java/Others) Memory Limit: 65536/32768 K (Java/Others) Total Su ...