GitLab 环境搭建【CentOS7】
RPM安装方式
https://mirrors.tuna.tsinghua.edu.cn/gitlab-ce/yum/el7

【最好给服务器分配至少4G内存】
先检查一下依赖:sshd
[root@localhost soft]# rpm -qa|grep openssh-server

openssh-server-.4p1-.el7.x86_64

[root@localhost soft]# ps -e|grep sshd

   ?        :: sshd

  ?        :: sshd

  ?        :: sshd
如果你没有,那么:
sudo yum install -y curl policycoreutils-python openssh-server

sudo systemctl enable sshd

sudo systemctl start sshd

sudo firewall-cmd --permanent --add-service=http

sudo systemctl reload firewalld
再检查一下postfix
[root@localhost soft]# rpm -qa|grep postfix

postfix-2.10.-.el7.x86_64

[root@localhost soft]# ps -e|grep postfix
如果你没有,那么
sudo yum install postfix

sudo systemctl enable postfix

sudo systemctl start postfix
..
最后找到你存放rpm目录并进入
[root@localhost soft]# wget https://mirrors.tuna.tsinghua.edu.cn/gitlab-ce/yum/el7/gitlab-ce-11.0.6-ce.0.el7.x86_64.rpm

---- ::--  https://mirrors.tuna.tsinghua.edu.cn/gitlab-ce/yum/el7/gitlab-ce-11.0.6-ce.0.el7.x86_64.rpm

Resolving mirrors.tuna.tsinghua.edu.cn (mirrors.tuna.tsinghua.edu.cn)... 101.6.8.193, :f000:::::

Connecting to mirrors.tuna.tsinghua.edu.cn (mirrors.tuna.tsinghua.edu.cn)|101.6.8.193|:... connected.

HTTP request sent, awaiting response...  OK

Length:  (416M) [application/x-redhat-package-manager]

Saving to: ‘gitlab-ce-11.0.-ce..el7.x86_64.rpm’

%[=========================================================================================================================================================>] ,, .50MB/s   in 4m 37s

-- :: (1.50 MB/s) - ‘gitlab-ce-11.0.-ce..el7.x86_64.rpm’ saved [/]
..查看
[root@localhost soft]# ll

total

-rw-r--r--.  root root  Sep   : gitlab-ce-11.0.6-ce.0.el7.x86_64.rpm

-rw-r--r--.  root root  Mar  : jdk-8u161-linux-x64.tar.gz

-rw-r--r--.  root root   Mar  : kafka_2.11-1.0.1.tgz

-rw-r--r--.  root root   Mar  : zookeeper-3.4.11.tar.gz

[root@localhost soft]#
安装
[root@localhost soft]# rpm -ivh gitlab-ce-11.0.-ce..el7.x86_64.rpm

warning: gitlab-ce-11.0.-ce..el7.x86_64.rpm: Header V4 RSA/SHA1 Signature, key ID f27eab47: NOKEY

Preparing...                          ################################# [%]

Updating / installing...

   :gitlab-ce-11.0.-ce..el7        ################################# [%]

It looks like GitLab has not been configured yet; skipping the upgrade script.

       *.                  *.

      ***                 ***

     *****               *****

    .******             *******

    ********            ********

   ,,,,,,,,,***********,,,,,,,,,

  ,,,,,,,,,,,*********,,,,,,,,,,,

  .,,,,,,,,,,,*******,,,,,,,,,,,,

      ,,,,,,,,,*****,,,,,,,,,.

         ,,,,,,,****,,,,,,

            .,,,***,,,,

                ,*,.

     _______ __  __          __

    / ____(_) /_/ /   ____ _/ /_

   / / __/ / __/ /   / __ `/ __ \

  / /_/ / / /_/ /___/ /_/ / /_/ /

  \____/_/\__/_____/\__,_/_.___/

Thank you for installing GitLab!

GitLab was unable to detect a valid hostname for your instance.

Please configure a URL for your GitLab instance by setting `external_url`

configuration in /etc/gitlab/gitlab.rb file.

Then, you can start your GitLab instance by running the following command:

  sudo gitlab-ctl reconfigure

For a comprehensive list of configuration options please see the Omnibus GitLab readme

https://gitlab.com/gitlab-org/omnibus-gitlab/blob/master/README.md
然后编辑
vim /etc/gitlab/gitlab.rb
修改

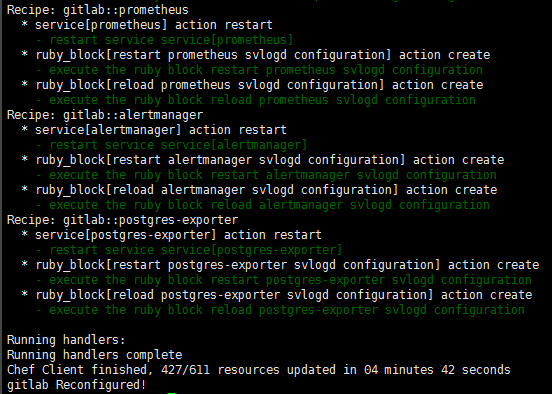
然后执行
gitlab-ctl reconfigure
..
..启动
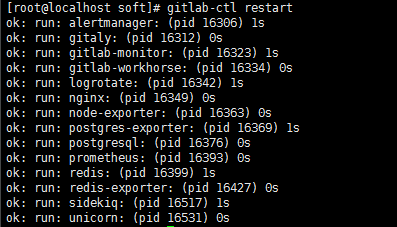
gitlab-ctl restart
..
..
查看端口占用
[root@localhost soft]# netstat -tunlp

Active Internet connections (only servers)

Proto Recv-Q Send-Q Local Address           Foreign Address         State       PID/Program name

tcp               127.0.0.1:          0.0.0.0:*               LISTEN      /node_exporter

tcp               127.0.0.1:          0.0.0.0:*               LISTEN      /gitlab-workho

tcp               0.0.0.0:             0.0.0.0:*               LISTEN      /systemd

tcp               127.0.0.1:          0.0.0.0:*               LISTEN      /unicorn maste

tcp               127.0.0.1:          0.0.0.0:*               LISTEN      /ruby

tcp        0      0 0.0.0.0:80              0.0.0.0:*               LISTEN      18765/nginx: master

tcp               127.0.0.1:          0.0.0.0:*               LISTEN      /sidekiq 5.1.

tcp               127.0.0.1:          0.0.0.0:*               LISTEN      /gitaly

tcp               192.168.122.1:        0.0.0.0:*               LISTEN      /dnsmasq

tcp               0.0.0.0:              0.0.0.0:*               LISTEN      /sshd

tcp               127.0.0.1:           0.0.0.0:*               LISTEN      /cupsd

tcp               127.0.0.1:            0.0.0.0:*               LISTEN      /master

tcp               0.0.0.0:            0.0.0.0:*               LISTEN      /nginx: master

tcp               0.0.0.0:            0.0.0.0:*               LISTEN      /alertmanager

tcp               127.0.0.1:          0.0.0.0:*               LISTEN      /redis_exporte

tcp               127.0.0.1:          0.0.0.0:*               LISTEN      /prometheus

tcp               127.0.0.1:          0.0.0.0:*               LISTEN      /postgres_expo

tcp               127.0.0.1:          0.0.0.0:*               LISTEN      /alertmanager

tcp6              :::                  :::*                    LISTEN      /systemd

tcp6              :::                :::*                    LISTEN      /ruby

tcp6              :::                   :::*                    LISTEN      /sshd

tcp6              :::                 :::*                    LISTEN      /cupsd

tcp6              :::                  :::*                    LISTEN      /master

udp               0.0.0.0:           0.0.0.0:*                           /avahi-daemon: r

udp               0.0.0.0:            0.0.0.0:*                           /avahi-daemon: r

udp               192.168.122.1:        0.0.0.0:*                           /dnsmasq

udp               0.0.0.0:              0.0.0.0:*                           /dnsmasq

udp               0.0.0.0:              0.0.0.0:*                           /dhclient

udp               0.0.0.0:           0.0.0.0:*                           /dhclient

udp               127.0.0.1:           0.0.0.0:*                           /chronyd

udp6              :::                :::*                                /dhclient

udp6              :::                 :::*                                /chronyd
..
查看防火墙
[root@localhost soft]#  firewall-cmd --zone=public --list-ports

/tcp /tcp /tcp

[root@localhost soft]# firewall-cmd --zone=public --add-port=/tcp --permanent

success

[root@localhost soft]# firewall-cmd --reload

success
打开浏览器,访问

..会让你重置密码,并且至少8位,我输入的12345678。然后会让你登录,用户名是root,密码是你重置的那个

你可以创建用户,创建项目。还可以设置SSH Key。

到此就完成啦。
脚本安装
打开:https://packages.gitlab.com/gitlab/gitlab-ce/install
现在我们换一台机器
[root@localhost admin]# cd /soft/

[root@localhost soft]# curl -s https://packages.gitlab.com/install/repositories/gitlab/gitlab-ce/script.rpm.sh | bash

Detected operating system as centos/.

Checking for curl...

Detected curl...

Downloading repository file: https://packages.gitlab.com/install/repositories/gitlab/gitlab-ce/config_file.repo?os=centos&dist=7&source=script

done.

Installing pygpgme to verify GPG signatures...

Loaded plugins: fastestmirror, langpacks

base                                                                                                                                                                        | 3.6 kB  ::

extras                                                                                                                                                                      | 3.4 kB  ::

https://packages.gitlab.com/gitlab/gitlab-ce/el/7/SRPMS/repodata/repomd.xml: [Errno 12] Timeout on https://packages-gitlab-com.s3-accelerate.amazonaws.com/empty/rpm/repomd.xml?AWSAccessKeyId=AKIAJ74R7IHMTQVGFCEA&Signature=iiqnja2rIZZgVhZPOxxLPMg8vWI=&Expires=1537345200: (28, 'Operation timed out after 30827 milliseconds with 0 out of 0 bytes received')

Trying other mirror.
问题在于访问超时
我不玩了好吧~
GitLab 环境搭建【CentOS7】的更多相关文章
- 基于【 centos7】五 || GitLab环境搭建
一.基于Docker部署GitLab环境搭建 1.下载镜像 docker pull beginor/gitlab-ce:11.0.1-ce.0 2.创建GitLab 的配置 (etc) . 日志 (l ...
- 基于CentOS7.x gitlab环境搭建,卸载,汉化 --汉化篇
gitlab环境搭建,卸载,汉化--汉化篇 注意gitlab的版本需和汉化版本一致 安装git yum install -y git 下载最新的汉化包 cd git clone https://git ...
- 基于CentOS7.x gitlab环境搭建,卸载,汉化 --卸载篇
gitlab环境搭建,卸载,汉化 --卸载篇 完全卸载 停止gitlab gitlab-ctl stop 卸载gitlab rpm -e gitlab-ce 查看gitlab进程 ps aux | ...
- 基于CentOS7.x gitlab环境搭建,卸载,汉化 --搭建篇
gitlab环境搭建,卸载,汉化 --搭建篇 环境搭建 安装依赖软件 yum -y install policycoreutils openssh-server openssh-clients pos ...
- LNMP环境搭建--Centos7
LNMP环境搭建--Centos7 | 刘鹏--博客 盒子 盒子 博客 分类 搜索 文章目录 在Centos7环境安装LAMP环境,备忘哈哈. 准备 首先去官网下载php,nginx 编译安装php ...
- 基于Bitnami gitlab OVA包的gitlab 环境搭建
前言 最近在折腾gitlab,本篇记录搭建的过程方便以后查找 环境 Windows server + VMware 安装 为方便本次我们直接采用Bitnami的VOA安装包(VOA格式可同时兼容Vir ...
- gitlab环境搭建
企业级的git管理程序.最好用的之一吧.估计其它的也得叫之二. 怎么搭建呢? 2G以上配置的机器才可以搞. . 如下 安装需要注意的是.如果开了80端口,8080的需要修改配置文件 下面会提到 1. ...
- Hyperledger Fabric 开发环境搭建 centos7系统
一.安装GO语言 下载最新版的go 打开Terminal,输入命令(以下命令都是以root管理员的角色进行的) su 输入密码:***** wget https://storage.googleapi ...
- EOS2.0环境搭建-centos7
需要安装启动的有三个组件 nodes,keosd,cleos,看看三者的关系 nodeos:核心程序,用于启动eos节点服务,在后台运行,可以配置不同 插件.该进程负责账户管理.区块生成.共识建立,并 ...
随机推荐
- sun.misc.BASE64Encoder----》找不到jar包的解决方法
1.右键项目->属性->java bulid path->jre System Library->access rules->resolution选择accessible ...
- Vue学习目录
前面的话 近年来,前端框架发展火热,新的框架和名词不停地出现在开发者眼前,而且开发模式也产生了一定的变化.目前来看,前端MVVM框架的出现给开发者带来了不小的便利,其中的代表就有Angular.js. ...
- 【建模应用】PCA主成分分析原理详解
原文载于此:http://blog.csdn.net/zhongkelee/article/details/44064401 一.PCA简介 1. 相关背景 上完陈恩红老师的<机器学习与知识发现 ...
- Kibana-4.6.6 marvel插件license过期重新注册
1.注册新的license,https://register.elastic.co/marvel_register,注册完毕邮箱收取下载地址,将新的license下载到本地 2.到license所在目 ...
- linux查找符合条件的文件并删除
找到根目录下所有的以test开头的文件并把查找结果当做参数传给rm -rf命令进行删除: 1.find / -name “test*” |xargs rm -rf 2.find / -name “te ...
- Nginx+Tomcat 负载均衡集群
案例分析 通常情况下,一台Tomcat站点由于可能出现单点故障及无法应对多客户复杂多样性的请求等问题,不能单独应用于生产环境下,所以我们需要一套更可靠的解决方案来完善Web站点架构. Nginx是一款 ...
- windows 下 mysql服务的注册和删除
注册: mysqld --install 服务名 --defaults-file="C:\Mysql\mysql-5.7\my.ini" 删除 sc delete 服务名 停止服务 ...
- 用递归方法计算斐波那契数列(Recursion Fibonacci Sequence Python)
先科普一下什么叫斐波那契数列,以下内容摘自百度百科: 斐波那契数列(Fibonacci sequence),又称黄金分割数列.因意大利数学家列昂纳多·斐波那契(Leonardoda Fibonacci ...
- python爬取豆瓣前25个影片内容的正则表达式练习
通过python正则表达式获取豆瓣top250的第一页的25个影片排名,影片名字,影片连接,导演,主演,上映日期,国家,剧情,评分,评价人数的内容 网页html内容: <ol class=&qu ...
- python中raise的用法
有关于python里raise显示引发异常的方法: 当程序出错时,python会自动触发异常,也可以通过raise显示引发异常 一旦执行了raise语句,raise之后的语句不在执行 如果加入了try ...