Python-Urllib库详解
官方文档地址:https://docs.python.org/3/library/urllib.html
什么是Urllib:
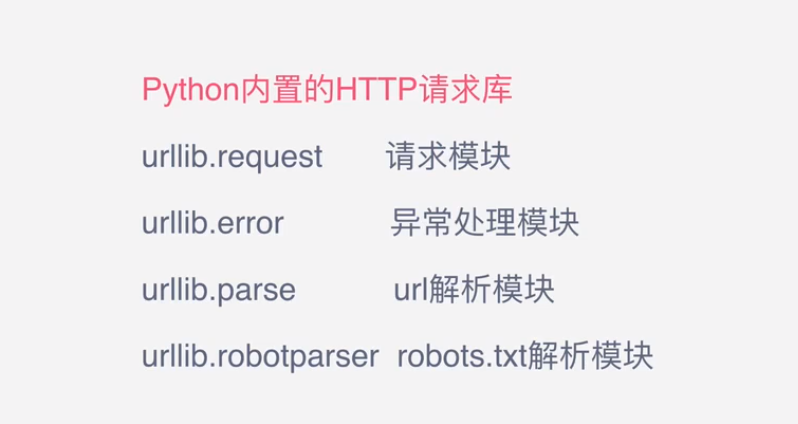
Urllib是python内置的HTTP请求库:
urllib.request 请求模块
urllib.error 异常处理模块
urllib.parse url解析模块
urllib.robotparser robots.txt解析模块
相比Python2:
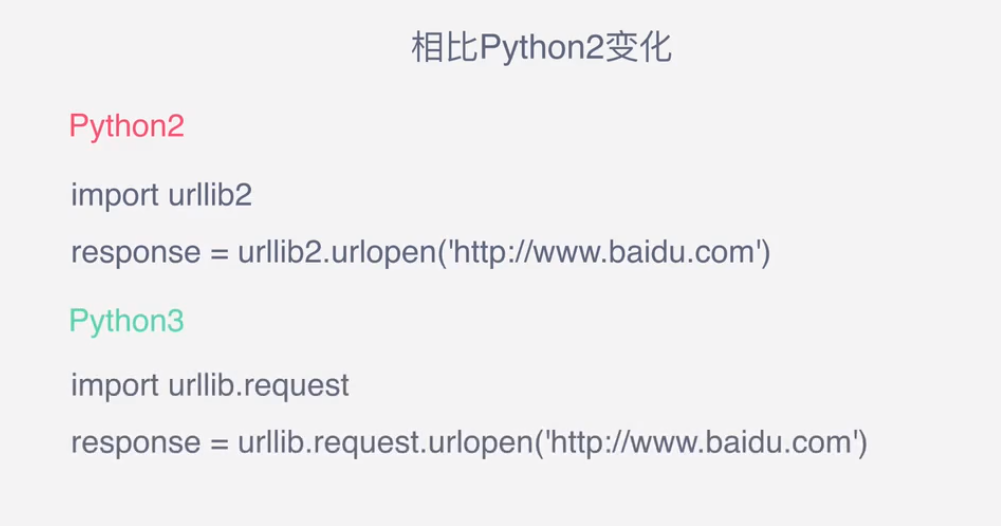
urlopen
关于urllib.request.urlopen参数的介绍:
urllib.request.urlopen(url, data=None, [timeout, ]*, cafile=None, capath=None, cadefault=False, context=None)
url参数的使用:
先写一个简单的例子:
import urllib.request

response = urllib.request.urlopen('http://www.baidu.com')

print(response.read().decode('utf-8'))
urlopen一般常用的有三个参数,它的参数如下:
urllib.requeset.urlopen(url,data,timeout)
response.read()可以获取到网页的内容,如果没有read(),将返回如下内容
data参数的使用
上述的例子是通过请求百度的get请求获得百度,下面使用urllib的post请求
这里通过http://httpbin.org/post网站演示(该网站可以作为练习使用urllib的一个站点使用,可以
模拟各种请求操作)。
import urllib.parse

import urllib.request

data = bytes(urllib.parse.urlencode({'word': 'hello'}), encoding='utf8')

print(data)

response = urllib.request.urlopen('http://httpbin.org/post', data=data)

print(response.read())
这里就用到urllib.parse,通过bytes(urllib.parse.urlencode())可以将post数据进行转换放到urllib.request.urlopen的data参数中。这样就完成了一次post请求。
所以如果我们添加data参数的时候就是以post请求方式请求,如果没有data参数就是get请求方式
timeout参数的使用
在某些网络情况不好或者服务器端异常的情况会出现请求慢的情况,或者请求异常,所以这个时候我们需要给
请求设置一个超时时间,而不是让程序一直在等待结果。例子如下:
import urllib.request

response = urllib.request.urlopen('http://httpbin.org/get', timeout=1)

print(response.read())
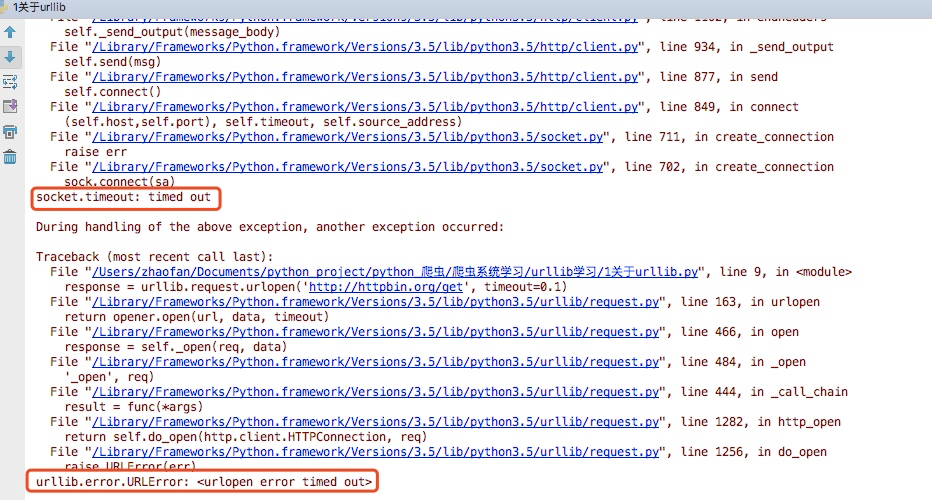
运行之后我们看到可以正常的返回结果,接着我们将timeout时间设置为0.1
运行程序会提示如下错误
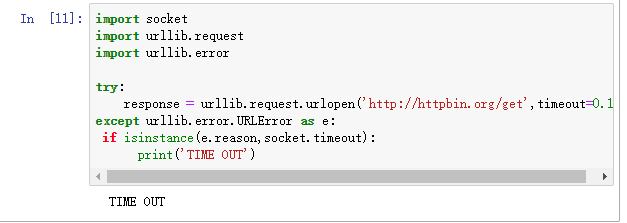
import socket

import urllib.request

import urllib.error

try:

    response = urllib.request.urlopen('http://httpbin.org/get',timeout=0.1)

except urllib.error.URLError as e:

 if isinstance(e.reason,socket.timeout):

      print('TIME OUT')
响应
响应类型、状态码、响应头
import urllib.request

response = urllib.request.urlopen('https://www.python.org')

print(type(response))
可以看到结果为:<class 'http.client.httpresponse'="">
我们可以通过response.status、response.getheaders().response.getheader("server"),获取状态码以及头部信息
response.read()获得的是响应体的内容
import urllib.request

response = urllib.request.urlopen('http://www.python.org')

print(response.status)

print(response.getheaders())

print(response.getheader('Server'))
当然上述的urlopen只能用于一些简单的请求,因为它无法添加一些header信息,如果后面写爬虫我们可以知道,很多情况下我们是需要添加头部信息去访问目标站的,这个时候就用到了urllib.request
request
设置Headers
有很多网站为了防止程序爬虫爬网站造成网站瘫痪,会需要携带一些headers头部信息才能访问,最长见的有user-agent参数
写一个简单的例子:
import urllib.request

request = urllib.request.Request('https://python.org')

response = urllib.request.urlopen(request)

print(response.read().decode('utf-8'))
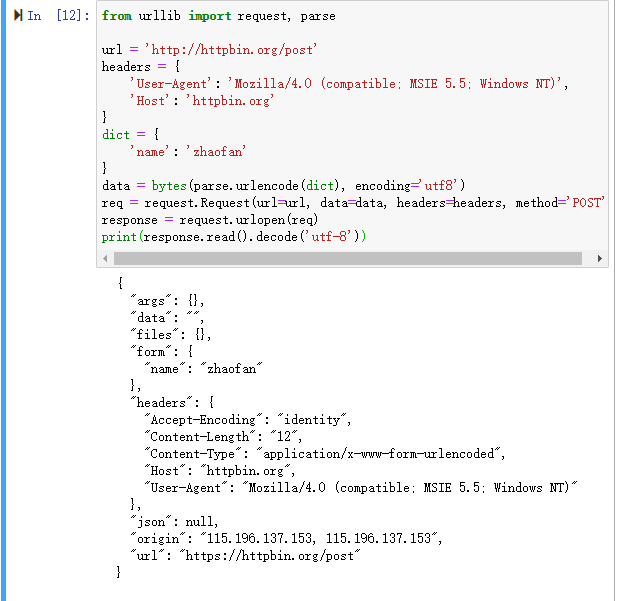
给请求添加头部信息,从而定制自己请求网站是时的头部信息
from urllib import request, parse

url = 'http://httpbin.org/post'

headers = {

    'User-Agent': 'Mozilla/4.0 (compatible; MSIE 5.5; Windows NT)',

    'Host': 'httpbin.org'

}

dict = {

    'name': 'zhaofan'

}

data = bytes(parse.urlencode(dict), encoding='utf8')

req = request.Request(url=url, data=data, headers=headers, method='POST')

response = request.urlopen(req)

print(response.read().decode('utf-8'))
添加请求头的第二种方式:
一样的效果
from urllib import request, parse

url = 'http://httpbin.org/post'

dict = {

    'name': 'Germey'

}

data = bytes(parse.urlencode(dict), encoding='utf8')

req = request.Request(url=url, data=data, method='POST')

req.add_header('User-Agent', 'Mozilla/4.0 (compatible; MSIE 5.5; Windows NT)')

response = request.urlopen(req)

print(response.read().decode('utf-8'))
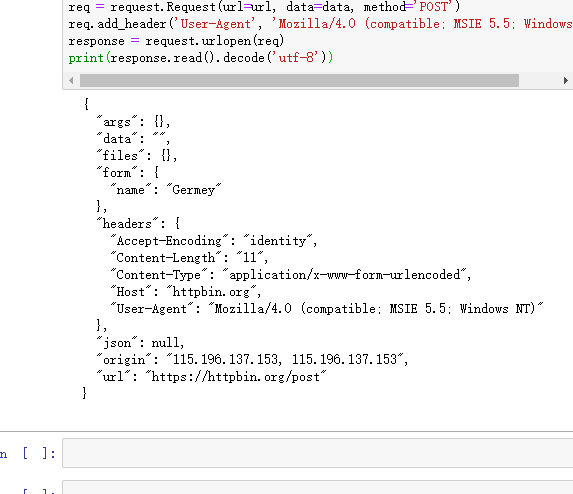
这种添加方式有个好处是自己可以定义一个请求头字典,然后循环进行添加
高级用法各种handler
代理,ProxyHandler
通过rulllib.request.ProxyHandler()可以设置代理,网站它会检测某一段时间某个IP 的访问次数,如果访问次数过多,它会禁止你的访问,所以这个时候需要通过设置代理来爬取数据
import urllib.request

proxy_handler = urllib.request.ProxyHandler({

    'http': 'http://127.0.0.1:9743',

    'https': 'https://127.0.0.1:9743'

})

opener = urllib.request.build_opener(proxy_handler)

response = opener.open('http://httpbin.org/get')

print(response.read())

cookie,HTTPCookiProcessor
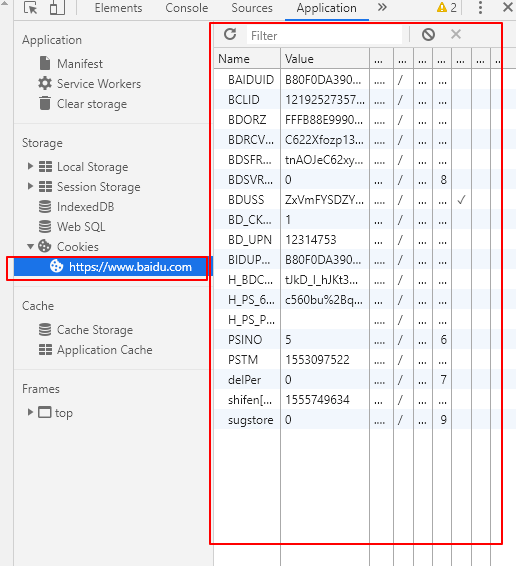
cookie中保存中我们常见的登录信息,有时候爬取网站需要携带cookie信息访问,这里用到了http.cookijar,用于获取cookie以及存储cookie
import http.cookiejar, urllib.request

cookie = http.cookiejar.CookieJar()

handler = urllib.request.HTTPCookieProcessor(cookie)

opener = urllib.request.build_opener(handler)

response = opener.open('http://www.baidu.com')

for item in cookie:

    print(item.name+"="+item.value)
同时cookie可以写入到文件中保存,有两种方式http.cookiejar.MozillaCookieJar和http.cookiejar.LWPCookieJar(),当然你自己用哪种方式都可以
具体代码例子如下:
http.cookiejar.MozillaCookieJar()方式
import http.cookiejar, urllib.request

filename = "cookie.txt"

cookie = http.cookiejar.MozillaCookieJar(filename)

handler = urllib.request.HTTPCookieProcessor(cookie)

opener = urllib.request.build_opener(handler)

response = opener.open('http://www.baidu.com')

cookie.save(ignore_discard=True, ignore_expires=True)
在工作目录下生成 cookie.txt 的文件:

http.cookiejar.LWPCookieJar()方式:和上一种方式有所不同采用的是 : LWP-Cookies-2.0 的方法
import http.cookiejar, urllib.request

filename = 'cookie.txt'

cookie = http.cookiejar.LWPCookieJar(filename)

handler = urllib.request.HTTPCookieProcessor(cookie)

opener = urllib.request.build_opener(handler)

response = opener.open('http://www.baidu.com')

cookie.save(ignore_discard=True, ignore_expires=True)

同样的如果想要通过获取文件中的cookie获取的话可以通过load方式,当然用哪种方式写入的,就用哪种方式读取。
import http.cookiejar, urllib.request

cookie = http.cookiejar.LWPCookieJar()

cookie.load('cookie.txt', ignore_discard=True, ignore_expires=True)

handler = urllib.request.HTTPCookieProcessor(cookie)

opener = urllib.request.build_opener(handler)

response = opener.open('http://www.baidu.com')

print(response.read().decode('utf-8'))
异常处理
在很多时候我们通过程序访问页面的时候,有的页面可能会出现错误,类似404,500等错误
这个时候就需要我们捕捉异常,下面先写一个简单的例子
from urllib import request,error

try:

    response = request.urlopen("http://pythonsite.com/1111.html")

except error.URLError as e:

    print(e.reason)

上述代码访问的是一个不存在的页面,通过捕捉异常,我们可以打印异常错误
这里我们需要知道的是在urllb异常这里有两个个异常错误:
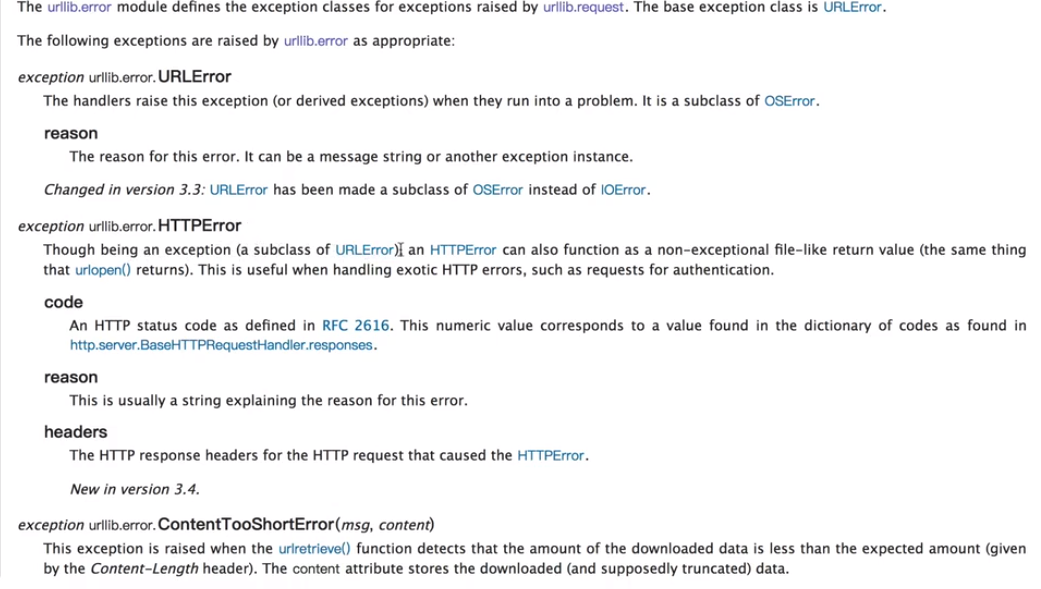
URLError,HTTPError,HTTPError是URLError的子类
URLError里只有一个属性:reason,即抓异常的时候只能打印错误信息,类似上面的例子
HTTPError里有三个属性:code,reason,headers,即抓异常的时候可以获得code,reson,headers三个信息,例子如下:
在捕抓error时应该先捕抓 HTTPError 再捕抓 URLError:
from urllib import request,error

try:

    response = request.urlopen("http://pythonsite.com/1111.html")

except error.HTTPError as e:

    print(e.reason)

    print(e.code)

    print(e.headers)

except error.URLError as e:

    print(e.reason)

else:

    print("reqeust successfully")
同时,e.reason其实也可以在做深入的判断,例子如下:
import socket

from urllib import error,request

try:

    response = request.urlopen("http://www.pythonsite.com/",timeout=0.001)

except error.URLError as e:

    print(type(e.reason))

    if isinstance(e.reason,socket.timeout):

        print("time out")
URL解析
urlparse
The URL parsing functions focus on splitting a URL string into its components, or on combining URL components into a URL string.
urllib.parse.urlparse(urlstring, scheme='', allow_fragments=True)
功能一:
from urllib.parse import urlparse

result = urlparse("http://www.baidu.com/index.html;user?id=5#comment")

print(result)
结果为:

from urllib.parse import urlparse

result = urlparse("http://www.baidu.com/index.html;user?id=5#comment")

print(type(result), result)
# <class 'urllib.parse.ParseResult'> ParseResult(scheme='http', netloc='www.baidu.com', path='/index.html', params='user', query='id=5', fragment='comment')
from urllib.parse import urlparse

result = urlparse("http://www.baidu.com/index.html;user?id=5#comment")

print(result)
#ParseResult(scheme='http', netloc='www.baidu.com', path='/index.html', params='user', query='id=5', fragment='comment')
scheme 给一个默认参数:原本存在http协议时 忽略 scheme:
from urllib.parse import urlparse

result = urlparse("www.baidu.com/index.html;user?id=5#comment", scheme='https')

print(result)
#ParseResult(scheme='http', netloc='www.baidu.com', path='/index.html', params='user', query='id=5', fragment='comment')
from urllib.parse import urlparse

result = urlparse("http://www.baidu.com/index.html;user?id=5#comment", scheme='https')

print(result)
#ParseResult(scheme='http', netloc='www.baidu.com', path='/index.html', params='user', query='id=5', fragment='comment')
from urllib.parse import urlparse

result = urlparse("http://www.baidu.com/index.html;user?id=5#comment", allow_fragments=False)

print(result)
#ParseResult(scheme='http', netloc='www.baidu.com', path='/index.html', params='user', query='id=5#comment', fragment='')
from urllib.parse import urlparse

result = urlparse("http://www.baidu.com/index.html#comment", allow_fragments=False)

print(result)
#ParseResult(scheme='http', netloc='www.baidu.com', path='/index.html#comment', params='', query='', fragment='')
这里就是可以对你传入的url地址进行拆分
同时我们是可以指定协议类型:
result = urlparse("www.baidu.com/index.html;user?id=5#comment",scheme="https")
这样拆分的时候协议类型部分就会是你指定的部分,当然如果你的url里面已经带了协议,你再通过scheme指定的协议就不会生效
urlunparse
其实功能和urlparse的功能相反,它是用于拼接,例子如下:
from urllib.parse import urlunparse

data = ['http','www.baidu.com','index.html','user','a=123','commit']

print(urlunparse(data))
结果如下

urljoin
这个的功能其实是做拼接的,例子如下:
from urllib.parse import urljoin

print(urljoin('http://www.baidu.com', 'FAQ.html'))

print(urljoin('http://www.baidu.com', 'https://pythonsite.com/FAQ.html'))

print(urljoin('http://www.baidu.com/about.html', 'https://pythonsite.com/FAQ.html'))

print(urljoin('http://www.baidu.com/about.html', 'https://pythonsite.com/FAQ.html?question=2'))

print(urljoin('http://www.baidu.com?wd=abc', 'https://pythonsite.com/index.php'))

print(urljoin('http://www.baidu.com', '?category=2#comment'))

print(urljoin('www.baidu.com', '?category=2#comment'))

print(urljoin('www.baidu.com#comment', '?category=2'))
结果为:

从拼接的结果我们可以看出,拼接的时候后面的优先级高于前面的url
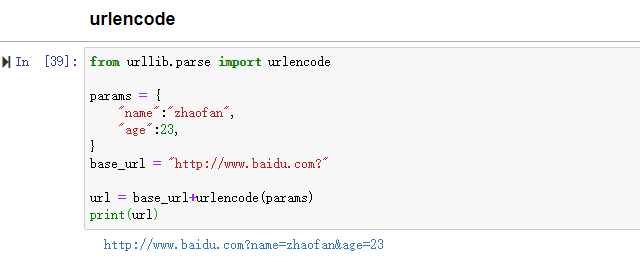
urlencode
这个方法可以将字典转换为url参数,例子如下
from urllib.parse import urlencode

params = {

    "name":"zhaofan",

    "age":23,

}

base_url = "http://www.baidu.com?"

url = base_url+urlencode(params)

print(url)
结果为:

Python-Urllib库详解的更多相关文章
- Python爬虫系列-Urllib库详解
Urllib库详解 Python内置的Http请求库: * urllib.request 请求模块 * urllib.error 异常处理模块 * urllib.parse url解析模块 * url ...
- 爬虫入门之urllib库详解(二)
爬虫入门之urllib库详解(二) 1 urllib模块 urllib模块是一个运用于URL的包 urllib.request用于访问和读取URLS urllib.error包括了所有urllib.r ...
- Python turtle库详解
Python turtle库详解 Turtle库是Python语言中一个很流行的绘制图像的函数库,想象一个小乌龟,在一个横轴为x.纵轴为y的坐标系原点,(0,0)位置开始,它根据一组函数指令的控制,在 ...
- Python urllib模块详解
在Python 2中,有urllib和urllib2两个库来实现请求的发送.而在Python 3中,已经不存在urllib2这个库了,统一为urllib,其官方文档链接为:https://docs.p ...
- python爬虫知识点总结(三)urllib库详解
一.什么是Urllib? 官方学习文档:https://docs.python.org/3/library/urllib.html 廖雪峰的网站:https://www.liaoxuefeng.com ...
- urllib库详解 --Python3
相关:urllib是python内置的http请求库,本文介绍urllib三个模块:请求模块urllib.request.异常处理模块urllib.error.url解析模块urllib.parse. ...
- 爬虫(二):Urllib库详解
什么是Urllib: python内置的HTTP请求库 urllib.request : 请求模块 urllib.error : 异常处理模块 urllib.parse: url解析模块 urllib ...
- 爬虫--Urllib库详解
1.什么是Urllib? 2.相比Python2的变化 3.用法讲解 (1)urlopen urlllb.request.urlopen(url,data=None[timeout,],cahle=N ...
- Python optparser库详解
一直以来对optparser不是特别的理解,今天就狠下心,静下心研究了一下这个库.当然了,不敢说理解的很到位,但是足以应付正常的使用了.废话不多说,开始今天的分享吧. 简介 optparse模块主要用 ...
- python爬虫知识点详解
python爬虫知识点总结(一)库的安装 python爬虫知识点总结(二)爬虫的基本原理 python爬虫知识点总结(三)urllib库详解 python爬虫知识点总结(四)Requests库的基本使 ...
随机推荐
- mssql sqlserver SQL 位运算举例权限应用
摘要: 下文通过举例的方式讲述sqlserver中位运算的相关知识,如下所示: 实验环境:sqlserver 2008 R2 在sqlserver的权限设置,我们通常使用1.2.4.8.16.32.6 ...
- innodb二阶段日志提交机制和组提交解析
前些天在查看关于innodb_flush_log_at_trx_commit的官网解释时产生了一些疑问,关于innodb_flush_log_at_trx_commit参数的详细解释参见官网: htt ...
- e lisp 常用缓冲区函数详解
e lisp 常用缓冲区函数详解 函数名 函数概要 buffer-name 返回当前缓冲区的名字 buffer-file-name 返回当前缓冲区所指文件的名字,包括路径 current-buffer ...
- C语言 统计一串字符中空格键、Tab键、回车键、字母、数字及其他字符的个数(Ctrl+Z终止输入)
//凯鲁嘎吉 - 博客园 http://www.cnblogs.com/kailugaji/ #include<stdio.h> void main(){ , num=, blank=, ...
- 微信小程序跳转微信小程序新增配置项目 navigateToMiniProgramAppIdList
每个小程序可跳转的其他小程序数量限制为不超过 10 个 从 2.4.0 版本以及指定日期(具体待定)开始,开发者提交新版小程序代码时,如使用了跳转其他小程序功能,则需要在代码配置中声明将要跳转的小程序 ...
- html 标签学习(续)
一.基础标签补充 1.div 标签和span标签 (没有特别的样式,常用) div标签用来定义一个块级元素,并无实际的意义.主要通过CSS样式为其赋予不同的表现. span标签用来定义内联(行内)元素 ...
- docker1.13.1的安装与卸载及mysql5.5安装实例
docker中国官方地址:https://www.docker-cn.com/ 您可以使用以下命令直接从该镜像加速地址进行拉取: $ docker pull registry.docker-cn.co ...
- C# 生成和解析二维码
下面是C#和JAVA两个版本的开放源码下载: C#:http://www.codeproject.com/Articles/20574/Open-Source-QRCode-Library JAVA: ...
- 直接运行vue+django项目
直接运行vue+django项目 下载前后端代码 wget https://files.cnblogs.com/files/pyyu/luffy_boy.zip wget https://files. ...
- AlexeyAB大神版yolo 待完善
目录 darknet优化经验 1. AlexeyAB改进项 2. Linux下编译选项 3. 训练经验 4. 提升检测效果 5. 总结 6. AlexeyAB大神改进 darknet优化经验 主要来自 ...
