CentOS7系列--1.2CentOS7基本设置
CentOS7基本设置
1. 查看相关信息
1.1. 查看系统信息
1.1.1. 查看系统位数
方法1:
[root@centos7 ~]# uname -a
Linux centos7.smartmap 3.10.0-514.el7.x86_64 #1 SMP Tue Nov 22 16:42:41 UTC 2016 x86_64 x86_64 x86_64 GNU/Linux
方法2:显示系统程序信息
[root@centos7 ~]# file /bin/ls
/bin/ls: ELF 64-bit LSB executable, x86-64, version 1 (SYSV), dynamically linked (uses shared libs), for GNU/Linux 2.6.32, BuildID[sha1]=3d705971a4c4544545cb78fd890d27bf792af6d4, stripped
方法3:
[root@centos7 ~]# cat /proc/version
Linux version 3.10.0-514.el7.x86_64 (builder@kbuilder.dev.centos.org) (gcc version 4.8.5 20150623 (Red Hat 4.8.5-11) (GCC) ) #1 SMP Tue Nov 22 16:42:41 UTC 2016
方法4:
(32位的系统中int类型和long类型一般都是4字节,64位的系统中int类型还是4字节的,但是long已变成了8字节inux系统中可用"getconf WORD_BIT"和"getconf LONG_BIT"获得word和long的位数。64位系统中应该分别得到32和64。)
[root@centos7 ~]# getconf LONG_BIT
64
1.1.2. 查看系统版本
方法1:
[root@centos7 ~]# lsb_release -a
方法2:
[root@centos7 ~]# cat /etc/os-release
NAME="CentOS Linux"
VERSION="7 (Core)"
ID="centos"
ID_LIKE="rhel fedora"
VERSION_ID="7"
PRETTY_NAME="CentOS Linux 7 (Core)"
ANSI_COLOR="0;31"
CPE_NAME="cpe:/o:centos:centos:7"
HOME_URL="https://www.centos.org/"
BUG_REPORT_URL="https://bugs.centos.org/"
CENTOS_MANTISBT_PROJECT="CentOS-7"
CENTOS_MANTISBT_PROJECT_VERSION="7"
REDHAT_SUPPORT_PRODUCT="centos"
REDHAT_SUPPORT_PRODUCT_VERSION="7"
方法3:
[root@centos7 ~]# cat /etc/redhat-release
CentOS Linux release 7.3.1611 (Core)
方法4:
[root@centos7 ~]# rpm -q centos-release
centos-release-7-3.1611.el7.centos.x86_64
1.1.3. 查看内核版本
方法1:
[root@centos7 ~]# cat /proc/version
Linux version 3.10.0-514.el7.x86_64 (builder@kbuilder.dev.centos.org) (gcc version 4.8.5 20150623 (Red Hat 4.8.5-11) (GCC) ) #1 SMP Tue Nov 22 16:42:41 UTC 2016
方法2:
[root@centos7 ~]# uname -a
Linux centos7.smartmap 3.10.0-514.el7.x86_64 #1 SMP Tue Nov 22 16:42:41 UTC 2016 x86_64 x86_64 x86_64 GNU/Linux
1.1.4. 查看默认语言
方法1:
[root@centos7 ~]# echo $LANG $LANGUAGE
en_US.UTF-8
1.2. 查看主机名
方法1:
[root@centos7 ~]# hostname
centos7.smartmap
方法2:
[root@centos7 ~]# cat /etc/hostname
centos7.smartmap
方法3:
[root@centos7 ~]# hostnamectl
Static hostname: centos7.smartmap
Icon name: computer-vm
Chassis: vm
Machine ID: 7f288507ab404a89bfcfc3030e334c3b
Boot ID: f8a46efd003c4e83bead7cb635cbc21a
Virtualization: vmware
Operating System: CentOS Linux 7 (Core)
CPE OS Name: cpe:/o:centos:centos:7
Kernel: Linux 3.10.0-514.el7.x86_64
Architecture: x86-64
方法4:
[root@centos7 ~]# nmcli general hostname
centos7.smartmap
1.3. 查看IP
/etc/sysconfig/network 说是全局设置,默认里面啥也没有,可以添加全局默认网关
/etc/hostname 用nmtui修改hostname后,主机名保存在这里
/etc/resolv.conf 保存DNS设置,不需要手工改,nmtui里面设置的DNS会出现在这里
/etc/sysconfig/network-scripts/ 连接配置信息 ifcfg 文件
/etc/NetworkManager/system-connections/ VPN、移动宽带、PPPoE连接
方法1:
[root@centos7 ~]# ip addr
1: lo: <LOOPBACK,UP,LOWER_UP> mtu 65536 qdisc noqueue state UNKNOWN qlen 1
link/loopback 00:00:00:00:00:00 brd 00:00:00:00:00:00
inet 127.0.0.1/8 scope host lo
valid_lft forever preferred_lft forever
inet6 ::1/128 scope host
valid_lft forever preferred_lft forever
2: ens33: <BROADCAST,MULTICAST,UP,LOWER_UP> mtu 1500 qdisc pfifo_fast state UP qlen 1000
link/ether 00:0c:29:56:e1:f1 brd ff:ff:ff:ff:ff:ff
inet 192.168.1.101/24 brd 192.168.1.255 scope global dynamic ens33
valid_lft 4765sec preferred_lft 4765sec
inet6 fe80::2eef:6152:a121:4867/64 scope link
valid_lft forever preferred_lft forever
方法2:
[root@centos7 ~]# nmcli
ens33: connected to ens33
"Intel 82545EM Gigabit Ethernet Controller (Copper) (PRO/1000 MT Single Port Adapter)"
ethernet (e1000), 00:0C:29:56:E1:F1, hw, mtu 1500
ip4 default
inet4 192.168.1.101/24
inet6 fe80::2eef:6152:a121:4867/64
lo: unmanaged
loopback (unknown), 00:00:00:00:00:00, sw, mtu 65536
Use "nmcli device show" to get complete information about known devices and
"nmcli connection show" to get an overview on active connection profiles.
Consult nmcli(1) and nmcli-examples(5) manual pages for complete usage details.
1.4. 查看网关
方法1:
[root@centos7 ~]# cat /etc/sysconfig/network
# Created by anaconda
NETWORKING=yes
HOSTNAME=appserver.smartmap.com
方法2:
1.5. 查看路由
方法1:
[root@centos7 ~]# ip route
default via 192.168.1.1 dev ens33 proto static metric 100
192.168.1.0/24 dev ens33 proto kernel scope link src 192.168.1.101 metric 100
方法2:
[root@centos7 ~]# ip route show
default via 192.168.1.1 dev ens33 proto static metric 100
192.168.1.0/24 dev ens33 proto kernel scope link src 192.168.1.101 metric 100
192.168.1.101 dev ens33 proto kernel scope link src 192.168.1.101 metric 100
1.6. 查看DNS
方法1:
[root@centos7 ~]# cat /etc/resolv.conf
# Generated by NetworkManager
search smartmap
nameserver 218.30.19.50
nameserver 61.134.1.5
2. 修改主机名
方法1:
[root@centos7 ~]# hostnamectl set-hostname appserver.smartmap
[root@centos7 ~]# hostname
appserver.smartmap
[root@centos7 ~]# cat /etc/hostname
192.168.1.110 appserver appserver.smartmap.com
方法2:
[root@centos7 ~]# nmcli general hostname centos7.smartmap
[root@centos7 ~]# hostname
centos7.smartmap
3. 修改IP
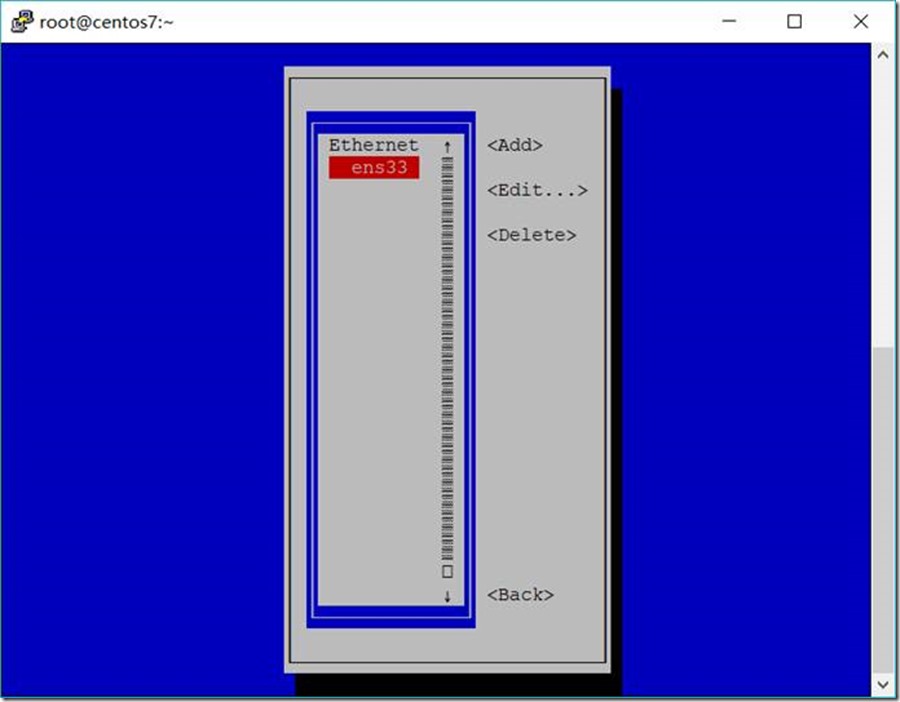
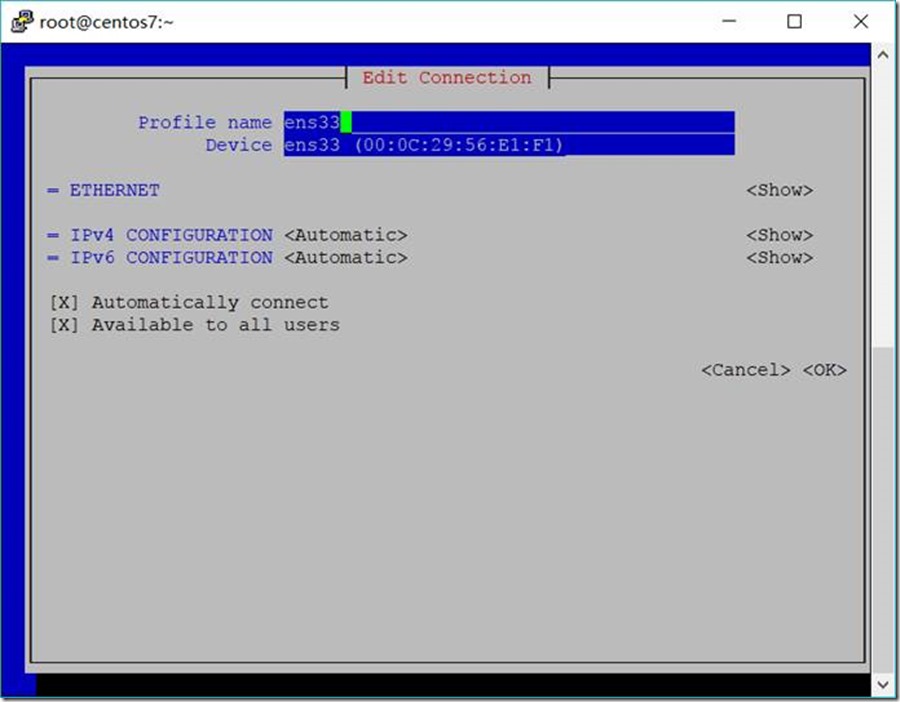
3.1. 应用nmtui的字符界面修改IP:
[root@centos7 ~]# nmtui


3.2. 应用nmcli的命令修改IP:
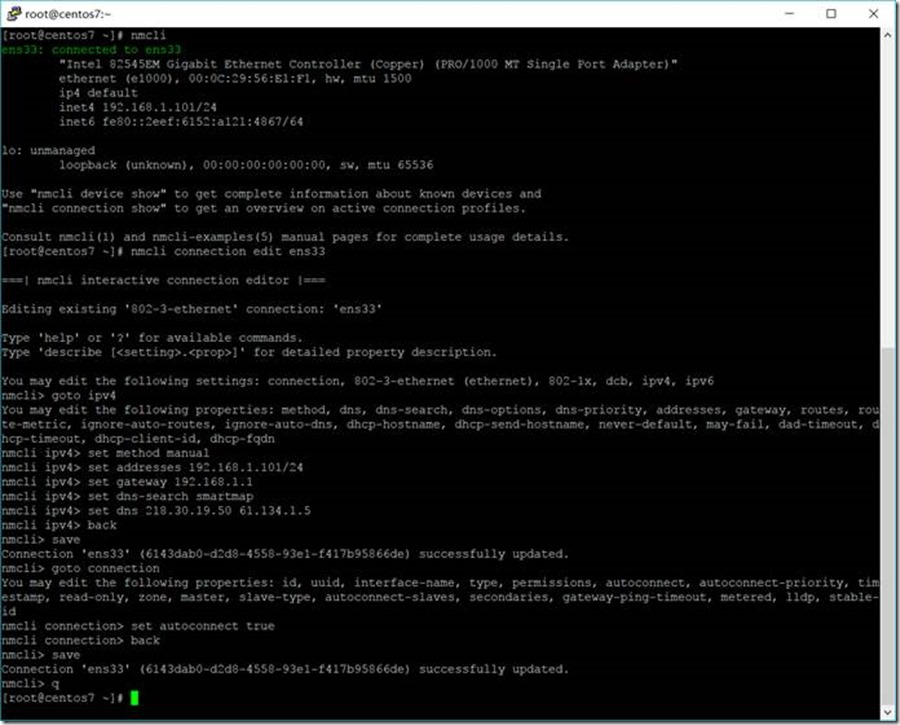
[root@centos7 ~]# nmcli
ens33: connected to ens33
"Intel 82545EM Gigabit Ethernet Controller (Copper) (PRO/1000 MT Single Port Adapter)"
ethernet (e1000), 00:0C:29:56:E1:F1, hw, mtu 1500
ip4 default
inet4 192.168.1.101/24
inet6 fe80::2eef:6152:a121:4867/64
lo: unmanaged
loopback (unknown), 00:00:00:00:00:00, sw, mtu 65536
Use "nmcli device show" to get complete information about known devices and
"nmcli connection show" to get an overview on active connection profiles.
Consult nmcli(1) and nmcli-examples(5) manual pages for complete usage details.
[root@centos7 ~]# nmcli connection edit ens33
===| nmcli interactive connection editor |===
Editing existing '802-3-ethernet' connection: 'ens33'
Type 'help' or '?' for available commands.
Type 'describe [<setting>.<prop>]' for detailed property description.
You may edit the following settings: connection, 802-3-ethernet (ethernet), 802-1x, dcb, ipv4, ipv6
nmcli> goto ipv4
You may edit the following properties: method, dns, dns-search, dns-options, dns-priority, addresses, gateway, routes, route-metric, ignore-auto-routes, ignore-auto-dns, dhcp-hostname, dhcp-send-hostname, never-default, may-fail, dad-timeout, dhcp-timeout, dhcp-client-id, dhcp-fqdn
nmcli ipv4> set method manual
nmcli ipv4> set addresses 192.168.1.101/24
nmcli ipv4> set gateway 192.168.1.1
nmcli ipv4> set dns-search smartmap
nmcli ipv4> set dns 218.30.19.50 61.134.1.5
nmcli ipv4> back
nmcli> save
Connection 'ens33' (6143dab0-d2d8-4558-93e1-f417b95866de) successfully updated.
nmcli> goto connection
You may edit the following properties: id, uuid, interface-name, type, permissions, autoconnect, autoconnect-priority, timestamp, read-only, zone, master, slave-type, autoconnect-slaves, secondaries, gateway-ping-timeout, metered, lldp, stable-id
nmcli connection> set autoconnect true
nmcli connection> back
nmcli> save
Connection 'ens33' (6143dab0-d2d8-4558-93e1-f417b95866de) successfully updated.
nmcli> q
查看修改结果
[root@centos7 ~]# cat /etc/sysconfig/network-scripts/ifcfg-ens33
TYPE=Ethernet
BOOTPROTO=none
DEFROUTE=yes
IPV4_FAILURE_FATAL=no
IPV6INIT=yes
IPV6_AUTOCONF=yes
IPV6_DEFROUTE=yes
IPV6_FAILURE_FATAL=no
IPV6_ADDR_GEN_MODE=stable-privacy
NAME=ens33
UUID=6143dab0-d2d8-4558-93e1-f417b95866de
DEVICE=ens33
ONBOOT=yes
DNS1=218.30.19.50
DNS2=61.134.1.5
DOMAIN=smartmap
IPADDR1=192.168.1.101
PREFIX1=32
IPADDR=192.168.1.101
PREFIX=24
GATEWAY=192.168.1.1
IPV6_PEERDNS=yes
IPV6_PEERROUTES=yes
IPV6_PRIVACY=no
4. 重启网卡
[root@centos7 ~]# systemctl restart network.service
5. 关闭selinux
[root@centos7 ~]# getenforce
Disabled
[root@centos7 ~]# vi /etc/sysconfig/selinux
修改SELINUX=enforcing为SELINUX=disabled
# This file controls the state of SELinux on the system.
# SELINUX= can take one of these three values:
# enforcing - SELinux security policy is enforced.
# permissive - SELinux prints warnings instead of enforcing.
# disabled - No SELinux policy is loaded.
SELINUX=disabled
# SELINUXTYPE= can take one of three two values:
# targeted - Targeted processes are protected,
# minimum - Modification of targeted policy. Only selected processes are protected.
# mls - Multi Level Security protection.
SELINUXTYPE=targeted
6. 关闭firewall
[root@centos7 ~]# systemctl status firewalld
● firewalld.service - firewalld - dynamic firewall daemon
Loaded: loaded (/usr/lib/systemd/system/firewalld.service; disabled; vendor preset: enabled)
Active: inactive (dead)
Docs: man:firewalld(1)
[root@centos7 ~]# systemctl stop firewalld.service
[root@centos7 ~]# systemctl disable firewalld.service
Removed symlink /etc/systemd/system/dbus-org.fedoraproject.FirewallD1.service.
Removed symlink /etc/systemd/system/basic.target.wants/firewalld.service.
[root@centos7 ~]# reboot
7. 系统更新
[root@centos7 ~]# yum -y update
参考: http://www.cnblogs.com/panblack/p/Centos7-WhatsNew-02-networking.html
CentOS7系列--1.2CentOS7基本设置的更多相关文章
- CentOS7系列--5.2CentOS7中配置和管理Docker
CentOS7配置和管理Docker Docker是操作系统级别的虚拟化工具,它能自动化布署在容器中的应用 1. 安装Docker 1.1. 安装Docker相关软件 [root@server1 ~] ...
- CentOS7系列--3.2CentOS7中配置iSCSI服务
CentOS7配置iSCSI服务 在网络上的存贮服务为iSCSI Target,而连接到iSCSI Target服务的叫iSCSI Initiator 1. 直接配置iSCSI Target服务 1. ...
- CentOS7系列--2.2CentOS7中配置SSH服务
CentOS7配置SSH服务 1. SSH配置 1.1. 使用SSH服务更加安全 [root@centos7 ~]# vi /etc/ssh/sshd_config 设置如下 PermitRootLo ...
- Android Studio系列教程二--基本设置与运行
Android Studio系列教程二--基本设置与运行 2014 年 11 月 28 日 DevTools 本文为个人原创,欢迎转载,但请务必在明显位置注明出处! 上面一篇博客,介绍了Studio的 ...
- CentOS7系列--安装Chrome浏览器
CentOS7系列--安装Chrome浏览器 1. 创建yum源文件 [root@server20 ~]# cd /etc/yum.repos.d/ [root@server20 yum.repos. ...
- cobbler部署centos6与centos7系列
cobbler部署centos6与centos7系列 转载自:http://www.jianshu.com/p/a4bed77bf40d 版权声明:完全抄自 http://www.jianshu.co ...
- 阿里云CentOS7系列三 -- 配置防火墙
前面讲到了安装JDK以及Tomcat.但是大家会发现,当我们访问 http:// XXX.XXX.XXX.XXX:8080/80 时候,tomcat 猫并没有出现.原因就是没有设置防火墙. 再次介绍下 ...
- 阿里云CentOS7系列二 -- 安装Tomcat7的方法
前面讲到了JDK在CentOS7 环境下的安装步骤.这次来分享安装Tomcat7的安装步骤: Tomcat7 安装包: 链接: http://pan.baidu.com/s/1geKwASN 密码: ...
- centos7系列Cobbler+kickstart全自动装机实战
配置yum源,以及epel源 [root@crobbler-90111 ~]# cat /etc/yum.repos.d/aliyun.repo [epel] name=ailiyun baseurl ...
随机推荐
- 设置User Agent
公司的前端要给项目的webview加一个区分,用来区别是iOS端访问.android访问还是在浏览器访问的,说是要加一个User Agent ,前端根据不同信息做适配,和我说来一头雾水,后来经过开发同 ...
- 【NOI2013】快餐店 环套树+线段树
题目大意:给你一颗环套树,你要在这棵的边上(包括端点)找一个点,使得离该点最远的点最近. 数据范围:$n≤10^5$,边权$≤10^9$. 此题不难看出一种暴力做法,我们依次断开环上的一条边,然后求整 ...
- 【learning】vim爆改记 (如何让vim用起来像devc++)
由于本蒟蒻NOIP人品大爆发,能去冬令营,故准备开始练习使用linux下的IDE:vim 在dalao DTZ的帮助下,我装好了vim,并做了最初的配置. 然而........好难用啊,怎么和devc ...
- 剑指offer四十七之求1+2+3+...+n
一.题目 求1+2+3+...+n,要求不能使用乘除法.for.while.if.else.switch.case等关键字及条件判断语句(A?B:C). 二.思路 1.需利用逻辑与的短路特性实现递归终 ...
- (转) rabbitmq应用场景
原文:http://blog.csdn.net/wangpengblog/article/details/76405598
- 48位MAC转化为唯一的128位IPV6地址
根据EUI_64规范,一个MAC地址生成唯一的一个IPV6地址. ①.反转MAC的第七位为1. ②.在24bit后加入FFFE. ③.在最前面加上FE80::. 示例:
- Android 开发工具类 17_setAlarm
Alarm 是在应用程序生命周期之外设置的,所以它们十分适合于调度定时更新或者数据查询,从而避免了在后台持续运行 Service.但触发 Alarm 时,就会广播指定的 Pending Intent. ...
- ES6-Array
/* * 数组解构赋值: * ES6允许按照一定模式,从数组和对象中提取值,对变量进行赋值,这种被称为解构. * 示例如下: */ var [a,b,c] = [1,2,3]; console.log ...
- Django如何让未登录的用户自动跳转至登录页
有多种方法可以实现: 使用Django自带的用户认证 from django.contrib.auth.decorators import login_required @login_required ...
- IOC给程序带来的好处
IOC(inversion of control)的中文解释是“控制反转”或者“依赖注入”,它的实现目的是:我们可以通过配置文件来控制程序的流程,达到程序代码的优化.初学者往往弄不清楚为什么我们可以通 ...