02.Redis主从集群的Sentinel配置
1.集群环境
192.168.110.100192.168.110.101192.168.110.102192.168.110.103
192.168.110.100启动多个Redis sentinel服务,构成Redis sentinel集群192.168.110.101启动Redis服务,设置成主节点192.168.110.102启动Redis服务,设置成192.168.110.101的从节点192.168.110.103启动Redis服务,设置成192.168.110.101的从节点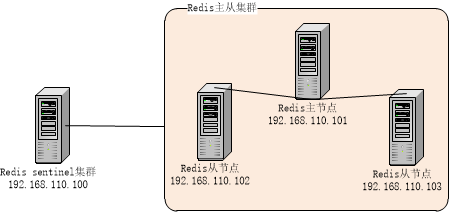
2.配置并启动Redis主从集群
# Master-Slave replication. Use slaveof to make a Redis instance a copy of# another Redis server. A few things to understand ASAP about Redis replication.## 1) Redis replication is asynchronous, but you can configure a master to# stop accepting writes if it appears to be not connected with at least# a given number of slaves.# 2) Redis slaves are able to perform a partial resynchronization with the# master if the replication link is lost for a relatively small amount of# time. You may want to configure the replication backlog size (see the next# sections of this file) with a sensible value depending on your needs.# 3) Replication is automatic and does not need user intervention. After a# network partition slaves automatically try to reconnect to masters# and resynchronize with them.## 主从同步。通过 slaveof 配置来实现Redis实例的备份。# 注意,这里是本地从远端复制数据。也就是说,本地可以有不同的数据库文件、绑定不同的IP、监听不同的端口。## slaveof <masterip> <masterport>slaveof 192.168.110.1016379
[wch@localhost bin]$ ./redis-server
./redis-server redis.conf
[wch@localhost bin]$ ./redis-cli -h 192.168.110.101 info Replication# Replicationrole:masterconnected_slaves:2slave0:ip=192.168.110.102,port=6379,state=online,offset=659,lag=1slave1:ip=192.168.110.103,port=6379,state=online,offset=659,lag=0master_repl_offset:659repl_backlog_active:1repl_backlog_size:1048576repl_backlog_first_byte_offset:2repl_backlog_histlen:658
[wch@localhost bin]$ ./redis-cli -h 192.168.110.102 info Replication# Replicationrole:slavemaster_host:192.168.110.101master_port:6379master_link_status:upmaster_last_io_seconds_ago:3master_sync_in_progress:0slave_repl_offset:701slave_priority:100slave_read_only:1connected_slaves:0master_repl_offset:0repl_backlog_active:0repl_backlog_size:1048576repl_backlog_first_byte_offset:0repl_backlog_histlen:0
[wch@localhost bin]$ ./redis-cli -h 192.168.110.103 info Replication# Replicationrole:slavemaster_host:192.168.110.101master_port:6379master_link_status:upmaster_last_io_seconds_ago:9master_sync_in_progress:0slave_repl_offset:715slave_priority:100slave_read_only:1connected_slaves:0master_repl_offset:0repl_backlog_active:0repl_backlog_size:1048576repl_backlog_first_byte_offset:0repl_backlog_histlen:0
3.配置sentinel集群并启动
port 26379# sentinel announce-ip <ip># sentinel announce-port <port>dir /tmp################################# master001 #################################sentinel monitor master001 192.168.110.10163792# sentinel auth-pass <master-name> <password>sentinel down-after-milliseconds master001 30000sentinel parallel-syncs master001 1sentinel failover-timeout master001 180000# sentinel notification-script <master-name> <script-path># sentinel client-reconfig-script <master-name> <script-path># 可以配置多个master节点################################# master002 #################################
./redis-sentinel sentinel001.conf./redis-sentinel sentinel002.conf./redis-sentinel sentinel003.conf
[7743]01Oct06:20:38.162# Sentinel runid is ba6c42e1accc31290e11d5876275e1562564295d[7743]01Oct06:20:38.162# +monitor master master001 192.168.110.101 6379 quorum 2[7743]01Oct06:20:39.110*+slave slave 192.168.110.102:6379192.168.110.1026379@ master001 192.168.110.1016379[7743]01Oct06:20:39.111*+slave slave 192.168.110.103:6379192.168.110.1036379@ master001 192.168.110.1016379[7743]01Oct06:25:07.595*+sentinel sentinel 192.168.110.100:36379192.168.110.10036379@ master001 192.168.110.1016379[7743]01Oct06:26:11.170*+sentinel sentinel 192.168.110.100:46379192.168.110.10046379@ master001 192.168.110.1016379
[7795]01Oct06:25:05.538# Sentinel runid is 52c14768b15837fb601b26328acf150c6bd30682[7795]01Oct06:25:05.538# +monitor master master001 192.168.110.101 6379 quorum 2[7795]01Oct06:25:06.505*+slave slave 192.168.110.102:6379192.168.110.1026379@ master001 192.168.110.1016379[7795]01Oct06:25:06.515*+slave slave 192.168.110.103:6379192.168.110.1036379@ master001 192.168.110.1016379[7795]01Oct06:25:07.557*+sentinel sentinel 192.168.110.100:26379192.168.110.10026379@ master001 192.168.110.1016379[7795]01Oct06:26:11.168*+sentinel sentinel 192.168.110.100:46379192.168.110.10046379@ master001 192.168.110.1016379
[7828]01Oct06:26:09.076# Sentinel runid is c8509594be4a36660b2122b3b81f4f74060c9b04[7828]01Oct06:26:09.076# +monitor master master001 192.168.110.101 6379 quorum 2[7828]01Oct06:26:10.063*+slave slave 192.168.110.102:6379192.168.110.1026379@ master001 192.168.110.1016379[7828]01Oct06:26:10.071*+slave slave 192.168.110.103:6379192.168.110.1036379@ master001 192.168.110.1016379[7828]01Oct06:26:11.516*+sentinel sentinel 192.168.110.100:26379192.168.110.10026379@ master001 192.168.110.1016379[7828]01Oct06:26:11.674*+sentinel sentinel 192.168.110.100:36379192.168.110.10036379@ master001 192.168.110.1016379
4.测试sentinel集群
[wch@localhost bin]$ ./redis-cli -h 192.168.110.101 info ReplicationCould not connect to Redis at 192.168.110.101:6379:Connection refused[wch@localhost bin]$ ./redis-cli -h 192.168.110.102 info Replication# Replicationrole:slavemaster_host:192.168.110.103master_port:6379master_link_status:upmaster_last_io_seconds_ago:1master_sync_in_progress:0slave_repl_offset:29128slave_priority:100slave_read_only:1connected_slaves:0master_repl_offset:0repl_backlog_active:0repl_backlog_size:1048576repl_backlog_first_byte_offset:0repl_backlog_histlen:0[wch@localhost bin]$ ./redis-cli -h 192.168.110.103 info Replication# Replicationrole:masterconnected_slaves:1slave0:ip=192.168.110.102,port=6379,state=online,offset=30456,lag=1master_repl_offset:30456repl_backlog_active:1repl_backlog_size:1048576repl_backlog_first_byte_offset:2repl_backlog_histlen:30455[wch@localhost bin]$
### 启动脚本,仍然使用默认配置[wch@localhost bin]$ ./redis-server[wch@localhost bin]$ ./redis-cli -h 192.168.110.101 info Replication# Replicationrole:slavemaster_host:192.168.110.103master_port:6379master_link_status:upmaster_last_io_seconds_ago:1master_sync_in_progress:0slave_repl_offset:57657slave_priority:100slave_read_only:1connected_slaves:0master_repl_offset:0repl_backlog_active:0repl_backlog_size:1048576repl_backlog_first_byte_offset:0repl_backlog_histlen:0[wch@localhost bin]$ ./redis-cli -h 192.168.110.102 info Replication# Replicationrole:slavemaster_host:192.168.110.103master_port:6379master_link_status:upmaster_last_io_seconds_ago:0master_sync_in_progress:0slave_repl_offset:60751slave_priority:100slave_read_only:1connected_slaves:0master_repl_offset:0repl_backlog_active:0repl_backlog_size:1048576repl_backlog_first_byte_offset:0repl_backlog_histlen:0[wch@localhost bin]$ ./redis-cli -h 192.168.110.103 info Replication# Replicationrole:masterconnected_slaves:2slave0:ip=192.168.110.102,port=6379,state=online,offset=63247,lag=1slave1:ip=192.168.110.101,port=6379,state=online,offset=63247,lag=1master_repl_offset:63393repl_backlog_active:1repl_backlog_size:1048576repl_backlog_first_byte_offset:2repl_backlog_histlen:63392[wch@localhost bin]$
[wch@localhost bin]$ ./redis-cli -h 192.168.110.101 info Replication# Replicationrole:slavemaster_host:192.168.110.103master_port:6379master_link_status:downmaster_last_io_seconds_ago:-1master_sync_in_progress:0slave_repl_offset:184231master_link_down_since_seconds:43slave_priority:100slave_read_only:1connected_slaves:0master_repl_offset:0repl_backlog_active:0repl_backlog_size:1048576repl_backlog_first_byte_offset:0repl_backlog_histlen:0[wch@localhost bin]$ ./redis-cli -h 192.168.110.102 info Replication# Replicationrole:slavemaster_host:192.168.110.103master_port:6379master_link_status:downmaster_last_io_seconds_ago:-1master_sync_in_progress:0slave_repl_offset:184231master_link_down_since_seconds:52slave_priority:100slave_read_only:1connected_slaves:0master_repl_offset:0repl_backlog_active:0repl_backlog_size:1048576repl_backlog_first_byte_offset:0repl_backlog_histlen:0[wch@localhost bin]$ ./redis-cli -h 192.168.110.103 info ReplicationCould not connect to Redis at 192.168.110.103:6379:Connection refused
02.Redis主从集群的Sentinel配置的更多相关文章
- Redis主从集群的Sentinel配置
http://www.cnblogs.com/LiZhiW/p/4851631.html
- docker搭建redis主从集群和sentinel哨兵集群,springboot客户端连接
花了两天搭建redis主从集群和sentinel哨兵集群,讲一下springboot客户端连接测试情况 redis主从集群 从网上查看说是有两种方式:一种是指定配置文件,一种是不指定配置文件 引用地址 ...
- Redis主从集群以及Sentinel的配置
安装完redis后,修改几个redis从节点的配置文件redis.conf,主要是加入主节点位置 slaveof 另外需要修改的地方包括,这样允许其他的从节点连入 bind 0.0.0.0 prote ...
- 一、全新安装搭建redis主从集群
前言· 这里分为三篇文章来写我是如何重新搭建redis主从集群和哨兵集群的及原本服务器上有单redis如何通过升级脚本来实现redis集群.(redis结构:主-从(备)-从(备)) 至于为什么要搭建 ...
- redis主从集群搭建及容灾部署(哨兵sentinel)
Redis也用了一段时间了,记录一下相关集群搭建及配置详解,方便后续使用查阅. 提纲 Redis安装 整体架构 Redis主从结构搭建 Redis容灾部署(哨兵sentinel) Redis常见问题 ...
- Redis主从集群及哨兵模式
本次实验环境准备用一台服务器模拟3台redis服务器,1主2从 主从集群搭建 第一步:安装Redis 安装Redis,参考前面安装Redis文章,保证单机使用没有问题. 第二步:配置服务器文件 定位到 ...
- Redis Cluster集群搭建与配置
Redis Cluster是一种服务器sharding分片技术,关于Redis的集群方案应该怎么做,请参考我的另一篇博客http://www.cnblogs.com/xckk/p/6134655.ht ...
- Redis 主从集群搭建及哨兵模式配置
最近搭建了redis集群及哨兵模式,为方便以后查看特此记录下来: 1.Redis安装 2.主从架构 2.1 Redis主从架构图 2.2Redis主从结构搭建 Redis集群不用安装多个Redis,只 ...
- Redis主从,集群部署及迁移
工作中有时会遇到需要把原Redis集群下线,迁移到另一个新的Redis集群的需求(如机房迁移,Redis上云等原因).此时原Redis中的数据需要如何操作才可顺利迁移到一个新的Redis集群呢? 本节 ...
随机推荐
- ASP.NET中@Page指令中的AutoEventWireup
AutoEventWireup:指示控件的事件是否自动匹配 (Autowire).如果启用事件自动匹配,则为 true:否则为 false.默认值为 true.如果设为false,则事件不可用.有关更 ...
- 收缩SQL数据库日志
各位同学,相信大家在使用SQL数据库时,常常会遇到日志文件比数据库文件还在大的情况.以下有一简单的办法,可以快速的删除日志档.使用其大小变为540K. 供各位参考. DUMP TRANSACTION ...
- ASP.net UrlRewrite的防盗链功能
ASP.net中如何实现基于UrlRewrite的防盗链. ASP.net中最快实现UrlRewrite的方法这篇文章中说了如何做UrlRewrite,那只是一个最简单的应用 其实利用UrlRewri ...
- JDBC基础二
1.配置文件:dbinfo.properties driverClass=com.mysql.jdbc.Driver url=jdbc:mysql://127.0.0.1:3306/test user ...
- python & pandas链接mysql数据库
Python&pandas与mysql连接 1.python 与mysql 连接及操作,直接上代码,简单直接高效: import MySQLdb try: conn = MySQLdb.con ...
- 7.python字符串-内置方法分析
上篇对python中的字符串内置方法进行了列举和简单说明,但这些方法太多,逐一背下效率实在太低,下面我来对这些方法按照其功能进行总结: 1.字母大小写相关(中文无效) 1.1 S.upper() -& ...
- WPF实现3D翻转的动画效果
1.前端代码实现 1.1 原理见代码注析 <Grid MouseDown="Grid_MouseDown"> <Viewport3D> <Viewpo ...
- 菜鸟学习Spring——第一个例子
一.概述 原来我们利用工厂来实现灵活的配置.现在利用Spring以后把这个交给了IoC容器管理.我们只要在XML文件上配上就可以了这样的话就节省了很多开发时间我们不需要知道后面的有多少只要动态的配上类 ...
- hdu 5146 Sequence
题目连接 http://acm.hdu.edu.cn/showproblem.php?pid=5146 Sequence Description Today we have a number sequ ...
- IOS中 如何去除Tabview里面cell之间的下划线
可以利用Tabview的separatorStyle属性来设置,选择其中的UITableViewCellSeparatorStyleNone 即可去除cell之间的下划线 self.tableView ...