颜色追踪块CamShift---33
原创博客:转载请标明出处:http://www.cnblogs.com/zxouxuewei/
颜色追踪块CamShift滤波器。
首先确保你的kinect驱动或者uvc相机驱动能正常启动:(如果你使用的是kinect,请运行openni驱动)
roslaunch openni_launch openni.launch
如果你没有安装kinect深度相机驱动,请看我前面的博文。
然后运行下面的launch文件:
roslaunch rbx1_vision camshift.launch
当视频出现时,通过鼠标画矩形将图像中的某个对象框住。这个矩形表示所选的区域,试着移动所选的区域。
以下是我的实验结果:
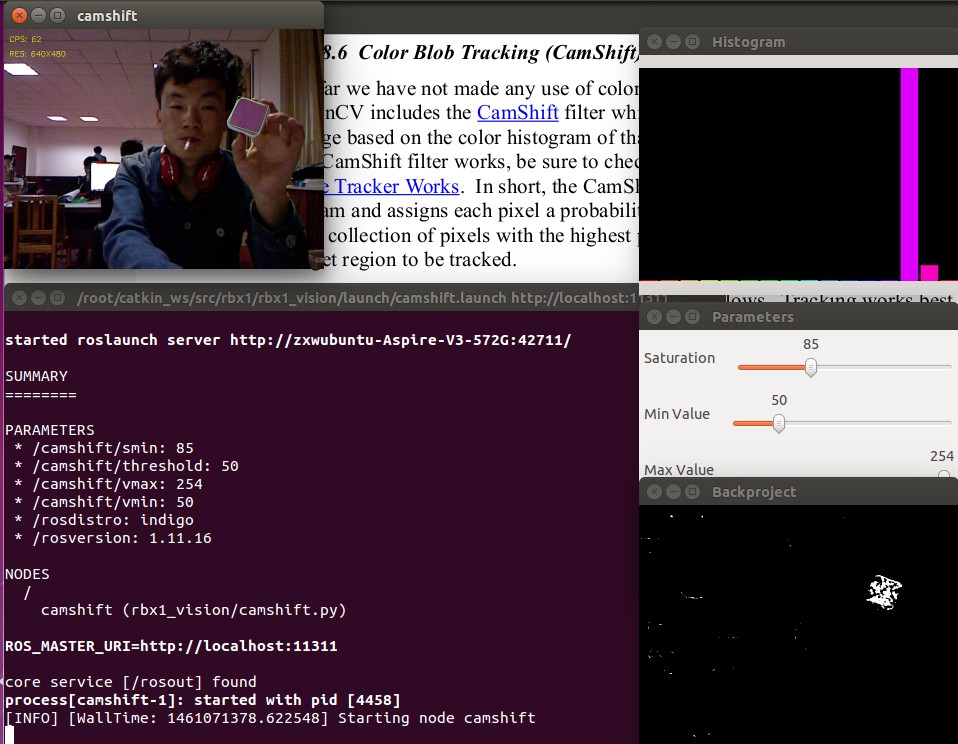

看看代码:启动文件为:camshift.launch。
#!/usr/bin/env python

""" camshift_node.py - Version 1.1 2013-12-20

    Modification of the ROS OpenCV Camshift example using cv_bridge and publishing the ROI

    coordinates to the /roi topic.

"""

import rospy

import cv2

from cv2 import cv as cv

from rbx1_vision.ros2opencv2 import ROS2OpenCV2

from std_msgs.msg import String

from sensor_msgs.msg import Image

import numpy as np

class CamShiftNode(ROS2OpenCV2):

    def __init__(self, node_name):

        ROS2OpenCV2.__init__(self, node_name)

        self.node_name = node_name

        # The minimum saturation of the tracked color in HSV space,

        # as well as the min and max value (the V in HSV) and a

        # threshold on the backprojection probability image.

        self.smin = rospy.get_param("~smin", )

        self.vmin = rospy.get_param("~vmin", )

        self.vmax = rospy.get_param("~vmax", )

        self.threshold = rospy.get_param("~threshold", )

        # Create a number of windows for displaying the histogram,

        # parameters controls, and backprojection image

        cv.NamedWindow("Histogram", cv.CV_WINDOW_NORMAL)

        cv.MoveWindow("Histogram", , )

        cv.NamedWindow("Parameters", )

        cv.MoveWindow("Parameters", , )

        cv.NamedWindow("Backproject", )

        cv.MoveWindow("Backproject", , )

        # Create the slider controls for saturation, value and threshold

        cv.CreateTrackbar("Saturation", "Parameters", self.smin, , self.set_smin)

        cv.CreateTrackbar("Min Value", "Parameters", self.vmin, , self.set_vmin)

        cv.CreateTrackbar("Max Value", "Parameters", self.vmax, , self.set_vmax)

        cv.CreateTrackbar("Threshold", "Parameters", self.threshold, , self.set_threshold)

        # Initialize a number of variables

        self.hist = None

        self.track_window = None

        self.show_backproj = False

    # These are the callbacks for the slider controls

    def set_smin(self, pos):

        self.smin = pos

    def set_vmin(self, pos):

        self.vmin = pos

    def set_vmax(self, pos):

       self.vmax = pos

    def set_threshold(self, pos):

        self.threshold = pos

    # The main processing function computes the histogram and backprojection

    def process_image(self, cv_image):

        try:

            # First blur the image

            frame = cv2.blur(cv_image, (, ))

            # Convert from RGB to HSV space

            hsv = cv2.cvtColor(frame, cv2.COLOR_BGR2HSV)

            # Create a mask using the current saturation and value parameters

            mask = cv2.inRange(hsv, np.array((., self.smin, self.vmin)), np.array((., ., self.vmax)))

            # If the user is making a selection with the mouse,

            # calculate a new histogram to track

            if self.selection is not None:

                x0, y0, w, h = self.selection

                x1 = x0 + w

                y1 = y0 + h

                self.track_window = (x0, y0, x1, y1)

                hsv_roi = hsv[y0:y1, x0:x1]

                mask_roi = mask[y0:y1, x0:x1]

                self.hist = cv2.calcHist( [hsv_roi], [], mask_roi, [], [, ] )

                cv2.normalize(self.hist, self.hist, , , cv2.NORM_MINMAX);

                self.hist = self.hist.reshape(-)

                self.show_hist()

            if self.detect_box is not None:

                self.selection = None

            # If we have a histogram, track it with CamShift

            if self.hist is not None:

                # Compute the backprojection from the histogram

                backproject = cv2.calcBackProject([hsv], [], self.hist, [, ], )

                # Mask the backprojection with the mask created earlier

                backproject &= mask

                # Threshold the backprojection

                ret, backproject = cv2.threshold(backproject, self.threshold, , cv.CV_THRESH_TOZERO)

                x, y, w, h = self.track_window

                if self.track_window is None or w <=  or h <=:

                    self.track_window = , , self.frame_width - , self.frame_height -

                # Set the criteria for the CamShift algorithm

                term_crit = ( cv2.TERM_CRITERIA_EPS | cv2.TERM_CRITERIA_COUNT, ,  )

                # Run the CamShift algorithm

                self.track_box, self.track_window = cv2.CamShift(backproject, self.track_window, term_crit)

                # Display the resulting backprojection

                cv2.imshow("Backproject", backproject)

        except:

            pass

        return cv_image

    def show_hist(self):

        bin_count = self.hist.shape[]

        bin_w =

        img = np.zeros((, bin_count*bin_w, ), np.uint8)

        for i in xrange(bin_count):

            h = int(self.hist[i])

            cv2.rectangle(img, (i*bin_w+, ), ((i+)*bin_w-, -h), (int(180.0*i/bin_count), , ), -)

        img = cv2.cvtColor(img, cv2.COLOR_HSV2BGR)

        cv2.imshow('Histogram', img)

    def hue_histogram_as_image(self, hist):

            """ Returns a nice representation of a hue histogram """

            histimg_hsv = cv.CreateImage((, ), , )

            mybins = cv.CloneMatND(hist.bins)

            cv.Log(mybins, mybins)

            (_, hi, _, _) = cv.MinMaxLoc(mybins)

            cv.ConvertScale(mybins, mybins, . / hi)

            w,h = cv.GetSize(histimg_hsv)

            hdims = cv.GetDims(mybins)[]

            for x in range(w):

                xh = ( * x) / (w - )  # hue sweeps from - across the image

                val = int(mybins[int(hdims * x / w)] * h / )

                cv2.rectangle(histimg_hsv, (x, ), (x, h-val), (xh,,), -)

                cv2.rectangle(histimg_hsv, (x, h-val), (x, h), (xh,,), -)

            histimg = cv2.cvtColor(histimg_hsv, cv.CV_HSV2BGR)

            return histimg

if __name__ == '__main__':

    try:

        node_name = "camshift"

        CamShiftNode(node_name)

        try:

            rospy.init_node(node_name)

        except:

            pass

        rospy.spin()

    except KeyboardInterrupt:

        print "Shutting down vision node."

        cv.DestroyAllWindows()
颜色追踪块CamShift---33的更多相关文章
- SPOJ 16549 - QTREE6 - Query on a tree VI 「一种维护树上颜色连通块的操作」
题意 有操作 $0$ $u$:询问有多少个节点 $v$ 满足路径 $u$ 到 $v$ 上所有节点(包括)都拥有相同的颜色$1$ $u$:翻转 $u$ 的颜色 题解 直接用一个 $LCT$ 去暴力删边连 ...
- SP16549 QTREE6 - Query on a tree VI LCT维护颜色联通块
\(\color{#0066ff}{ 题目描述 }\) 给你一棵n个点的树,编号1~n.每个点可以是黑色,可以是白色.初始时所有点都是黑色.下面有两种操作请你操作给我们看: 0 u:询问有多少个节点v ...
- bzoj2906 颜色 分块+块大小分析
题目传送门 https://lydsy.com/JudgeOnline/problem.php?id=2906 题解 如果可以离线的话,那么这个题目就是一个莫队的裸题. 看上去这个数据范围也还会一个根 ...
- OpenGL学习进程(11)第八课:颜色绘制的详解
本节是OpenGL学习的第八个课时,下面将详细介绍OpenGL的颜色模式,颜色混合以及抗锯齿. (1)颜色模式: OpenGL支持两种颜色模式:一种是RGBA,一种是颜色索引模式. R ...
- iOS 中实现随机颜色
开发中为了测试能够快速看到效果很多时候我们对颜色采用随机颜色 代码块如下 UIColor * randomColor= [UIColor colorWithRed:((float)arc4random ...
- Sass函数--颜色函数--HSL函数
HSL函数简介HSL颜色函数包括哪些具体的函数,所起的作用是什么: hsl($hue,$saturation,$lightness):通过色相(hue).饱和度(saturation)和亮度(ligh ...
- printf 字体颜色打印
为了给printf着色方便, 我们可以定义一些宏: view plain copy to clipboard print ? #define NONE "/033[m&qu ...
- 2-4 Sass的函数功能-颜色函数
RGB颜色函数-RGB()颜色函数 在 Sass 的官方文档中,列出了 Sass 的颜色函数清单,从大的方面主要分为 RGB , HSL 和 Opacity 三大函数,当然其还包括一些其他的颜色函数, ...
- python----模块知识拓展
1.hashlib ------configpraser-------- xml hashlib 模块导入:import hashlib 模块说明:用于将信息加密,明文变成密文 功能说明 MD5算法 ...
随机推荐
- websocket++编译过程
websocket++ 是一个开源 websocket 库,使用websocket++ 能够开发基于websocket 服务. 前一段时间成功编译 websocket++ ,分享一下,编译websoc ...
- 结对编程——关于Fault、Error、Failure程序设计
一.问题描述: 构造程序,分别是: •不能触发Fault •触发Fault,但是不能触发Error •触发Error,但是不能产生Fai ...
- Section 1.4 Packing Rectangles
本来是USACO Training的1.4.1的,但是介于今早过了食物链想起了这道题实在是太怨念了,翻出自己写的AC程序居然有5KB!! 思路很简单,枚举,而且就图中的六种情况.但是第六种变化状况太多 ...
- T420修改wifi灯闪动模式
给T420新装了centos7发现默认的配置wifi灯是工作时闪动的,有点晃眼,想改成简单的on 的时候常亮,off的时候常暗的模式 添加配置文件: vi /etc/modprobe.d/wlanle ...
- Helloworld程序的创建以及配置文件的讲解
创建项目. create Project 选择创建的Project类别以及使用的SDK,可能SDK需要配置或者修改配置. 这个页面是问你是否使用模板创建. Command Line App 会自动创建 ...
- [__NSCFString absoluteURL]错误的解决方案
Xcode提醒错误: -[__NSCFString absoluteURL]: unrecognized selector sent to instance 0x8c4d3a0 *** Termina ...
- SharePoint重置密码功能Demo
博客地址 http://blog.csdn.net/foxdave 本文将说明一个简单的重置SharePoint用户密码(NTLM Windows认证)的功能如何实现 重置密码功能,实际上就是重置域用 ...
- Matlab单一变量曲线拟合-cftool
2.启动曲线拟合工具箱>cftool 3.进入曲线拟合工具箱界面“Curve Fitting tool”(1)点击“Data”按钮,弹出“Data”窗口:(2)利用X data和Y data的下 ...
- (转)HTML 5离线存储之Web SQL
原文:http://developer.51cto.com/art/201106/267357.htm HTML 5离线存储之Web SQL 2011-06-07 15:14 kkun kkun的博客 ...
- ajax 提交成功页面跳转问题
jsx/ajax提交成功后采用以下方式跳转:1.本页面跳转:"window.location.href"."location.href" 2.上一层页面跳转:& ...