【WebService】WebService之CXF的拦截器(五)
CXF拦截器介绍
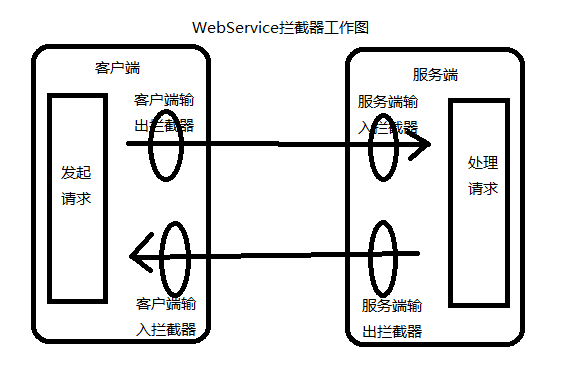
CXF拦截器是功能的主要实现单元,也是主要的扩展点,可以在不对核心模块进行修改的情况下,动态添加功能。当服务被调用时,会经过多个拦截器链(Interceptor Chain)处理,拦截器链在服务输入(IN)或输出(OUT)阶段实现附加功能,拦截器可以在客户端加入,也可以在服务端加入。
工作示意图如下:
拦截器的拦截阶段:
拦截器有多个阶段,每个阶段都有多个拦截器。拦截器在哪个阶段起作用,可以在拦截器的构造函数中声明。
| 阶段名称 | 阶段功能描述 |
|---|---|
| RECEIVE | Transport level processing(接收阶段,传输层处理) |
| (PRE/USER/POST)_STREAM | Stream level processing/transformations(流处理/转换阶段) |
| READ | This is where header reading typically occurs(SOAPHeader读取) |
| (PRE/USER/POST)_PROTOCOL | Protocol processing, such as JAX-WS SOAP handlers(协议处理阶段,例如JAX-WS的Handler处理) |
| UNMARSHAL | Unmarshalling of the request(SOAP请求解码阶段) |
| (PRE/USER/POST)_LOGICAL | Processing of the umarshalled request(SOAP请求解码处理阶段) |
| PRE_INVOKE | Pre invocation actions(调用业务处理之前进入该阶段) |
| INVOKE | Invocation of the service(调用业务阶段) |
| POST_INVOKE | Invocation of the outgoing chain if there is one(提交业务处理结果,并触发输入连接器) |
| 阶段名称 | 阶段功能描述 |
|---|---|
| SETUP | Any set up for the following phases(设置阶段) |
| (PRE/USER/POST)_LOGICAL | Processing of objects about to marshalled |
| PREPARE_SEND | Opening of the connection(消息发送准备阶段,在该阶段创建Connection) |
| PRE_STREAM | 流准备阶段 |
| PRE_PROTOCOL | Misc protocol actions(协议准备阶段) |
| WRITE | Writing of the protocol message, such as the SOAP Envelope.(写消息阶段) |
| MARSHAL | Marshalling of the objects |
| (USER/POST)_PROTOCOL | Processing of the protocol message |
| (USER/POST)_STREAM | Processing of the byte level message(字节处理阶段,在该阶段把消息转为字节) |
| SEND | 消息发送 |
在CXF中,所有对消息的处理都是通过各种拦截器实现。CXF已经实现了多种拦截器,如操纵消息头、执行认证检查、验证消息数据、日志记录、消息压缩等,有些拦截器在发布服务、访问服务时已经默认添加到拦截器。
日志拦截器
首先使用CXF搭建好WebService的客户端以及服务端。参照(【WebService】使用CXF开发WebService(四)),下例中使用的是上一篇的工程。
1、服务器端的日志拦截器:主要是在发布的时候,添加输入和输出日志拦截器。代码如下:
 package com.test.ws.server;

 import java.util.List;

 import javax.xml.ws.Endpoint;

 import org.apache.cxf.interceptor.Interceptor;

 import org.apache.cxf.interceptor.LoggingInInterceptor;

 import org.apache.cxf.interceptor.LoggingOutInterceptor;

 import org.apache.cxf.jaxws22.EndpointImpl;

 import org.apache.cxf.message.Message;

 import com.test.ws.HelloWSImpl;

 /**

  * 发布Web Service

  * @author H__D

  * @date 2017年7月28日 上午11:40:48

  *

  */

 public class ServerTest {

     public static void main(String[] args) {

         //定义WebService的发布地址,这个地址就是提供给外界访问Webervice的URL地址,URL地址格式为:http://ip:端口号/xxxx

         String address = "http://127.0.0.1:8989/test-webservice/hellows";

         //使用Endpoint类提供的publish方法发布WebService,发布时要保证使用的端口号没有被其他应用程序占用

         Endpoint endpoint = Endpoint.publish(address, new HelloWSImpl());

         //打印endpoint,可以看到endpoint实际上是一个 org.apache.cxf.jaxws22.EndpointImpl 对象

         System.out.println("endpoint -->" + endpoint);

         //强转为EndpointImpl对象

         EndpointImpl endpointImpl = (EndpointImpl) endpoint;

         //服务端的日志入拦截器

         List<Interceptor<? extends Message>> inInterceptors = endpointImpl.getInInterceptors();

         inInterceptors.add(new LoggingInInterceptor());

         //服务器端的日志出拦截器

         List<Interceptor<? extends Message>> outInterceptors = endpointImpl.getOutInterceptors();

         outInterceptors.add(new LoggingOutInterceptor());

         System.out.println("发布webservice成功!");

     }

 }
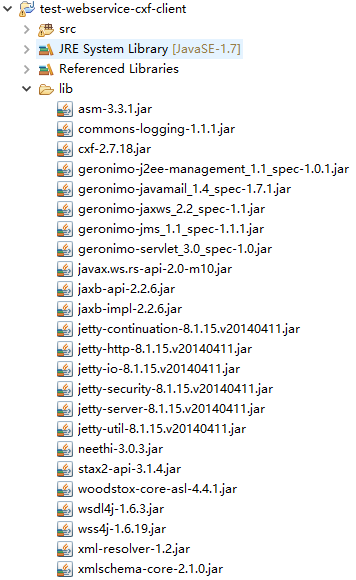
2、客服端的日志拦截器:主要是在调整WebService的时候,添加输入和输出日志拦截器。(注:由于使用的是CXF拦截器,所以客户端也需要添加CXF相应的jar包)
客户端添加CXF的jar包:
调用代码如下:
 package com.test.ws.client;

 import java.util.List;

 import org.apache.cxf.endpoint.Client;

 import org.apache.cxf.frontend.ClientProxy;

 import org.apache.cxf.interceptor.Interceptor;

 import org.apache.cxf.interceptor.LoggingInInterceptor;

 import org.apache.cxf.interceptor.LoggingOutInterceptor;

 import org.apache.cxf.message.Message;

 import com.test.ws.HelloWS;

 import com.test.ws.HelloWSImplService;

 /**

  * 调用WebService的客户端

  * @author H__D

  * @date 2017年7月28日 下午2:39:24

  *

  */

 public class WSClient {

     public static void main(String[] args) {

         //创建一个用于产生WebServiceImpl实例的工厂,WebServiceImplService类是wsimport工具生成的

         HelloWSImplService factory = new HelloWSImplService();

         //通过工厂生成一个WebServiceImpl实例,WebServiceImpl是wsimport工具生成的

         HelloWS helloWS = factory.getHelloWSImplPort();

         System.out.println(helloWS.getClass());

         //发送请求的客户端对象

         Client client = ClientProxy.getClient(helloWS);

         //客户端的日志入拦截器

         List<Interceptor<? extends Message>> inInterceptors = client.getInInterceptors();

         inInterceptors.add(new LoggingInInterceptor());

         //客户端的日志出拦截器

         List<Interceptor<? extends Message>> outInterceptors = client.getOutInterceptors();

         outInterceptors.add(new LoggingOutInterceptor());

         //调用WebService的sayHello方法

         String result = helloWS.sayHello("Jack");

         System.out.println(result);

     }

 }
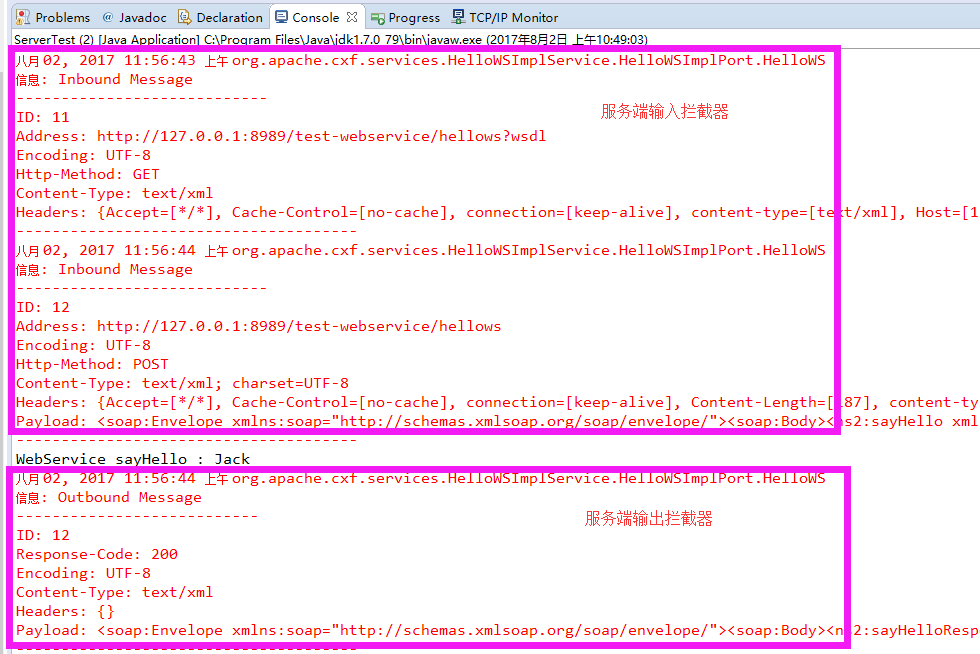
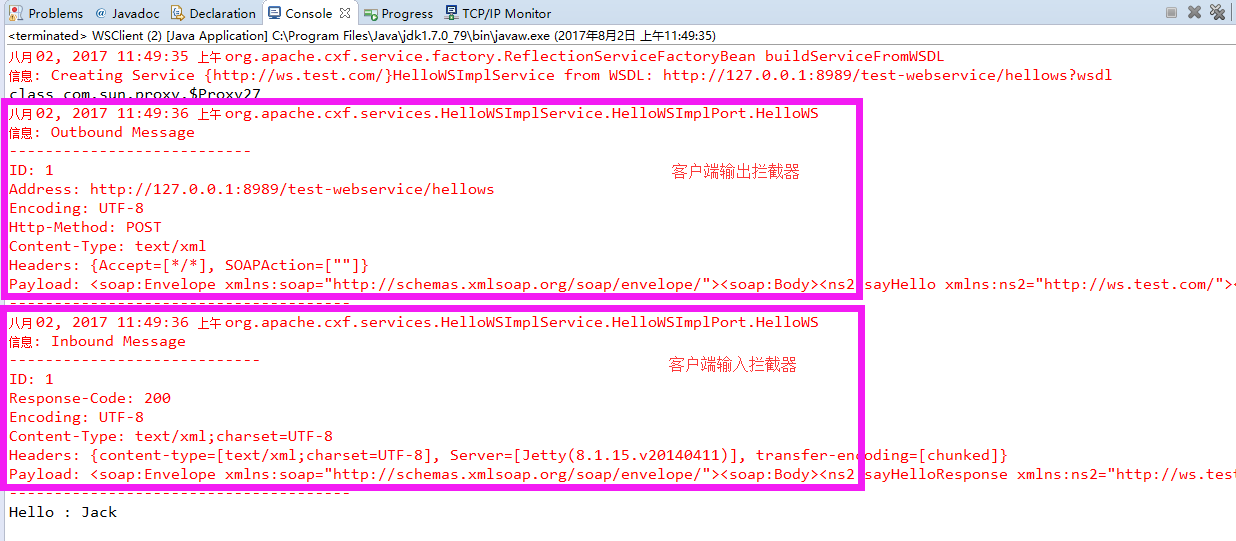
3、发布WebService服务端,然后使用客户端进行调用。控制台输出如下:
服务端控制台输出:
客户端控制台输出:
自定义拦截器
下面使用cxf自定义拦截器,客户端使用自定义拦截器添加用户信息,服务端使用自定义 拦截器获取用户信息并验证
1、在服务端工程编写自定义拦截器,验证用户信息,代码如下
 package com.test.wx.interceptor;

 import java.util.List;

 import javax.xml.namespace.QName;

 import org.apache.cxf.binding.soap.SoapMessage;

 import org.apache.cxf.headers.Header;

 import org.apache.cxf.interceptor.Fault;

 import org.apache.cxf.phase.AbstractPhaseInterceptor;

 import org.apache.cxf.phase.Phase;

 import org.w3c.dom.Element;

 /**

  * 服务端权限拦截器

  * @author H__D

  * @date 2017年8月2日 下午2:22:02

  *

  */

 public class AuthInterceptor extends AbstractPhaseInterceptor<SoapMessage> {

     public AuthInterceptor() {

         super(Phase.PRE_INVOKE); //拦截器在调用方法之前拦截SOAP消息

     }

     /**

      * 拦截器操作

      * 信息如下

      * <soap:Envelope xmlns:soap="http://schemas.xmlsoap.org/soap/envelope/">

      *         <soap:Header>

      *             <authHeader>

      *                 <name>hd</name>

      *                 <password>123456</password>

      *             </authHeader>

      *         </soap:Header>

      *         <soap:Body>

      *             <ns2:sayHello xmlns:ns2="http://ws.test.com/">

      *                 <arg0>Jack</arg0>

      *             </ns2:sayHello>

      *         </soap:Body>

      * </soap:Envelope>

      */

     @Override

     public void handleMessage(SoapMessage msg) throws Fault {

         System.out.println("com to auth interceptor...");

         //获取SOAP信息的所有Header

         List<Header> headers = msg.getHeaders();

         if(headers == null || headers.size() < 1)

         {

             throw new Fault(new IllegalArgumentException("没有Header,拦截器实施拦截"));

         }

         boolean isAuth = false;

         //获取Header携带的用户名和密码信息

         for (Header header : headers) {

             //判断认证信息头

             if(new QName("authHeader").equals(header.getName()))

             {

                 //提取认证信息

                 Element element = (Element) header.getObject();

                 String name = element.getElementsByTagName("name").item(0).getTextContent();

                 String password = element.getElementsByTagName("password").item(0).getTextContent();

                 if(name.equals("hd") && password.equals("123456"))

                 {

                     isAuth = true;

                     break;

                 }

             }

         }

         if(isAuth)

         {

             System.out.println("认证成功!!!");

         }else

         {

             throw new Fault(new IllegalArgumentException("用户名或密码不正确"));

         }

     }

 }
服务端设置好自定义拦截器,并进行发布,代码如下:
 package com.test.ws.server;

 import java.util.List;

 import javax.xml.ws.Endpoint;

 import org.apache.cxf.interceptor.Interceptor;

 import org.apache.cxf.interceptor.LoggingInInterceptor;

 import org.apache.cxf.interceptor.LoggingOutInterceptor;

 import org.apache.cxf.jaxws22.EndpointImpl;

 import org.apache.cxf.message.Message;

 import com.test.ws.HelloWSImpl;

 import com.test.wx.interceptor.AuthInterceptor;

 /**

  * 发布Web Service

  * @author H__D

  * @date 2017年7月28日 上午11:40:48

  *

  */

 public class ServerTest {

     public static void main(String[] args) {

         //定义WebService的发布地址,这个地址就是提供给外界访问Webervice的URL地址,URL地址格式为:http://ip:端口号/xxxx

         String address = "http://127.0.0.1:8989/test-webservice/hellows";

         //使用Endpoint类提供的publish方法发布WebService,发布时要保证使用的端口号没有被其他应用程序占用

         Endpoint endpoint = Endpoint.publish(address, new HelloWSImpl());

         //打印endpoint,可以看到endpoint实际上是一个 org.apache.cxf.jaxws22.EndpointImpl 对象

         System.out.println("endpoint -->" + endpoint);

         //强转为EndpointImpl对象

         EndpointImpl endpointImpl = (EndpointImpl) endpoint;

         //服务端的日志入拦截器

         List<Interceptor<? extends Message>> inInterceptors = endpointImpl.getInInterceptors();

         inInterceptors.add(new LoggingInInterceptor());

         //服务端的自定义拦截器:验证用户名和密码

         inInterceptors.add(new AuthInterceptor());

         //服务器端的日志出拦截器

         List<Interceptor<? extends Message>> outInterceptors = endpointImpl.getOutInterceptors();

         outInterceptors.add(new LoggingOutInterceptor());

         System.out.println("发布webservice成功!");

     }

 }
2、在客户端编写自定义拦截器,添加用户信息,代码如下:
 package com.test.interceptor;

 import java.util.List;

 import javax.xml.namespace.QName;

 import org.apache.cxf.binding.soap.SoapMessage;

 import org.apache.cxf.headers.Header;

 import org.apache.cxf.helpers.DOMUtils;

 import org.apache.cxf.interceptor.Fault;

 import org.apache.cxf.phase.AbstractPhaseInterceptor;

 import org.apache.cxf.phase.Phase;

 import org.w3c.dom.Document;

 import org.w3c.dom.Element;

 /**

  * 客户端添加用户信息拦截器

  * @author H__D

  * @date 2017年8月2日 下午2:47:08

  *

  */

 public class AddUserInterceptor extends AbstractPhaseInterceptor<SoapMessage> {

     private String name;

     private String password;

     public AddUserInterceptor(String name, String password) {

         super(Phase.PRE_PROTOCOL);//准备协议化时拦截

         this.name = name;

         this.password = password;

     }

     /**

      * <soap:Envelope xmlns:soap="http://schemas.xmlsoap.org/soap/envelope/">

      *         <soap:Header>

      *             <authHeader>

      *                 <name>hd</name>

      *                 <password>123456</password>

      *             </authHeader>

      *         </soap:Header>

      *         <soap:Body>

      *             <ns2:sayHello xmlns:ns2="http://ws.test.com/">

      *                 <arg0>Jack</arg0>

      *             </ns2:sayHello>

      *         </soap:Body>

      * </soap:Envelope>

      */

     @Override

     public void handleMessage(SoapMessage msg) throws Fault {

         //获取消息头

         List<Header> headers = msg.getHeaders();

         //创建文档

         Document document = DOMUtils.createDocument();

         //创建根目录

         Element rootEle = document.createElement("authHeader");

         //配置head信息的用户名和密码

         Element nameEle = document.createElement("name");

         nameEle.setTextContent(name);

         Element passwordEle = document.createElement("password");

         passwordEle.setTextContent(password);

         rootEle.appendChild(nameEle);

         rootEle.appendChild(passwordEle);

         //将信息添加到头

         headers.add(new Header(new QName("authHeader"), rootEle));

     }

 }
客户端添加自定义拦截器,并调用WebService服务,代码如下:
 package com.test.ws.client;

 import java.util.List;

 import org.apache.cxf.endpoint.Client;

 import org.apache.cxf.frontend.ClientProxy;

 import org.apache.cxf.interceptor.Interceptor;

 import org.apache.cxf.interceptor.LoggingInInterceptor;

 import org.apache.cxf.interceptor.LoggingOutInterceptor;

 import org.apache.cxf.message.Message;

 import com.test.interceptor.AddUserInterceptor;

 import com.test.ws.HelloWS;

 import com.test.ws.HelloWSImplService;

 /**

  * 调用WebService的客户端

  * @author H__D

  * @date 2017年7月28日 下午2:39:24

  *

  */

 public class WSClient {

     public static void main(String[] args) {

         //创建一个用于产生WebServiceImpl实例的工厂,WebServiceImplService类是wsimport工具生成的

         HelloWSImplService factory = new HelloWSImplService();

         //通过工厂生成一个WebServiceImpl实例,WebServiceImpl是wsimport工具生成的

         HelloWS helloWS = factory.getHelloWSImplPort();

         System.out.println(helloWS.getClass());

         //发送请求的客户端对象

         Client client = ClientProxy.getClient(helloWS);

         //客户端的日志入拦截器

         List<Interceptor<? extends Message>> inInterceptors = client.getInInterceptors();

         inInterceptors.add(new LoggingInInterceptor());

         //客户端的日志出拦截器

         List<Interceptor<? extends Message>> outInterceptors = client.getOutInterceptors();

         outInterceptors.add(new LoggingOutInterceptor());

         //添加自定义输出拦截器

         outInterceptors.add(new AddUserInterceptor("hd", "123456"));

         //调用WebService的sayHello方法

         String result = helloWS.sayHello("Jack");

         System.out.println(result);

     }

 }
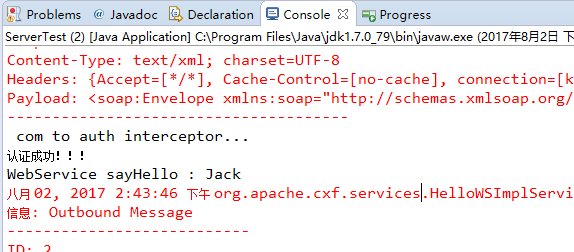
3、服务端控制台输出如下,可以看到自定义拦截器已经启用,并且获取到了用户名和密码进行验证。
4、客户端控制台输出如下,可以看到自定义拦截器已经启用,并且添加了用户名和密码到消息的头里面。

注:通过控制台可以看出,webservice服务器收到的是一段xml,而返回的也是xml,所有在调用webservcie的时候,可以使用ajax的post请求或者java里面HttpURLConnection来发送请求xml,然后获取响应xml进行处理。
【WebService】WebService之CXF的拦截器(五)的更多相关文章
- WebService学习总结(五)--CXF的拦截器
拦截器是Cxf的基础,Cxf中很多的功能都是由内置的拦截器来实现的,拦截器在Cxf中由Interceptor表示.拦截器的作用类似axis2中handle.Cxf的拦截器包括入拦截器和出拦截器,所有的 ...
- CXF实战之自己定义拦截器(五)
CXF已经内置了一些拦截器,这些拦截器大部分默认加入到拦截器链中,有些拦截器也能够手动加入,如手动加入CXF提供的日志拦截器.也能够自己定义拦截器.CXF中实现自己定义拦截器非常easy.仅仅要继承A ...
- CXF之五 拦截器Interceptor
拦截器(Interceptor)是CXF功能最主要的扩展点,可以在不对核心模块进行修改的情况下,动态添加很多功能.拦截器和JAX-WS Handler.Filter的功能类似,当服务被调用时,就会创建 ...
- CXF添加拦截器和自定义拦截器
前面讲了如何采用CXF开发webservice,现在来讲如何添加拦截器和自定义拦截器. 服务端代码: HelloWorld implementor=new HelloWorldImpl(); Stri ...
- Apache CXF自定义拦截器
为什么设计拦截器?1.为了在webservice请求过程中,能动态操作请求和响应数据,CXF设计了拦截器 拦截器分类: 1.按所处的位置分:服务器端拦截器,客户端拦截器. 2.按消息的方向分:入拦截器 ...
- CXF 自定义拦截器
此例子来自apache cxf sample. /** * Licensed to the Apache Software Foundation (ASF) under one * or more ...
- (八)CXF添加自定义拦截器
前面我们说到CXF添加内置的拦截器,今天的话,我们来讲下如何添加自定义拦截器: 我们的实例是客户端访问服务端webservice接口要加权限认证. 我们思路先说下.我们可以通过在SOAP消息的Head ...
- (七)CXF添加拦截器
今天开始讲下拦截器,前面大家学过servlet,struts2 都有拦截器概念,主要作用是做一些权限过滤,编码处理等: webservice也可以加上拦截器,我们可以给webservice请求加权限判 ...
- 【CXF】- 拦截器 Interceptor
CXF拦截器 拦截动态操作请求和响应数据 拦截器分类 位置:服务器端拦截器,客户端拦截器 消息方向:入拦截器 出拦截器 定义者:系统拦截器 自定义拦截器:LoggingInInteceptor ①:创 ...
随机推荐
- 使用Fiddler查看APP的请求接口、接口参数和返回值的方法
1.下载Fiddler,然后安装成功后. 2.开启代理的设置 3.查看电脑的ip, 4.建立一个wifi局域网,什么360wifi,猎豹wifi,腾讯wifi都可以,用安装手机接入到这个局域网的wif ...
- 【Scrapy】关于使用Scrapy框架爬虫遇到的问题1
class testScrapy(scrapy.Spider): name = "testLogs" allowed_domains=["cnblogs.com" ...
- 数据库类型空间效率探索(四)-tinyint与enum与set
mysql> select count(*) from userinfo;+----------+| count(*) |+----------+| 115597 |+----------+1 ...
- java执行jar包出错:Unable to access jarfile
java执行jar包出错:Unable to access jarfile 错误的原因有多种: 1.一般都是路径不正确.在Windows中,正确的路径类似于: java -jar "D:\W ...
- Neumann's Principle and Curie laws
Neumann's Principle Neumann's principle, or principle of symmetry, states that, if a crystal is inva ...
- mybatis知识点(已掌握)
1.${} 和 #{} 的区别? ${} 直接显示传入数据,不能防止sql注入,一般用于传数据库对象(比如表名). #{} 传入数据被当成字符串,自动加上双引号,防止sql注入. 2.有哪些Execu ...
- OpenGL ES 2 for Android - A Quick Start Guide
英文原版,语法很简单,带书签,带实例,很好的书,从头到尾讲述OpenGL强烈推荐!~~~ 扫码时备注或说明中留下邮箱 付款后如未回复请至https://shop135452397.taobao.com ...
- QT信号与槽
参考: 简单例子: http://www.cnblogs.com/MuyouSome/p/3515941.html 基本了解: http://blog.csdn.net/harbinzju/artic ...
- PTA 7-2 符号配对(栈模拟)
请编写程序检查C语言源程序中下列符号是否配对:/*与*/.(与).[与].{与}. 输入格式: 输入为一个C语言源程序.当读到某一行中只有一个句点.和一个回车的时候,标志着输入结束.程序中需要检查配对 ...
- linux命令学习之:ps
Linux中的ps命令是Process Status的缩写.ps命令用于报告当前系统的进程状态,列出系统中当前运行的那些进程.可以搭配kill指令随时中断.删除不必要的程序. 要对进程进行监测和控制, ...
