WPF实现窗体中的悬浮按钮
WPF实现窗体中的悬浮按钮,按钮可拖动,吸附停靠在窗体边缘。
控件XAML代码:
<Button x:Class="SunCreate.Common.Controls.FloatButton"

             xmlns="http://schemas.microsoft.com/winfx/2006/xaml/presentation"

             xmlns:x="http://schemas.microsoft.com/winfx/2006/xaml"

             xmlns:mc="http://schemas.openxmlformats.org/markup-compatibility/2006"

             xmlns:d="http://schemas.microsoft.com/expression/blend/2008"

             mc:Ignorable="d"

             d:DesignHeight="300" d:DesignWidth="300"

             Width="50" Height="50" Margin="0"

             HorizontalAlignment="Left" VerticalAlignment="Top"

             x:Name="btn"

             Loaded="btn_Loaded" Click="btn_Click" >

    <Button.Template>

        <ControlTemplate>

            <Grid MouseLeftButtonDown="Border_MouseLeftButtonDown">

                <Border CornerRadius="25" Background="#022938" Opacity="0.2" >

                </Border>

                <Border CornerRadius="20" Width="40" Height="40" Background="#022938" Opacity="0.3" >

                </Border>

                <Border CornerRadius="14" Width="28" Height="28" Background="#b06919" Opacity="0.8" >

                </Border>

            </Grid>

        </ControlTemplate>

    </Button.Template>

</Button>
控件cs代码:
using System;

using System.Collections.Generic;

using System.Linq;

using System.Text;

using System.Threading;

using System.Threading.Tasks;

using System.Windows;

using System.Windows.Controls;

using System.Windows.Data;

using System.Windows.Documents;

using System.Windows.Input;

using System.Windows.Media;

using System.Windows.Media.Animation;

using System.Windows.Media.Imaging;

using System.Windows.Navigation;

using System.Windows.Shapes;

namespace SunCreate.Common.Controls

{

    /// <summary>

    /// 悬浮按钮

    /// </summary>

    public partial class FloatButton : Button

    {

        public event EventHandler ClickEvent;

        private bool _move = false;

        double _distance = ;

        double _distanceNew = ;

        private Point _lastPos;

        private Point _newPos;

        private Point _oldPos;

        public FloatButton()

        {

            InitializeComponent();

        }

        private void btn_Loaded(object sender, RoutedEventArgs e)

        {

            if (this.Parent != null && this.Parent is FrameworkElement)

            {

                FrameworkElement parent = this.Parent as FrameworkElement;

                double left1 = parent.ActualWidth - this.ActualWidth - this._distanceNew;

                double top1 = parent.ActualHeight - this.ActualHeight - this._distanceNew;

                this.Margin = new Thickness(left1, top1, , );

                parent.PreviewMouseMove += (s, ee) =>

                {

                    if (_move)

                    {

                        Point pos = ee.GetPosition(parent);

                        double left = this.Margin.Left + pos.X - this._lastPos.X;

                        double top = this.Margin.Top + pos.Y - this._lastPos.Y;

                        this.Margin = new Thickness(left, top, , );

                        _lastPos = ee.GetPosition(parent);

                    }

                };

                parent.PreviewMouseUp += (s, ee) =>

                {

                    if (_move)

                    {

                        _move = false;

                        Point pos = ee.GetPosition(parent);

                        _newPos = pos;

                        double left = this.Margin.Left + pos.X - this._lastPos.X;

                        double top = this.Margin.Top + pos.Y - this._lastPos.Y;

                        double right = parent.ActualWidth - left - this.ActualWidth;

                        double bottom = parent.ActualHeight - top - this.ActualHeight;

                        if (left < _distance && top < _distance) //左上

                        {

                            left = this._distanceNew;

                            top = this._distanceNew;

                        }

                        else if (left < _distance && bottom < _distance) //左下

                        {

                            left = this._distanceNew;

                            top = parent.ActualHeight - this.ActualHeight - this._distanceNew;

                        }

                        else if (right < _distance && top < _distance) //右上

                        {

                            left = parent.ActualWidth - this.ActualWidth - this._distanceNew;

                            top = this._distanceNew;

                        }

                        else if (right < _distance && bottom < _distance) //右下

                        {

                            left = parent.ActualWidth - this.ActualWidth - this._distanceNew;

                            top = parent.ActualHeight - this.ActualHeight - this._distanceNew;

                        }

                        else if (left < _distance && top > _distance && bottom > _distance) //左

                        {

                            left = this._distanceNew;

                            top = this.Margin.Top;

                        }

                        else if (right < _distance && top > _distance && bottom > _distance) //右

                        {

                            left = parent.ActualWidth - this.ActualWidth - this._distanceNew;

                            top = this.Margin.Top;

                        }

                        else if (top < _distance && left > _distance && right > _distance) //上

                        {

                            left = this.Margin.Left;

                            top = this._distanceNew;

                        }

                        else if (bottom < _distance && left > _distance && right > _distance) //下

                        {

                            left = this.Margin.Left;

                            top = parent.ActualHeight - this.ActualHeight - this._distanceNew;

                        }

                        ThicknessAnimation marginAnimation = new ThicknessAnimation();

                        marginAnimation.From = this.Margin;

                        marginAnimation.To = new Thickness(left, top, , );

                        marginAnimation.Duration = TimeSpan.FromMilliseconds();

                        Storyboard story = new Storyboard();

                        story.FillBehavior = FillBehavior.Stop;

                        story.Children.Add(marginAnimation);

                        Storyboard.SetTargetName(marginAnimation, "btn");

                        Storyboard.SetTargetProperty(marginAnimation, new PropertyPath("(0)", Border.MarginProperty));

                        story.Begin(this);

                        this.Margin = new Thickness(left, top, , );

                    }

                };

            }

        }

        private void Border_MouseLeftButtonDown(object sender, MouseButtonEventArgs e)

        {

            if (this.Parent != null && this.Parent is FrameworkElement)

            {

                FrameworkElement parent = this.Parent as FrameworkElement;

                _move = true;

                _lastPos = e.GetPosition(parent);

                _oldPos = _lastPos;

            }

        }

        private void btn_Click(object sender, RoutedEventArgs e)

        {

            if (_newPos.Equals(_oldPos))

            {

                if (ClickEvent != null)

                {

                    ClickEvent(sender, e);

                }

            }

        }

    }

}
如何使用:
<Window

        xmlns="http://schemas.microsoft.com/winfx/2006/xaml/presentation"

        xmlns:x="http://schemas.microsoft.com/winfx/2006/xaml"

        xmlns:ui="clr-namespace:SunCreate.Common.Controls;assembly=SunCreate.Common.Controls"

        xmlns:d="http://schemas.microsoft.com/expression/blend/2008" xmlns:mc="http://schemas.openxmlformats.org/markup-compatibility/2006" mc:Ignorable="d" x:Class="SunCreate.Common.Controls.Demo.MainWindow"

        Title="MainWindow"

        Height="700" Width="1200"

        Background="#ff10498c"

        WindowStartupLocation="CenterScreen">

    <Grid>

        <ui:FloatButton x:Name="floatBtn" ></ui:FloatButton>

    </Grid>

</Window>
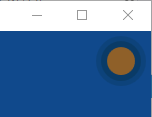
效果图:

WPF实现窗体中的悬浮按钮的更多相关文章
- 您的位置:首页 » IOS » iOS中全局悬浮按钮,类似IPhone中的AssistiveTouch iOS中全局悬浮按钮,类似IPhone中的AssistiveTouch
原文地址:http://blog.5ibc.net/p/86562.html 前提:当时看到别人写过这个类似AssistiveTouch的demo,但是有问题,第一改变不了位置.第二切换页面后无法使用 ...
- Delphi窗体中禁用最大化按钮
第一种方法是设置窗体的BorderIcons/biMaximize属性为False,这种方法仅让窗体的最大化按钮灰掉: 第二种方法是设置窗体的BorderStyle属性为bsDialog,这种方法使最 ...
- wpf 透明窗体中使用webbrowser
wpf ,PNG图形半透明窗体 ,使用webbrowser控件 附件:http://files.cnblogs.com/xe2011/WpfApplication1_webbrowser_tran ...
- WPF MVVM模式中,通过命令实现窗体拖动、跳转以及显隐控制
原文:WPF MVVM模式中,通过命令实现窗体拖动.跳转以及显隐控制 在WPF中使用MVVM模式,可以让我们的程序实现界面与功能的分离,方便开发,易于维护.但是,很多初学者会在使用MVVM的过程中遇到 ...
- WPF子窗体
效果: 1. 点击WPF主窗体上的一个按钮,弹出子窗体, 2. 窗体最小化后,在菜单栏中点击子窗体,会连带显示它所从属的主窗体. 1. 在WPF项目中,已有主窗体MainWindow,再新建子窗体Ch ...
- winfrom窗体中嵌套WPF控件
前言 本文主要介绍如何在winfrom窗体中嵌套WPF控件, 一来是自己记录一下,而来希望能对有需要的朋友提供实现思路. 如有错误请指出...下面进入正题... -1.前期准备 准备一个建立好的win ...
- 关于WinForm引用WPF窗体---在Winform窗体中使用WPF控件
项目中有个界面展示用WPF实现起来比较简单,并且能提供更酷炫的效果,但是在WinForm中使用WPF窗体出现了问题,在网上找了一下有些人说Winform不能引用WPF的窗体,我就很纳闷,Win32都能 ...
- WPF Prism MVVM 中 弹出新窗体. 放入用户控件
原文:WPF Prism MVVM 中 弹出新窗体. 放入用户控件 版权声明:本文为博主原创文章,未经博主允许不得转载. https://blog.csdn.net/qq_37214567/artic ...
- 在WPF窗体中重绘
原文:在WPF窗体中重绘 写这篇主要是为了验证任何元素自身都具备绘图功能. 在默认Window中重写OnRender方法 protected override void OnRender(Draw ...
随机推荐
- ajax的基础
去年也是这个时候,开始学了ajax,也是这个技术领我走上了网页制作的道路,于是这样感觉到手写html比之前的dw拖拖拽拽要有意思得多. 话不多说,下面是一个例子: 这个是ajax显示页面:index. ...
- 《C#从现象到本质》读书笔记(二)第2章 C#类型基础(上)
<C#从现象到本质>读书笔记第二篇 第2章 C#类型基础(上) 类型指的是集合{类,结构,接口,枚举,委托}中的任意一个成员.任何拥有某类型的值(value)称为某类型的一个实例(inst ...
- DB2序列和主键自增长
1.把主键定义为自动增长标识符类型 在mysql中,如果把表的主键设为auto_increment类型,数据库就会自动为主键赋值.例如: create table customers(id int a ...
- 移动开发学习touchmove
<!DOCTYPE html> <html> <head> <meta http-equiv="Content-Type" content ...
- 【WebService】使用CXF开发WebService(四)
CXF简介 Apache CXF = Celtix + XFire,开始叫 Apache CeltiXfire,后来更名为 Apache CXF 了,以下简称为 CXF.CXF 继承了 Celtix ...
- python之并发编程进阶篇9
一.守护进程和守护线程 1)守护进程的概念 什么是守护进程: 守护: 在主进程代码结束情况下,就立即死掉 守护进程本质就是一个子进程,该子进程守护着主进程 为何要用守护进程 守护进程本质就是一个子进程 ...
- keras框架的CNN手写数字识别MNIST
参考:林大贵.TensorFlow+Keras深度学习人工智能实践应用[M].北京:清华大学出版社,2018. 首先在命令行中写入 activate tensorflow和jupyter notebo ...
- Django的学习(一)————初入django
一.基本指令 1.项目的建立: Django的项目建立,进入目录,打开cmd输入 django-admin startproject[项目名称],注意如果是在其他文件下把项目设计成资源文件. 2.Ap ...
- 859. Buddy Strings
class Solution { public: bool buddyStrings(string A, string B) { int lenA=A.length(); int lenB=B.len ...
- 2019.02.09 bzoj2560: 串珠子(状压dp+简单容斥)
传送门 题意简述:nnn个点的带边权无向图,定义一个图的权值是所有边的积,问所有nnn个点都连通的子图的权值之和. 思路: fif_ifi表示保证集合iii中所有点都连通其余点随意的方案数. gig ...
