Linux安装mysql教程
安装之前需要先卸载mysql
1.1、下载压缩包
[root@guohaien package]# wget https://dev.mysql.com/get/Downloads/MySQL-5.7/mysql-5.7.25-linux-glibc2.12-x86_64.tar.gz
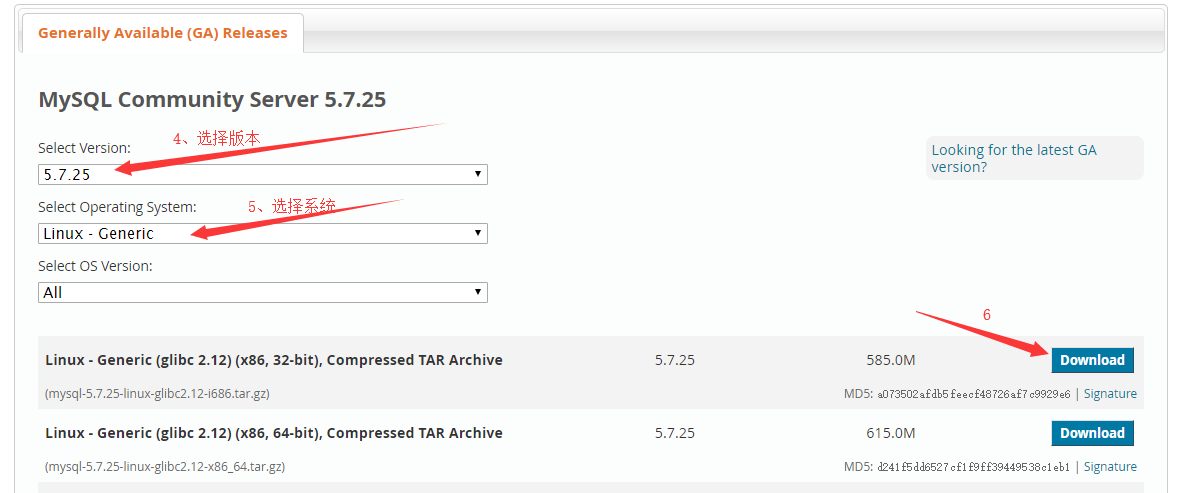
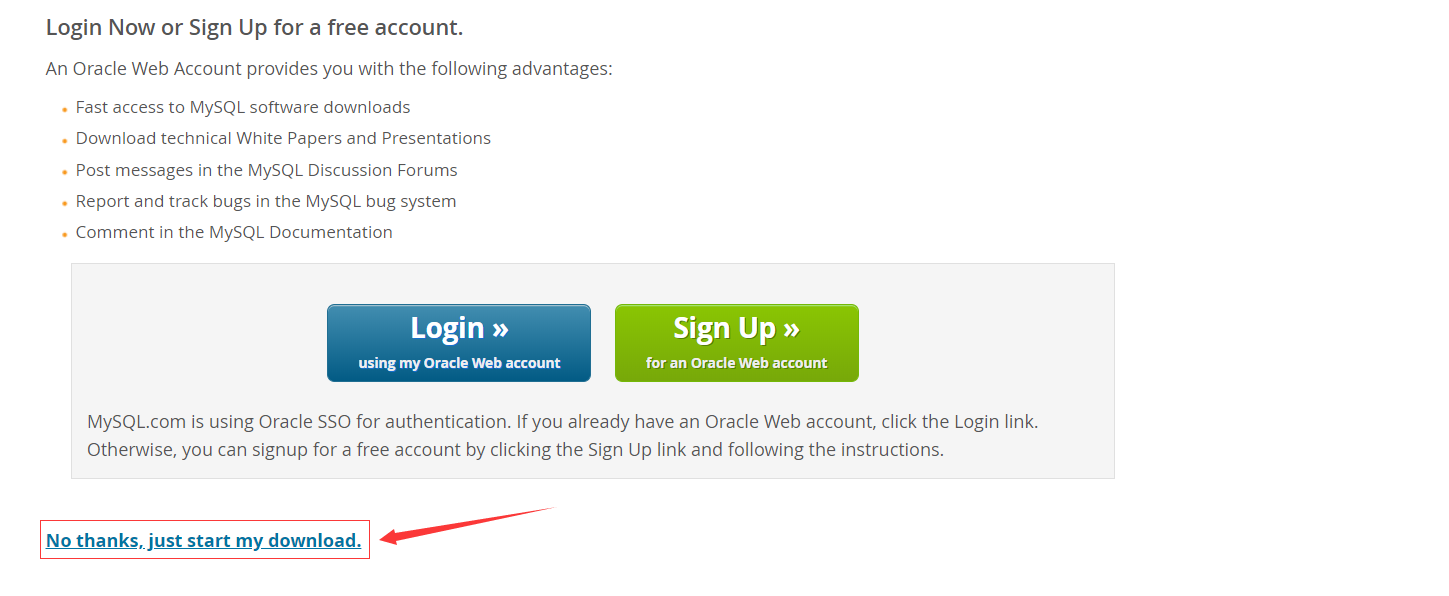
其中下载地址的获取方法如下所示
1、打开mysql官网
2、按下图所示的步骤点击


3、右键下图标记位置,复制下载地址

1.2、给mysql目录创建一个用户组和用户,并在mysql目录下创建一个data目录,具体的操作如下所示
 [root@guohaien soft]# groupadd mysql

 [root@guohaien soft]# useradd -g mysql -d /soft/mysql mysql

 [root@guohaien soft]# cd mysql

 [root@guohaien mysql]# mkdir data
1.3、先解压包,后进入文件夹mysql-5.7.25-linux-glibc2.12-x86_64,将里面的内容移动到上面创建的mysql目录下,并删除该文件夹,最后进入到mysql目录中,具体的操作顺序如下所示
 [root@guohaien package]# tar zxvf mysql-5.7.25-linux-glibc2.12-x86_64.tar.gz

 [root@guohaien package]# cd mysql-5.7.25-linux-glibc2.12-x86_64

 [root@guohaien mysql-5.7.25-linux-glibc2.12-x86_64]# mv * /soft/mysql

 [root@guohaien mysql-5.7.25-linux-glibc2.12-x86_64]# cd ..

 [root@guohaien package]# rm -rf mysql-5.7.25-linux-glibc2.12-x86_64

 [root@guohaien package]# cd ../mysql
1.4、初始化数据库,初始化的时候会生成一个随机密码,需要记录下来,后面会用到,其中密码在如下图标志的位置

初始化是可能会出现以下问题
其中一种输出是如下所示
./bin/mysqld: error while loading shared libraries: libaio.so.1: cannot open shared object file: No such file or directory
这是因为没有安装libaio,只需要执行如下命令即可
[root@guohaien mysql]# yum install -y libaio
还有可能输出如下结果,这是因为data目录不为空,只需要进入到data目录执行rm -rf *
2019-03-19T06:04:15.345713Z 0 [Warning] TIMESTAMP with implicit DEFAULT value is deprecated. Please use --explicit_defaults_for_timestamp server option (see documentation for more details).

2019-03-19T06:04:15.347456Z 0 [ERROR] --initialize specified but the data directory has files in it. Aborting.

2019-03-19T06:04:15.347485Z 0 [ERROR] Aborting
1.5、修改mysql.server文件中的basedir和datadir的值,一下是修改文件的命令,和修改的位置
[root@guohaien mysql]# vim support-files/mysql.server

修改完成按Esc,然后输入wq退出
1.6、创建配置文件
给默认的my.cnf文件备份
[root@guohaien mysql]# cp /etc/my.cnf /etc/my.cnf.bak
可以将my.cnf文件修改为如下所示
[mysqld]

basedir=/soft/mysql

datadir=/soft/mysql/data

character_set_server=utf8

init_connect='SET NAMES utf8'

[client]

default-character-set=utf8
1.7、启动mysql服务
[root@guohaien mysql]# ./support-files/mysql.server start

若输出以上结果则启动成功
可以通过如下步骤改变启动的方法,并设置为开机自启动
 [root@guohaien mysql]# cp support-files/mysql.server /etc/init.d/mysqld

 [root@guohaien mysql]# systemctl enable mysqld

 mysqld.service is not a native service, redirecting to /sbin/chkconfig.

 Executing /sbin/chkconfig mysqld on
修改后的mysql服务的启动命令有两种为
[root@guohaien mysql]# service mysqld start

[root@guohaien mysql]# systemctl start mysqld
其中关闭和重启服务只需要将start改为stop和restart即可
1.8、修改登录密码
[root@guohaien mysql]# ./bin/mysqladmin -u root -p password

Enter password:

New password:

Confirm new password:

Warning: Since password will be sent to server in plain text, use ssl connection to ensure password safety.
先输入原始密码,在输入两次新密码(其中原始密码即为上面生成的那个随机密码)
也可以使用如下命令修改密码
[root@guohaien mysql]# ./bin/mysqladmin -uroot -p'原始密码' password '新密码'
设置完成后就能使用新密码登录数据库
 [root@guohaien mysql]# ./bin/mysql -u root -p

 Enter password:

 Welcome to the MySQL monitor.  Commands end with ; or \g.

 Your MySQL connection id is 4

 Server version: 5.7.25 MySQL Community Server (GPL)

 Copyright (c) 2000, 2019, Oracle and/or its affiliates. All rights reserved.

 Oracle is a registered trademark of Oracle Corporation and/or its

 affiliates. Other names may be trademarks of their respective

 owners.

 Type 'help;' or '\h' for help. Type '\c' to clear the current input statement.

 mysql>
可以给登录服务创建一个软链接
[root@guohaien mysql]# ln -s /soft/mysql/bin/mysql /usr/bin/mysql
这样就能将上面的./bin/mysql 替换为mysql
1.9、mysql远程授权
目前只能在该服务器上登录mysql,远程并不能访问,登录mysql后执行如下sql
mysql> grant all privileges on *.* to 'root'@'%' identified by '密码';

Query OK, 0 rows affected, 1 warning (0.00 sec)

mysql> FLUSH PRIVILEGES;

Query OK, 0 rows affected (0.00 sec)
以上即为mysql5.7在centos7.6 64位系统下的安装及配置
2.1、关闭mysql服务
[root@guohaien /]# service mysqld stop
2.2、检查是否有rpm包,若是没有用rpm安装过mysql,应该就没有,若是有的话就要删除
检查的命令
[root@guohaien /]# rpm -qa|grep -i mysql
删除的命令
[root@guohaien /]# rpm -e 包名
有时候会有依赖无法删除,可以用命令
root@guohaien /]# rpm -e --nodeps 包名
2.3、检查是否有mysql相关目录或文件,若有则删除
检查的命令
[root@guohaien /]# find / -name mysql
删除的命令
[root@guohaien /]# rm -rf 目录或文件
2.4、删除mysql用户和分组
删除用户命令
[root@guohaien /]# userdel mysql
删除分组命令
[root@guohaien /]# groupdel mysql
卸载完成后就可以开始安装mysql
Linux安装mysql教程的更多相关文章
- Linux 安装Mysql(图文教程)
原文:Linux 安装Mysql(图文教程) 版权声明:本文为博主原创文章,遵循CC 4.0 BY-SA版权协议,转载请附上原文出处链接和本声明. 本文链接:https://blog.csdn.net ...
- Linux 安装 MySQL 8 数据库(图文详细教程)
本教程手把手教你如何在 Linux 安装 MySQL 数据库,以 CentOS 7为例. 1. 下载并安装 MySQL 官方的 Yum Repository wget -i -c https://re ...
- linux安装mysql后root无法登录 sql 无法登录
linux安装mysql后root无法登录 问题:[root@localhost mysql]# mysql -u root -pEnter password: ERROR 1045 (28000): ...
- linux安装mysql~~~mysql5.6.12
Linux安装mysql服务器 准备: MySQL-client-5.6.12-1.rhel5.i386.rpm MySQL-server-5.6.12-1.rhel5.i386.rpm 首先检查环境 ...
- linux安装mysql全纪录[包括yum和rpm安装,编码,远程连接以及大小写问题]
linux安装mysql全纪录[包括yum和rpm安装,编码,远程连接以及大小写问题] 一.查看mysql是否已经安装 使用“whereis mysql”命令来查看mysql安装路径: [root@h ...
- linux安装mysql服务分两种安装方法:
linux安装mysql服务分两种安装方法: ①源码安装,优点是安装包比较小,只有十多M,缺点是安装依赖的库多,安装编译时间长,安装步骤复杂容易出错: ②使用官方编译好的二进制文件安装,优点是安装速度 ...
- 阿里云Centos7上安装MySQL教程
1 基本安装过程 1.查看系统是否安装了mysql软件 # rpm -qa|grep -i mysql 2.将已经安装过的软件卸载掉.注意:这样的卸载是不彻底,不过这里够用了 # yum remove ...
- linux安装MySQL后输入mysql显示 ERROR 2002 (HY000): Can't connect to local MySQL server through socket
我是小白,大佬勿喷 *** linux安装MySQL后输入mysql显示 ERROR 2002 (HY000): Can't connect to local MySQL server through ...
- CentOS7.5 安装MySql教程
CentOS7位安装MySql教程 1.先检查系统是否装有mysql rpm -qa | grep mysql 2.下载mysql的repo源 wget http://repo.mysql.com/m ...
随机推荐
- Token的生成和检验
package TestToken; import com.auth0.jwt.JWT; import com.auth0.jwt.JWTVerifier; import com.auth0.jwt. ...
- 关于SQL的常用操作(增、删、改、查)
关于SQL的常见操作主要是增.删.改.查. 1.增,顾名思义就是新增数据(insert into).该语句用于向表中插入新纪录.insert into有两种用法. (1).无需指定要插入数据的列名,只 ...
- (转)Cognos的下载地址分享
原文:https://blog.csdn.net/Wikey_Zhang/article/details/76138965 刚开始接触Cognos,发现Cognos真是一款挺不错的报表工具,先分享一下 ...
- 静态编译 Qt5.7.0 (含 openssl 支持)
关于Qt静态便宜的环境等,请先参见 Win10 + VS2015 下编译 Qt5.6.0 . 首先编译 openssl .我这里用的版本是 openssl 1.0.2j (新的1.1版本的便宜稍有不同 ...
- Spring Boot + docker +mongo
启动mongo镜像 docker run --name mongo-container -d -P mongo 连接到容器内 docker exec -it eb sh 输入:mongo 输入:sho ...
- 常见数据结构的Java实现
单链表的Java实现 首先参考wiki上的单链表说明,单链表每个节点包含数据和指向链表中下一个节点的指针或引用.然后看代码 import java.lang.*; public class Singl ...
- PPT-常用快捷键
Ctrl+Shift+C 复制文本格式 Ctrl+Shift+V 粘贴文本格式 Ctrl+B 应用粗体格式Ctrl+U 应用下划线Ctrl+l 应用斜体格式 全选 Ctrl + A 光标之后 ...
- OSRM笔记
OSRM OSRM(OpenStreetMap Routeing Machine)可用于路线规划.作为高性能的路线规划引擎,OSRM使用C++14编写,基于开源的OpenStreetMap数据实现. ...
- CentOS 7.3.1611编译安装Nginx1.10.3+MySQL5.7.16+PHP7.1.2
前传: 1.CentOS 7.3.1611系统安装配置图解教程 http://www.jb51.net/os/RedHat/597874.html 2.CentOS服务器初始化设置 http://ww ...
- 同一台电脑使用多个ssh连接git,出现权限不够的问题
在本地使用多个ssh连接git时出现如下错误: Permission denied (publickey,gssapi-keyex,gssapi-with-mic) 当一台电脑上同时使用多个ssh k ...
