Nextcloud13私有云盘安装指南
一、环境说明:
※操作系统版本CentOS 7.5 Minimal-1804
※ Nextcloud版本 13.05
※ 数据库使用MariaDB,安装在同一台机器,
※ 参考链接https://www.cnblogs.com/kevingrace/p/8343060.html
※ 参考链接 https://blog.csdn.net/kyotrue/article/details/77934724?locationNum=5&fps=1
二、安装仓库源及基础软件
添加EPEL包的仓库源
yum -y install epel-release
添加 PHP7-FPM webtatic 仓库
rpm -Uvh https://mirror.webtatic.com/yum/el7/webtatic-release.rpm
安装基础环境:
yum -y install nginx redis unzip wget mariadb mariadb-server
三、安装PHP7和PHP7-FPM
yum -y install php71w-fpm php71w-cli php71w-gd php71w-mcrypt php71w-mysql php71w-pear php71w-xml php71w-mbstring php71w-pdo php71w-json php71w-opcache php71w-pecl-apcu php71w-pecl-apcu-devel php71w-pecl-igbinary php71w-pecl-igbinary-devel php71w-pecl-imagick php71w-pecl-imagick-devel php71w-pecl-redis php71w-pecl-redis-devel php71w-ldap
四、配置PHP-FPM
1、我们需要配置 php-fpm 与 Nginx 协同运行。hp7-fpm 将使用 nginx 用户来运行,并监听 9000 端口。
使用 vi 编辑默认的 php7-fpm 配置文件。
vi /etc/php-fpm.d/www.conf
修改以下不连续的记录点,修改用户,指定端口,启用环境变量。
<<www.conf>>
#Line 8-10
user = nginx
group = nginx
#Line 22
listen = 127.0.0.1:9000
#Line 366-370
env[HOSTNAME] = $HOSTNAME
env[PATH] = /usr/local/bin:/usr/bin:/bin
env[TMP] = /tmp
env[TMPDIR] = /tmp
env[TEMP] = /tmp
2、保存文件并退出 vim 编辑器. 需要在 /var/lib/ 目录下创建一个新的文件夹 session,并将其拥有者变更为 nginx 用户。
mkdir -p /var/lib/php/session
chown nginx:nginx -R /var/lib/php/session/
3、vi /etc/php.d/opcache.ini 将以下行注释掉,修改为对应的配置值:
<<opcache.ini>>
zend_extension=opcache.so
opcache.enable=1
opcache.enable_cli=1
opcache.memory_consumption=128
opcache.interned_strings_buffer=8
opcache.max_accelerated_files=10000
opcache.revalidate_freq=1
opcache.save_comments=1
4、启动服务、设为开机启动
systemctl start php-fpm
systemctl start nginx
systemctl start mariadb
systemctl start redis
systemctl enable redis
systemctl enable php-fpm
systemctl enable nginx
systemctl enable mariadb
五、配置MariaDB
1、MySQL初始化指令初始化root用户,默认密码为空(此步可以先忽略)
mysql_secure_installation
#配置过程
Set root password? [Y/n] Y
New password:
Re-enter new password:
Remove anonymous users? [Y/n] Y
Disallow root login remotely? [Y/n] n
Remove test database and access to it? [Y/n] Y
Reload privilege tables now? [Y/n] Y
2、创建数据库、创建库用户、用户授权
mysql -u root -p
create database nextcloud;
create user nextclouduser@localhost identified by 'nextclouduser@';
grant all privileges on nextcloud_db.* to nextclouduser@'localhost' identified by 'nextclouduser@';
flush privileges;
exit
六、安装SSL证书
我们可以自己生成SSL证书,也可以申请专业的SSL证书。自签名的SSL证书在使用的时候会报错,建议使用有资质的SSL证书。
安装过程如下:
1、为 SSL 文件创建新目录:
mkdir -p /etc/nginx/cert
2、创建证书(生产环境请购买公网SSL证书)
openssl req -new -x509 -days 365 -nodes -out /etc/nginx/cert/pan.mcitp.cn.crt -keyout /etc/nginx/cert/pan.mcitp.cn.key
3、在该目录下储存申请过的SSL证书,并设置证书的权限:
chmod 700 /etc/nginx/cert
chmod 600 /etc/nginx/cert/*
七、下载和初步安装 Nextcloud
1、开始下载nextcloud 并解压 (也可以先下载到windows,再通过xftp上传)
mkdir -p /var/www/nextcloud
cd /var/www/nextcloud
wget https://download.nextcloud.com/server/releases/nextcloud-13.0.5.zip
unzip nextcloud-13.0.5.zip
mv /var/www/nextcloud/web/* /var/www/nextcloud
2、为NextCloud创建文件储存文件夹,并授予一定的权限
mkdir -p /var/www/nextcloud/data
chown nginx:nginx -R /var/www/nextcloud/
3、手动指定云盘文件储存位置(配置文件中有默认配置)
vi /var/www/nextcloud/config/config.sample.php
找到如下字段(默认值为 /var/www/nextcloud/data):
'datadirectory' => '/var/www/owncloud_data/'
八、配置Nginx转发规则
1、创建文件:
vi /etc/nginx/conf.d/nextcloud.conf
2、参考配置文件,下面是已经修改好的文件,直接上传至 /etc/nginx/conf.d/ 即可)nextcloud官方文档
upstream php-handler {
server 127.0.0.1:9000;
#server unix:/var/run/php5-fpm.sock;
}
server {
listen 80;
listen [::]:80;
server_name pan.mcitp.cn;
# enforce https
return 301 https://$server_name$request_uri;
}
server {
listen 443 ssl http2;
listen [::]:443 ssl http2;
server_name pan.mcitp.cn;
# SSL证书路径
ssl_certificate /etc/nginx/cert/pan.mcitp.cn.crt;
ssl_certificate_key /etc/nginx/cert/pan.mcitp.cn.key;
# Add headers to serve security related headers
# Before enabling Strict-Transport-Security headers please read into this
# topic first.
#
# WARNING: Only add the preload option once you read about
# the consequences in https://hstspreload.org/. This option
# will add the domain to a hardcoded list that is shipped
# in all major browsers and getting removed from this list
# could take several months.
add_header Strict-Transport-Security "max-age=15768000;includeSubDomains; preload;";
add_header X-Content-Type-Options nosniff;
add_header X-XSS-Protection "1; mode=block";
add_header X-Robots-Tag none;
add_header X-Download-Options noopen;
add_header X-Permitted-Cross-Domain-Policies none;
add_header X-Frame-Options SAMEORIGIN;
# 网站根目录
root /var/www/nextcloud/;
location = /robots.txt {
allow all;
log_not_found off;
access_log off;
}
# The following 2 rules are only needed for the user_webfinger app.
# Uncomment it if you're planning to use this app.
#rewrite ^/.well-known/host-meta /public.php?service=host-meta last;
#rewrite ^/.well-known/host-meta.json /public.php?service=host-meta-json
# last;
location = /.well-known/carddav {
return 301 $scheme://$host/remote.php/dav;
}
location = /.well-known/caldav {
return 301 $scheme://$host/remote.php/dav;
}
client_max_body_size 1024M;
fastcgi_buffers 64 4K;
# Enable gzip but do not remove ETag headers
gzip on;
gzip_vary on;
gzip_comp_level 4;
gzip_min_length 256;
gzip_proxied expired no-cache no-store private no_last_modified no_etag auth;
gzip_types application/atom+xml application/javascript application/json application/ld+json application/manifest+json application/rss+xml application/vnd.geo+json application/vnd.ms-fontobject application/x-font-ttf application/x-web-app-manifest+json application/xhtml+xml application/xml font/opentype image/bmp image/svg+xml image/x-icon text/cache-manifest text/css text/plain text/vcard text/vnd.rim.location.xloc text/vtt text/x-component text/x-cross-domain-policy;
# Uncomment if your server is build with the ngx_pagespeed module
# This module is currently not supported.
#pagespeed off;
location / {
rewrite ^ /index.php$uri;
}
location ~ ^/(?:build|tests|config|lib|3rdparty|templates|data)/ {
deny all;
}
location ~ ^/(?:\.|autotest|occ|issue|indie|db_|console) {
deny all;
}
location ~ ^/(?:index|remote|public|cron|core/ajax/update|status|ocs/v[12]|updater/.+|ocs-provider/.+)\.php(?:$|/) {
fastcgi_split_path_info ^(.+\.php)(/.*)$;
include fastcgi_params;
fastcgi_param SCRIPT_FILENAME $document_root$fastcgi_script_name;
fastcgi_param PATH_INFO $fastcgi_path_info;
fastcgi_param HTTPS on;
#Avoid sending the security headers twice
fastcgi_param modHeadersAvailable true;
fastcgi_param front_controller_active true;
fastcgi_pass php-handler;
fastcgi_intercept_errors on;
fastcgi_request_buffering off;
}
location ~ ^/(?:updater|ocs-provider)(?:$|/) {
try_files $uri/ =404;
index index.php;
}
# Adding the cache control header for js and css files
# Make sure it is BELOW the PHP block
location ~ \.(?:css|js|woff|svg|gif)$ {
try_files $uri /index.php$uri$is_args$args;
add_header Cache-Control "public, max-age=15778463";
# Add headers to serve security related headers (It is intended to
# have those duplicated to the ones above)
# Before enabling Strict-Transport-Security headers please read into
# this topic first.
# add_header Strict-Transport-Security "max-age=15768000; includeSubDomains; preload;";
#
# WARNING: Only add the preload option once you read about
# the consequences in https://hstspreload.org/. This option
# will add the domain to a hardcoded list that is shipped
# in all major browsers and getting removed from this list
# could take several months.
add_header X-Content-Type-Options nosniff;
add_header X-XSS-Protection "1; mode=block";
add_header X-Robots-Tag none;
add_header X-Download-Options noopen;
add_header X-Permitted-Cross-Domain-Policies none;
# Optional: Don't log access to assets
access_log off;
}
location ~ \.(?:png|html|ttf|ico|jpg|jpeg)$ {
try_files $uri /index.php$uri$is_args$args;
# Optional: Don't log access to other assets
access_log off;
}
}
3、根据个人需要修改并写入配置:
server_name需要改为域名
ssl_certificate和ssl_certificate_key需要改为SSL证书对应的文件
root需要改为nextcloud文件夹所在路径
4、验证配置文件,重启动nginx服务:
nginx -t
nginx: the configuration file /etc/nginx/nginx.conf syntax is ok
nginx: configuration file /etc/nginx/nginx.conf test is successful
systemctl restart nginx
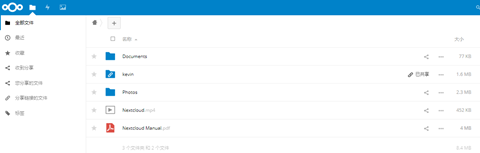
九,网页安装Nextcloud
1、浏览器访问 https://pan.mcitp.cn (如果没有解析域名,请添加host文件)

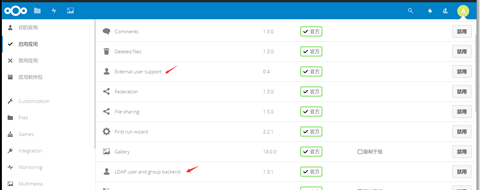
十、microsoft AD集成与邮件通知
前提条件:
已经安装了php72w-ldap,nextcloud主机能够解析到AD域名。
1、启用组件:
2、配置服务器:
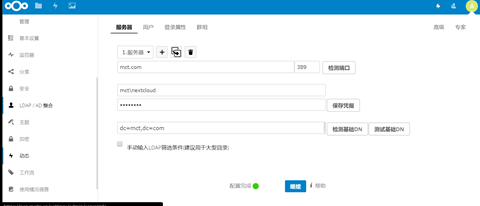
3、配置用户

4、配置登录属性

5、配置配置群组

6、更多高级设置请点击"高级"或者 "专家"按钮

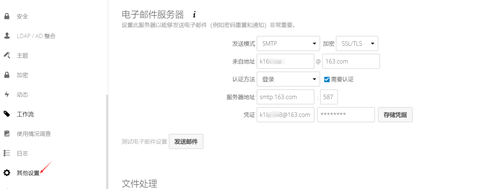
7、配置邮件通知
十一、常见错误
有可能你在访问页面时可以正常显示但是提示你"内部服务器错误",若出现这个情况有两个可能:
1、Nginx对nextcloud文件夹的访问权限不够,使用如下操作重新给予权限
mkdir -p /var/www/nextcloud/data
chown nginx:nginx -R /var/www/nextcloud/
2、防火墙和SELinux未关闭
systemctl stop firewalld
systemctl disable firewalld
永久关闭SELinux需要编辑文件/etc/selinux/config,将SELINUX=enforcing修改为SELINUX=disabled,重启后生效
3、数据库ERROR 1004\4200错误
在/etc/my.cnf文件里添加"skip-grant-tables"
systemctl restart mariadb
4、维护模式的启用和关闭:
cd /var/www/nextcloud
sudo -u nginx php occ maintenance:mode --on (开启维护模式)
sudo -u nginx php occ maintenance:mode --off (关闭维护模式)
十二、安全与性能优化
1、云盘上传文件大小限制
nextcloud上传文件大小的自身限制为512M,如果要想调整这个大小,操作方法如下:
1)修改php.ini上传文件大小限制
vi /etc/php.ini
max_execution_time = 0 #默认是30秒,改为0,表示没有限制
post_max_size = 10800M #设定 POST 数据所允许的最大大小,如果POST数据尺寸大于post_max_size $_POST 和 $_FILES superglobals 便会为空.
upload_max_filesize = 10240M #表示所上传的文件的最大大小
#另外要说明的是,post_max_size 大于 upload_max_filesize 为佳.
2)修改nginx.conf
vi /etc/nginx/conf.d/nextcloud.conf
client_max_body_size 10240M;
3)重启php和nginx服务
systemctl restart php-fpm
systemctl restart nginx
2、配置防火墙:
firewall-cmd --permanent --add-service=http
firewall-cmd --permanent --add-service=https
firewall-cmd --reload
3、开启缓存
vi /var/www/nextcloud/config/config.php 在第22行下方添加如下配置:
'memcache.local' => '\OC\Memcache\APCu',
'memcache.locking' => '\OC\Memcache\Redis',
'redis' => array(
'host' => 'localhost',
'port' => 6379,
),
完整config.php如下:

systemctl enable redis
systemctl start redis
4、安装更新
yum- y update
Nextcloud13私有云盘安装指南的更多相关文章
- nextcloud私有云盘的部署
nextcloud在centos系统下搭建自己的私有云盘 搭建一套自己的私有云盘,让数据存储更加方便.可靠.自己搭建的云存储,首先没有什么容量.下载速度的限制,而且本地访问速度很快.一开始以为Next ...
- linux下使用URLOS搭建nextcloud私有云盘系统
Nextcloud是一个免费专业的私有云存储网盘开源项目,可以让你简单快速地在个人/公司电脑.服务器甚至是树莓派等设备上架设一套属于自己或团队专属的云同步网盘,从而实现跨平台跨设备文件同步.共享.版本 ...
- 政务私有云盘系统建设的工具 – Mobox私有云盘
序言 这几年,智慧政务已经成为了政府行业IT建设发展的重要进程.传统办公方式信息传递速度慢.共享程度低.查询利用难,早已成为政府机关获取和利用信息的严重制约因素.建立文档分享共用机制,加强数据整合,避 ...
- 5分钟快速部署ownCloud私有云盘存储系统
ownCloud 是一个开源免费专业的私有云存储项目,它能帮你快速在个人电脑或服务器上架设一套专属的私有云文件同步网盘,可以像 Dropbox 那样实现文件跨平台同步.共享.版本控制.团队协作等等.o ...
- docker 搭建私有云盘 Seafile
缘起 现如今各种云存储服务其实挺多的,国外有经典的DropBox.Google Drive.微软的OneDrive等,国内也有可以免费使用的各种云. 那么为什么想要搭建私有云存储呢?主要是本着“自己的 ...
- 极客DIY:使用树莓派制作一套“NAS+私有云盘+下载机”
原创作者:HackLiu 0×00 前言 如果你家里有多台设备需要联网需要娱乐,你一定会或多或少遇到设备碎片化带来的烦恼.当然,已经有很多厂商包括新晋的小米.360在内的互联网公司做了这个事情 ...
- 使用Hadoop打造私有云盘之API操作
项目介绍:使用hadoop实现云盘的增删读获取列表功能,hadoop不支持数据修改,特性是一次写入多次读取.主流的网盘也不支持该功能.今天我们用hdfs的FileSystem实现这些操作. 1.上传功 ...
- Nextcloud私有云盘在Centos7下的部署笔记
搭建个人云存储一般会想到ownCloud,堪称是自建云存储服务的经典.而Nextcloud是ownCloud原开发团队打造的号称是“下一代”存储.初一看觉得“口气”不小,刚推出来就重新“定义”了Clo ...
- 使用树莓派制作一套“NAS+私有云盘+下载机”
原创作者:HackLiu 0×00 前言 如果你家里有多台设备需要联网需要娱乐,你一定会或多或少遇到设备碎片化带来的烦恼.当然,已经有很多厂商包括新晋的小米.360在内的互联网公司 ...
随机推荐
- LAMP平台的搭建及应用
实验要求 1.构建PHP运行环境,实现LAMP协同架构,前提条件是服务器中已经编译好了Apache HTTP Server和MySQL数据库,(编译安装apache和编译安装mysql 请查看公众号L ...
- 如何使用EditPlus批量删除 带有某个字符的一行
比如以下五行,我要将带有英文字母a的一行全部批量删除1234551243243123aa244123123981232137aa 2013-04-11 19:32 提问者采纳 我这里是英文版, ...
- dns bind配置教程
实验环境 三台centos7虚拟机,一台ip为192.168.52.130,一台为192.168.52.131,最后一台为192.168.52.132 安装bind 使用yum -y insall b ...
- MySQL多实例.md
MySQL5.7多实例配置 数据库实例1配置文件 # cat /etc/my.cnf [mysqld] datadir=/data/mysql port=3306 socket=/tmp/mysql. ...
- 【转】Android实战技巧之四十九:Usb通信之USB Host
零 USB背景知识 USB是一种数据通信方式,也是一种数据总线,而且是最复杂的总线之一. 硬件上,它是用插头连接.一边是公头(plug),一边是母头(receptacle).例如,PC上的插座就是母头 ...
- day1-课堂代码
# # a = 1 # b = a # print(b) # # c = a + 1 # print(c) # # def add(x,y): # return x+y # # d = add(3,5 ...
- C#自定义控件开发
自定义控件开发 一般而言,Visual Studio 2005中自带的几十种控件已经足够我们使用了,但是,在一些特殊的需求中,可能需要一些特殊的控件来与用户进行交互,这时,就需要我们自己开发新的.满足 ...
- leetcode18—4Sum
Given an array nums of n integers and an integer target, are there elements a, b, c, and d in nums s ...
- Android SurfaceView概述
简介:SurfaceView继承自View,但它与View不同,View是在UI主线程中更新画面,而SurfaceView是在一个新线程中更新画面,View的特性决定了其不适合做动画,因为如果更新画面 ...
- POJ1127 Jack Straws
给你一些线段,求出哪些线段是相连的,哪些是不相连的.相连包括间接相连,即这两条线段本身不直接相连,而是通过其它线段的连接而间接相连. 线段相交+并查集 这里主要说如何判断线段相交:快速排斥试验+跨立试 ...