JAVA总结--Spring框架全解
一、Spring简介
- Spring 是个java企业级应用的开源开发框架。Spring主要用来开发Java应用,但是有些扩展是针对构建J2EE平台的web应用。Spring 框架目标是简化Java企业级应用开发,并通过POJO为基础的编程模型促进良好的编程习惯。
二、Spring框架组成
- 7个主要模块如下

- Core(核心容器):核心容器提供 Spring 框架的基本功能。核心容器的主要组件是
BeanFactory,它是通过工厂模式来实现的。BeanFactory使用控制反转 (IOC) 模式将应用程序的配置和依赖性规范与实际的应用程序代码分开。
三、核心组件详解 Bean/Context/Core/IOC/AOP/MVC
Spring 框架中的核心组件只有三个:Core、Context 和 Beans,其中Beans 组件最为重要;
Spring 就是面向 Bean 的编程(BOP,Bean Oriented Programming):关键点是把对象之间的依赖关系转而用配置文件来管理,也就是依赖注入机制;
Spring 设计策略类似面向对象编程(Object Oriented Programming),Spring将对象包装在 Bean 中,进而对这些对象管理以及进行一些额外操作;
三者关系:Bean 中包装Object,Object中包含数据;Context是Bean 依赖关系的集合;Core 是发现、建立和维护每个 Bean 之间的关系所需要的一些列的工具;
1、Bean 组件在 Spring 的 org.springframework.beans 包下:Bean 的定义、Bean 的创建以及对 Bean 的解析
(1)Bean 的定义,BeanDefinition,类图如下:
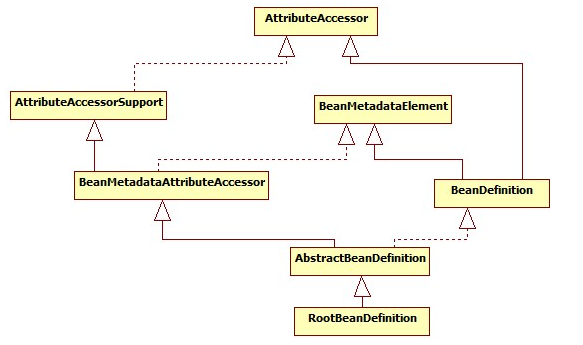
Bean 的定义就是完整的描述了在 Spring 的配置文件中定义的 <bean/> 节点中所有的信息,包括各种子节点。当 Spring 成功解析已定义的一个 <bean/> 节点后,在 Spring 的内部它就回被转化成 BeanDefinition 对象。以后所有的操作都是对这个对象完成的。
(2)Bean 的创建由工厂模式实现,类图如下:
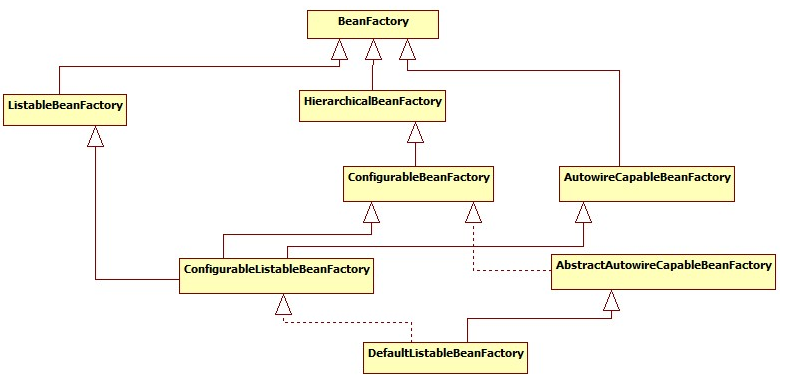
其中BeanFactory作为最顶层的一个接口类,它定义了IOC容器的基本功能规范,BeanFactory 有三个子类:ListableBeanFactory、HierarchicalBeanFactory 和AutowireCapableBeanFactory;最终实现所有的接口的默认实现类是DefaultListableBeanFactory;ListableBeanFactory 接口表示这些 Bean 是可列表的,而 HierarchicalBeanFactory 表示的是这些 Bean 是有继承关系的,也就是每个 Bean 有可能有父 Bean。AutowireCapableBeanFactory 接口定义 Bean 的自动装配规则。
(3)Bean 的解析,类图如下:

2、Context 组件在 Spring 的 org.springframework.context 包下:环境构建
Context 相关的类结构图如下:
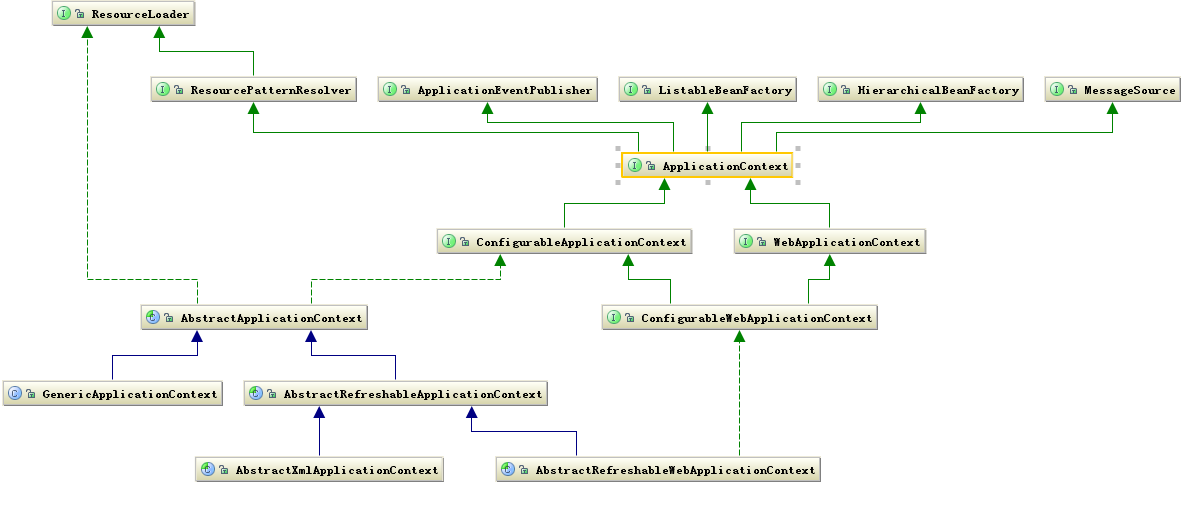
ApplicationContext 是 Context 的顶级父类,他除了能标识一个应用环境的基本信息外,他还继承了扩展了 Context 功能的五个接口;
ApplicationContext 继承了 BeanFactory(再次Spring 容器中运行的主体对象是 Bean);ApplicationContext 继承了 ResourceLoader 接口用于访问到任何外部资源(Core 的功能);
ApplicationContext 的子类主要包含两个方面:
- ConfigurableApplicationContext 表示该 Context 是可修改的,也就是在构建 Context 中用户可以动态添加或修改已有的配置信息,它下面又有多个子类,其中最经常使用的是可更新的 Context,即 AbstractRefreshableApplicationContext 类。
- WebApplicationContext 顾名思义,就是为 web 准备的 Context 他可以直接访问到 ServletContext,通常情况下,这个接口使用的少。
Context 作为 Spring 的 Ioc 容器,基本上整合了 Spring 的大部分功能,或者说是大部分功能的基础:标识一个应用环境;利用 BeanFactory 创建 Bean 对象;保存对象关系表;能够捕获各种事件;
3、Core 组件: Spring 的核心组件
Core 组件作为 Spring 的核心组件,包含了很多的关键类,重要组成部分就是定义了资源的访问方式;
Core 相关的类结构图如下:
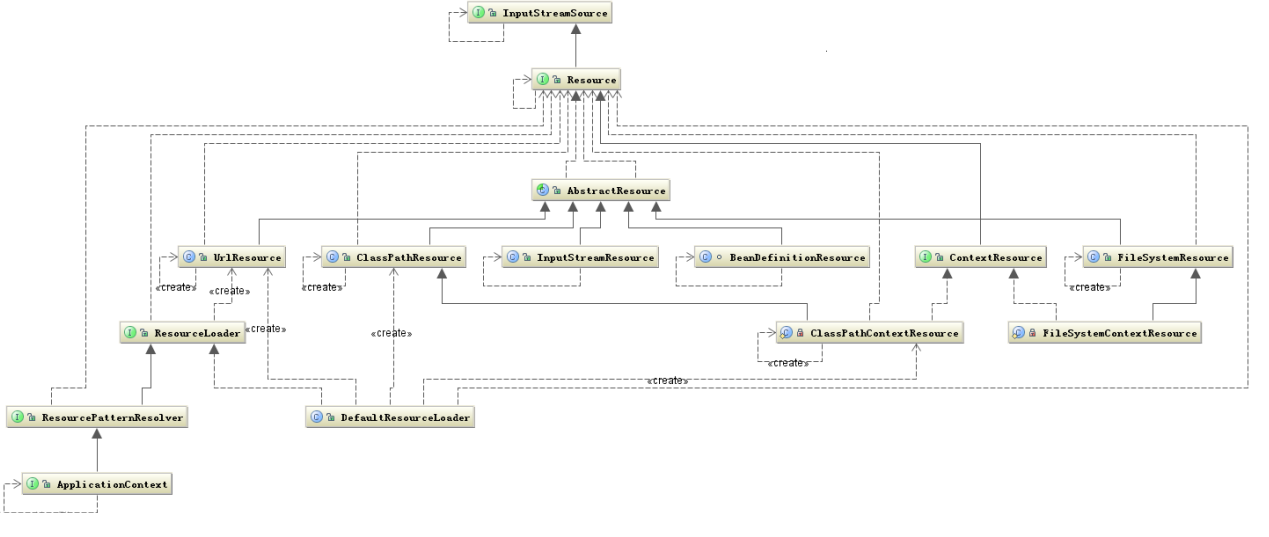
Resource 接口继承了 InputStreamSource 接口,这个接口中有个 getInputStream 方法,返回的是 InputStream 类,所有的资源都被可以通过 InputStream 类来获取,屏蔽资源提供者;
ResourceLoader 接口实现加载资源,保持资源的加载者的统一,默认实现是 DefaultResourceLoader;
Context 和 Resource 的类关系图如下:

Context 是把资源的加载、解析和描述工作委托给了 ResourcePatternResolver 类来完成,他相当于一个接头人,他把资源的加载、解析和资源的定义整合在一起便于其他组件使用;
4、IOC — 贴入源码注释均为“英译汉”,望理解
概念Inversion of Control(控制反转):把对象之间的依赖关系转而用配置文件来管理;对组件对象的控制权转移给外部容器;对象的协作关系由容器来建立。(不再由对象自己来负责)
(1)如何创建 BeanFactory 工厂?
Ioc 容器,实际上是 Context 组件结合其他两个组件共同构建了一个 Bean 关系网,源码如下
源码片段0:ApplicationContext =new FileSystemXmlApplicationContext(xmlPath);
 /**

 * Create a new FileSystemXmlApplicationContext, loading the definitions

 * from the given XML files and automatically refreshing the context.

 * @param configLocations array of file paths

 * @throws BeansException if context creation failed

  */

  //构造方法

 public FileSystemXmlApplicationContext(String... configLocations) throws BeansException {

     this(configLocations, true, null);

 }

 //实际调用

 public FileSystemXmlApplicationContext(String[] configLocations, boolean refresh, ApplicationContext parent)

         throws BeansException {

     super(parent);

     setConfigLocations(configLocations);

     if (refresh) {

         refresh();

     }

 }
源码片段1:AbstractApplicationContext 的refresh 方法
//构建的入口就在 AbstractApplicationContext 类的 refresh 方法中,方法的代码如下:
public void refresh() throws BeansException, IllegalStateException {
synchronized (this.startupShutdownMonitor) {
//调用容器准备刷新的方法,获取容器的当时时间,同时给容器设置同步标识// Prepare this context for refreshing.
prepareRefresh();
//告诉子类启动refreshBeanFactory()方法,Bean定义资源文件的载入从 // Tell the subclass to refresh the internal bean factory.
//子类的refreshBeanFactory()方法启动 --父子工厂均进行刷新
ConfigurableListableBeanFactory beanFactory = obtainFreshBeanFactory();
//为BeanFactory配置容器特性,例如类加载器、事件处理器等 // Prepare the bean factory for use in this context.
prepareBeanFactory(beanFactory);
try {
//为容器的某些子类指定特殊的BeanPost事件处理器// Allows post-processing of the bean factory in context subclasses.
postProcessBeanFactory(beanFactory);
//调用所有注册的BeanFactoryPostProcessor的Bean// Invoke factory processors registered as beans in the context.
invokeBeanFactoryPostProcessors(beanFactory);
//为BeanFactory注册BeanPost事件处理器. // Register bean processors that intercept bean creation.
//BeanPostProcessor是Bean后置处理器,用于监听容器触发的事件
registerBeanPostProcessors(beanFactory);
//初始化信息源,和国际化相关. // Initialize message source for this context.
initMessageSource();
//初始化容器事件传播器.// Initialize event multicaster for this context.
initApplicationEventMulticaster();
//调用子类的某些特殊Bean初始化方法 // Initialize other special beans in specific context subclasses.
onRefresh();
//为事件传播器注册事件监听器. // Check for listener beans and register them.
registerListeners();
//初始化所有剩余的单态Bean. // Instantiate all remaining (non-lazy-init) singletons.
finishBeanFactoryInitialization(beanFactory);
//初始化容器的生命周期事件处理器,并发布容器的生命周期事件 // Last step: publish corresponding event.
finishRefresh();
}
catch (BeansException ex) {
//销毁以创建的单态Bean // Destroy already created singletons to avoid dangling resources.
destroyBeans();
//取消refresh操作,重置容器的同步标识. // Reset 'active' flag.
cancelRefresh(ex);
throw ex;
}
}
}
refresh()方法的作用是:在创建IoC容器前,如果已经有容器存在,则需要把已有的容器销毁和关闭,以保证在refresh之后使用的是新建立起来的IoC容器;第8行ConfigurableListableBeanFactory beanFactory = obtainFreshBeanFactory();以后均为注册容器的信息源和生命周期事件;
源码片段2:上述代码第8行中的obtainFreshBeanFactory方法
 protected ConfigurableListableBeanFactory obtainFreshBeanFactory() {

        //这里使用了委派设计模式,父类定义了抽象的refreshBeanFactory()方法,具体实现调用子类容器的refreshBeanFactory()方法

        refreshBeanFactory();

        ConfigurableListableBeanFactory beanFactory = getBeanFactory();

        if (logger.isDebugEnabled()) {

             logger.debug("Bean factory for " + getDisplayName() + ": " + beanFactory);

        }

        return beanFactory;

  }
源码片段3:上述代码第3行中的refreshBeanFactory方法
 protected final void refreshBeanFactory() throws BeansException {

        if (hasBeanFactory()) {//如果已经有容器,销毁容器中的bean,关闭容器

            destroyBeans();

            closeBeanFactory();

        }

        try {

             //创建IoC容器

             DefaultListableBeanFactory beanFactory = createBeanFactory();

             beanFactory.setSerializationId(getId());

            //对IoC容器进行定制化,如设置启动参数,开启注解的自动装配等

            customizeBeanFactory(beanFactory);

            //调用载入Bean定义的方法,主要这里又使用了一个委派模式,在当前类中只定义了抽象的loadBeanDefinitions方法,具体的实现调用子类容器

            loadBeanDefinitions(beanFactory);

            synchronized (this.beanFactoryMonitor) {

                this.beanFactory = beanFactory;

            }

        }

        catch (IOException ex) {

            throw new ApplicationContextException("I/O error parsing bean definition source for " + getDisplayName(), ex);

        }

    }
先判断BeanFactory是否存在,如果存在则先销毁beans并关闭beanFactory,接着创建DefaultListableBeanFactory,并调用loadBeanDefinitions(beanFactory)装载bean定义;
源码片段4:上述代码第13行中的loadBeanDefinitions(beanFactory)方法
 public abstract class AbstractXmlApplicationContext extends AbstractRefreshableConfigApplicationContext {

     ……

     //实现父类抽象的载入Bean定义方法

     @Override

     protected void loadBeanDefinitions(DefaultListableBeanFactory beanFactory) throws BeansException, IOException {

         //创建XmlBeanDefinitionReader,即创建Bean读取器,并通过回调设置到容器中去,容  器使用该读取器读取Bean定义资源

         XmlBeanDefinitionReader beanDefinitionReader = new XmlBeanDefinitionReader(beanFactory);

         //为Bean读取器设置Spring资源加载器,AbstractXmlApplicationContext的

         //祖先父类AbstractApplicationContext继承DefaultResourceLoader,因此,容器本身也是一个资源加载器

        beanDefinitionReader.setResourceLoader(this);

        //为Bean读取器设置SAX xml解析器

        beanDefinitionReader.setEntityResolver(new ResourceEntityResolver(this));

        //当Bean读取器读取Bean定义的Xml资源文件时,启用Xml的校验机制

        initBeanDefinitionReader(beanDefinitionReader);

        //Bean读取器真正实现加载的方法

        loadBeanDefinitions(beanDefinitionReader);

    }

    //Xml Bean读取器加载Bean定义资源

    protected void loadBeanDefinitions(XmlBeanDefinitionReader reader) throws BeansException, IOException {

        //获取Bean定义资源的定位

        Resource[] configResources = getConfigResources();

        if (configResources != null) {

            //Xml Bean读取器调用其父类AbstractBeanDefinitionReader读取定位

            //的Bean定义资源

            reader.loadBeanDefinitions(configResources);

        }

        //如果子类中获取的Bean定义资源定位为空,则获取FileSystemXmlApplicationContext构造方法中setConfigLocations方法设置的资源

        String[] configLocations = getConfigLocations();

        if (configLocations != null) {

            //Xml Bean读取器调用其父类AbstractBeanDefinitionReader读取定位

            //的Bean定义资源

            reader.loadBeanDefinitions(configLocations);

        }

    }

    //这里又使用了一个委托模式,调用子类的获取Bean定义资源定位的方法

    //该方法在ClassPathXmlApplicationContext中进行实现,对于我们

    //举例分析源码的FileSystemXmlApplicationContext没有使用该方法

    protected Resource[] getConfigResources() {

        return null;

    }   ……

 41}
原文参照: https://www.ibm.com/developerworks/cn/java/j-lo-spring-principle/ (IBM在线图书,有价值)
https://www.cnblogs.com/ITtangtang/p/3978349.html
(2)Bean生命周期
  <bean id="batchAddLineActiona" class="nc.ui.pgrade_set.action.Pgradepd_setAddLineActiona" init-method="initUI" >

          <property name="model"><ref bean="batchModel"/></property>

          <property name="voClassName" value="nc.vo.pgradepd_set.Grade_setVO" />

          <property name="exceptionHandler"><ref bean="exceptionHandler" /></property>

</bean>- 概念Bean:一个组件;
- Bean 的标识 (id 和 name),Id 属性具有唯一性,name 属性可以指定一个或者多个名称,第一名称默认为标识;
- Bean 的 class属性,具体实现类(注意是实现类,不能是接口)的全路径包名.类名,在 Spring 配置文件中 class 属性指明 Bean 的来源,也就是 Bean 的实际路径,它指向一个实体类;
- Bean 的作用域 scope,
- Singleton( 单例 ):表示Spring IoC容器中只会存在一个共享的bean实例;
- non-Singleton(也称 prototype):每次对该bean请求(将其注入到另一个bean中,或者调用getBean())时都会创建一个新的bean实例;
- 仅在基于web的Spring ApplicationContext情形下有效:request:针对每一个 HTTP 请求都会产生一个新的 Bean,请求结束时销毁;
- 仅在基于web的Spring ApplicationContext情形下有效:session :针对某个HTTP Session都会产生一个新的 Bean,HTTP Session最终被废弃时销毁;
- 仅在基于web的Spring ApplicationContext情形下有效:global session :全局的HTTP Session中(基于portlet的web应用),一个bean定义对应一个实例;
- 概念Inversion of Control(控制反转):对组件对象的控制权转移给外部容器;对象的协作关系由容器来建立。(不再由对象自己来负责)
1)Bean实例化
实例化的三种方式:构造器实例化、静态工厂方式实例化、实例工厂方式实例化;
2)属性注入
IOC注入,根据Bean的定义信息进行属性配置;
3)自身方法、Bean级生命周期接口和方法、容器级生命接口和方法、工厂后处理器接口偶和方法、
BeanNameAware接口,调用它实现的setBeanName(String beanId)方法,此处传递的是Spring配置文件中Bean的ID;
BeanFactoryAware接口,调用它实现的setBeanFactory(),传递的是Spring工厂本身(可以用这个方法获取到其他Bean);
BeanPostProcessors,调用postProcessBeforeInstantiation(Class<?>c,String beanName) 方法;
Spring配置文件中配置了init-method属性,自动调用其配置的初始化方法;
BeanPostProcessors,调用postProcessAfterInstantiation(Object bean,String beanName) 方法;
4)此时实例化的Bean就可以使用了
此时,Bean已经可以被应用系统使用,并且将保留在BeanFactory中直到它不在被使用;
5)销毁接口和方法
关闭容器时,DisposableBean接口,执行destroy()方法;
关闭容器时,Spring配置文件中配置了destroy-method属性,自动调用其配置的销毁方法;
(3)依赖注入的几种方式
注解注入:Autowired、Resource、Qualifier、Service、Controller、Repository、Component;
Autowired是自动注入,代替setter和getter方法;Repository类似Autowired(按类型等),但是它是按照名称注入;Qualifier和Autowired配合使用,指定bean的名称(接口多实现时接口声明变量确定实现类);Service,Controller,Repository分别标记类是Service层类,Controller层类,数据存储层的类;一般注入的是DAO实现类和Service的接口;
set注入:定义私有变量,借助setXXX方法设置属性值;XML文件的<property>标签声明(name,value或ref);
构造器注入:带有参数的构造函数注入;
工厂注入:静态工厂的方法注入,实例工厂的方法注入;
5、AOP(Aspect Oriented Programming),即面向切面编程
(1)代理模式
代理模式:提供了对目标对象另外的访问方式;即通过代理对象访问目标对象。
代理模式的关键点是:代理对象与目标对象,代理对象是对目标对象的扩展,并会调用目标对象;
代理模式优点:在目标对象已经实现的功能操作的基础上,增加额外的功能操作,拓展目标对象的功能;(不修改已经写好的代码,运用代理模式实现新功能)
静态代理模式:代理对象需要与目标对象实现一样的接口
 // 接口

 public interface IUserDao {

     void save();

 }

 /**

  * 接口实现, 目标对象

  */

 public class UserDao implements IUserDao {

     public void save() {

         System.out.println("----已经保存数据!----");

     }

 }

 /**

  * 代理对象,静态代理

  */

 public class UserDaoProxy implements IUserDao{

     //接收保存目标对象

     private IUserDao target;

     public UserDaoProxy(IUserDao target){

         this.target=target;

     }

     public void save() {

         System.out.println("开始事务...");

         target.save();//执行目标对象的方法

         System.out.println("提交事务...");

     }

 }

 /**

  * 测试类

  */

 public class App {

     public static void main(String[] args) {

         //目标对象

         UserDao target = new UserDao();

         //代理对象,把目标对象传给代理对象,建立代理关系

         UserDaoProxy proxy = new UserDaoProxy(target);

         proxy.save();//执行的是代理的方法

     }

 }
JDK动态代理模式:代理对象不需要实现接口,但目标对象必须实现接口
static Object newProxyInstance(ClassLoader loader, Class<?>[] interfaces,InvocationHandler h )
其中,在Proxy类中是静态方法,且接收的三个参数依次为:
ClassLoader loader:指定当前目标对象使用类加载器,获取加载器的方法是固定的;Class<?>[] interfaces:目标对象实现的接口的类型,使用泛型方式确认类型;InvocationHandler h:事件处理,执行目标对象的方法时,会触发事件处理器的方法,会把当前执行目标对象的方法作为参数传入;
 /**

  * 创建动态代理对象

  * 动态代理不需要实现接口,但是需要指定接口类型

  */

 public class ProxyFactory{

     //维护一个目标对象

     private Object target;

     public ProxyFactory(Object target){

         this.target=target;

     }

    //给目标对象生成代理对象

     public Object getProxyInstance(){

         return Proxy.newProxyInstance(

                 target.getClass().getClassLoader(),

                 target.getClass().getInterfaces(),

                 new InvocationHandler() {

                     @Override

                     public Object invoke(Object proxy, Method method, Object[] args) throws Throwable {

                         System.out.println("开始事务2");

                         //执行目标对象方法

                         Object returnValue = method.invoke(target, args);

                         System.out.println("提交事务2");

                         return returnValue;

                     }

                 }

         );

     }

 }

 /**

  * 测试类

  */

 public class App {

     public static void main(String[] args) {

         // 目标对象

         IUserDao target = new UserDao();

         // 【原始的类型 class cn.itcast.b_dynamic.UserDao】

         System.out.println(target.getClass());

         // 给目标对象,创建代理对象

         IUserDao proxy = (IUserDao) new ProxyFactory(target).getProxyInstance();

         // class $Proxy0   内存中动态生成的代理对象

         System.out.println(proxy.getClass());

         // 执行方法   【代理对象】

         proxy.save();

     }

 }
Cglib动态代理:子类代理,目标对象不需要实现接口,根据目标对象构建一个子类对象从而实现对目标对象功能的扩展;
 /**

  * 目标对象,没有实现任何接口

  */

 public class UserDao {

     public void save() {

         System.out.println("----已经保存数据!----");

     }

 }

 /**

  * Cglib子类代理工厂

  * 对UserDao在内存中动态构建一个子类对象

  */

 public class ProxyFactory implements MethodInterceptor{

     //维护目标对象

     private Object target;

     public ProxyFactory(Object target) {

         this.target = target;

     }

     //给目标对象创建一个代理对象

     public Object getProxyInstance(){

         //1.工具类

         Enhancer en = new Enhancer();

         //2.设置父类

         en.setSuperclass(target.getClass());

         //3.设置回调函数

         en.setCallback(this);

         //4.创建子类(代理对象)

         return en.create();

     }

     @Override

     public Object intercept(Object obj, Method method, Object[] args, MethodProxy proxy) throws Throwable {

         System.out.println("开始事务...");

         //执行目标对象的方法

         Object returnValue = method.invoke(target, args);

         System.out.println("提交事务...");

         return returnValue;

     }

 }

 /**

  * 测试类

  */

 public class App {

     @Test

     public void test(){

         //目标对象

         UserDao target = new UserDao();

         //代理对象

         UserDao proxy = (UserDao)new ProxyFactory(target).getProxyInstance();

         //执行代理对象的方法

         proxy.save();

     }

 }
在Spring的AOP编程中:如果加入容器的目标对象有实现接口,用JDK代理;如果目标对象没有实现接口,用Cglib代理;
(2)AOP概念
切面:与业务无关,却被业务模块共同调用的逻辑,封装起来,提高代码复用,利于维护等;
连接点:被拦截的方法;(拦截哪些方法,增加哪些功能)
切入点:对连接点进行拦截的定义;
通知:拦截到连接点后要执行操作或处理,如前置before、后置after-returning、异常after-throwing、最终after、环绕around通知五类;
引入:在不修改代码的前提下,为类添加新的属性或者方法;
织入:将切面应用于目标对象并且导致代理对象的创建;
(3)使用场景
Authentication 权限
Caching 缓存
Context passing 内容传递
Error handling 错误处理
Lazy loading 懒加载
Debugging 调试
logging, tracing, profiling and monitoring 记录跟踪 优化 校准
Performance optimization 性能优化
Persistence 持久化
Resource pooling 资源池
Synchronization 同步
Transactions 事务
(4)实现方式--基础XML配置AOP、基于注解配置AOP、
AOP编程其实是很简单的事情,纵观AOP编程,程序员只需要参与三个部分:
1、定义普通业务组件
2、定义切入点,一个切入点可能横切多个业务组件
3、定义增强处理,增强处理就是在AOP框架为普通业务组件织入的处理动作
1)、基于xml配置Spring AOP;通过<aop:config>来配置
AOP配置要定义切面aspect、定义切点pointcut、定义连接通知方法等;
配置文件如下:
 <?xml version="1.0" encoding="UTF-8"?>

 <beans xmlns="http://www.springframework.org/schema/beans"

     xmlns:xsi="http://www.w3.org/2001/XMLSchema-instance"

     xmlns:aop="http://www.springframework.org/schema/aop"

     xmlns:tx="http://www.springframework.org/schema/tx"

     xsi:schemaLocation="http://www.springframework.org/schema/beans

         http://www.springframework.org/schema/beans/spring-beans-4.2.xsd

         http://www.springframework.org/schema/aop

         http://www.springframework.org/schema/aop/spring-aop-4.2.xsd">

         <bean id="helloWorldImpl1" class="com.xrq.aop.HelloWorldImpl1" />

         <bean id="helloWorldImpl2" class="com.xrq.aop.HelloWorldImpl2" />

         <bean id="timeHandler" class="com.xrq.aop.TimeHandler" />

         <aop:config>

             <aop:aspect id="time" ref="timeHandler">

                 <aop:pointcut id="addAllMethod" expression="execution(* com.xrq.aop.HelloWorld.*(..))" />

                 <aop:before method="printTime" pointcut-ref="addAllMethod" />

                 <aop:after method="printTime" pointcut-ref="addAllMethod" />

             </aop:aspect>

         </aop:config>

 </beans>
实现代码如下:
 //定义接口

 public interface HelloWorld

 {

     void printHelloWorld();

     void doPrint();

 }

 //实现类1

 public class HelloWorldImpl1 implements HelloWorld

 {

     public void printHelloWorld()

     {

         System.out.println("Enter HelloWorldImpl1.printHelloWorld()");

     }

     public void doPrint()

     {

         System.out.println("Enter HelloWorldImpl1.doPrint()");

         return ;

     }

 }

 //实现类2

 public class HelloWorldImpl2 implements HelloWorld

 {

     public void printHelloWorld()

     {

         System.out.println("Enter HelloWorldImpl2.printHelloWorld()");

     }

     public void doPrint()

     {

         System.out.println("Enter HelloWorldImpl2.doPrint()");

         return ;

     }

 }

 //横切关注点--增加打印时间

 public class TimeHandler

 {

     public void printTime()

     {

         System.out.println("CurrentTime = " + System.currentTimeMillis());

     }

 }

 //main方法测试

 public static void main(String[] args)

 {

     ApplicationContext ctx =

             new ClassPathXmlApplicationContext("aop.xml");

     HelloWorld hw1 = (HelloWorld)ctx.getBean("helloWorldImpl1");

     HelloWorld hw2 = (HelloWorld)ctx.getBean("helloWorldImpl2");

     hw1.printHelloWorld();

     System.out.println();

     hw1.doPrint();

     System.out.println();

     hw2.printHelloWorld();

     System.out.println();

     hw2.doPrint();

 }
打印输出结果:
CurrentTime = 1446129611993

Enter HelloWorldImpl1.printHelloWorld()

CurrentTime = 1446129611993

CurrentTime = 1446129611994

Enter HelloWorldImpl1.doPrint()

CurrentTime = 1446129611994

CurrentTime = 1446129611994

Enter HelloWorldImpl2.printHelloWorld()

CurrentTime = 1446129611994

CurrentTime = 1446129611994

Enter HelloWorldImpl2.doPrint()

CurrentTime = 1446129611994
2)、基于注解配置
目标对象对应的原代码,即被代理类代码中,增加注解@Service等;
在通知类代码中,增加注解@Component会被IOC容器管理、@Aspect声明是切面;在方法前增加@Before、@After等通知注解;
 /**

  * 被代理的目标类

  */

 @Service("math")

 public class Math{

 ......

 }

 /**

  * 通知类,横切逻辑

  *

  */

 @Component

 @Aspect

 public class Advices {

     @Before("execution(* com.zhangguo.Spring052.aop02.Math.*(..))")

     public void before(JoinPoint jp){

         System.out.println("----------前置通知----------");

         System.out.println(jp.getSignature().getName());

     }

     @After("execution(* com.zhangguo.Spring052.aop02.Math.*(..))")

     public void after(JoinPoint jp){

         System.out.println("----------最终通知----------");

     }

 }
 <!--XML仅仅声明需要用到AOP即可-->

 <aop:aspectj-autoproxy/>

 <!--或者-->

 <aop:aspectj-autoproxy proxy-target-class="true"></aop:aspectj-autoproxy>
注:1、2中的execution(* com.xrq.aop.HelloWorld.*(..))语句中,execution实际上是切点函数(AspectJ切点函数),除此之外还有within(包名.*)匹配指定的包的所有连接点,this(类名)该类名下所有方法,args(多个参数类型)参数个数以及类型能匹配上的方法,annotation特殊制定注解;
注:除以上知识还有AspectJ注解通知、零配置实现IOC和AOP;
6、Spring的MVC:基于请求驱动的Web框架
(1)、组成部分
模型(model)—视图(view)—控制器(controller)

MVC执行步骤
- 用户发起Request请求至控制器(Controller),控制器接收用户的请求,并将请求委托给模型进行处理。
- 控制器请求模型(Model),模型处理业务数据并得到处理结果,模型通常是指业务逻辑,包括Pojo、Service、Dao等三层
- 模型将处理结果返回给控制器
- 控制器将模型数据在视图(View)中展示
说明:web中模型无法将数据直接在视图上显示,需要通过控制器完成。如果在C/S应用中模型是可以将数据在视图中展示的。 - 控制器将视图响应结果,Response响应给用户,通过视图展示给用户数据或者处理结果。
以上MVC仅仅易于入门,实际如下:
Spring MVC主要由DispatcherServlet前端控制器、HandlerMapping处理器映射器、HandlerAdapter处理器(控制器、适配器)、ViewResolver视图解析器、视图组成;
前端控制器:Spring MVC的核心,职责分派、职责调度、控制流程,负责控制转发,中央处理器,接收到用户的请求,调用处理器映射器找到handler,调用处理器
执行handler,如果遇到异常,统一调用异常处理器;
处理器映射器:根据配置文件的配置或根据注解设置,找到.action对应的Handler(处理器),还找到Handler前边和后边执行的拦截器;
处理器:根据handler类的规则去执行Handler,给前端控制器返回一个ModelAndView;
视图解析器:根据逻辑视图名解析到真正的view的地址,最终将View返回给前端控制器;
(2)运行流程
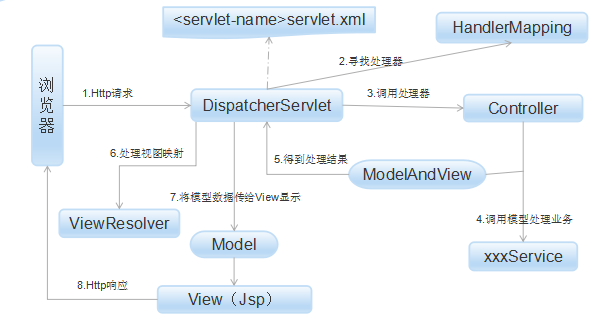
- 1Http请求:客户端请求提交到DispatcherServlet。
- 2寻找处理器:由DispatcherServlet控制器查询一个或多个HandlerMapping,找到处理请求的Controller。
- 3调用处理器:DispatcherServlet将请求提交到Controller。
- 4-5调用业务处理和返回结果:Controller调用业务逻辑处理后,返回ModelAndView。
- 6-7处理视图映射并返回模型: DispatcherServlet查询一个或多个ViewResoler视图解析器,找到ModelAndView指定的视图。
- 8 Http响应:视图负责将结果显示到客户端。
流程描述
1、用户发送请求至前端控制器DispatcherServlet
2、DispatcherServlet收到请求调用HandlerMapping处理器映射器。
3、处理器映射器找到具体的处理器,生成处理器对象及处理器拦截器(如果有则生成)一并返回给DispatcherServlet。
4、DispatcherServlet调用HandlerAdapter处理器适配器
5、HandlerAdapter经过适配调用具体的处理器(Controller,也叫后端控制器)。
6、Controller执行完成返回ModelAndView
7、HandlerAdapter将controller执行结果ModelAndView返回给DispatcherServlet
8、DispatcherServlet将ModelAndView传给ViewReslover视图解析器
9、ViewReslover解析后返回具体View
10、DispatcherServlet根据View进行渲染视图(即将模型数据填充至视图中)。
11、DispatcherServlet响应用户
(3)MVC实现 https://www.cnblogs.com/superjt/p/3309255.html
- web.xml文件中进行配置,在配置中设置springmvc-context.xml的路径
- Spring是一个开源框架,是一个分层架构;
- Spring目标是遵循一系列的接口标准,这样的好处是只需要简单的Java对象或者Javabean就能进行Java EE开发,这样开发的入门、测试、应用部署都得到了简化;
- Spring有7个核心模块,Core(核心容器)、AOP(切面)、DAO(事务支持)、ORM(O\R MAPPING封装)、Web(上下文、服务于Web请求等)、Web MVC(MVC框架);
- Inversion of Control(控制反转)、Dependency Injection(依赖注入)
二、控制反转IoC
概念:对组件对象的控制权转移给外部容器;对象的协作关系由容器来建立。(不再由对象自己来负责)
实现方式:<1>依赖查找(Dependency Lookup)<2>依赖注入(Dependency Injection)
依赖注入:setter注入---- XMl的bean下增加property配置,java增加get/set方法;
三、面向切面的编程AOP
概念:将程序中的交叉业务逻辑提取出来;将业务逻辑的各个部分分离,降低耦合;关注于业务逻辑而不是实体对象;
AOP(Aspect Oriented Programming) OOP(Object Oriented Programming,面向对象的编程)
四、框架优缺点
优点:降低耦合,解耦;AOP,易于实现业务逻辑;支持主流框架;高开放性,有的放矢;
面试常问:
1、最常用的BeanFactory 实现是XmlBeanFactory 类,它根据XML文件中的定义加载beans。该容器从XML 文件读取配置元数据并用它去创建一个完全配置的系统或应用。
2、bean 装配是指在Spring 容器中把bean组装到一起,前提是容器需要知道bean的依赖关系,如何通过依赖注入来把它们装配到一起。
3、Spring 容器能够自动装配相互合作的bean,这意味着容器不需要<constructor-arg>和<property>配置,能通过Bean工厂自动处理bean之间的协作。
4、有五种自动装配的方式,可以用来指导Spring容器用自动装配方式来进行依赖注入。
- no:默认的方式是不进行自动装配,通过显式设置ref 属性来进行装配。
- byName:通过参数名 自动装配,Spring容器在配置文件中发现bean的autowire属性被设置成byname,之后容器试图匹配、装配和该bean的属性具有相同名字的bean。
- byType::通过参数类型自动装配,Spring容器在配置文件中发现bean的autowire属性被设置成byType,之后容器试图匹配、装配和该bean的属性具有相同类型的bean。如果有多个bean符合条件,则抛出错误。
- constructor:这个方式类似于byType, 但是要提供给构造器参数,如果没有确定的带参数的构造器参数类型,将会抛出异常。
- autodetect:首先尝试使用constructor来自动装配,如果无法工作,则使用byType方式。
5、自动装配的局限性是:
- 重写: 你仍需用 <constructor-arg>和 <property> 配置来定义依赖,意味着总要重写自动装配。
- 基本数据类型:你不能自动装配简单的属性,如基本数据类型,String字符串,和类。
- 模糊特性:自动装配不如显式装配精确,如果有可能,建议使用显式装配。
JAVA总结--Spring框架全解的更多相关文章
- JAVA笔试题(全解)
目录 一. Java基础部分................................................................. 9 1.一个".java& ...
- Spring框架详解介绍-基本使用方法
1.Spring框架-控制反转(IOC) 2.Spring框架-面向切面编程(AOP) 3.Spring 内置的JdbcTemplate(Spring-JDBC) Spring框架-控制反转(IOC) ...
- 关于Spring框架你解多少?
类似于谈谈你对Spring的了解的题目,在很多面试中都会被提到的. Spring,英文意思是春天的意思.在java的世界里,Spring是一个现时非常流行的开源应用框架. Spring 框架是一个分层 ...
- spring框架详解: IOC装配Bean
1 Spring框架Bean实例化的方式: 提供了三种方式实例化Bean. 构造方法实例化:(默认无参数) 静态工厂实例化: 实例工厂实例化: 无参数构造方法的实例化: <!-- 默认情况下使用 ...
- Spring 框架 详解 (四)------IOC装配Bean(注解方式)
Spring的注解装配Bean Spring2.5 引入使用注解去定义Bean @Component 描述Spring框架中Bean Spring的框架中提供了与@Component注解等效的三个注 ...
- Spring 框架 详解 (三)-----IOC装配Bean
IOC装配Bean: 1.1.1 Spring框架Bean实例化的方式: 提供了三种方式实例化Bean. * 构造方法实例化:(默认无参数) * 静态工厂实例化: * 实例工厂实例化: 无参数构造方法 ...
- Java之Spring mvc详解
文章大纲 一.Spring mvc介绍二.Spring mvc代码实战三.项目源码下载四.参考文章 一.Spring mvc介绍 1. 什么是springmvc springmvc是sprin ...
- Spring 框架 详解 (二)
Spring的入门的程序: 1.1.1 下载Spring的开发包: spring-framework-3.2.0.RELEASE-dist.zip ---Spring开发包 * docs :sprin ...
- Spring 框架 详解 (一)
Spring是分层的JavaSE/EE full-stack(一站式) 轻量级开源框架 * 分层: * SUN提供的EE的三层结构:web层.业务层.数据访问层(持久层,集成层) * Struts2是 ...
随机推荐
- JOI2019 有趣的家庭菜园3
问题描述 家庭菜园专家 JOI 先生在他的家庭菜园中种植了一种叫 Joy 草的植物.在他的菜园里,有 N 个花盆自东向西摆放,编号分别为 \(1, \ldots, N\).每个花盆中有一株 Joy 草 ...
- 微信小程序-wxml-空格
必须要在<text>标签中 先在标签中写decode="{{true}}"然后 就代表空格了 占一个中文字符
- 微信小程序-坑1-await-async
VM45:1 thirdScriptError sdk uncaught third Error regeneratorRuntime is not defined ReferenceError: r ...
- System.currentTimeMillis和System.nanoTime()
ns(nanosecond):纳秒, 时间单位.一秒的10亿分之一,即等于10的负9次方秒.常用作 内存读写速度的单位. 1纳秒=0.000001 毫秒 1纳秒=0.00000 0001秒 jav ...
- vue多层传递$attrs
今天在使用$attrs的时候遇到一个问题: 父组件: <PanelContainer name="正向舆情"> <PositiveOpinion opinion= ...
- RAM 大全-DRAM, SRAM, SDRAM的关系与区别
ROM和RAM指的都是半导体存储器,ROM是Read Only Memory的缩写,RAM是Random Access Memory的缩写.ROM在系统停止供电的时候仍然可以保持数据,而RAM通常都是 ...
- 3D Computer Grapihcs Using OpenGL - 05 EBO
本节将采用两种方法绘制两个三角形. 先看第一种方法的代码 MyGlWindow.cpp #include <gl\glew.h> #include "MyGlWindow.h&q ...
- SpringCloud 教程 (六)断路器聚合监控(Hystrix Turbine)
一.Hystrix Turbine简介 看单个的Hystrix Dashboard的数据并没有什么多大的价值,要想看这个系统的Hystrix Dashboard数据就需要用到Hystrix Turbi ...
- SpringCloud 教程 (五) 断路器监控(Hystrix Dashboard)
一.Hystrix Dashboard简介 在微服务架构中为例保证程序的可用性,防止程序出错导致网络阻塞,出现了断路器模型.断路器的状况反应了一个程序的可用性和健壮性,它是一个重要指标.Hystrix ...
- [ethereum源码分析](4) ethereum运行开启console
前言 在上一章我们介绍了 ethereum初始化指令 ,包括了系统是如何调用指令和指令的执行.在本章节我们将会介绍 geth --datadir dev/data/ --networkid cons ...
