轻松搞定表白女朋友:Android版APP (零基础也可直接下载软件)
在我们平时生活当中,经常会看到一些表白女朋友的html网页,但是Android端的表白软件可以说是基本没有,笔者在全网搜了一下,就没有一个可以用的。安卓端可以给人一种定制和精美的感觉,这是网页所做不到的,网页链接不见了就没了。因此在这里将自己写的Android软件制作流程以及代码全部开源,这里采用了web与安卓原生混合开发的技术,引入了腾讯X5内核替换WebView,可以让软件加载速度提高百分之三十。在github里,我也导入了了几款不同的背景动态模板,可以供你们进行挑选,也导入了不同的背景音乐可供选择,具体的更换方法也会在下面的博客当中详细解释的(如果不想自己敲代码的话),麻烦在Github给颗星,小弟将不胜感激!不会打包生成安装包apk的,可以直接安装的apk文件我也直接上传到github上了!零基础也可以玩儿!看了博客还能自己改!
- Github链接:https://github.com/Geeksongs/ExpressLove
- 安装包APK文件链接(debug版本,可直接使用):https://github.com/Geeksongs/ExpressLove/tree/master/app/debug
软件表白流程:
1.首页开屏暂停三秒,固定背景图
2.进入表白界面
3.如果想要离开,点击手机上的返回按钮,但不管怎么点也退不出去
4.开始表白
5.表白成功之后,出现烟花场景,然后跳转至微信,自动和小哥哥聊天(也可以跳转到QQ等任何软件,只需要改一个字符串就可以了)
下面是软件演示:
一.首先是我们的Mainactivity.java
这个活动(Java文件)在文件夹:ExpressLove\app\src\main\java\com\example\lenovo\expresslove下。我们在这个活动当中写进去一个hander,进入延时,延时到了之后跳转到第二个活动,这个活动让我们的首页开屏暂停三秒,固定背景图,如果想要更换背景图的你,则可以在下载下来的文件夹:ExpressLove\app\src\main\res\drawable当中的timg.png图片进行自行更换,但更换后的名称要保持一致。想要更改延时长短的你,则可以在下面的代码当中作修改,注释比较详细。
Mainactivity.java的代码如下:
package com.example.lenovo.expresslove;

import android.app.Activity;

import android.content.Intent;

import android.os.Bundle;

import android.os.Handler;

import android.support.v7.app.ActionBar;

import android.support.v7.app.AppCompatActivity;

import android.view.WindowManager;

import android.webkit.WebViewClient;

import com.tencent.smtt.sdk.WebView;

public class MainActivity extends AppCompatActivity {

    @Override

    protected void onCreate(Bundle savedInstanceState) {

        super.onCreate(savedInstanceState);

        setContentView(R.layout.activity_main);

        ActionBar actionBar=getSupportActionBar();//后面几行都用于隐藏标题栏

        if(actionBar !=null)

        {

            actionBar.hide();

        }

        getWindow().setFlags(WindowManager.LayoutParams.FLAG_FULLSCREEN, WindowManager.LayoutParams.FLAG_FULLSCREEN);

        getSupportActionBar().hide();

        new Handler().postDelayed(new Runnable(){ // 为了减少代码使用匿名Handler创建一个延时的调用

            public void run() {

                Intent i = new Intent(MainActivity.this,Main2Activity.class);//延时之后跳转到活动2,main2activity.java

                MainActivity.this.startActivity(i);

                MainActivity.this.finish();

            } }, 3000);//3000表示的是延时3秒

    }

        }
二.首页布局代码:activity_main.xml(不需要改)
在文件夹:ExpressLove\app\src\main\res\layout下的activity_main.xml 当中
<?xml version="1.0" encoding="utf-8"?>

<LinearLayout xmlns:android="http://schemas.android.com/apk/res/android"

    xmlns:tools="http://schemas.android.com/tools"

    android:layout_width="match_parent"

    android:layout_height="match_parent"

    android:orientation="vertical"

    android:background="@drawable/timg">

</LinearLayout>
三.进入第二个活动:(安卓程序员可以在这里进入腾讯X5内核)
main2activity.java,和Mainactivity.java在同一个文件夹下,这个活动就引入了我们的心形动态图的界面:
这部分代码由几个部分组成:
1.安卓程序员可以在加入腾讯X5内核,由于我们这个活动后面的背景动态是通过Webview来加载的,第一次打开软件的速度会偏慢,如果去掉注释删除webview控件的调用,使用X5则会提高加载速度。下面的注释也比较详细。
2.由于背后的动态是html5文件,这个文件是放置在笔者已经创建好的asset文件夹下的,如果想要更改后面的背景动态,则可以直接到ExpressLove\app\src\main\assets文件夹下查看我们已经给出的html5背景动态,如果不满意可以自己更替,笔者已经往里面注入了index.html index2.html index3.html index4.html 四个背景动态,效果可以自行在电脑浏览器当中查看,可以在webview代码实现处更改。如果想要本动态的背景文字,稍后我会详细解释。
3.再引入文字动画,但是动画就需要我们创建新的xml文件来完成这个动画了,这个活动里仅仅是Java代码对xml动画进行的调用,实现的是顶部标题栏文字的渐变动画,代码从animation处开始,使用的是补间动画的知识,稍后我们会给出新xml文件的代码。
4.流氓式表白过程,主要使用了对话框的技术,如果用户首先点击了软件上的button“点我啦”,则会跳转到一个对话框,而对话框又只有一个按钮,代码当中利用对话框的嵌套,从而实现点了对话框当中按钮之后又会出现新的对话框。直到点击完对话框。
5.无法返回到桌面的精美对话框dialog制作:如果用户点击了手机上的返回按钮,则会出现:“小姐姐求求你别离开我好吗?”,不管是点击确定还是返回都会返回到第二个活动当中,并不会退出软件。
ackage com.example.lenovo.expresslove;

import android.app.Dialog;

import android.content.DialogInterface;

import android.content.Intent;

import android.os.Build;

import android.os.Handler;

import android.support.v7.app.ActionBar;

import android.support.v7.app.AlertDialog;

import android.support.v7.app.AppCompatActivity;

import android.os.Bundle;

import android.view.KeyEvent;

import android.view.View;

import android.view.Window;

import android.view.WindowManager;

import android.view.animation.Animation;

import android.view.animation.AnimationUtils;

import android.webkit.WebViewClient;

import android.widget.Button;

import android.widget.TextView;

import android.widget.Toast;

import android.net.http.SslError;

import android.os.Bundle;

import android.support.v7.app.AppCompatActivity;

import android.webkit.SslErrorHandler;

import android.webkit.WebSettings;

import android.webkit.WebView;

import android.webkit.WebViewClient;

/*import com.tencent.smtt.sdk.WebSettings;

import com.tencent.smtt.sdk.WebView;*/

public class Main2Activity extends AppCompatActivity {

  //  private WebView mWebView;

  private WebView webView;

    AlertDialog builder=null;//进入流氓式表白

    @Override

    protected void onCreate(Bundle savedInstanceState) {

        super.onCreate(savedInstanceState);

        setContentView(R.layout.activity_main2);
//下面被注释掉的这几行代码完全看程序员的个人意愿了,如果想要用腾讯X5内核的,就把后面的注释符号删除就可以了,同时还需要把我们的webview控件相关的

      /*  mWebView = (com.tencent.smtt.sdk.WebView) findViewById(R.id.webView2);

        mWebView.loadUrl("file:///android_asset/index3.html");

        if (Build.VERSION.SDK_INT >= 21) {//设置顶部状态栏为半透明

            getWindow().setFlags(

                    WindowManager.LayoutParams.FLAG_TRANSLUCENT_STATUS,

                    WindowManager.LayoutParams.FLAG_TRANSLUCENT_STATUS);

        }*/

        final TextView  textView=(TextView)findViewById(R.id.textview);

//下面是运用的webview来加载我们的h5动画,如果想使用x5的可以把下面的这些删掉,再利用上面已经注释过的代码即可。

        webView = (WebView) findViewById(R.id.webView);

        //需要加载的网页的url

        webView.loadUrl("file:///android_asset/index3.html");//这里写的是assets文件夹下html文件的名称,需要带上后面的后缀名,前面的路径是安卓系统自己规定的android_asset就是表示的在assets文件夹下的意思,如果想要其他动态背景,更改index文件名即可。

        webView.getSettings().setLayoutAlgorithm(WebSettings.LayoutAlgorithm.SINGLE_COLUMN);//自适应屏幕

        webView.getSettings().setLoadWithOverviewMode(true);//自适应屏幕

        webView.getSettings().setSupportZoom(true);

        webView.getSettings().setUseWideViewPort(true);//扩大比例的缩放

       // webView.getSettings().setBuiltInZoomControls(true);//设置是否出现缩放工具,这里我想就不出现了,影响效果

        WebSettings settings = webView.getSettings();

        // 如果访问的页面中要与Javascript交互,则webview必须设置支持Javascript

        settings.setJavaScriptEnabled(true);

        webView.setWebViewClient(new WebViewClient(){

            public boolean shouldOverrideUrlLoading(WebView view, String url){

                view.loadUrl(url);

                return true;

            }

        });
//下面这里引入的是动画,在标题栏上方的文字渐变效果,从“正在加载当中”渐变到“还愣着干嘛?”

        Animation scaleAnimation = AnimationUtils.loadAnimation(this, R.animator.anim);

        textView.startAnimation(scaleAnimation);
//这里是隐藏安卓系统本身的标题栏

        ActionBar actionBar=getSupportActionBar();

        if(actionBar!=null)

        {

            actionBar.hide();

        }
//这里是设置安卓顶部状态栏为半透明状态,和我们的顶部标题栏颜色相呼应,不然的话显示时间的状态栏就是深蓝色,看起来会很烦

        if (Build.VERSION.SDK_INT >= ) {//设置顶部状态栏为半透明

            getWindow().setFlags(

                    WindowManager.LayoutParams.FLAG_TRANSLUCENT_STATUS,

                    WindowManager.LayoutParams.FLAG_TRANSLUCENT_STATUS);}

        getWindow().setFlags(WindowManager.LayoutParams.FLAG_FULLSCREEN, WindowManager.LayoutParams.FLAG_FULLSCREEN);

        getSupportActionBar().hide();

        new Handler().postDelayed(new Runnable(){ // 为了减少代码使用匿名Handler创建一个延时的调用

            public void run() {

                textView.setText("<----还愣着干嘛??");

            } }, );//文字渐变的时间为4500ms

        Button button=(Button)findViewById(R.id.button);

        button.setOnClickListener(new View.OnClickListener() {

            @Override

            public void onClick(View view) {

                AlertDialog.Builder b = new AlertDialog.Builder(Main2Activity.this);

//2.设置属性

                b.setTitle("每天做饭给你吃?");

                b.setPositiveButton("好呀", new DialogInterface.OnClickListener() {

                    @Override

                    public void onClick(DialogInterface dialogInterface, int i) {

                        AlertDialog.Builder c = new AlertDialog.Builder(Main2Activity.this);

                        c.setTitle("小姐姐:");

                        c.setMessage("每个月生活费全都给你");

                        c.setPositiveButton("好鸭", new DialogInterface.OnClickListener() {

                            @Override

                            public void onClick(DialogInterface dialogInterface, int i) {

                                AlertDialog.Builder d = new AlertDialog.Builder(Main2Activity.this);

                                d.setTitle("小姐姐:");

                                d.setMessage("房产证写你名字");

                                d.setNegativeButton("好鸭", new DialogInterface.OnClickListener() {

                                    @Override

                                    public void onClick(DialogInterface dialogInterface, int i) {

                                        AlertDialog.Builder y = new AlertDialog.Builder(Main2Activity.this);

                                        y.setTitle("小姐姐");

                                        y.setMessage("每天都陪你逛街");

                                        y.setNegativeButton("好呀", new DialogInterface.OnClickListener() {

                                            @Override

                                            public void onClick(DialogInterface dialogInterface, int i) {

                                                Intent intent=new Intent(Main2Activity.this,Main3Activity.class);

                                                startActivity(intent);

                                            }

                                        });

                                        y.create();

                                        y.show();

                                    }

                                });

                                d.create();

                                d.show();

                            }

                        });

                        c.create();//创建

                        c.show();//show

                    }

                });

                b.create();//创建

                b.show();//show

            }

        });

        //这里是外面的括号了

    }

//下面是点击返回,跳出精美对话框的按钮,不管确定还是取消都不会退出软件

    public boolean onKeyUp(int keyCode, KeyEvent event) {

        if(keyCode == KeyEvent.KEYCODE_BACK){

            new CommomDialog(this, R.style.dialog, "求求你别离开我好吗?", new CommomDialog.OnCloseListener() {

                @Override

                public void onClick(Dialog dialog, boolean confirm) {

                    if(confirm){

                        dialog.dismiss();

                    }

                }

            })

                    .setTitle("小姐姐:").show();

    }

    return true;

    }}
四.index3.html
如果想要修改背景动态后面的文字:“Dear love”为你想要Dear的那个人,则可以在这个网页文件里面进行修改:
如果不知道怎样自己创建asset目录的同学可以参见我的前几篇博文,传送门:https://www.cnblogs.com/geeksongs/p/10673133.html 文件目录在这儿:ExpressLove\app\src\main\assets
代码如下:
<!DOCTYPE html>

<html lang="en" >

<head>

<meta charset="UTF-8">

<title>爱你</title>

<link rel="stylesheet" href="css/style.css">

</head>

<body>

<link href='https://fonts.googleapis.com/css?family=Lato:100' rel='stylesheet' type='text/css'>

<canvas id="canvas" width="" height=""></canvas>

<div class="title"><b>Dear Love</b></div><!--在这里修改背景当中的文字-->

<script src='js/FastBlur.js'></script>

<script src='js/jquery.min.js'></script>

<script src="js/index.js"></script>

</body>

</html>
从代码当中我们可以看到这里引用了不少的js文件,相关的js文件夹我已经放到了asset文件夹之下,所以就可以进行正确的调用了。如果想引入新html5动画背景的程序员,请一定要注意您html5网页所对应的javascript文件和css文件所对应的文件夹名不要和笔者这里的重复了,不然会引起一些不必要的麻烦。
五.anim.xml
这个文件是我们补间动画所用到的xml文件,首前面的scale属性被我注释掉了,这个表示的是文字或者图片的缩放,但是实际在android软件当中运行的效果不太理想,就仅仅使用了alpha的渐变属性,对文字进行渐变。创建anim.xml需要特定的方式才能够创建,而不是直接在我们的layout文件夹之下进行创建。 同学们可以自行百度/谷歌一下。
<?xml version="1.0" encoding="utf-8"?>

<set xmlns:android="http://schemas.android.com/apk/res/android">

    <!--<scale

        android:duration=""

        android:startOffset =""

        android:fillBefore = "true"

        android:fillAfter = "false"

        android:fillEnabled= "true"

        android:repeatMode= "restart"

        android:repeatCount = ""

        android:fromXScale="0.0"

        android:toXScale=""

        android:fromYScale="0.0"

        android:toYScale=""

        android:pivotX="50%"

        android:pivotY="50%" />-->

    <alpha

    android:duration=""

    android:startOffset =""

    android:fillBefore = "true"

    android:fillEnabled= "true"

    android:repeatMode= "restart"

    android:repeatCount = ""

        android:fromAlpha="0.0"

    android:toAlpha="1.0"

    />

</set>
六.第二个活动的布局activity_main2.xml
这个布局略显复杂了一点,但是细细看看其实也不太难。主要是在整个布局的最上方我们引入了一个嵌套的相对布局,这样才可以起到替换安卓自带的标题栏的作用。如果想使用X5内核的话,直接把我已经注释掉的X5控件的主食删掉,再删除WEBVIEW的布局就好了,但是不管如何其id一定要对才行,因为我们会在第二个活动当中引入它的id!!
<?xml version="1.0" encoding="utf-8"?>

<LinearLayout xmlns:android="http://schemas.android.com/apk/res/android"

    xmlns:app="http://schemas.android.com/apk/res-auto"

    xmlns:tools="http://schemas.android.com/tools"

    android:layout_width="match_parent"

    android:layout_height="match_parent"

    android:orientation="vertical"

    tools:context=".Main2Activity">

    <RelativeLayout

        android:background="@color/mainColor"

        android:layout_width="match_parent"

        android:layout_height="17dp">

    </RelativeLayout>

<RelativeLayout

    android:background="@color/mainColor"

    android:layout_width="match_parent"

    android:layout_height="42dp">

    <Button

        android:id="@+id/button"

        android:layout_width="wrap_content"

        android:layout_height="match_parent"

        android:text="点我啦"/>

<TextView

    android:id="@+id/textview"

    android:textSize="23dp"

    android:layout_alignParentRight="true"

    android:textColor="@color/white"

    android:layout_width="250dp"

    android:layout_height="match_parent"

    android:text="正在加载中,稍等....."/>

</RelativeLayout>

   <!-- <com.tencent.smtt.sdk.WebView

        android:id="@+id/webView2"

        android:layout_width="match_parent"

        android:layout_height="match_parent"/>-->

    <WebView

        android:id="@+id/webView"

        android:layout_width="match_parent"

        android:layout_height="match_parent"></WebView>

</LinearLayout>
最后的布局的效果如下:(真机运行出来的效果),可以看到上面的状态栏是没有蓝色的,蓝色的标题栏也被我们隐藏了,因为我们在第二个活动当中已经隐藏了这些。只是需要注意将状态栏变为半透明需要将安卓软件的API提升到21以上,没有在21以上的可以直接在gradle文件里面进行修改,修改之后在点击android studio 右上方的syic now ,再等待电脑运行一段时间就可以了。

除此之外,我们在点击返回按钮的时候会跳出一个仿微信的对话框,如下: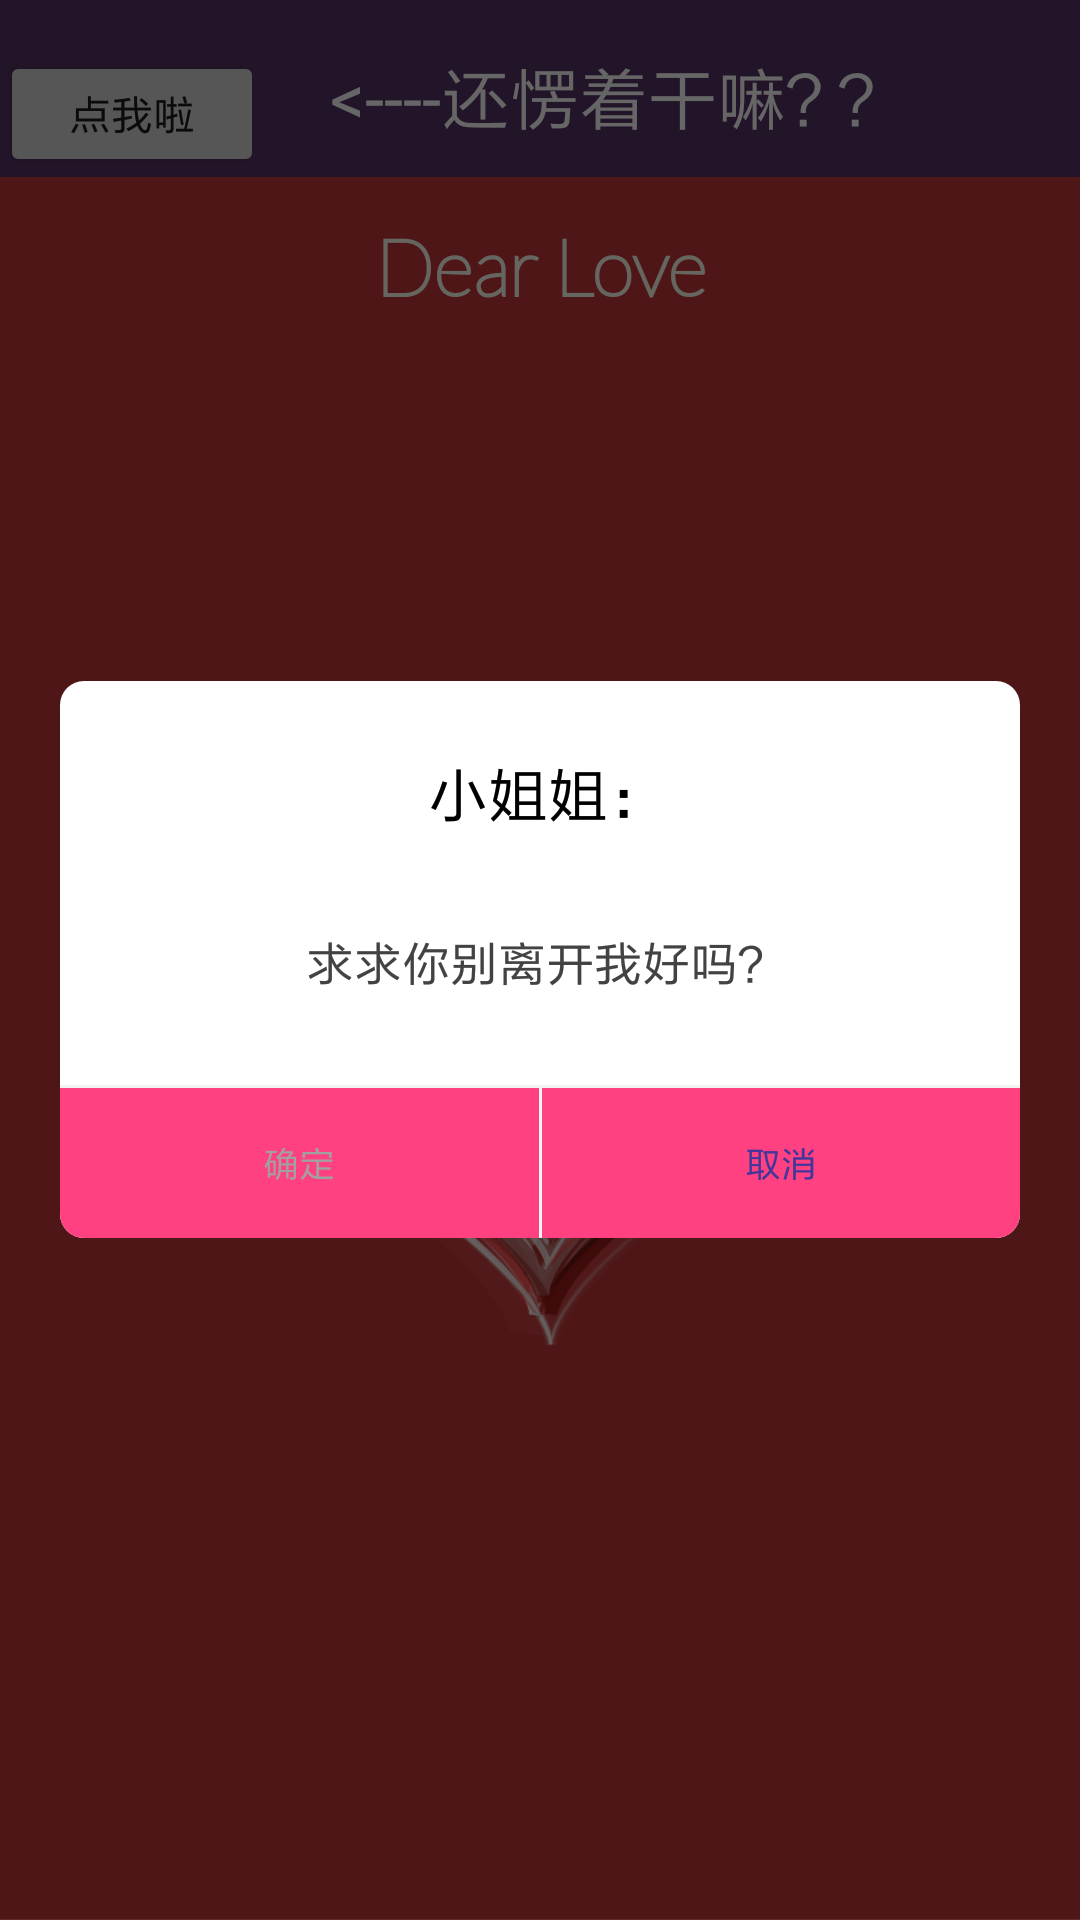
在第二个活动当中已经触发了这个事件,因此我们还需要在xml文件当中做一些美工,下面是我们需要编辑的第一个xml文件:
七.dialog_commom.xml
这个布局直接创建到我们的layout文件夹之下就可以了.
代码如下:
<?xml version="1.0" encoding="utf-8"?>

<LinearLayout xmlns:android="http://schemas.android.com/apk/res/android"

    android:layout_width="match_parent"

    android:layout_height="match_parent"

    android:background="@drawable/bg_round_white"

    android:orientation="vertical" >

    <TextView

        android:id="@+id/title"

        android:layout_width="match_parent"

        android:layout_height="wrap_content"

        android:gravity="center_horizontal"

        android:padding="12dp"

        android:layout_marginTop="12dp"

        android:text="提示"

        android:textSize="20sp"

        android:textColor="@color/black"/>

    <TextView

        android:id="@+id/content"

        android:layout_width="match_parent"

        android:layout_height="wrap_content"

        android:gravity="center"

        android:layout_gravity="center_horizontal"

        android:lineSpacingExtra="3dp"

        android:layout_marginLeft="40dp"

        android:layout_marginTop="20dp"

        android:layout_marginRight="40dp"

        android:layout_marginBottom="30dp"

        android:text="签到成功,获得200积分"

        android:textSize="16sp"

        android:textColor="@color/font_common_1"/>

    <View

        android:layout_width="match_parent"

        android:layout_height="1dp"

        android:background="@color/commom_background"/>

    <LinearLayout

        android:layout_width="match_parent"

        android:layout_height="50dp"

        android:orientation="horizontal">

        <TextView

            android:id="@+id/cancel"

            android:layout_width="match_parent"

            android:layout_height="match_parent"

            android:background="@drawable/bg_dialog_left_white"

            android:layout_weight="1.0"

            android:gravity="center"

            android:text="确定"

            android:textSize="12sp"

            android:textColor="@color/font_common_2"/>

        <View

            android:layout_width="1dp"

            android:layout_height="match_parent"

            android:background="@color/commom_background"/>

        <TextView

            android:id="@+id/submit"

            android:layout_width="match_parent"

            android:layout_height="match_parent"

            android:background="@drawable/bg_dialog_right_white"

            android:gravity="center"

            android:layout_weight="1.0"

            android:text="取消"

            android:textSize="12sp"

            android:textColor="@color/font_blue"/>

    </LinearLayout>

</LinearLayout>
八.colors.xml
values下的文件,必须的
<?xml version="1.0" encoding="utf-8"?>

<resources>

    <color name="colorPrimary">#3F51B5</color>

    <color name="colorPrimaryDark">#303F9F</color>

    <color name="colorAccent">#FF4081</color>

    <color name="mainColor">#</color>

    <color name="white">#FFFFFF</color>

    <color name="black">#</color>

    <color name="font_gray_b">#d4d4d3</color>

    <color name="font_tab_1">#42369a</color>

    <color name="font_tab_0">#b1b1b1</color>

    <color name="font_common_1">#</color>

    <color name="font_common_2">#a1a1a1</color>

    <color name="font_blue">#42369a</color>

    <color name="font_green">#00cccc</color>

    <color name="commom_background">#f3f3f3</color>

</resources>
九.styles.xml
<resources>

    <!-- Base application theme. -->

    <style name="AppTheme" parent="Theme.AppCompat.Light.DarkActionBar">

        <!-- Customize your theme here. -->

        <item name="colorPrimary">@color/colorPrimary</item>

        <item name="colorPrimaryDark">@color/colorPrimaryDark</item>

        <item name="colorAccent">@color/colorAccent</item>

    </style>

    <style name="dialog" parent="@android:style/Theme.Dialog">

        <item name="android:windowFrame">@null</item>

        <!--边框-->

        <item name="android:windowIsFloating">true</item>

        <!--是否浮现在activity之上-->

        <item name="android:windowIsTranslucent">false</item>

        <!--半透明-->

        <item name="android:windowNoTitle">true</item>

        <!--无标题-->

        <item name="android:windowBackground">@android:color/transparent</item>

        <!--背景透明-->

        <item name="android:backgroundDimEnabled">true</item>

        <!--模糊-->

    </style>

    <style name="AppTheme.NoActionBar">

        <item name="windowActionBar">false</item>

        <item name="windowNoTitle">true</item>

    </style>

    <style name="AppTheme.AppBarOverlay" parent="ThemeOverlay.AppCompat.Dark.ActionBar" />

    <style name="AppTheme.PopupOverlay" parent="ThemeOverlay.AppCompat.Light" />

</resources>
为了能够在点击的时候跳出这个弹框,我们还需要编写新的Java类:
九.CommomDialog.java
package com.example.lenovo.expresslove;

import android.app.Dialog;

import android.content.Context;

import android.os.Bundle;

import android.text.TextUtils;

import android.view.View;

import android.widget.TextView;

public class CommomDialog extends Dialog implements View.OnClickListener {

    private TextView contentTxt;

    private TextView titleTxt;

    private TextView submitTxt;

    private TextView cancelTxt;

    private Context mContext;

    private String content;

    private OnCloseListener listener;

    private String positiveName;

    private String negativeName;

    private String title;

    public CommomDialog(Context context) {

        super(context);

        this.mContext = context;

    }

    public CommomDialog(Context context, int themeResId, String content) {

        super(context, themeResId);

        this.mContext = context;

        this.content = content;

    }

    public CommomDialog(Context context, int themeResId, String content, OnCloseListener listener) {

        super(context, themeResId);

        this.mContext = context;

        this.content = content;

        this.listener = listener;

    }

    protected CommomDialog(Context context, boolean cancelable, OnCancelListener cancelListener) {

        super(context, cancelable, cancelListener);

        this.mContext = context;

    }

    public CommomDialog setTitle(String title){

        this.title = title;

        return this;

    }

    public CommomDialog setPositiveButton(String name){

        this.positiveName = name;

        return this;

    }

    public CommomDialog setNegativeButton(String name){

        this.negativeName = name;

        return this;

    }

    @Override

    protected void onCreate(Bundle savedInstanceState) {

        super.onCreate(savedInstanceState);

        setContentView(R.layout.dialog_commom);

        setCanceledOnTouchOutside(false);

        initView();

    }

    private void initView(){

        contentTxt = (TextView)findViewById(R.id.content);

        titleTxt = (TextView)findViewById(R.id.title);

        submitTxt = (TextView)findViewById(R.id.submit);

        submitTxt.setOnClickListener(this);

        cancelTxt = (TextView)findViewById(R.id.cancel);

        cancelTxt.setOnClickListener(this);

        contentTxt.setText(content);

        if(!TextUtils.isEmpty(positiveName)){

            submitTxt.setText(positiveName);

        }

        if(!TextUtils.isEmpty(negativeName)){

            cancelTxt.setText(negativeName);

        }

        if(!TextUtils.isEmpty(title)){

            titleTxt.setText(title);

        }

    }

    @Override

    public void onClick(View v) {

        switch (v.getId()){

            case R.id.cancel:

                if(listener != null){

                    listener.onClick(this, false);

                }

                this.dismiss();

                break;

            case R.id.submit:

                if(listener != null){

                    listener.onClick(this, true);

                }

                break;

        }

    }

    public interface OnCloseListener{

        void onClick(Dialog dialog, boolean confirm);

    }

}
如果想要X5内核运行好的话,还需要新建MyApplication.java类:
十.MyApplication.java
这个类如果不用X5内核,写了也没有关系,要用的话就必须写了。
package com.example.lenovo.expresslove;

import android.app.Application;

import android.util.Log;

import com.tencent.smtt.sdk.QbSdk;

public class MyApplication extends Application {

    public void onCreate() {

        // TODO Auto-generated method stub

        super.onCreate();

        initX5();

    }

    /**

     * 初始化X5

     */

    private void initX5() {

        //x5內核初始化回调

        QbSdk.PreInitCallback cb = new QbSdk.PreInitCallback() {

            @Override

            public void onViewInitFinished(boolean arg0) {

                //x5內核初始化完成的回调,为true表示x5内核加载成功,否则表示x5内核加载失败,会自动切换到系统内核。

                Log.d("app", " onViewInitFinished is " + arg0);

            }

            @Override

            public void onCoreInitFinished() {

            }

        };

        //x5内核初始化接口

        QbSdk.initX5Environment(getApplicationContext(), cb);

    }

}
现在前面两个主活动就编写完成了,现在来到了我们的第三个活动,烟花场景,播放完毕之后则直接跳转到微信。
十一.Main3Activity.java
package com.example.lenovo.expresslove;

import android.content.ComponentName;

import android.content.Context;

import android.content.Intent;

import android.content.pm.PackageInfo;

import android.content.pm.PackageManager;

import android.net.Uri;

import android.os.Build;

import android.os.Handler;

import android.support.v7.app.ActionBar;

import android.support.v7.app.AppCompatActivity;

import android.os.Bundle;

import android.view.WindowManager;

import android.webkit.WebSettings;

import android.webkit.WebView;

import android.webkit.WebViewClient;

import java.util.List;

public class Main3Activity extends AppCompatActivity {

    private WebView webView;

    @Override

    protected void onCreate(Bundle savedInstanceState) {

        super.onCreate(savedInstanceState);

        setContentView(R.layout.activity_main3);

        getWindow().setFlags(WindowManager.LayoutParams.FLAG_FULLSCREEN, WindowManager.LayoutParams.FLAG_FULLSCREEN);

        getSupportActionBar().hide();

        new Handler().postDelayed(new Runnable(){ // 为了减少代码使用匿名Handler创建一个延时的调用

            public void run() {

                String url="weixin://";

                startActivity(new Intent(Intent.ACTION_VIEW, Uri.parse(url)));

            } }, );

        webView = (WebView) findViewById(R.id.webView2);

        //需要加载的网页的url

        webView.loadUrl("file:///android_asset/index4.html");//这里写的是assets文件夹下html文件的名称,需要带上后面的后缀名,前面的路径是安卓系统自己规定的android_asset就是表示的在assets文件夹下的意思。

        webView.getSettings().setLayoutAlgorithm(WebSettings.LayoutAlgorithm.SINGLE_COLUMN);//自适应屏幕

        webView.getSettings().setLoadWithOverviewMode(true);//自适应屏幕

        webView.getSettings().setSupportZoom(true);

        webView.getSettings().setUseWideViewPort(true);//扩大比例的缩放

        // webView.getSettings().setBuiltInZoomControls(true);//设置是否出现缩放工具,这里我想就不出现了,影响效果

        WebSettings settings = webView.getSettings();

        // 如果访问的页面中要与Javascript交互,则webview必须设置支持Javascript

        settings.setJavaScriptEnabled(true);

        webView.setWebViewClient(new WebViewClient(){

            public boolean shouldOverrideUrlLoading(WebView view, String url){

                view.loadUrl(url);

                return true;

            }

        });

        if (Build.VERSION.SDK_INT >= ) {//设置顶部状态栏为半透明

            getWindow().setFlags(

                    WindowManager.LayoutParams.FLAG_TRANSLUCENT_STATUS,

                    WindowManager.LayoutParams.FLAG_TRANSLUCENT_STATUS);}

        ActionBar actionBar=getSupportActionBar();

        if(actionBar!=null)

        {

            actionBar.hide();

        }

    }

}
下面是第三个活动布局:
十二.activity_main3.xml
<?xml version="1.0" encoding="utf-8"?>

<LinearLayout xmlns:android="http://schemas.android.com/apk/res/android"

    xmlns:app="http://schemas.android.com/apk/res-auto"

    xmlns:tools="http://schemas.android.com/tools"

    android:layout_width="match_parent"

    android:layout_height="match_parent"

    tools:context=".Main3Activity">

<WebView

    android:id="@+id/webView2"

    android:layout_width="match_parent"

    android:layout_height="match_parent">

</WebView>

</LinearLayout>
最终的动画场景如下:(这里就仅仅截屏了)

等待几秒钟之后则会自动跳转微信,等待我们也是用匿名handler来完成的。好了,差不多了,这样我们一个完整的软件就制作完成了,如果还有什么问题的话,去源码里看看嘿嘿
- Github链接:https://github.com/Geeksongs/ExpressLove
- 喜欢就点个“推荐”哦!
轻松搞定表白女朋友:Android版APP (零基础也可直接下载软件)的更多相关文章
- 使用BleLib的轻松搞定Android低功耗蓝牙Ble 4.0开发具体解释
转载请注明来源: http://blog.csdn.net/kjunchen/article/details/50909410 使用BleLib的轻松搞定Android低功耗蓝牙Ble 4.0开发具体 ...
- 【转】轻松搞定FTP之FlashFxp全攻略
转载网址:http://www.newhua.com/2008/0603/39163.shtml 轻松搞定FTP之FlashFxp全攻略 导读: FlashFXP是一款功能强大的FXP/FTP软件,融 ...
- 【微服务】之六:轻松搞定SpringCloud微服务-API网关zuul
通过前面几篇文章的介绍,我们可以轻松搭建起来微服务体系中比较重要的几个基础构建服务.那么,在本篇博文中,我们重点讲解一下,如何将所有微服务的API同意对外暴露,这个就设计API网关的概念. 本系列教程 ...
- Python高级特性: 12步轻松搞定Python装饰器
12步轻松搞定Python装饰器 通过 Python 装饰器实现DRY(不重复代码)原则: http://python.jobbole.com/84151/ 基本上一开始很难搞定python的装 ...
- 人脸识别JavaScript也可以轻松搞定
前言 是不是觉得不可思议,js已经强大到这个地步? 是的,js日新月异,它在不断的进步.只要稍不留神,那我们都只能望尘莫及了. 今天我们就来看看是什么js插件可以如此厉害? 人脸识别JavaScrip ...
- 春节过后就是金三银四求职季,分享几个Java面试妙招,轻松搞定HR!
春节过后就是金三银四,分享几个Java面试妙招,轻松搞定HR! 2020年了,先祝大家新年快乐! 今年IT职位依然相当热门,特别是Java开发岗位.软件开发人才在今年将有大量的就业机会.春节过后,金三 ...
- 盘它!基于CANN的辅助驾驶AI实战案例,轻松搞定车辆检测和车距计算!
摘要:基于昇腾AI异构计算架构CANN(Compute Architecture for Neural Networks)的简易版辅助驾驶AI应用,具备车辆检测.车距计算等基本功能,作为辅助驾驶入门级 ...
- 轻松搞定javascript变量(闭包,预解析机制,变量在内存的分配 )
变量: 存储数据的容器 1.声明 var 2.作用域 全局变量. 局部变量. 闭包(相对的全局变量): 3.类型 a.基本类型(undefi ...
- Webcast / 技术小视频制作方法——自己动手录制video轻松搞定
Webcast / 技术小视频制作方法——自己动手录制video轻松搞定 http://blog.sina.com.cn/s/blog_67d387490100wdnh.html 最近申请加入MSP的 ...
随机推荐
- Spring Boot实战笔记(二)-- Spring常用配置(Scope、Spring EL和资源调用)
一.Bean的Scope Scope描述的是Spring容器如何新建Bean实例的.Spring的Scope有以下几种,通过@Scope注解来实现. (1)Singleton:一个Spring容器中只 ...
- Spring Boot使用RestTemplate消费REST服务的几个问题记录
我们可以通过Spring Boot快速开发REST接口,同时也可能需要在实现接口的过程中,通过Spring Boot调用内外部REST接口完成业务逻辑. 在Spring Boot中,调用REST Ap ...
- 队列Queue和栈
1.队列Queue是常用的数据结构,可以将队列看成特殊的线性表,队列限制了对线性表的访问方式,只能从线性表的一段添加(offer)元素, 从另一段取出(poll)元素,队列遵循先进先出的原则. 2.J ...
- linux下错误的捕获:errno(errno.h)和strerror(string.h)的使用
参考:http://blog.csdn.net/starstar1992/article/details/52756387 linux下错误的捕获:errno和strerror的使用 经常在调用lin ...
- flock SUSE/RHEL
Util-linux-2.26 Util-linux 软件包其它实用程序.包括处理文件系统.控制台.分区以及消息等工具. 大概编译时间:1.3 SBU 需要磁盘空间:137 MB 6.65.1. FH ...
- mysqldump+系统计划任务定时备份MySql数据
MYSQL 数据库备份有很多种(cp.tar.lvm2.mysqldump.xtarbackup)等等,具体使用哪一个还要看你的数据规模.下面给出一个表 #摘自<学会用各种姿态备份Mysql数据 ...
- sniffer 软件的使用方法
一.捕获数据包前的准备工作 在默认情况下,sniffer将捕获其接入碰撞域中流经的所有数据包,但在某些场景下,有些数据包可能不是我们所需要的,为了快速定位网络问题所在,有必要对所要捕获的数据包作过滤. ...
- maven中pom文件配置解决资源文件的编码问题
<build> <plugin> <groupId>org.apache.maven.plugins</groupId> <artifactId& ...
- thinter中combobox下拉选择控件(九)
combobox控件,下拉菜单控件 combobox控件在tkinter中的ttk下 简单的实现下: import tkinter from tkinter import ttk # 导入ttk模块, ...
- Javascript书籍推荐----(步步为赢)
在此分享一些高清javascript书籍,因为我也没有全部看完,所以在这只是推荐,不同的书适合不同的人,所有的书在网上均有电子书,若找不到,请在博客留言,我有大部分书籍的电子稿.希望有更多的好书分享出 ...