MySQL高可用复制管理工具 —— Orchestrator使用
背景
在上一篇「MySQL高可用复制管理工具 —— Orchestrator介绍」中大致介绍了Orchestrator的功能、配置和部署,当然最详细的说明可以查阅官方文档。本文开始对Orchestrator的各方面进行测试和说明。
测试说明
环境介绍
服务器环境:
三台服务器

:MySQL实例(3306是orch的后端数据库,3307是MySQL主从架构「开启GTID」)

Master :192.168.163.131:

Slave  :192.168.163.132:

Slave  :192.168.163.133:

:hosts(etc/hosts):

192.168.163.131 test1

192.168.163.132 test2

192.168.163.133 test3
这里需要注意的是,orch检测主库宕机依赖从库的IO线程(本身连不上主库后,还会通过从库再去检测主库是否异常),所以默认change搭建的主从感知主库宕机的等待时间过长,需要需要稍微改下:
change master to master_host='192.168.163.131',master_port=,master_user='rep',master_password='rep',master_auto_position=,MASTER_HEARTBEAT_PERIOD=,MASTER_CONNECT_RETRY=, MASTER_RETRY_COUNT=;
set global slave_net_timeout=;
slave_net_timeout(全局变量):MySQL5.7.7之后,默认改成60秒。该参数定义了从库从主库获取数据等待的秒数,超过这个时间从库会主动退出读取,中断连接,并尝试重连。
master_heartbeat_period:复制心跳的周期。默认是slave_net_timeout的一半。Master在没有数据的时候,每master_heartbeat_period秒发送一个心跳包,这样 Slave 就能知道 Master 是不是还正常。
slave_net_timeout是设置在多久没收到数据后认为网络超时,之后 Slave 的 IO 线程会重新连接 Master 。结合这两个设置就可以避免由于网络问题导致的复制延误。master_heartbeat_period 单位是秒,可以是个带上小数,如 10.5,最高精度为 1 毫秒。
重试策略为:
备库过了slave-net-timeout秒还没有收到主库来的数据,它就会开始第一次重试。然后每过 master-connect-retry 秒,备库会再次尝试重连主库。直到重试了 master-retry-count 次,它才会放弃重试。如果重试的过程中,连上了主库,那么它认为当前主库是好的,又会开始 slave-net-timeout 秒的等待。

slave-net-timeout 的默认值是  秒, master-connect-retry 默认为  秒, master-retry-count 默认为  次。也就是说,如果主库一分钟都没有任何数据变更发送过来,备库才会尝试重连主库。
这样,主库宕机之后,约8~10秒感知主库异常,Orchestrator开始切换。另外还需要注意的是,orch默认是用主机名来进行管理的,需要在mysql的配置文件里添加:report_host和report_port参数。
数据库环境:
Orchestrator后端数据库:

在启动Orchestrator程序的时候,会自动在数据库里创建orchestrator数据库,保存orchestrator的一些数据信息。

Orchestrator管理的数据库:

在配置文件里配置的一些query参数,需要在每个被管理的目标库里有meta库来保留一些元信息(类似cmdb功能),比如用pt-heartbeat来验证主从延迟;用cluster表来保存别名、数据中心等。
如下面是测试环境的cluster表信息:
> CREATE TABLE `cluster` (

  `anchor` tinyint() NOT NULL,

  `cluster_name` varchar() CHARACTER SET ascii NOT NULL DEFAULT '',

  `cluster_domain` varchar() CHARACTER SET ascii NOT NULL DEFAULT '',

  `data_center` varchar() NOT NULL,

  PRIMARY KEY (`anchor`)

) ENGINE=InnoDB DEFAULT CHARSET=utf8

>select * from cluster;

+--------+--------------+----------------+-------------+

| anchor | cluster_name | cluster_domain | data_center |

+--------+--------------+----------------+-------------+

|       | test         | CaoCao         | BJ          |

+--------+--------------+----------------+-------------+
测试说明
开启Orchestrator进程:
./orchestrator --config=/etc/orchestrator.conf.json http
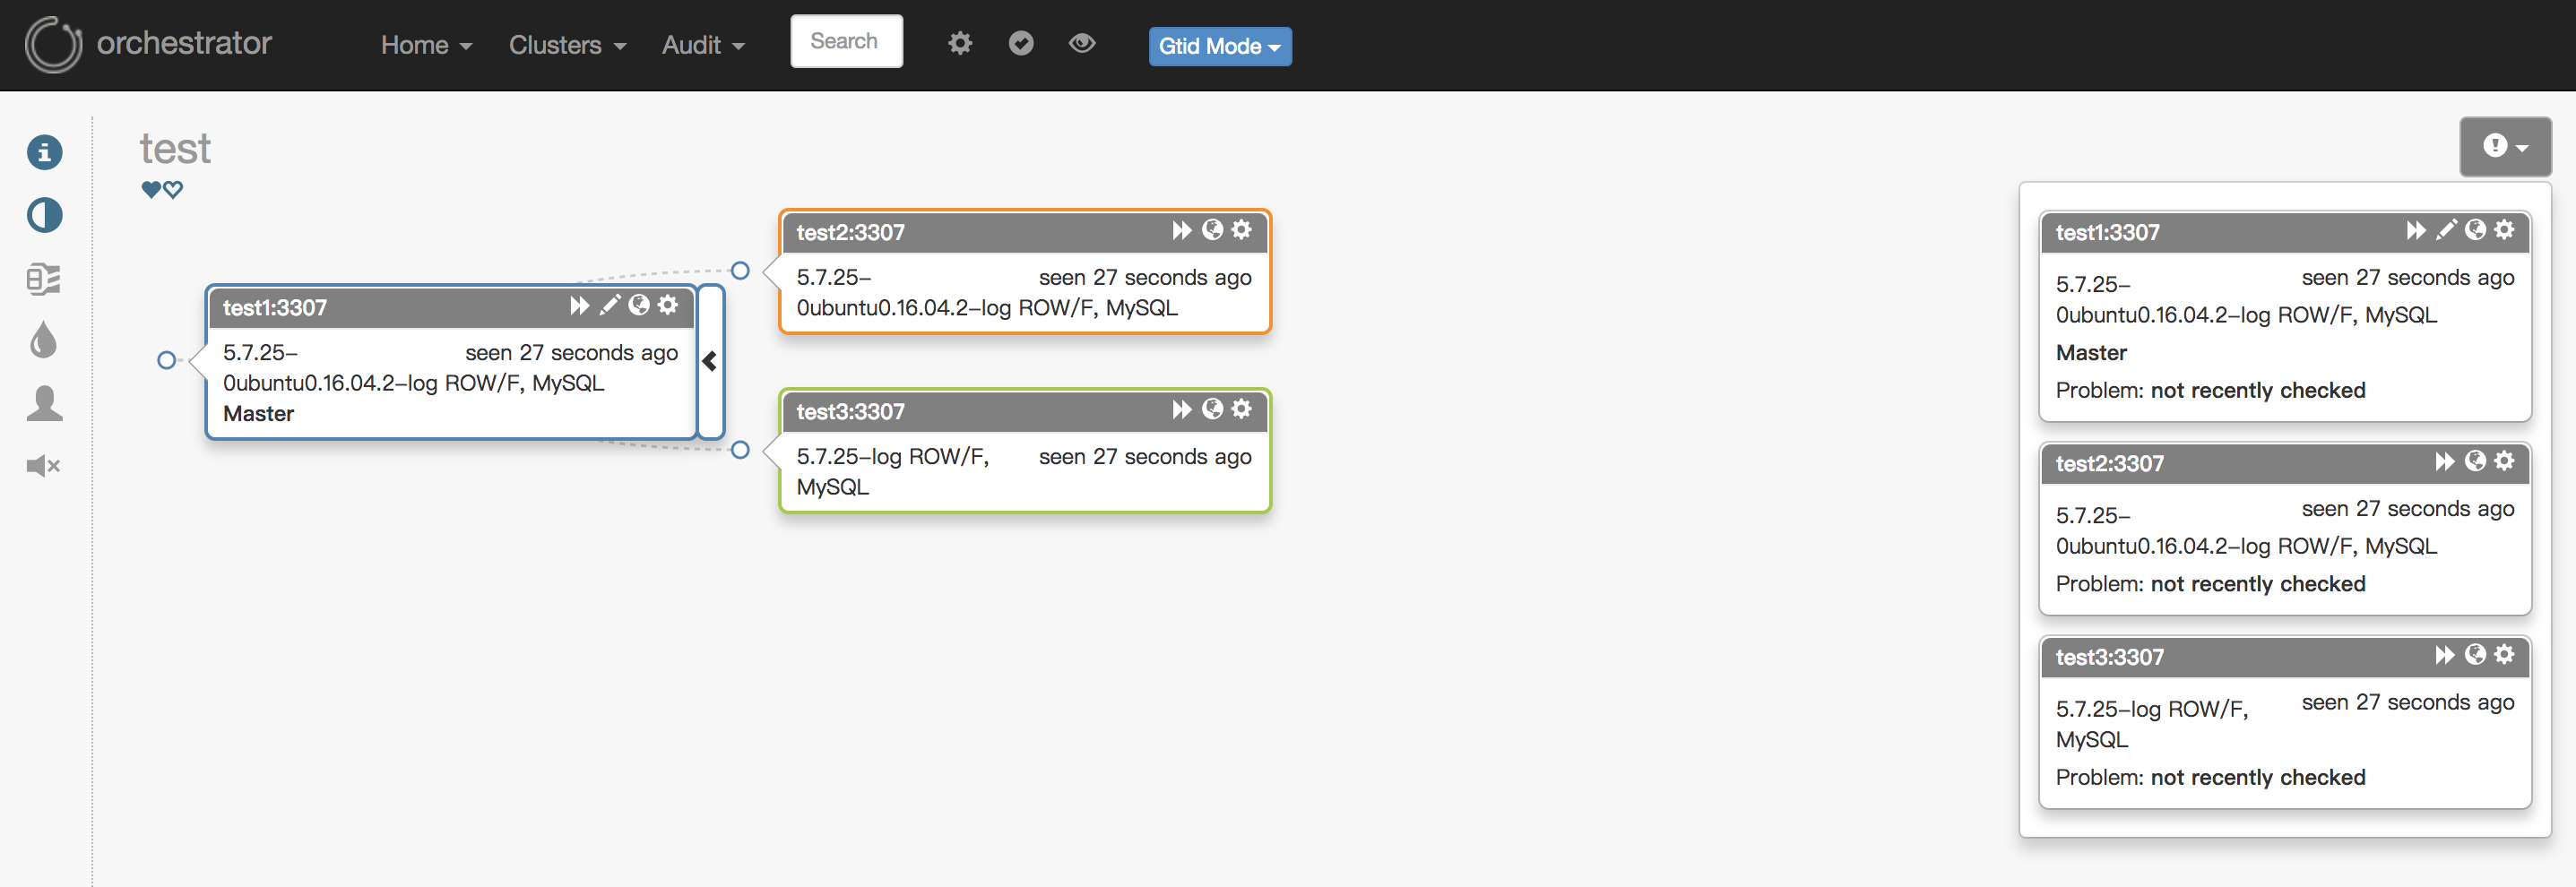
在浏览器里输入三台主机的任意主机的IP加端口(http://192.168.163.131:3000)进入到Web管理界面,在Clusters导航的Discover里输入任意一台被管理MySQL实例的信息。添加完成之后,Web界面效果:
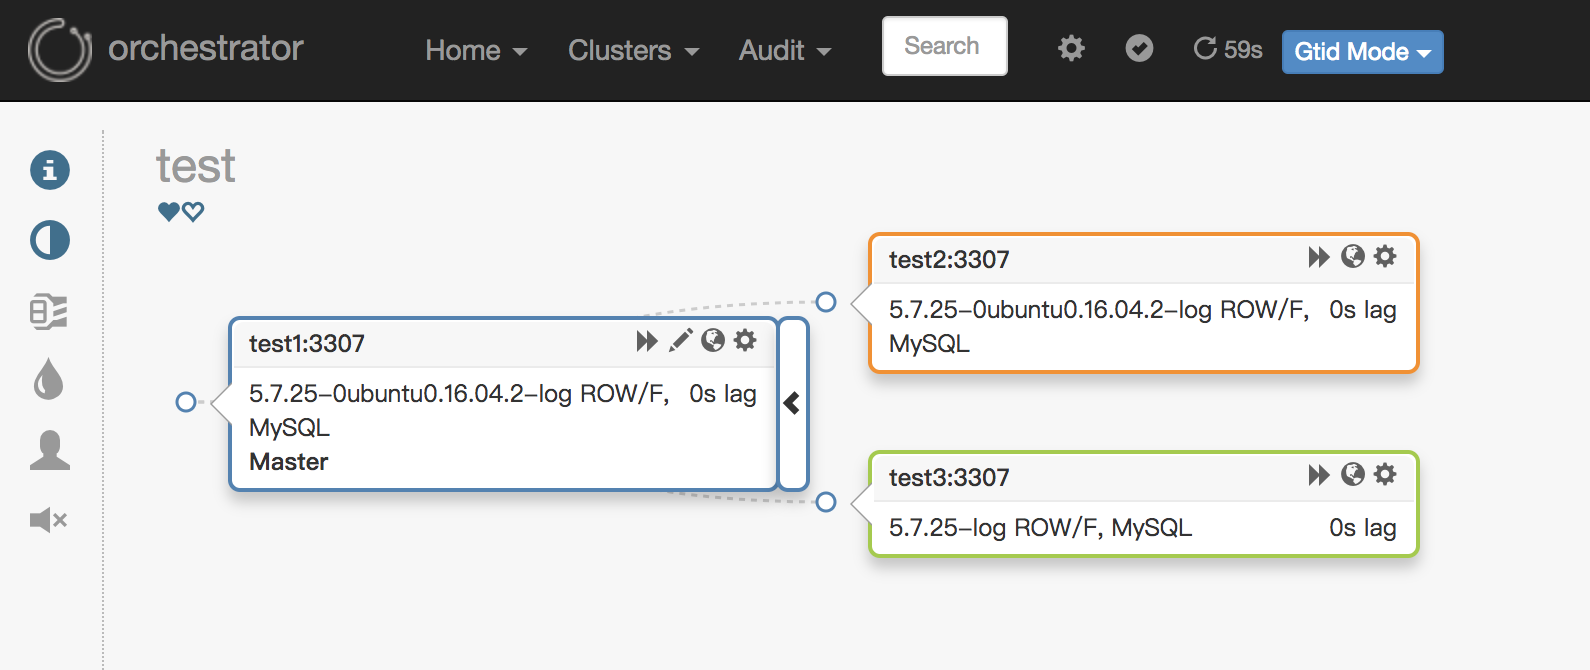
在web上可以进行相关的管理,关于Web上的相关按钮的说明,下面会做相关说明:
1. 部分可修改的参数(点击Web上需要被修改实例的任意图标):
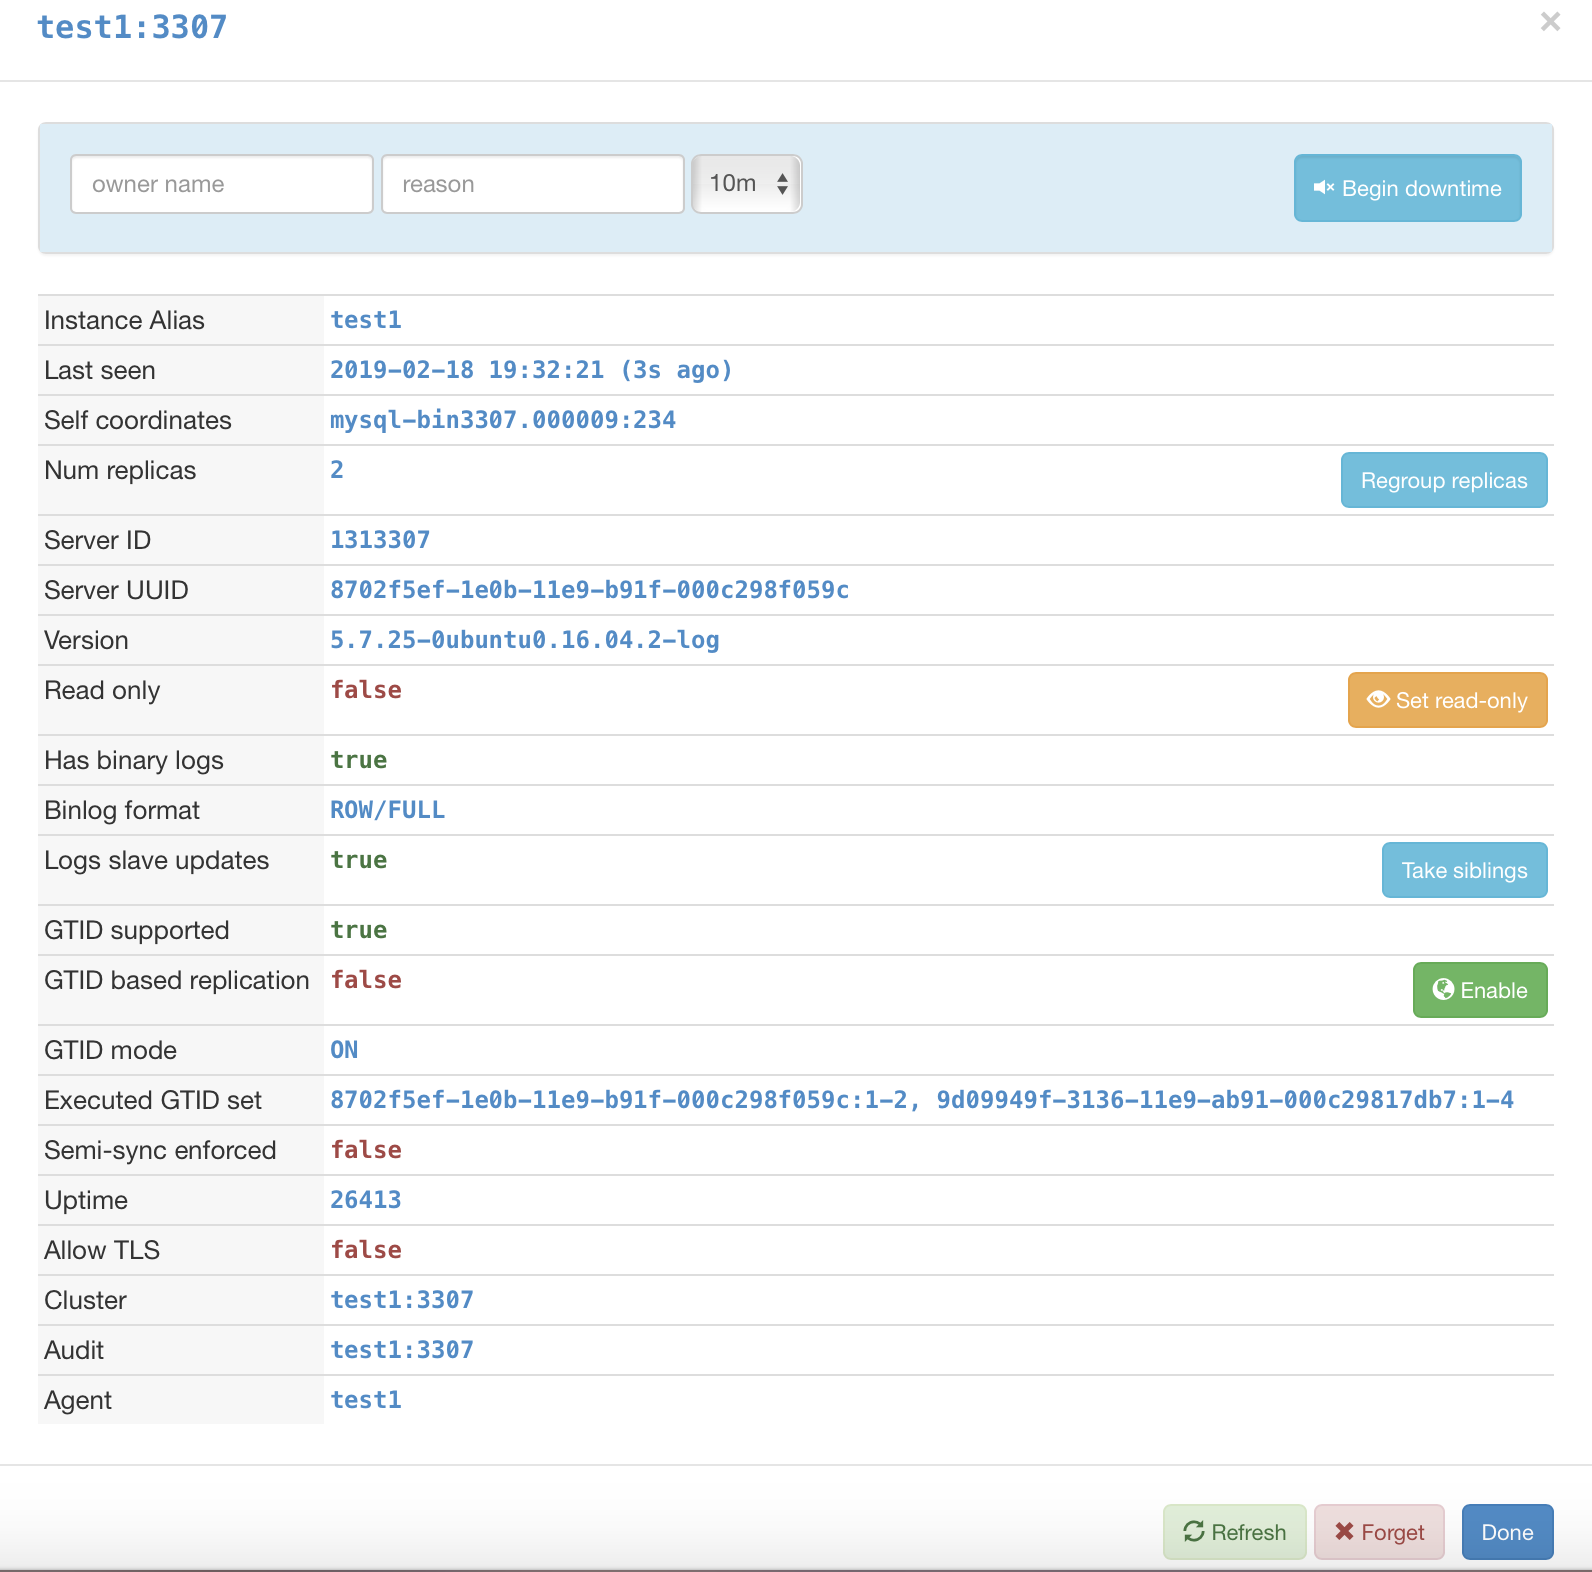
说明
Instance Alias :实例别名

Last seen       :  最后检测时间

Self coordinates :自身的binlog位点信息

Num replicas :有几个从库

Server ID    : MySQL server_id

Server UUID :    MySQL UUID

Version :    版本

Read only : 是否只读

Has binary logs :是否开启binlog

Binlog format    :binlog 模式

Logs slave updates :是否开启log_slave_updates

GTID supported :是否支持GTID

GTID based replication :是否是基于GTID的复制

GTID mode    :复制是否开启了GTID

Executed GTID set :复制中执行过的GTID列表

Uptime :启动时间

Allow TLS :是否开启TLS

Cluster :集群别名

Audit :审计实例

Agent :Agent实例
说明:上面图中,后面有按钮的都是可以在Web上进行修改的功能,如:是否只读,是否开启GTID的复制等。其中Begin Downtime 会将实例标记为已停用,此时如果发生Failover,该实例不会参与。
2. 任意改变主从的拓扑结构:可以直接在图上拖动变更复制,会自动恢复拓扑关系:
3. 主库挂了之后自动Failover,如:
图中显示,当主挂掉之后,拓扑结构里自动剔除该主节点,选择一个最合适的从库提升成主库,并修复复制拓扑。在Failover过程当中,可以查看/tmp/recovery.log文件(配置文件里定死),里面包含了在Failover过程中Hooks执行的外部脚本,类似MHA的master_ip_failover_script参数。可以通过外部脚本进行相应的如:VIP切换、Proxy修改、DNS修改、中间件修改、LVS修改等等,具体的执行脚本可以根据自己的实际情况编写。
4. Orchestrator高可用。因为在一开始就已经部署了3台,通过配置文件里的Raft参数进行通信。只要有2个节点的Orchestrator正常,就不会影响使用,如果出现2个节点的Orchestrator异常,则Failover会失败。2个节点异常的图如下:
图中的各个节点全部显示灰色,此时Raft算法失效,导致Orch的Failover功能失败。相对比MHA的Manager的单点,Orchestrator通过Raft算法解决了本身的高可用性以及解决网络隔离问题,特别是跨数据中心网络异常。这里说明下Raft,通过共识算法:
Orchestrator节点能够选择具有仲裁的领导者(leader)。如有3个orch节点,其中一个可以成为leader(3节点仲裁大小为2,5节点仲裁大小为3)。只允许leader进行修改,每个MySQL拓扑服务器将由三个不同的orchestrator节点独立访问,在正常情况下,三个节点将看到或多或少相同的拓扑图,但他们每个都会独立分析写入其自己的专用后端数据库服务器:
① 所有更改都必须通过leader。
② 在启用raft模式上禁止使用orchestrator客户端。
③ 在启用raft模式上使用orchestrator-client,orchestrator-client可以安装在没有orchestrator上的服务器。
④ 单个orchestrator节点的故障不会影响orchestrator的可用性。在3节点设置上,最多一个服务器可能会失败。在5节点设置上,2个节点可能会失败。
⑤ Orchestrator节点异常关闭,然后再启动。它将重新加入Raft组,并接收遗漏的任何事件,只要有足够的Raft记录。
⑥ 要加入比日志保留允许的更长/更远的orchestrator节点或者数据库完全为空的节点,需要从另一个活动节点克隆后端DB。
关于Raft更多的信息见:https://github.com/github/orchestrator/blob/master/docs/raft.md
Orchestrator的高可用有2种方式,第一种就是上面说的通过Raft(推荐),另一种是通过后端数据库的同步。详细信息见文档。文档里详细比较了两种高可用性部署方法。两种方法的图如下:

到这里,Orchestrator的基本功能已经实现,包括主动Failover、修改拓扑结构以及Web上的可视化操作。
5. Web上各个按钮的功能说明
①:Home下的status:查看orch的状态:包括运行时间、版本、后端数据库以及各个Raft节点的状态。
②:Cluster下的dashboard:查看orch下的所有被管理的MySQL实例。
③:Cluster下的Failure analysis:查看故障分析以及包括记录的故障类型列表。
④:Cluster下的Discover:用来发现被管理的MySQL实例。
⑤:Audit下的Failure detection:故障检测信息,包含历史信息。
⑥:Audit下的Recovery:故障恢复信息以及故障确认。
⑦:Audit下的Agent:是一个在MySQL主机上运行并与orchestrator通信的服务,能够向orch提供操作系统,文件系统和LVM信息,以及调用某些命令和脚本。
⑧:导航栏里的 图标,对应左边导航栏的图标:
第1行:集群别名的查看修改。
第2行:pools。
第3行:Compact display,紧凑展示。
第4行:Pool indicator,池指示器。
第5行:Colorize DC,每个数据中心用不同颜色展示。
第6行:Anonymize,匿名集群中的主机名。
注意:左边导航栏里的 图标,表示实例的概括:实例名、别名、故障检测和恢复等信息。
⑧:导航栏里的 图标,表示是否禁止全局恢复。禁止掉的话不会进行Failover。
⑨:导航栏里的 图标,表示是否开启刷新页面(默认60一次)。
⑩:导航栏里的 图标,表示MySQL实例迁移模式。
Smart mode:自动选择迁移模式,让Orch自己选择迁移模式。

Classic mode:经典迁移模式,通过binlog和position进行迁移。

GTID mode:GTID迁移模式。

Pseudo GTID mode:伪GTID迁移模式。
到此,Orchestrator的基本测试和Web说明已经介绍完毕。和MHA比已经有很大的体验提升,不仅在Web进行部分参数的设置修改,还可以改变复制拓扑,最重要的是解决MHA Manager单点的问题。还有什么理由不替换MHA呢?:)
工作流程说明
Orchestrator实现了自动Failover,现在来看看自动Failover的大致流程是怎么样的。
1. 检测流程
① orchestrator利用复制拓扑,先检查主本身,并观察其slaves。
② 如果orchestrator本身连不上主,可以连上该主的从,则通过从去检测,若在从上也看不到主(IO Thread)「2次检查」,判断Master宕机。
该检测方法比较合理,当从都连不上主了,则复制肯定有出问题,故会进行切换。所以在生产中非常可靠。
检测发生故障后并不都会进行自动恢复,比如:禁止全局恢复、设置了shutdown time、上次恢复离本次恢复时间在RecoveryPeriodBlockSeconds设置的时间内、失败类型不被认为值得恢复等。检测与恢复无关,但始终启用。 每次检测都会执行OnFailureDetectionProcesses Hooks。
{

  "FailureDetectionPeriodBlockMinutes": ,

}

Hooks相关参数:

{

  "OnFailureDetectionProcesses": [

    "echo 'Detected {failureType} on {failureCluster}. Affected replicas: {countReplicas}' >> /tmp/recovery.log"

  ],

}

MySQL复制相关调整:

slave_net_timeout

MASTER_CONNECT_RETRY
2. 恢复流程
恢复的实例需要支持:GTID、伪GTID、开启Binlog。恢复的配置如下:
{

  "RecoveryPeriodBlockSeconds": ,

  "RecoveryIgnoreHostnameFilters": [],

  "RecoverMasterClusterFilters": [

    "thiscluster",

    "thatcluster"

  ],

  "RecoverMasterClusterFilters": ["*"],

  "RecoverIntermediateMasterClusterFilters": [

    "*"

  ],

}

{

  "ApplyMySQLPromotionAfterMasterFailover": true,

  "PreventCrossDataCenterMasterFailover": false,

  "FailMasterPromotionIfSQLThreadNotUpToDate": true,

  "MasterFailoverLostInstancesDowntimeMinutes": ,

  "DetachLostReplicasAfterMasterFailover": true,

}

Hooks:

{

  "PreGracefulTakeoverProcesses": [

    "echo 'Planned takeover about to take place on {failureCluster}. Master will switch to read_only' >> /tmp/recovery.log"

  ],

  "PreFailoverProcesses": [

    "echo 'Will recover from {failureType} on {failureCluster}' >> /tmp/recovery.log"

  ],

  "PostFailoverProcesses": [

    "echo '(for all types) Recovered from {failureType} on {failureCluster}. Failed: {failedHost}:{failedPort}; Successor: {successorHost}:{successorPort}' >> /tmp/recovery.log"

  ],

  "PostUnsuccessfulFailoverProcesses": [],

  "PostMasterFailoverProcesses": [

    "echo 'Recovered from {failureType} on {failureCluster}. Failed: {failedHost}:
    {failedPort}; Promoted: {successorHost}:{successorPort}' >> /tmp/recovery.log"

  ],

  "PostIntermediateMasterFailoverProcesses": [],

  "PostGracefulTakeoverProcesses": [

    "echo 'Planned takeover complete' >> /tmp/recovery.log"

  ],

}
具体的参数含义请参考「MySQL高可用复制管理工具 —— Orchestrator介绍」。在执行故障检测和恢复的时候都可以执行外部自定义脚本(hooks),来配合使用(VIP、Proxy、DNS)。
可以恢复中继主库(DeadIntermediateMaster)和主库:
中继主库:恢复会找其同级的节点进行做主从。匹配副本按照哪些实例具有log-slave-updates、实例是否延迟、它们是否具有复制过滤器、哪些版本的MySQL等等
主库:恢复可以指定提升特定的从库「提升规则」(register-candidate),提升的从库不一定是最新的,而是选择最合适的,设置完提升规则之后,有效期为1个小时。
提升规则选项有:
prefer      --比较喜欢

neutral    --中立(默认)

prefer_not --比较不喜欢

must_not  --拒绝
恢复支持的类型有:自动恢复、优雅的恢复、手动恢复、手动强制恢复,恢复的时候也可以执行相应的Hooks参数。具体的恢复流程可以看恢复流程的说明。关于恢复的配置可以官方说明。
补充:每次恢复除了自动的Failover之外,都需要配合执行自己定义的Hooks的脚本来处理外部的一些操作:VIP修改、DNS修改、Proxy修改等等。所以这么多Hooks的参数该如何设置呢?哪个参数需要执行,哪个参数不需要执行,以及Hooks的执行顺序是怎么样的?虽然文章里有介绍,但为了更好的进行说明,下面进行各种恢复场景执行Hooks的顺序:
   "OnFailureDetectionProcesses": [   #检测故障时执行

    "echo '②  Detected {failureType} on {failureCluster}. Affected replicas: {countSlaves}' >> /tmp/recovery.log"

  ],

  "PreGracefulTakeoverProcesses": [   #在主变为只读之前立即执行

    "echo '①   Planned takeover about to take place on {failureCluster}. Master will switch to read_only' >> /tmp/recovery.log"

  ],

  "PreFailoverProcesses": [   #在执行恢复操作之前立即执行

    "echo '③  Will recover from {failureType} on {failureCluster}' >> /tmp/recovery.log"

  ],

  "PostMasterFailoverProcesses": [ #在主恢复成功结束时执行

    "echo '④  Recovered from {failureType} on {failureCluster}. Failed: {failedHost}:{failedPort}; Promoted: {successorHost}:{successorPort}' >> /tmp/recovery.log"

  ],

  "PostFailoverProcesses": [   #在任何成功恢复结束时执行

    "echo '⑤  (for all types) Recovered from {failureType} on {failureCluster}. Failed: {failedHost}:{failedPort}; Successor: {successorHost}:{successorPort}' >> /tmp/recovery.log"

  ],

  "PostUnsuccessfulFailoverProcesses": [  #在任何不成功的恢复结束时执行

    "echo '⑧  >> /tmp/recovery.log'"

  ],

  "PostIntermediateMasterFailoverProcesses": [  #在成功的中间主恢复结束时执行

    "echo '⑥ Recovered from {failureType} on {failureCluster}. Failed: {failedHost}:{failedPort}; Successor: {successorHost}:{successorPort}' >> /tmp/recovery.log"

  ],

  "PostGracefulTakeoverProcesses": [   #在旧主位于新晋升的主之后执行

    "echo '⑦ Planned takeover complete' >> /tmp/recovery.log"

  ],
 主库宕机,自动Failover

②  Detected UnreachableMaster on test1:. Affected replicas:

②  Detected DeadMaster on test1:. Affected replicas:

③  Will recover from DeadMaster on test1:

④  Recovered from DeadMaster on test1:. Failed: test1:; Promoted: test2:

⑤  (for all types) Recovered from DeadMaster on test1:. Failed: test1:; Successor: test2:

 优雅的主从切换:test2:3307优雅的切换到test1:,切换之后需要手动执行start slave

  orchestrator-client -c graceful-master-takeover -a test2: -d test1:

①  Planned takeover about to take place on test2:. Master will switch to read_only

②  Detected DeadMaster on test2:. Affected replicas:

③  Will recover from DeadMaster on test2:

④  Recovered from DeadMaster on test2:. Failed: test2:; Promoted: test1:

⑤  (for all types) Recovered from DeadMaster on test2:. Failed: test2:; Successor: test1:

⑦ Planned takeover complete

 手动恢复,当从库进入停机或则维护模式,此时主库宕机,不会自动Failover,需要手动执行恢复,指定死掉的主实例:

  orchestrator-client -c recover -i test1:

②  Detected UnreachableMaster on test1:. Affected replicas:

②  Detected DeadMaster on test1:. Affected replicas:

③  Will recover from DeadMaster on test1:

④  Recovered from DeadMaster on test1:. Failed: test1:; Promoted: test2:

⑤  (for all types) Recovered from DeadMaster on test1:. Failed: test1:; Successor: test2:

 手动强制恢复,不管任何情况,都进行恢复:

  orchestrator-client -c force-master-failover -i test2:

②  Detected DeadMaster on test2:. Affected replicas:

③  Will recover from DeadMaster on test2:

②  Detected AllMasterSlavesNotReplicating on test2:. Affected replicas:

④  Recovered from DeadMaster on test2:. Failed: test2:; Promoted: test1:

⑤  (for all types) Recovered from DeadMaster on test2:. Failed: test2:; Successor: test1:
其中上面的情况下,⑥和⑧都没执行。因为⑥是执行中间主库时候执行的,没有中间主库(级联复制)可以不用设置。⑧是恢复失败的时候执行的,上面恢复没有出现失败,可以定义一些告警提醒。
生产环境上部署
在生产上部署Orchestrator,可以参考文档。
1. Orchestrator首先需要确认本身高可用的后端数据库是用单个MySQL,MySQL复制还是本身的Raft。
2. 运行发现服务(web、orchestrator-client)
orchestrator-client -c discover -i this.hostname.com
3. 确定提升规则(某些服务器更适合被提升)
orchestrator -c register-candidate -i ${::fqdn} --promotion-rule ${promotion_rule}
4. 如果服务器出现问题,将在Web界面上的问题下拉列表中显示。使用Downtiming则不会在问题列表里显示,并且也不会进行恢复,处于维护模式。
orchestrator -c begin-downtime -i ${::fqdn} --duration=5m --owner=cron --reason=continuous_downtime"

也可以用API:

curl -s "http://my.orchestrator.service:80/api/begin-downtime/my.hostname/3306/wallace/experimenting+failover/45m"
5. 伪GTID,如果MySQL没有开启GTID,则可以开启伪GTID实现类似GTID的功能。
6. 保存元数据,元数据大部分通过参数的query来获取,比如在自的表cluster里获取集群的别名(DetectClusterAliasQuery)、数据中心(DetectDataCenterQuery)、域名(DetectClusterDomainQuery)等,以及复制的延迟(pt-heartbeat)、是否半同步(DetectSemiSyncEnforcedQuery)。以及可以通过正则匹配:DataCenterPattern、PhysicalEnvironmentPattern等。
7. 可以给实例打标签。
命令行、API的使用
Orchestrator不仅有Web界面来进行查看和管理,还可以通过命令行(orchestrator-client)和API(curl)来执行更多的管理命令,现在来说明几个比较常用方法。
通过help来看下有哪些可以执行的命令:./orchestrator-client --help,命令的说明可以看手册说明。
Usage: orchestrator-client -c <command> [flags...]

Example: orchestrator-client -c which-master -i some.replica

Options:

  -h, --help

    print this help

  -c <command>, --command <command>

    indicate the operation to perform (see listing below)

  -a <alias>, --alias <alias>

    cluster alias

  -o <owner>, --owner <owner>

    name of owner for downtime/maintenance commands

  -r <reason>, --reason <reason>

    reason for downtime/maintenance operation

  -u <duration>, --duration <duration>

    duration for downtime/maintenance operations

  -R <promotion rule>, --promotion-rule <promotion rule>

    rule for 'register-candidate' command

  -U <orchestrator_api>, --api <orchestrator_api>

    override $orchestrator_api environemtn variable,

    indicate where the client should connect to.

  -P <api path>, --path <api path>

    With '-c api', indicate the specific API path you wish to call

  -b <username:password>, --auth <username:password>

    Specify when orchestrator uses basic HTTP auth.

  -q <query>, --query <query>

    Indicate query for 'restart-replica-statements' command

  -l <pool name>, --pool <pool name>

    pool name for pool related commands

  -H <hostname> -h <hostname>

    indicate host for resolve and raft operations

    help                                     Show available commands

    which-api                                Output the HTTP API to be used

    api                                      Invoke any API request; provide --path argument

    async-discover                           Lookup an instance, investigate it asynchronously. Useful for bulk loads

    discover                                 Lookup an instance, investigate it

    forget                                   Forget about an instance's existence

    forget-cluster                           Forget about a cluster

    topology                                 Show an ascii-graph of a replication topology, given a member of that topology

    topology-tabulated                       Show an ascii-graph of a replication topology, given a member of that topology, in tabulated format

    clusters                                 List all clusters known to orchestrator

    clusters-alias                           List all clusters known to orchestrator

    search                                   Search for instances matching given substring

    instance"|"which-instance                Output the fully-qualified hostname:port representation of the given instance, or error if unknown

    which-master                             Output the fully-qualified hostname:port representation of a given instance's master

    which-replicas                           Output the fully-qualified hostname:port list of replicas of a given instance

    which-broken-replicas                    Output the fully-qualified hostname:port list of broken replicas of a given instance

    which-cluster-instances                  Output the list of instances participating in same cluster as given instance

    which-cluster                            Output the name of the cluster an instance belongs to, or error if unknown to orchestrator

    which-cluster-master                     Output the name of a writable master in given cluster

    all-clusters-masters                     List of writeable masters, one per cluster

    all-instances                            The complete list of known instances

    which-cluster-osc-replicas               Output a list of replicas in a cluster, that could serve as a pt-online-schema-change operation control replicas

    which-cluster-osc-running-replicas       Output a list of healthy, replicating replicas in a cluster, that could serve as a pt-online-schema-change operation control replicas

    downtimed                                List all downtimed instances

    dominant-dc                              Name the data center where most masters are found

    submit-masters-to-kv-stores              Submit a cluster's master, or all clusters' masters to KV stores

    relocate                                 Relocate a replica beneath another instance

    relocate-replicas                        Relocates all or part of the replicas of a given instance under another instance

    match                                    Matches a replica beneath another (destination) instance using Pseudo-GTID

    match-up                                 Transport the replica one level up the hierarchy, making it child of its grandparent, using Pseudo-GTID

    match-up-replicas                        Matches replicas of the given instance one level up the topology, making them siblings of given instance, using Pseudo-GTID

    move-up                                  Move a replica one level up the topology

    move-below                               Moves a replica beneath its sibling. Both replicas must be actively replicating from same master.

    move-equivalent                          Moves a replica beneath another server, based on previously recorded "equivalence coordinates"

    move-up-replicas                         Moves replicas of the given instance one level up the topology

    make-co-master                           Create a master-master replication. Given instance is a replica which replicates directly from a master.

    take-master                              Turn an instance into a master of its own master; essentially switch the two.

    move-gtid                                Move a replica beneath another instance via GTID

    move-replicas-gtid                       Moves all replicas of a given instance under another (destination) instance using GTID

    repoint                                  Make the given instance replicate from another instance without changing the binglog coordinates. Use with care

    repoint-replicas                         Repoint all replicas of given instance to replicate back from the instance. Use with care

    take-siblings                            Turn all siblings of a replica into its sub-replicas.

    tags                                     List tags for a given instance

    tag-value                                List tags for a given instance

    tag                                      Add a tag to a given instance. Tag in "tagname" or "tagname=tagvalue" format

    untag                                    Remove a tag from an instance

    untag-all                                Remove a tag from all matching instances

    tagged                                   List instances tagged by tag-string. Format: "tagname" or "tagname=tagvalue" or comma separated "tag0,tag1=val1,tag2" for intersection of all.

    submit-pool-instances                    Submit a pool name with a list of instances in that pool

    which-heuristic-cluster-pool-instances   List instances of a given cluster which are in either any pool or in a specific pool

    begin-downtime                           Mark an instance as downtimed

    end-downtime                             Indicate an instance is no longer downtimed

    begin-maintenance                        Request a maintenance lock on an instance

    end-maintenance                          Remove maintenance lock from an instance

    register-candidate                       Indicate the promotion rule for a given instance

    register-hostname-unresolve              Assigns the given instance a virtual (aka "unresolved") name

    deregister-hostname-unresolve            Explicitly deregister/dosassociate a hostname with an "unresolved" name

    stop-replica                             Issue a STOP SLAVE on an instance

    stop-replica-nice                        Issue a STOP SLAVE on an instance, make effort to stop such that SQL thread is in sync with IO thread (ie all relay logs consumed)

    start-replica                            Issue a START SLAVE on an instance

    restart-replica                          Issue STOP and START SLAVE on an instance

    reset-replica                            Issues a RESET SLAVE command; use with care

    detach-replica                           Stops replication and modifies binlog position into an impossible yet reversible value.

    reattach-replica                         Undo a detach-replica operation

    detach-replica-master-host               Stops replication and modifies Master_Host into an impossible yet reversible value.

    reattach-replica-master-host             Undo a detach-replica-master-host operation

    skip-query                               Skip a single statement on a replica; either when running with GTID or without

    gtid-errant-reset-master                 Remove errant GTID transactions by way of RESET MASTER

    gtid-errant-inject-empty                 Apply errant GTID as empty transactions on cluster's master

    enable-semi-sync-master                  Enable semi-sync (master-side)

    disable-semi-sync-master                 Disable semi-sync (master-side)

    enable-semi-sync-replica                 Enable semi-sync (replica-side)

    disable-semi-sync-replica                Disable semi-sync (replica-side)

    restart-replica-statements               Given `-q "<query>"` that requires replication restart to apply, wrap query with stop/start slave statements as required to restore instance to same replication state. Print out set of statements

    can-replicate-from                       Check if an instance can potentially replicate from another, according to replication rules

    can-replicate-from-gtid                  Check if an instance can potentially replicate from another, according to replication rules and assuming Oracle GTID

    is-replicating                           Check if an instance is replicating at this time (both SQL and IO threads running)

    is-replication-stopped                   Check if both SQL and IO threads state are both strictly stopped.

    set-read-only                            Turn an instance read-only, via SET GLOBAL read_only :=

    set-writeable                            Turn an instance writeable, via SET GLOBAL read_only :=

    flush-binary-logs                        Flush binary logs on an instance

    last-pseudo-gtid                         Dump last injected Pseudo-GTID entry on a server

    recover                                  Do auto-recovery given a dead instance, assuming orchestrator agrees there's a problem. Override blocking.

    graceful-master-takeover                 Gracefully promote a new master. Either indicate identity of new master via '-d designated.instance.com' or setup replication tree to have a single direct replica to the master.

    force-master-failover                    Forcibly discard master and initiate a failover, even if orchestrator doesn't see a problem. This command lets orchestrator choose the replacement master

    force-master-takeover                    Forcibly discard master and promote another (direct child) instance instead, even if everything is running well

    ack-cluster-recoveries                   Acknowledge recoveries for a given cluster; this unblocks pending future recoveries

    ack-all-recoveries                       Acknowledge all recoveries

    disable-global-recoveries                Disallow orchestrator from performing recoveries globally

    enable-global-recoveries                 Allow orchestrator to perform recoveries globally

    check-global-recoveries                  Show the global recovery configuration

    replication-analysis                     Request an analysis of potential crash incidents in all known topologies

    raft-leader                              Get identify of raft leader, assuming raft setup

    raft-health                              Whether node is part of a healthy raft group

    raft-leader-hostname                     Get hostname of raft leader, assuming raft setup

    raft-elect-leader                        Request raft re-elections, provide hint for new leader's identity
orchestrator-client不需要和Orchestrator服务放一起,不需要访问后端数据库,在任意一台上都可以。
注意:因为配置了Raft,有多个Orchestrator,所以需要ORCHESTRATOR_API的环境变量,orchestrator-client会自动选择leader。如:
export ORCHESTRATOR_API="test1:3000/api test2:3000/api test3:3000/api"
1. 列出所有集群:clusters
默认:
# orchestrator-client -c clusters

test2:
返回包含集群别名:clusters-alias
# orchestrator-client -c clusters-alias

test2:,test
2. 发现指定实例:discover/async-discover
同步发现:
# orchestrator-client -c discover -i test1:

test1:
异步发现:适用于批量
# orchestrator-client -c async-discover -i test1:

:null
3. 忘记指定对象:forget/forget-cluster
忘记指定实例:
# orchestrator-client -c forget -i test1:
忘记指定集群:
# orchestrator-client -c forget-cluster -i test
4. 打印指定集群的拓扑:topology/topology-tabulated
普通返回:
# orchestrator-client -c topology -i test1:

test2:   [0s,ok,5.7.-0ubuntu0.16.04.-log,rw,ROW,>>,GTID]

+ test1: [0s,ok,5.7.-0ubuntu0.16.04.-log,ro,ROW,>>,GTID]

+ test3: [0s,ok,5.7.-log,ro,ROW,>>,GTID]
列表返回:
# orchestrator-client -c topology-tabulated -i test1:

test2:  |0s|ok|5.7.-0ubuntu0.16.04.-log|rw|ROW|>>,GTID

+ test1:|0s|ok|5.7.-0ubuntu0.16.04.-log|ro|ROW|>>,GTID

+ test3:|0s|ok|5.7.-log                 |ro|ROW|>>,GTID
5. 查看使用哪个API:自己会选择出leader。which-api
# orchestrator-client -c which-api

test3:/api
也可以通过 http://192.168.163.133:3000/api/leader-check 查看。
6. 调用api请求,需要和 -path 参数一起:api..-path
# orchestrator-client -c api -path clusters

[ "test2:3307" ]

# orchestrator-client -c api -path leader-check

"OK"

# orchestrator-client -c api -path status

{ "Code": "OK", "Message": "Application node is healthy"...}
7. 搜索实例:search
# orchestrator-client -c search -i test

test2:

test1:

test3:
8. 打印指定实例的主库:which-master
# orchestrator-client -c which-master -i test1:

test2:

# orchestrator-client -c which-master -i test3:

test2:

# orchestrator-client -c which-master -i test2:3307 #自己本身是主库

:
9. 打印指定实例的从库:which-replicas
# orchestrator-client -c which-replicas -i test2:

test1:

test3:
10. 打印指定实例的实例名:which-instance
# orchestrator-client -c instance -i test1:

test1:
11. 打印指定主实例从库异常的列表:which-broken-replicas,模拟test3的复制异常:
# orchestrator-client -c which-broken-replicas -i test2:

test3:
12. 给出一个实例或则集群别名,打印出该实例所在集群下的所有其他实例。which-cluster-instances
# orchestrator-client -c which-cluster-instances -i test

test1:

test2:

test3:

root@test1:~# orchestrator-client -c which-cluster-instances -i test1:

test1:

test2:

test3:
13. 给出一个实例,打印该实的集群名称:默认是hostname:port。which-cluster
# orchestrator-client -c which-cluster -i test1:

test2:# orchestrator-client -c which-cluster -i test2:

test2:# orchestrator-client -c which-cluster -i test3:

test2:
14. 打印出指定实例/集群名或则所有所在集群的可写实例,:which-cluster-master
指定实例:which-cluster-master
# orchestrator-client -c which-cluster-master -i test2:

test2:

# orchestrator-client -c which-cluster-master -i test

test2:
所有实例:all-clusters-masters,每个集群返回一个
# orchestrator-client -c all-clusters-masters

test1:
15. 打印出所有实例:all-instances
# orchestrator-client -c all-instances

test2:

test1:

test3:
16. 打印出集群中可以作为pt-online-schema-change操作的副本列表:which-cluster-osc-replicas
~# orchestrator-client -c which-cluster-osc-replicas -i test

test1:

test3:

root@test1:~# orchestrator-client -c which-cluster-osc-replicas -i test2:

test1:

test3:
17. 打印出集群中可以作为pt-online-schema-change可以操作的健康的副本列表:which-cluster-osc-running-replicas
# orchestrator-client -c which-cluster-osc-running-replicas -i test

test1:

test3:

# orchestrator-client -c which-cluster-osc-running-replicas -i test1:

test1:

test3:
18. 打印出所有在维护(downtimed)的实例:downtimed
# orchestrator-client -c downtimed

test1:

test3:
19. 打印出进群中主的数据中心:dominant-dc
# orchestrator-client -c dominant-dc

BJ
20. 将集群的主提交到KV存储。submit-masters-to-kv-stores
# orchestrator-client -c submit-masters-to-kv-stores

mysql/master/test:test2:

mysql/master/test/hostname:test2

mysql/master/test/port:

mysql/master/test/ipv4:192.168.163.132

mysql/master/test/ipv6:
21. 迁移从库到另一个实例上:relocate
# orchestrator-client -c relocate -i test3: -d test1:3307   #迁移test3:3307作为test1:3307的从库

test3:<test1:

查看

# orchestrator-client -c topology -i test2:

test2:     [0s,ok,5.7.-0ubuntu0.16.04.-log,rw,ROW,>>,GTID]

+ test1:   [0s,ok,5.7.-0ubuntu0.16.04.-log,ro,ROW,>>,GTID]

  + test3: [0s,ok,5.7.-log,ro,ROW,>>,GTID]
22. 迁移一个实例的所有从库到另一个实例上:relocate-replicas
# orchestrator-client -c relocate-replicas -i test1: -d test2:3307   #迁移test1:3307下的所有从库到test2:3307下,并列出被迁移的从库的实例名

test3:
23. 将slave在拓扑上向上移动一级,对应web上的是在Classic Model下进行拖动:move-up
# orchestrator-client -c move-up -i test3: -d test2:

test3:<test2:
结构从 test2:3307 -> test1:3307 -> test3:3307 变成 test2:3307 -> test1:3307
-> test3:3307
24. 将slave在拓扑上向下移动一级(移到同级的下面),对应web上的是在Classic Model下进行拖动:move-below
# orchestrator-client -c move-below -i test3: -d test1:

test3:<test1:
结构从 test2:3307 -> test1:3307 变成 test2:3307 -> test1:3307 -> test3:3307
-> test3:3307
25. 将给定实例的所有从库在拓扑上向上移动一级,基于Classic Model模式:move-up-replicas
# orchestrator-client -c move-up-replicas -i test1:3307
test3:
结构从 test2:3307 -> test1:3307 -> test3:3307 变成 test2:3307 -> test1:3307
-> test3:3307
26. 创建主主复制,将给定实例直接和当前主库做成主主复制:make-co-master
# orchestrator-client -c make-co-master -i test1:

test1:<test2:
27.将实例转换为自己主人的主人,切换两个:take-master
# orchestrator-client -c take-master -i test3:

test3:<test2:
结构从 test2:3307 -> test1:3307 -> test3:3307 变成 test2:3307 -> test3:3307 -> test1:3307
28. 通过GTID移动副本,move-gtid:
通过orchestrator-client执行报错:
# orchestrator-client -c move-gtid -i test3: -d test1:

parse error: Invalid numeric literal at line , column

parse error: Invalid numeric literal at line , column

parse error: Invalid numeric literal at line , column
通过orchestrator执行是没问题,需要添加--ignore-raft-setup参数:
# orchestrator -c move-gtid -i test3: -d test2: --ignore-raft-setup

test3:<test2:
29.通过GTID移动指定实例下的所有slaves到另一个实例,move-replicas-gtid
通过orchestrator-client执行报错:
# orchestrator-client -c move-replicas-gtid -i test3: -d test1:

jq: error (at <stdin>:): Cannot index string with string "Key"
通过orchestrator执行是没问题,需要添加--ignore-raft-setup参数:
# ./orchestrator -c move-replicas-gtid -i test2: -d test1: --ignore-raft-setup

test3:
30. 将给定实例的同级slave,变更成他的slave,take-siblings
# orchestrator-client -c take-siblings -i test3:

test3:<test1:
结构从 test1:3307 -> test2:3307 变成 test1:3307 -> test3:3307 -> test2:3307
-> test3:3307
31. 给指定实例打上标签,tag
# orchestrator-client -c tag -i test1: --tag 'name=AAA'

test1:
32. 列出指定实例的标签,tags:
# orchestrator-client -c tags -i test1:

name=AAA
33. 列出给定实例的标签值:tag-value
# orchestrator-client -c tag-value -i test1: --tag "name"

AAA
34. 移除指定实例上的标签:untag
# orchestrator-client -c untag -i test1: --tag "name=AAA"

test1:
35. 列出打过某个标签的实例,tagged:
# orchestrator-client -c tagged -t name

test3:

test1:

test2:
36. 标记指定实例进入停用模式,包括时间、操作人、和原因,begin-downtime:
# orchestrator-client -c begin-downtime -i test1: -duration=10m -owner=zjy -reason 'test'

test1:
37. 移除指定实例的停用模式,end--downtime:
# orchestrator-client -c end-downtime -i test1:

test1:
38. 请求指定实例上的维护锁:拓扑更改需要将锁放在最小受影响的实例上,以避免在同一个实例上发生两个不协调的操作,begin-maintenance :
# orchestrator-client -c begin-maintenance -i test1: --reason "XXX"

test1:
锁默认10分钟后过期,有参数MaintenanceExpireMinutes。
39. 移除指定实例上的维护锁:end-maintenance
# orchestrator-client -c end-maintenance -i test1:

test1:
40. 设置提升规则,恢复时可以指定一个实例进行提升:register-candidate:需要和promotion-rule一起使用
# orchestrator-client -c register-candidate -i test3: --promotion-rule prefer

test3:
提升test3:3307的权重,如果进行Failover,会成为Master。
41. 指定实例执行停止复制:
普通的:stop slave:stop-replica
# orchestrator-client -c stop-replica -i test2:

test2:
应用完relay log,在stop slave:stop-replica-nice
# orchestrator-client -c stop-replica-nice -i test2:

test2:
42.指定实例执行开启复制: start-replica
# orchestrator-client -c start-replica -i test2:

test2:
43. 指定实例执行复制重启:restart-replica
# orchestrator-client -c restart-replica -i test2:

test2:
44.指定实例执行复制重置:reset-replica
# orchestrator-client -c reset-replica -i test2:

test2:
45.分离副本:非GTID修改binlog position,detach-replica :
# orchestrator-client -c detach-replica -i test2:
46.恢复副本:reattach-replica
# orchestrator-client -c reattach-replica -i test2:
47.分离副本:注释master_host来分离,detach-replica-master-host :如Master_Host: //test1
# orchestrator-client -c detach-replica-master-host -i test2:

test2:
48. 恢复副本:reattach-replica-master-host
# orchestrator-client -c reattach-replica-master-host -i test2:

test2:
49. 跳过SQL线程的Query,如主键冲突,支持在GTID和非GTID下:skip-query
# orchestrator-client -c skip-query -i test2:

test2:
50. 将错误的GTID事务当做空事务应用副本的主上:gtid-errant-inject-empty「web上的fix」
# orchestrator-client -c gtid-errant-inject-empty  -i test2:

test2:
51. 通过RESET MASTER删除错误的GTID事务:gtid-errant-reset-master
# orchestrator-client -c gtid-errant-reset-master  -i test2:

test2:
52. 设置半同步相关的参数:
orchestrator-client -c $variable -i test1:
    enable-semi-sync-master      主上执行开启半同步

    disable-semi-sync-master      主上执行关闭半同步

    enable-semi-sync-replica       从上执行开启半同步

    disable-semi-sync-replica      从上执行关闭半同步
53. 执行需要stop/start slave配合的SQL:restart-replica-statements
# orchestrator-client -c restart-replica-statements -i test3: -query "change master to auto_position=1" | jq .[] -r

stop slave io_thread;

stop slave sql_thread;

change master to auto_position=;

start slave sql_thread;

start slave io_thread;

# orchestrator-client -c restart-replica-statements -i test3: -query "change master to master_auto_position=1" | jq .[] -r  |  mysql -urep -p -htest3 -P3307

Enter password:
54.根据复制规则检查实例是否可以从另一个实例复制(GTID和非GTID):
非GTID,can-replicate-from:
# orchestrator-client -c can-replicate-from -i test3: -d test1:

test1:
GTID:can-replicate-from-gtid
# orchestrator-client -c can-replicate-from-gtid -i test3: -d test1:

test1:
55. 检查指定实例是否在复制:is-replicating
#有返回在复制

# orchestrator-client -c is-replicating -i test2:

test2:

#没有返回,不在复制

# orchestrator-client -c is-replicating -i test1:
56.检查指定实例的IO和SQL限制是否都停止:
# orchestrator-client -c is-replicating -i test2:
57.将指定实例设置为只读,通过SET GLOBAL read_only=1,set-read-only:
# orchestrator-client -c set-read-only -i test2:

test2:
58.将指定实例设置为读写,通过SET GLOBAL read_only=0,set-writeable
# orchestrator-client -c set-writeable -i test2:

test2:
59. 轮询指定实例的binary log,flush-binary-logs
# orchestrator-client -c flush-binary-logs -i test1:

test1:
60. 手动执行恢复,指定一个死机的实例,recover:
# orchestrator-client -c recover -i test2:

test3:
测试下来,该参数会让处理停机或则维护状态下的实例进行强制恢复。结构:
test1:3307 -> test2:3307 -> test3:3307(downtimed) 当test2:3307死掉之后,此时test3:3307处于停机状态,不会进行Failover,执行后变成
test1:3307 -> test2:3307
-> test3:3307
61. 优雅的进行主和指定从切换,graceful-master-takeover:
# orchestrator-client -c graceful-master-takeover -a test1: -d test2:

test2:
结构从test1:3307 -> test2:3307 变成 test2:3307 -> test1:3307。新主指定变成读写,新从变成只读,还需要手动start slave。
注意需要配置:需要从元表里找到复制的账号和密码。
"ReplicationCredentialsQuery":"SELECT repl_user, repl_pass from meta.cluster where anchor=1"
62. 手动强制执行恢复,即使orch没有发现问题,force-master-failover:转移之后老主独立,需要手动加入到集群。
# orchestrator-client -c force-master-failover -i test1:

test3:
63.强行丢弃master并指定的一个实例,force-master-takeover:老主(test1)独立,指定从(test2)提升为master
# orchestrator-client -c force-master-takeover -i test1: -d test2:

test2:
64. 确认集群恢复理由,在web上的Audit->Recovery->Acknowledged 按钮确认,/ack-all-recoveries
确认指定集群:ack-cluster-recoveries
# orchestrator-client -c ack-cluster-recoveries  -i test2: -reason=''

test1:
确认所有集群:ack-all-recoveries
# orchestrator-client -c ack-all-recoveries  -reason='OOOPPP'

eason=XYZ
65.检查、禁止、开启orchestrator执行全局恢复:
检查:check-global-recoveries
# orchestrator-client -c check-global-recoveries

enabled
禁止:disable-global-recoveries
# orchestrator-client -c disable-global-recoveries

disabled
开启:enable--global-recoveries
# orchestrator-client -c enable-global-recoveries

enabled
66. 检查分析复制拓扑中存在的问题:replication-analysis
# orchestrator-client -c replication-analysis

test1: (cluster test1:): ErrantGTIDStructureWarning
67. raft检测:leader查看、健康监测、迁移leader:
查看leader节点

# orchestrator-client -c raft-leader

192.168.163.131:

健康监测

# orchestrator-client -c raft-health

healthy

leader 主机名

# orchestrator-client -c  raft-leader-hostname

test1

指定主机选举leader

# orchestrator-client -c raft-elect-leader -hostname test3

test3
68.伪GTID相关参数:
match      #使用Pseudo-GTID指定一个从匹配到指定的另一个(目标)实例下

match-up #Transport the replica one level up the hierarchy, making it child of its grandparent, using Pseudo-GTID

match-up-replicas  #Matches replicas of the given instance one level up the topology, making them siblings of given instance, using Pseudo-GTID

last-pseudo-gtid #Dump last injected Pseudo-GTID entry on a server
到此关于Orchestrator的使用以及命令行说明已经介绍完毕,Web API可以在Orchestrator API查看,通过命令行和API上的操作可以更好的进行自动化开发。
总结:
Orchestrator是一款开源(go编写)的MySQL复制拓扑管理工具,支持MySQL主从复制拓扑关系的调整、主库故障自动切换、手动主从切换等功能。提供Web界面展示MySQL集群的拓扑关系及状态,可以更改MySQL实例的部分配置信息,也提供命令行和api接口。相对比MHA,Orchestrator自身可以部署多个节点,通过raft分布式一致性协议来保证自身的高可用。
更多玩法:MySQL High Availability at GitHub,翻译文 GitHub 的 MySQL 高可用性实践分享
MySQL高可用复制管理工具 —— Orchestrator使用的更多相关文章
- MySQL高可用复制管理工具 —— Orchestrator介绍
背景 在MySQL高可用架构中,目前使用比较多的是Percona的PXC,Galera以及MySQL 5.7之后的MGR等,其他的还有的MHA,今天介绍另一个比较好用的MySQL高可用复制管理工具:O ...
- MHA实现mysql高可用复制集群
MHA简述 MHA(Master High Availability)目前在MySQL高可用方面是一个相对成熟的解决方案,是一套优秀的作为MySQL高可用性环境下故障切换和主从提升的高可用软件.在My ...
- (5.10)mysql高可用系列——percona-toolkit工具下的pt-table-checksum 在线验证主从一致性【续写中】
关键词:percona-toolkit 工具包中包含 pt-table-checksum工具,在线验证主从一致性 [1]percona-toolkit 工具包 [1.1]percona-toolkit ...
- MySQL高可用工具--orchestrator
orchestrator是一款MySQL高可用工具,其支持: 集群拓扑探测 集群拓扑重塑 故障恢复 提供3种使用方式: 命令行 HTTP API web页面 orchestator github地址
- MySQL高可用之组复制(1):组复制技术简介
MySQL组复制系列文章: MySQL组复制大纲 MySQL组复制(1):组复制技术简介 MySQL组复制(2):配置单主模型的组复制 MySQL组复制(3):配置多主模型的组复制 MySQL组复制( ...
- (5.8)mysql高可用系列——MySQL中的GTID复制(实践篇)
一.基于GTID的异步复制(一主一从)无数据/少数据搭建 二.基于GTID的无损半同步复制(一主一从)(mysql5.7)基于大数据量的初始化 正文: [0]概念 [0.5]GTID 复制(mysql ...
- MySQL高可用架构之MySQL5.7组复制MGR
MySQL高可用架构之MySQL5.7组复制MGR########################################################################### ...
- MySQL高可用基础之keepalived+双主复制【转】
环境:MySQL-VIP:192.168.1.3MySQL-master1:192.168.1.1MySQL-master2:192.168.1.2 OS版本:CentOS release 6.4 ( ...
- (5.1)mysql高可用系列——高可用架构方案概述
关键词:mysql高可用概述,mysql高可用架构 常用高可用方案 20190918 现在业内常用的MySQL高可用方案有哪些?目前来说,用的比较多的开源方案分内置高可用与外部实现,内置高可用有如下: ...
随机推荐
- Python Django 1.Hello Django
#安装Djangopip install Django #==版本号#选择路径:D:#任意文件夹名 cd Django #罗列Django所提供的命令,其中startproject命令来创建项目 dj ...
- 《The java.util.concurrent Synchronizer Framework》 JUC同步器框架(AQS框架)原文翻译
一.论文简介 闲来无事,看看源码,发现了一篇JDK作者的论文<The java.util.concurrent Synchronizer Framework>主要描述了作者对Abstrac ...
- 三元运算符 与 return
有三元运算符可以很好的代替if else简单语句 但是在使用的时候发现 与 return使用的时候 需要用这种形式 错误形式: $a ? return 1 ? return 0; 正确形式: retu ...
- python中os.path.dirname(__file__) 命令行 参数没有绝对路径导致数据库找不到
(1).当"print os.path.dirname(__file__)"所在脚本是以完整路径被运行的, 那么将输出该脚本所在的完整路径,比如: python d:/python ...
- vue2.0 axios封装、vuex介绍
一.前言 博主也是vue道路上的行者,道行不深,希望自己的东西能对大家有所帮助.这篇博客针对 了解过vue基础,但是没有做过vue项目的童鞋.如果想看基础指令,可以看我之前的一篇博客,请点击 跳转, ...
- 贝叶斯深度学习(bayesian deep learning)
本文简单介绍什么是贝叶斯深度学习(bayesian deep learning),贝叶斯深度学习如何用来预测,贝叶斯深度学习和深度学习有什么区别.对于贝叶斯深度学习如何训练,本文只能大致给个介绍. ...
- 【工具篇】接口测试神器 -- Postman 入门教程
一.Postman概述 (1)工具介绍 Postman是一个接口测试工具,一款非常流行的API调试工具.在做接口测试的时候,Postman相当于一个客户端,它可以模拟用户发起的各类HTTP请求,将请求 ...
- es6学习笔记-class之继承
继承 上一篇学习了class的概念,在es5时,对象的继承有好几种,原型链继承,借用构造函数继承,组合继承,原型式继承,寄生式继承以及寄生组合式继承,都是按照函数的形式去集成的,现在class也有它的 ...
- Redux的中间件原理分析
redux的中间件对于使用过redux的各位都不会感到陌生,通过应用上我们需要的所有要应用在redux流程上的中间件,我们可以加强dispatch的功能.最近也有一些初学者同时和实习生在询问中间件有关 ...
- Asp.Net Core 轻松学-基于微服务的后台任务调度管理器
前言 在 Asp.Net Core 中,我们常常使用 System.Threading.Timer 这个定时器去做一些需要长期在后台运行的任务,但是这个定时器在某些场合却不太灵光,而且常常无法 ...