文件上传之——用SWF插件实现文件异步上传和头像截取
之前写过几篇文件上传,那些都不错。今天小编带领大家体会一种新的上传方法,及使用Flash插件实现文件上传。
使用Flash的好处就是可以解决浏览器兼容性问题。之前我写的一个快捷复制功能也是利用的Flash。
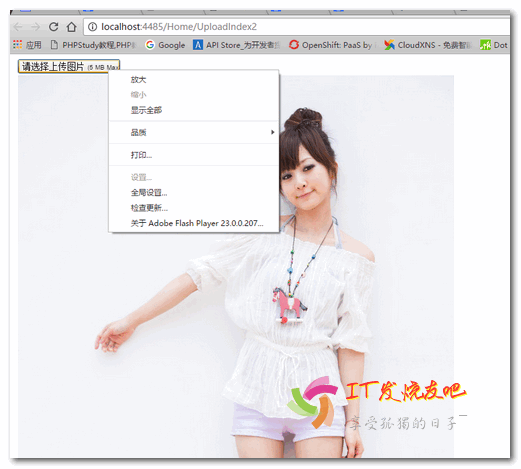
最近一直在用MVC,所以还是以MVC举例;先来张效果图:

UploadIndex2.cshtml代码:
@{

    Layout = null;

}

<!DOCTYPE html>

<html>

<head>

    <meta name="viewport" content="width=device-width" />

    <meta http-equiv="X-UA-Compatible" content="IE=EmulateIE7" />

    <title>上传</title>

    <script src="~/SWFUpload/swfupload.js" type="text/javascript"></script>

    <script src="~/SWFUpload/handlers.js" type="text/javascript"></script>

    <script src="~/Scripts/jquery-1.8.2.min.js"></script>

    <script type="text/javascript">

        var swfu;

        window.onload = function () {

            swfu = new SWFUpload({

                // Backend Settings

                upload_url: "@Url.Action("HandlerUpload2","Home")",//上传路径

                post_params: {

                    "ASPSESSID": "<@Session.SessionID>"

                },

                // File Upload Settings

                file_size_limit: "5 MB",

                file_types: "*.jpg;*.gif",

                file_types_description: "JPG Images",

                file_upload_limit: ,    // Zero means unlimited

                // Event Handler Settings - these functions as defined in Handlers.js

                //  The handlers are not part of SWFUpload but are part of my website and control how

                //  my website reacts to the SWFUpload events.

                swfupload_preload_handler: preLoad,

                swfupload_load_failed_handler: loadFailed,

                file_queue_error_handler: fileQueueError,

                file_dialog_complete_handler: fileDialogComplete,

                upload_progress_handler: uploadProgress,

                upload_error_handler: uploadError,

                upload_success_handler: showData,

                upload_complete_handler: uploadComplete,

                // Button settings

                button_image_url: "/SWFUpload/images/XPButtonNoText_160x22.png",//设置按钮图片,注意要是连续的四张

                button_placeholder_id: "spanButtonPlaceholder",//设置按钮id

                button_width: ,

                button_height: ,

                button_text: '<span class="button">请选择上传图片 <span class="buttonSmall">(5 MB Max)</span></span>',

                button_text_style: '.button { font-family: Helvetica, Arial, sans-serif; font-size: 14pt; } .buttonSmall { font-size: 10pt; }',

                button_text_top_padding: ,

                button_text_left_padding: ,

                // Flash Settings

                flash_url: "/SWFUpload/swfupload.swf", // Relative to this file

                flash9_url: "/SWFUpload/swfupload_FP9.swf", // Relative to this file

                custom_settings: {

                    upload_target: "divFileProgressContainer"

                },

                // Debug Settings

                debug: false

            });

        }

        //上传成功以后执行该方法.

        function showData(file, serverData) {

            $("#imgSrc").attr("src", serverData);

        }

    </script>

</head>

<body>

    <form id="form1">

        <div id="content">

            <div id="swfu_container" style="margin: 0px 10px;">

                <div>

                    <span id="spanButtonPlaceholder"></span>  <!--注意:这个ID要和上面的一致-->

                </div>

                <img id="imgSrc" /><!---在这里显示上传的图片,这个插件采用的为异步上传-->

            </div>

        </div>

    </form>

</body>

</html>
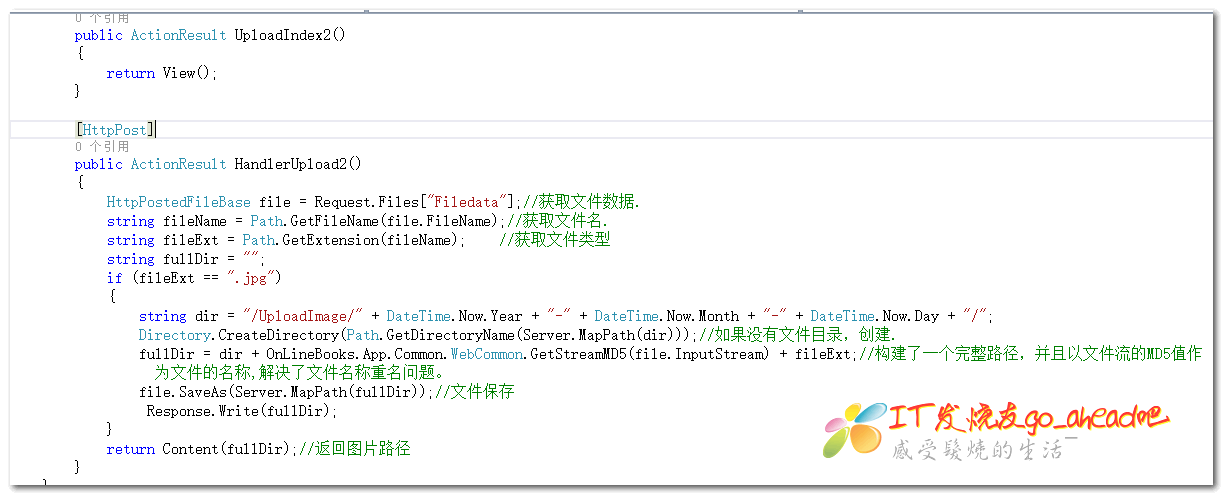
后端代码:
     public ActionResult UploadIndex2()

        {

            return View();

        }

        [HttpPost]

        public ActionResult HandlerUpload2()

        {

            HttpPostedFileBase file = Request.Files["Filedata"];//获取文件数据.

            string fileName = Path.GetFileName(file.FileName);//获取文件名.

            string fileExt = Path.GetExtension(fileName);    //获取文件类型

            string fullDir = "";

            if (fileExt == ".jpg")

            {

                string dir = "/UploadImage/" + DateTime.Now.Year + "-" + DateTime.Now.Month + "-" + DateTime.Now.Day + "/";

                Directory.CreateDirectory(Path.GetDirectoryName(Server.MapPath(dir)));//如果没有文件目录,创建.

                fullDir = dir + OnLineBooks.App.Common.WebCommon.GetStreamMD5(file.InputStream) + fileExt;//构建了一个完整路径,并且以文件流的MD5值作为文件的名称,解决了文件名称重名问题。

                file.SaveAs(Server.MapPath(fullDir));//文件保存

            }

            return Content(fullDir);//返回图片路径

        }
SWFUpload文件下载链接:http://pan.baidu.com/s/1c2xIf5Y密码:wphd
上面提到了图片上传,接下来小编带大家实现图像截取,先上图:

前台实现:
@{

    Layout = null;

}

<!DOCTYPE html>

<html>

<head>

    <meta name="viewport" content="width=device-width" />

    <title>UploadIndex3</title>

    <link href="~/Content/themes/ui-lightness/jquery-ui-1.8.2.custom.css" rel="stylesheet" />

    <script src="~/SWFUpload/swfupload.js" type="text/javascript"></script>

    <script src="~/SWFUpload/handlers.js" type="text/javascript"></script>

    <script src="~/Scripts/jquery-1.8.2.min.js"></script>

    <script src="~/SWFUpload/jquery-ui-1.8.2.custom.min.js"></script>

    @*<script src="//apps.bdimg.com/libs/jqueryui/1.10.4/jquery-ui.min.js"></script>*@

    <script type="text/javascript">

    var swfu;

    window.onload = function () {

        swfu = new SWFUpload({

            // Backend Settings

            upload_url: "@Url.Action("Cut_upload", "Home")?action=up",

            post_params: {

                "ASPSESSID": "@Session.SessionID"

            },

            // File Upload Settings

            file_size_limit: "2 MB",

            file_types: "*.jpg;*.gif",

            file_types_description: "JPG Images",

            file_upload_limit: 0,    // Zero means unlimited

            // Event Handler Settings - these functions as defined in Handlers.js

            //  The handlers are not part of SWFUpload but are part of my website and control how

            //  my website reacts to the SWFUpload events.

            swfupload_preload_handler: preLoad,

            swfupload_load_failed_handler: loadFailed,

            file_queue_error_handler: fileQueueError,

            file_dialog_complete_handler: fileDialogComplete,

            upload_progress_handler: uploadProgress,

            upload_error_handler: uploadError,

            upload_success_handler: showData,

            upload_complete_handler: uploadComplete,

            // Button settings

            button_image_url: "/SWFUpload/images/XPButtonNoText_160x22.png",

            button_placeholder_id: "spanButtonPlaceholder",

            button_width: 160,

            button_height: 22,

            button_text: '<span class="button">请选择上传图片 <span class="buttonSmall">(2 MB Max)</span></span>',

            button_text_style: '.button { font-family: Helvetica, Arial, sans-serif; font-size: 14pt; } .buttonSmall { font-size: 10pt; }',

            button_text_top_padding: 1,

            button_text_left_padding: 5,

            // Flash Settings

            flash_url: "/SWFUpload/swfupload.swf", // Relative to this file

            flash9_url: "/SWFUpload/swfupload_FP9.swf", // Relative to this file

            custom_settings: {

                upload_target: "divFileProgressContainer"

            },

            // Debug Settings

            debug: false

        });

    }

        //上传成功以后执行该方法.

        var data;

    function showData(file, serverData) {

        //一:创建一个DIV,通过该DIV确定出要截取大小与范围.(实现DIV的拖动与调整大小.)

        //首先将上传成功的图像作为divContent的背景图像.

         data = serverData.split(':');

        if (data[0] == "ok") {

            //设置图片的高度与宽度,注意单位.px

            $("#divContent").css("backgroundImage", "url(" + data[1] + ")").css("width", data[2] + "px").css("height", data[3] + "px");

        }

    }

    //拖动红色DIV并且可以调整大小.

    $(function () {

        $("#divCut").resizable({

            containment: "#divContent"

        }).draggable({ containment: "parent" });      //设置拖动

        $("#btnCut").click(function () {

            CutImage();//截取头像

        });

    });

    function CutImage() {

        //offset():获取元素的绝对坐标 top:纵坐标

        var y = $("#divCut").offset().top - $("#divContent").offset().top;//纵坐标

        var x = $("#divCut").offset().left - $("#divContent").offset().left;

        var width = $("#divCut").width(); //宽度.

        var height = $("#divCut").height();

        //将上面的数据发送到服务端.

        $.post("@Url.Action("Cut_upload", "Home")", { "action": "cut", "x": parseInt(x), "y": parseInt(y), "width": parseInt(width), "height": parseInt(height), "imgUrl": data[1] }, function (data) {

            $("#imgUrl").attr("src", data);

        })

    }

</script>

</head>

<body>

    <form id="form1">

        <div id="content">

            <div id="swfu_container" style="margin: 0px 10px;">

                <div>

                    <span id="spanButtonPlaceholder"></span>

                </div>

                <div id="divFileProgressContainer" style="height: 75px;"></div>

            </div>

            <div id="divContent" style="width:300px; height:300px">

                <div id="divCut" style="width:100px; height:100px; border:1px solid red"></div>

            </div>

            <input type="button" value="头像截取" id="btnCut" />

            <img id="imgUrl" />

        </div>

    </form>

</body>

</html>
后台实现:
    /// <summary>

        /// 截取图像

        /// </summary>

        /// <returns></returns>

        [HttpPost]

        public ActionResult Cut_upload()

        {

            string action = Request["action"];

            if (action == "up")//上传

            {

                HttpPostedFileBase file = Request.Files["Filedata"];//获取文件数据.

                //获取文件名.

                string fileName = Path.GetFileName(file.FileName);

                //获取文件类型

                string fileExt = Path.GetExtension(fileName);

                if (fileExt == ".jpg")

                {

                    //获取上传的图片的流(文件内容),创建一个Image.所以Image的高度与宽度实际上就是上传图片的高度与宽度.

                    using (Image img = Image.FromStream(file.InputStream))

                    {

                        file.SaveAs(Server.MapPath("/UploadImage/" + fileName));

                        return Content("ok:/UploadImage/" + fileName + ":" + img.Width + ":" + img.Height);

                    }

                }

            }

            else if (action == "cut")//头像截取

            {

                //1:接收截取头像范围的数据

                int x = Convert.ToInt32(Request.Form["x"]);

                int y = Convert.ToInt32(Request.Form["y"]);

                int width = Convert.ToInt32(Request.Form["width"]);

                int height = Convert.ToInt32(Request.Form["height"]);

                string imgUrl = Request.Form["imgUrl"];

                //2:创建画布,然后将指定范围的图像画到画布上,最后保存画布.

                using (Bitmap map = new Bitmap(width, height))//画布的大小与截取的图像大小一致

                {

                    //为画布创建了一个画笔.

                    using (Graphics g = Graphics.FromImage(map))

                    {

                        //为上传成功的头像创建一个Image

                        using (Image img = Image.FromFile(Server.MapPath(imgUrl)))

                        {//将图像画到画布上.

                            //第一参数:表示对哪张图片进行操作.

                            //二:画多么大

                            //三:画哪一部分.

                            g.DrawImage(img, new Rectangle(0, 0, width, height), new Rectangle(x, y, width, height), GraphicsUnit.Pixel);

                            string imgName = Guid.NewGuid().ToString().Substring(0, 8);

                            map.Save(Server.MapPath("/UploadImage/" + imgName + ".jpg"));//将Bitmap保存成图片文件

                            return Content("/UploadImage/" + imgName + ".jpg");

                        }

                    }

                }

            }

            return Content("");

        }
zj。。。
文件上传之——用SWF插件实现文件异步上传和头像截取的更多相关文章
- jQuery插件之ajaxFileUpload异步上传
介绍 AjaxFileUpload.js 是一个异步上传文件的jQuery插件,原理是创建隐藏的表单和iframe然后用JS去提交,获得返回值. 下载地址: http://files.cnblogs. ...
- 【转】JQuery插件ajaxFileUpload 异步上传文件(PHP版)
前几天想在手机端做个异步上传图片的功能,平时用的比较多的JQuery图片上传插件是Uploadify这个插件,效果很不错,但是由于手机不支持flash,所以不得不再找一个文件上传插件来用了.后来发现a ...
- JQuery插件ajaxFileUpload 异步上传文件(PHP版)
太久没写博客了,真的是太忙了.善于总结,进步才会更快啊.不多说,直接进入主题. 前几天想在手机端做个异步上传图片的功能,平时用的比较多的JQuery图片上传插件是Uploadify这个插件,效果很不错 ...
- 适用于各浏览器支持图片预览,无刷新异步上传js插件
文件上传无疑是web应用中一个非常常用的功能,不管是PHP.jsp还是aspx.mvc等都会需要文件上传,但是众所周知当使用自带的文件上传功能时总会出现页面刷新的情况.当然现在有了html5这个好东西 ...
- 使用ajax异步上传文件或图片(配合php)
//html代码 <form enctype="multipart/form-data" id="upForm"> <input type=& ...
- ajax 异步上传视频带进度条并提取缩略图
最近在做一个集富媒体功能于一身的项目.需要上传视频.这里我希望做成异步上传,并且有进度条,响应有状态码,视频连接,缩略图. 服务端响应 { "thumbnail": "/ ...
- sae storage 使用uploadify插件进行文件批量上传
uploadify插件在文件上传方面还是很不错的,这不我需要往sae 的storage上上传文件,就用了它.下面我就分享一下如何实现的吧.我们先到官网下载最新的uploadify最新的插件包.在页面中 ...
- JQUery利用Uploadify插件实现文件异步上传(十一)
一:简介: Uploadify是JQuery的一个上传插件,实现的效果非常好,带进度显示 ,且Ajax异步,能一次性上传多个文件,功能强大,使用简单 1.支持单文件或多文件上传,可控制并发上传的文件数 ...
- 视频大文件分片上传(使用webuploader插件)
背景 公司做网盘系统,一直在调用图片服务器的接口上传图片,以前写的,以为简单改一改就可以用 最初要求 php 上传多种视频格式,支持大文件,并可以封面截图,时长统计 问题 1.上传到阿里云服务器,13 ...
随机推荐
- 利用rebase来压缩多次提交
我们可以用Git merge –squash来将分支中多次提交合并到master后,只保留一次提交历史.但是有些提交到github远程仓库中的commit信息如何合并呢? 历史记录 首先我们查看一下m ...
- Java内部类final语义实现
本文描述在java内部类中,经常会引用外部类的变量信息.但是这些变量信息是如何传递给内部类的,在表面上并没有相应的线索.本文从字节码层描述在内部类中是如何实现这些语义的. 本地临时变量 基本类型 fi ...
- 成就PHP高手的五个必由之路
亲们,此文时转载过来的,不是原创!特此说明一下 原文名称:5 ways to be a better php developer原文链接:http://www.developertutorials.c ...
- 【转载】10 个实用技巧,让 Finder 带你飞
来自:http://sspai.com/27403/ Finder 是 Mac 电脑的系统程序,有的功能类似 Windows 的资源管理器.它是我们打开 Mac 首先见到的「笑脸」,有了它,我们可以组 ...
- Eclipse 日期和时间格式自定义
点击下载Eclipse插件 org.eclipse.text_3.5.300.v20130515-1451.jar 覆盖下图所示的jar文件. /************************* ...
- 弹出层layer的使用
弹出层layer的使用 Intro layer是一款web弹层组件,致力于服务各个水平段的开发人员.layer官网:http://layer.layui.com/ layer侧重于用户灵活的自定义,为 ...
- HTML学习(零)简介
一)HTML介绍 它是一个超文本标记语言,静态页面. 所谓的'超文本'就是指页面内可以包含图片.链接,甚至音乐.程序等非文字元素. 主要的结构为包括"头"部分(英语:Head).和 ...
- KOTLIN开发语言文档(官方文档) -- 入门
网页链接:https://kotlinlang.org/docs/reference/basic-syntax.html 1. 入门 1.1. 基本语法 1.1.1. 定义包 包说明应该在源 ...
- ios native工程集成react-native的demo
react-native看到了给现有工程添加react-native环境的时候碰到一个问题: 如何往工程中添加 package.json文件,以及node_modules是怎么来的? 我开始的时候以为 ...
- 如何安装Genymotion虚拟机以及Genmotion的eclipse插件
---内容开始--- - 首先去genymotion的官网去下载其安装文件 资源下载 Genymotion官网必须注册一个账号这个账号安装之后还有用的,用户名最好用网易126邮箱注册----我下载的是 ...