Android的自定义View及View的绘制流程
目标:实现Android中的自定义View,为理清楚Android中的View绘制流程“铺路”。
想法很简单:从一个简单例子着手开始编写自定义View,对ViewGroup、View类中与绘制View相关的方法解析,并最终弄清楚View的绘制流程。
View类代表用户界面组件的基本构建块;View在屏幕上占据一个矩形区域,并负责绘制和事件处理;View是用于创建交互式用户界面组件(按钮、文本等)的基础类。
ViewGroup是View的子类,是所有布局的父类,是一个可以包含其他View或者ViewGroup并定义它们的布局属性一个看不见的容器。
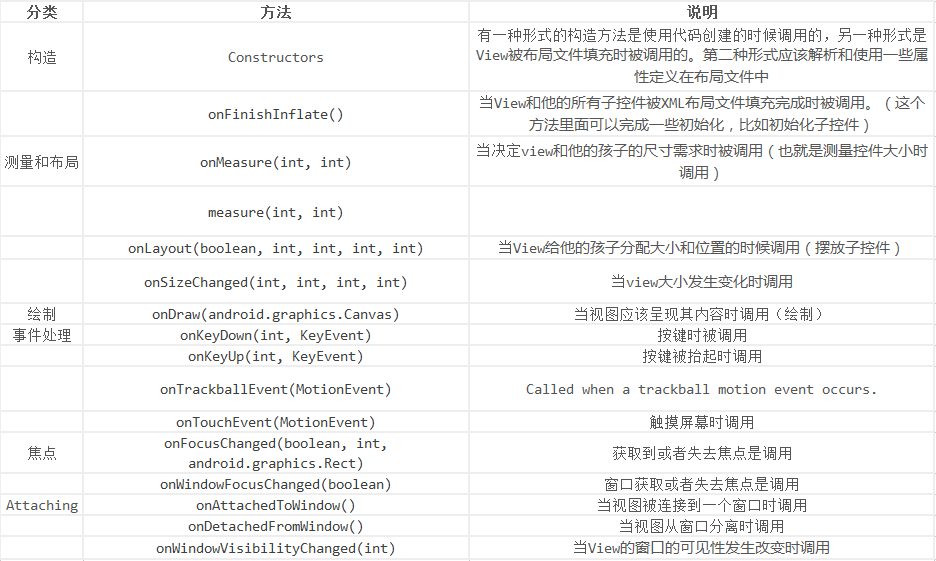
实现一个自定义View,通常会覆写一些Framework层上在所有View上调用的标准方法。
View在Activity中显示出来,要经历测量、布局和绘制三个步骤,分别对应三个动作:measure、layout和draw。
测量:onMeasure()决定View的大小;
布局:onLayout()决定View在ViewGroup中的位置;
绘制:onDraw()决定绘制这个View。
自定义View的步骤:
1. 自定义View的属性;
2. 在View的构造方法中获得自定义的属性;
3. 重写onMeasure(); --> 并不是必须的,大部分的时候还需要覆写
4. 重写onDraw();
自定义属性:
<?xml version="1.0" encoding="utf-8"?>

<resources>

	<!-- 定义字体、字体颜色、字体大小3个属性,format指该属性的取值类型 -->

    <attr name="titleText" format="string" />

    <attr name="titleTextColor" format="color" />

    <attr name="titleTextSize" format="dimension" />

    <declare-styleable name="CustomTitleView">

        <attr name="titleText" />

        <attr name="titleTextColor" />

        <attr name="titleTextSize" />

    </declare-styleable>

</resources>
使用自定义属性:
<RelativeLayout xmlns:android="http://schemas.android.com/apk/res/android"

    xmlns:tools="http://schemas.android.com/tools"

    xmlns:custom="http://schemas.android.com/apk/res/com.spt.designview"

    android:layout_width="match_parent"

    android:layout_height="match_parent"

    tools:context="com.spt.designview.DesignViewActivity" >

    <!-- 需要引入命名空间:xmlns:custom="http://schemas.android.com/apk/res/com.spt.designview" -->

    <com.spt.designview.view.CustomTitleView

        android:layout_width="match_parent"

        android:layout_height="match_parent"

        android:layout_centerInParent="true"

        android:padding="100dp"

        custom:titleText="3712"

        custom:titleTextColor="#ff0000"

        custom:titleTextSize="40sp" />

</RelativeLayout>
上述使用的custom:titleText,取值上文的命名空间。
View有四种形式的构造方法,其中4个参数的构造方法出现在API 21之后;我们一般只需要覆写其他的3个构造方法即可。参数不同对应不同的创建方式;比如1个参数的构造方法通常是通过代码初始化控件时使用的;2个参数的构造方法通常对应.xml布局文件中控件被映射成对象时调用(解析属性);通常让上述2种构造方式调用3个参数的构造方法,然后在该方法中进行初始化操作。
    public CustomTitleView(Context context) {

        this(context, null);

    }

    /**

     * <默认构造函数> 布局文件调用的是两个参数的构造方法

     */

    public CustomTitleView(Context context, AttributeSet attrs) {

        this(context, attrs, 0);

    }
代码中获取自定义属性:
    /**

     * <默认构造函数> 获得自定义属性

     */

    public CustomTitleView(Context context, AttributeSet attrs, int defStyleAttr) {

        super(context, attrs, defStyleAttr);

        // R.styleable.CustomTitleView来自attrs.xml文件

        TypedArray typedArray = context.getTheme().obtainStyledAttributes(

                attrs, R.styleable.CustomTitleView, defStyleAttr, 0);

        int n = typedArray.getIndexCount();

        for (int i = 0; i < n; i++) {

            int attr = typedArray.getIndex(i);

            switch (attr) {

                case R.styleable.CustomTitleView_titleText:

                    mTitleText = typedArray.getString(attr);

                    break;

                case R.styleable.CustomTitleView_titleTextColor:

                    // 默认设置为黑色

                    mTitleTextColor = typedArray.getColor(attr, Color.BLACK);

                    break;

                case R.styleable.CustomTitleView_titleTextSize:

                    // 默认设置为16sp,TypeValue将sp转为px

                    mTitleTextSize = typedArray.getDimensionPixelSize(attr,

                            (int) TypedValue.applyDimension(

                                    TypedValue.COMPLEX_UNIT_SP, 16,

                                    getResources().getDisplayMetrics()));

                default:

                    break;

            }

        }

        typedArray.recycle();
代码中引用的R.styleable.CustomTitleView就是attrs.xml中定义的名称:http://blog.csdn.net/dalancon/article/details/9701855
绘制时钟的Demo:http://blog.csdn.net/To_be_Designer/article/details/48500801
一般会在自定义View中引入自定义的属性。
什么时候调用onMeasure方法?
当控件的父元素正要放置该控件时调用View的onMeasure()。ViewGroup会问子控件View一个问题:“你想要用多大地方啊?”,然后传入两个参数——widthMeasureSpec和heightMeasureSpec;这两个参数指明控件可获得的空间以及关于这个空间描述的元数据。更好的方法是传递子控件View的高度和宽度到setMeasuredDimension()里,直接告诉父控件需要多大地方放置子控件。在onMeasure()的最后都会调用setMeasuredDimension();如果不调用,将会由measure()抛出一个IllegalStateException()。
自定义View的onMeasure(): --> 测量View的大小
系统帮我们测量的高度和宽度都是MATCH_PARENT;当我们设置明确的宽度和高度时,系统测量的结果就是我们设置的结果。
当设置为WRAP_CONTENT,或者是MATCH_PARENT时,系统测量的结果就是MATCH_PARENT的长度。
当设置为WRAP_CONTENT时,而有需要进行自我测量时,就需要覆写onMeasure()。
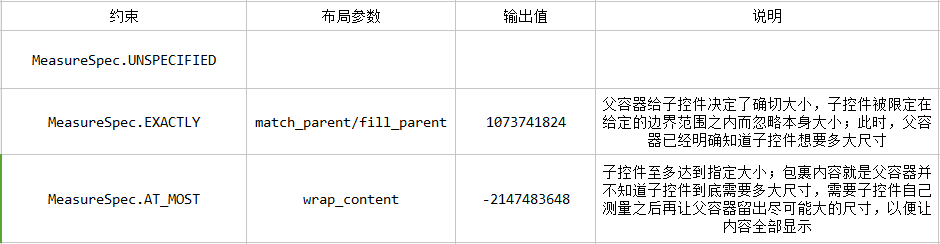
重写之前先了解MeasureSpec的specMode,一共三种类型:
EXACTLY:一般是设置为明确的值或者是精确的值,Parent为子View决定了一个绝对尺寸,子View会被赋予这个边界限制,不管子View自己想要多大;
AT_MOST:表示子布局限制在一个最大值内,代表最大可获取的空间;代表子View可以是任意的大小,但是有一个绝对尺寸上限;
UNSPECIFIED:表示子布局想要多大就多大,很少使用;代表Parent没有对子View强加任何限制,子View可以是它想要的任何尺寸;
public static class MeasureSpec {

        private static final int MODE_SHIFT = 30;

        private static final int MODE_MASK  = 0x3 << MODE_SHIFT;

        /**

         * Measure specification mode: 父控件对子View的尺寸无任何要求

         */

        public static final int UNSPECIFIED = 0 << MODE_SHIFT;

        /**

         * Measure specification mode: 父控件对子View有精确的尺寸要求

         */

        public static final int EXACTLY     = 1 << MODE_SHIFT;

        /**

         * Measure specification mode: 父控件对子View有最大尺寸要求

         */

        public static final int AT_MOST     = 2 << MODE_SHIFT;

        /**

         * Creates a measure specification based on the supplied size and mode.

         */

        public static int makeMeasureSpec(int size, int mode) {

            if (sUseBrokenMakeMeasureSpec) {

                return size + mode;

            } else {

                return (size & ~MODE_MASK) | (mode & MODE_MASK);

            }

        }

        /**

         * Extracts the mode from the supplied measure specification.

         */

        public static int getMode(int measureSpec) {

            return (measureSpec & MODE_MASK);

        }

        /**

         * Extracts the size from the supplied measure specification.

         */

        public static int getSize(int measureSpec) {

            return (measureSpec & ~MODE_MASK);

        }

        static int adjust(int measureSpec, int delta) {

            final int mode = getMode(measureSpec);

            if (mode == UNSPECIFIED) {

                // No need to adjust size for UNSPECIFIED mode.

                return makeMeasureSpec(0, UNSPECIFIED);

            }

            int size = getSize(measureSpec) + delta;

            if (size < 0) {

                Log.e(VIEW_LOG_TAG, "MeasureSpec.adjust: new size would be negative! (" + size +

                        ") spec: " + toString(measureSpec) + " delta: " + delta);

                size = 0;

            }

            return makeMeasureSpec(size, mode);

        }

        /**

         * Returns a String representation of the specified measure

         * specification.

         */

        public static String toString(int measureSpec) {

            int mode = getMode(measureSpec);

            int size = getSize(measureSpec);

            StringBuilder sb = new StringBuilder("MeasureSpec: ");

            if (mode == UNSPECIFIED)

                sb.append("UNSPECIFIED ");

            else if (mode == EXACTLY)

                sb.append("EXACTLY ");

            else if (mode == AT_MOST)

                sb.append("AT_MOST ");

            else

                sb.append(mode).append(" ");

            sb.append(size);

            return sb.toString();

        }

    }
下面针对onMeasure()进行测量:
    @Override

    protected void onMeasure(int widthMeasureSpec, int heightMeasureSpec) {

        super.onMeasure(widthMeasureSpec, heightMeasureSpec);

        int widthMode = MeasureSpec.getMode(widthMeasureSpec);

        int widthSize = MeasureSpec.getMode(widthMeasureSpec);

        int width = 0;
onMeasure()中传入的两个参数值,表示的是指明控件可获得的空间以及关于这个空间描述的元数据,也就是父容器对该子View的一种期望值或者一种要求。
上述的三种类型和我们.xml文件中的布局设置有什么关系?明确地说,和fill_parent、match_parent或者wrap_content有什么关系?
当设置为wrap_content时,传给onMeasure()的是AT_MOST, 表示子view的大小最多是多少,这样子View会根据这个上限来设置自己的尺寸。
当设置为fill_parent或者match_parent时,传给子View的onMeasure()的是EXACTLY,因为子view会占据剩余容器的空间,所以它大小是确定的。
当子View的大小设置为精确值时,传给子View的onMeasure()的是EXACTLY,而MeasureSpec的UNSPECIFIED模式目前还没有发现在什么情况下使用。
D/CustomTitleView(13652): onMeasure::MeasureSpec.AT_MOST

D/CustomTitleView(13652): onMeasure::MeasureSpec.EXACTLY

D/CustomTitleView(13652): onMeasure::MeasureSpec.AT_MOST

D/CustomTitleView(13652): onMeasure::MeasureSpec.EXACTLY

D/CustomTitleView(13652): onDraw::getMeasuredWidth()=30; getMeasuredHeight()=74

D/CustomTitleView(13652): onDraw::getWidth()=161; getHeight()=74

D/CustomTitleView(13652): onMeasure::MeasureSpec.AT_MOST

D/CustomTitleView(13652): onMeasure::MeasureSpec.EXACTLY

D/CustomTitleView(13652): onDraw::getMeasuredWidth()=30; getMeasuredHeight()=74

D/CustomTitleView(13652): onDraw::getWidth()=161; getHeight()=74
为什么会多次调用onMeasure()?
测试结果如下:

默认情况下,match_parent和wrap_content给出的size值时一样的,都是填充剩余空间。
此处有一个问题:为什么.xml文件中设置为wrap_content时,内容布局会全覆盖整个界面?
解决办法如下:
    @Override

    protected void onMeasure(int widthMeasureSpec, int heightMeasureSpec) {

        super.onMeasure(widthMeasureSpec, heightMeasureSpec);

        int width;

        int height;

        int widthMode = MeasureSpec.getMode(widthMeasureSpec);

        int widthSize = MeasureSpec.getSize(widthMeasureSpec);

        int heightMode = MeasureSpec.getMode(heightMeasureSpec);

        int heightSize = MeasureSpec.getSize(heightMeasureSpec);

        Log.d(TAG, "onMeasure::widthMode=" + widthMode + "; widthSize="

                + widthSize);

        Log.d(TAG, "onMeasure::heightMode=" + heightMode + "; heightSize="

                + heightSize);

        if (widthMode == MeasureSpec.EXACTLY) {

            width = widthSize;

        } else {

            width = (int) (getPaddingLeft() + mBound.width() + getPaddingRight());

        }

        if (heightMode == MeasureSpec.EXACTLY) {

            height = heightSize;

        } else {

            height = (int) (getPaddingTop() + mBound.height() + getPaddingBottom());

        }

        setMeasuredDimension(width, height);

    }
如果.xml文件中写入的是wrap_content,则计算显示全部文本内容所需要的空间大小,实现展示全部内容。
总结如下:
当View对象的measure()返回时,它的getMeasureWidth()和getMeasuredHeight()值被设置好了,并且它的子孙的值也被设置好了。
注意:一个Parent可能会不止一次地对子View调用measure()。比如,第一遍的时候,一个Parent可能测量它的每一个孩子,并没有指定尺寸,parent只是为了发现它们想要多大;如果第一遍之后得知,所有孩子的无限制的尺寸总和太大或者太小,Parent会再次对它的孩子调用measure(),这个时候Parent会设定规则,介入这个过程,使用实际值(让孩子自由发展不成,于是家长介入)。
    @Override

    protected void onDraw(Canvas canvas) {

        super.onDraw(canvas);

        Log.d(TAG, "onDraw::getMeasuredWidth()=" + getMeasuredWidth()

                + "; getMeasuredHeight()=" + getMeasuredHeight());

        Log.d(TAG, "onDraw::getWidth()=" + getWidth() + "; getHeight()="

                + getHeight());

        mPaint.setColor(Color.YELLOW);

        // 绘制背景(一个矩形框),长度为getMeasuredWidth(),高度为:getMeasuredHeight()

        canvas.drawRect(0, 0, getMeasuredWidth(), getMeasuredHeight(), mPaint);

        mPaint.setColor(mTitleTextColor);

        // 绘制文字

        canvas.drawText(mTitleText, getWidth() / 2 - mBound.width() / 2,

                getHeight() / 2 + mBound.height() / 2, mPaint);

        /**

         * getMeasuredWidth()和getWidth()有什么区别?上述输出结构相同,都是300(200dp)和150(100dp)

         * 什么时候上述两种方法返回不同结果?

         */

    }
onDraw()绘制View,让UI界面显示出来。
View的measure()用final关键词修饰,无法实现覆写;在measure()中调用了onMeasure(),子类可以覆写onMeasure()来提供更加准确和有效的测量。
Android的自定义View及View的绘制流程的更多相关文章
- Android中自定义样式与View的构造函数中的第三个参数defStyle的意义
零.序 一.自定义Style 二.在XML中为属性声明属性值 1. 在layout中定义属性 2. 设置Style 3. 通过Theme指定 三.在运行时获取属性值 1. View的第三个构造函数的第 ...
- 【朝花夕拾】Android自定义View篇之(一)View绘制流程
前言 转载请申明转自[https://www.cnblogs.com/andy-songwei/p/10955062.html]谢谢! 自定义View.多线程.网络,被认为是Android开发者必须牢 ...
- Android应用层View绘制流程与源码分析
1 背景 还记得前面<Android应用setContentView与LayoutInflater加载解析机制源码分析>这篇文章吗?我们有分析到Activity中界面加载显示的基本流程原 ...
- android View层的绘制流程
还记得前面<Android应用setContentView与LayoutInflater加载解析机制源码分析>这篇文章吗?我们有分析到Activity中界面加载显示的基本流程原理,记不记得 ...
- 深入理解 Android 之 View 的绘制流程
概述 本篇文章会从源码(基于Android 6.0)角度分析Android中View的绘制流程,侧重于对整体流程的分析,对一些难以理解的点加以重点阐述,目的是把View绘制的整个流程把握好,而对于特定 ...
- Android View的绘制流程
写得太好了,本来还想自己写的,奈何肚里墨水有限,直接转吧.正所谓前人种树,后人乘凉.. View的绘制和事件处理是两个重要的主题,上一篇<图解 Android事件分发机制>已经把事件的分发 ...
- Android自定义View4——统计图View
1.介绍 周末在逛慕课网的时候,看到了一张学习计划报告图,详细记录了自己一周的学习情况,天天都是0节课啊!正好在学习Android自定义View,于是就想着自己去写了一个,这里先给出一张慕课网的图,和 ...
- Android中View绘制流程以及invalidate()等相关方法分析
[原文]http://blog.csdn.net/qinjuning 整个View树的绘图流程是在ViewRoot.java类的performTraversals()函数展开的,该函数做的执行过程可简 ...
- Android视图绘制流程完全解析,带你一步步深入了解View(二)
转载请注明出处:http://blog.csdn.net/guolin_blog/article/details/16330267 在上一篇文章中,我带着大家一起剖析了一下LayoutInflater ...
随机推荐
- CAD快捷键
F1: 获取帮助 F2: 实现作图窗和文本窗口的切换 F3: 控制是否实现对象自动捕捉 F4:数字化仪控制 F5: 等轴测平面切换 F6: 控制状态行上坐标的显示方式 F7: 栅格显示模式控制 F8: ...
- HTTP高并发调优小记
tomcat服务层 1.修改server.xml <Connector port="8088" protocol="HTTP/1.1" maxThread ...
- list转换string
方法1 "".join 若list中为字符型 str = "".join(list) >>> L=['a','b','c'] >> ...
- Python:匿名函数lambda的函数用法和排序用法
一.介绍: Lambda函数,是一个匿名函数,创建语法: lambda parameters:express parameters:可选,如果提供,通常是逗号分隔的变量表达式形式,即位置参数. exp ...
- 内核模块加载错误 “Invalid module format” 解决办法
参考链接: http://blog.chinaunix.net/uid-20448327-id-172345.html
- GDAL create kml
新增kml 点 public void WriteKmlPiont() { string driverName = "KML"; //MapInfo File OSGeo.GDAL ...
- Linux配置环境变量
自己mark一下 gedit ~/.bashrc 后面记得要 source ~/.bashrc 使之马上生效(其中波浪线 ~ 代表用户主目录,即home/XX,XX是用户的用户名) Linux下配置环 ...
- 分组PARTITION BY及游标CURSOR的用法
基础数据表: select * from dbo.RecommendationChanelVersionRelation: 数据如下: 要求按照ChannelVersionID分组,对每组中的Orde ...
- openssl 1.1.1 reference
openssl 1.1.1 include/openssl aes.h: # define HEADER_AES_H aes.h: # define AES_ENCRYPT 1 aes.h: # de ...
- iOS(12) ANCS链接问题(用Android 9.0设备链接)
由于iOS系统默认不会为自带的ANCS服务发送广播, 并且使用ANCS的通知订阅功能必须进行配对. 所以我们需要在ios上写自己的代码,让目标设备和iOS进行配对. 配对完成后,监听设备和iOS都可以 ...