TensorFlow使用记录 (十四): Multi-task to MNIST + Fashion MNIST
前言
后面工作中有个较重要的 task 是将 YOLOV3 目标检测和 LanNet 车道线检测和到一个网络中训练,特别的是,这两部分数据来自于不同的数据源。这和我之前在 caffe 环境下训练检测整个车身的同时还要训练车头车尾类似,只不过环境变更到了 tensorflow,尴尬的是,这个月才真正接触 TF。因此,先拿 MNIST 和Fashion_MNIST 这两个数据集来练练手了。
数据预处理
MNIST 和 Fashion_MNIST 这两个数据集下载下来是压缩文件格式的,为了方便后面使用,先用一下代码转一下,不要问我为啥转。。。除了官方的我就见过这种的
#!/usr/bin/env python

# -*- coding: utf-8 -*-

# ================================================================

# @Time    : 2019/10/25 10:50

# @Author  : YangTao

# @Site    :

# @File    : process.py

# @IDE: PyCharm Community Edition

# ================================================================

import os

# MNIST

MNIST = '../../MNIST_data'

def convert(imgf, labelf, outf, n):

  f = open(imgf, "rb")

  o = open(outf, "w")

  l = open(labelf, "rb")

  f.read(16)

  l.read(8)

  images = []

  for i in range(n):

    image = [ord(l.read(1))]

    for j in range(28*28):

      image.append(ord(f.read(1)))

    images.append(image)

  for image in images:

    o.write(",".join(str(pix) for pix in image)+"\n")

  f.close()

  o.close()

  l.close()

convert(os.path.join(MNIST, "train-images-idx3-ubyte"), os.path.join(MNIST, "train-labels-idx1-ubyte"), os.path.join(MNIST, "mnist_train.csv"), 60000)

convert(os.path.join(MNIST, "t10k-images-idx3-ubyte"), os.path.join(MNIST, "t10k-labels-idx1-ubyte"), os.path.join(MNIST, "mnist_test.csv"), 10000)
数据层
#!/usr/bin/env python

# -*- coding: utf-8 -*-

# ================================================================

# @Time    : 2019/10/25 13:50

# @Author  : YangTao

# @Site    :

# @File    : dataset.py

# @IDE: PyCharm Community Edition

# ================================================================

import os

import numpy as np

import tensorflow as tf

from matplotlib import pyplot as plt

F_class_names = ['T-shirt/top', 'Trouser', 'Pullover', 'Dress', 'Coat',

               'Sandal', 'Shirt', 'Sneaker', 'Bag', 'Ankle boot']

class MNISTplusFashion(object):

    data_dirM = './MNIST'

    data_dirF = './F_MNIST'

    def __init__(self, phase, batch_size=10):

        self.num_classes = 10

        self.train_input_size_h = 28

        self.train_input_size_w = 28

        self.batch_size = batch_size

        if phase == 'train':

            self.dataM = open(os.path.join(self.data_dirM, 'mnist_train.csv'), 'r').read().split('\n')[:-1]

            self.flagM = np.zeros(shape=(len(self.dataM)), dtype=np.int)

            self.dataF = open(os.path.join(self.data_dirF, 'fashion_mnist_train.csv'), 'r').read().split('\n')[:-1]

            self.flagF = np.ones(shape=(len(self.dataF)), dtype=np.int)

        elif phase == 'val':

            self.dataM = open(os.path.join(self.data_dirM, 'mnist_test.csv'), 'r').read().split('\n')[:-1]

            self.flagM = np.zeros(shape=(len(self.dataM)), dtype=np.int)

            self.dataF = open(os.path.join(self.data_dirF, 'fashion_mnist_test.csv'), 'r').read().split('\n')[:-1]

            self.flagF = np.ones(shape=(len(self.dataF)), dtype=np.int)

        self.dataM = [d.split(',') for d in self.dataM]

        self.dataF = [d.split(',') for d in self.dataF]

        data = self.dataM + self.dataF

        flag = np.concatenate([self.flagM ,self.flagF],axis=0)

        self.num_samples = len(flag)  # dataset size

        self.num_batchs = int(np.ceil(self.num_samples / self.batch_size))  # 向上取整

        self.batch_count = 0  # batch index

        # np.random.seed(1)

        random_idx = np.random.permutation(self.num_samples)

        self.data = []

        for index in random_idx:

            self.data.append(data[index] + [flag[index]])

    def __iter__(self):

        return self

    def __next__(self):

        with tf.device('/cpu:0'):

            batch_image = np.zeros((self.batch_size, self.train_input_size_h, self.train_input_size_w, 1))

            batch_label = np.zeros((self.batch_size, self.num_classes))

            batch_tag = np.zeros((self.batch_size, 1))

            num = 0  # sample in one batch's index

            if self.batch_count < self.num_batchs:

                while num < self.batch_size:

                    index = self.batch_count * self.batch_size + num

                    if index >= self.num_samples:  # 从头开始

                        index -= self.num_samples

                    batch_image[num, :, :, :] = np.array(

                        self.data[index][1:-1]).reshape(

                            self.train_input_size_h, self.train_input_size_w,1

                        ).astype(np.float32) / 255.0

                    # ======================

                    # smooth onehot label

                    onehot = np.zeros(self.num_classes, dtype=np.float)

                    onehot[int(self.data[index][0])] = 1.0

                    uniform_distribution = np.full(self.num_classes, 1.0 / self.num_classes)

                    deta = 0.01

                    smooth_onehot = onehot * (1 - deta) + deta * uniform_distribution

                    # ======================

                    batch_label[num, :] = smooth_onehot # self.data[index][0]

                    batch_tag[num] = self.data[index][-1]

                    num += 1

                self.batch_count += 1

                return batch_image, batch_label, batch_tag

            else:

                self.batch_count = 0

                np.random.shuffle(self.data)

                raise StopIteration

    def __len__(self):

        return self.num_batchs

def show_batch(img_batch):

  grid_image = img_batch[0,:,:,0]

  for idx, img in enumerate(img_batch):

    if idx == 0:

      continue

    grid_image = np.hstack((grid_image, img[:,:,0]))

  plt.imshow(grid_image)

  plt.title('Batch from dataloader')

if __name__ == "__main__":

    val_data = MNISTplusFashion(phase='val', batch_size=10)

    for idx in range(val_data.num_batchs):

        batch_image, batch_label, batch_tag = val_data.__next__()

        print("sample %d," % idx, batch_image.shape, batch_label.shape, batch_tag.shape)

        plt.figure()

        show_batch(batch_image)

        plt.axis('off')

        plt.ioff()

        plt.show()
这里简单讲 MNIST 和 Fashion_MNIST 按照 1:1 concat 到一起后打乱输出了,每个 batch(iter) 返回三个变量:
"""

batch_image: batch x 28 x 28 x 1

batch_label: batch x 10, smooth one-hot label

batch_tag:   batch x 1, 0 is mnist, 1 is fashion_mnist

"""

网络训练
#!/usr/bin/env python
# -*- coding: utf-8 -*-
# ================================================================
# @Time : 2019/10/25 15:30
# @Author : YangTao
# @Site :
# @File : dataset.py
# @IDE: PyCharm Community Edition
# ================================================================ import tensorflow as tf
from tqdm import tqdm
import numpy as np
from matplotlib import pyplot as plt
from dataset import MNISTplusFashion, show_batch print(tf.__version__)
# 1. create data
trainset = MNISTplusFashion(phase='train', batch_size=100)
testset = MNISTplusFashion(phase='val', batch_size=20000) with tf.variable_scope('Input'):
tf_x = tf.placeholder(dtype=tf.float32, shape=[None, 28, 28, 1], name='x')
tf_y = tf.placeholder(dtype=tf.float32, shape=[None, 10], name='y')
tf_flag = tf.placeholder(dtype=tf.float32, shape=[None, 1], name='flag')
is_training = tf.placeholder(dtype=tf.bool, shape=None)
global_step = tf.Variable(1.0, dtype=tf.float64, trainable=False, name='global_step') idxM = tf.where(tf.equal(tf_flag, 0))[:,0]
idxF = tf.where(tf.equal(tf_flag, 1))[:,0]
tf_yM = tf.gather(tf_y, idxM)
tf_yF= tf.gather(tf_y, idxF) # 2. define Network
with tf.variable_scope('Net'):
# conv1 = tf.layers.conv2d(inputs=tf_x, filters=96, kernel_size=3,
# strides=1, padding='same', activation=tf.nn.relu) # 96x28x28
# conv2 = tf.layers.conv2d(inputs=conv1, filters=96, kernel_size=3,
# strides=1, padding='same', activation=tf.nn.relu) # 96x28x28
# conv3 = tf.layers.conv2d(inputs=conv2, filters=96, kernel_size=3,
# strides=2, padding='same', activation=tf.nn.relu) # 96x14x14
# conv4 = tf.layers.conv2d(inputs=conv3, filters=192, kernel_size=3,
# strides=1, padding='same', activation=tf.nn.relu) # 192x14x14
# conv5 = tf.layers.conv2d(inputs=conv4, filters=192, kernel_size=3,
# strides=1, padding='same', activation=tf.nn.relu) # 192x14x14
# conv6 = tf.layers.conv2d(inputs=conv5, filters=192, kernel_size=3,
# strides=2, padding='same', activation=tf.nn.relu) # 192x7x7
# conv7 = tf.layers.conv2d(inputs=conv6, filters=192, kernel_size=3,
# strides=1, activation=tf.nn.relu) # 192x5x5
# conv8 = tf.layers.conv2d(inputs=conv7, filters=192, kernel_size=1,
# strides=1, activation=tf.nn.relu) # 192x5x5
# classifier = tf.layers.conv2d(inputs=conv8, filters=10, kernel_size=1,
# strides=1, activation=tf.nn.relu) # 10x5x5
# predict = tf.layers.average_pooling2d(inputs=classifier, pool_size=5, strides=1)
# predict = tf.reshape(predict, [-1, 1])
# ======================
conv1 = tf.layers.conv2d(inputs=tf_x, filters=32, kernel_size=5,
strides=1, padding='same', activation=tf.nn.relu) # 32x28x28
pool1 = tf.layers.max_pooling2d(inputs=conv1, pool_size=2, strides=2) # 32x14x14
conv2 = tf.layers.conv2d(pool1, 64, 3, 1, 'same', activation=tf.nn.relu) # 64x14x14
pool2 = tf.layers.max_pooling2d(conv2, 2, 2) # 64x7x7
pool2_flat = tf.reshape(pool2, [-1, 7*7*64])
pool2_flatM = tf.gather(pool2_flat, idxM)
pool2_flatF = tf.gather(pool2_flat, idxF)
with tf.variable_scope('MNIST'):
fc1M = tf.layers.dense(pool2_flatM, 1024, tf.nn.relu)
fc1M = tf.layers.dropout(fc1M, rate=0.5, training=is_training)
fc2M = tf.layers.dense(fc1M, 512, tf.nn.relu)
fc2M = tf.layers.dropout(fc2M, rate=0.5, training=is_training)
predictM = tf.layers.dense(fc2M, 10)
with tf.variable_scope('F_MNIST'):
fc1F = tf.layers.dense(pool2_flatF, 1024, tf.nn.relu)
fc1F = tf.layers.dropout(fc1F, rate=0.5, training=is_training)
fc2F = tf.layers.dense(fc1F, 521, tf.nn.relu)
fc2F = tf.layers.dropout(fc2F, rate=0.5, training=is_training)
predictF = tf.layers.dense(fc2F, 10) # 3. define loss & accuracy
with tf.name_scope('loss'):
lossM = tf.losses.softmax_cross_entropy(onehot_labels=tf_yM, logits=predictM, label_smoothing=0.01)
tf.summary.scalar('lossM', lossM)
lossF = tf.losses.softmax_cross_entropy(onehot_labels=tf_yF, logits=predictF, label_smoothing=0.01)
tf.summary.scalar('lossF', lossF)
loss = lossM + lossF
tf.summary.scalar('loss', loss) with tf.name_scope('accuracy'):
# tf.metrics.accuracy() 返回 累计[上次的平均accuracy, 这次的平均accuracy]
accuracyM = tf.metrics.accuracy(labels=tf.argmax(tf_yM, axis=1), predictions=tf.argmax(predictM, axis=1))[1]
tf.summary.scalar('accuracyM', accuracyM)
accuracyF = tf.metrics.accuracy(labels=tf.argmax(tf_yF, axis=1), predictions=tf.argmax(predictF, axis=1))[1]
tf.summary.scalar('accuracyF', accuracyF) # 4. define optimizer
with tf.name_scope('train'):
optimizer_op = tf.train.AdamOptimizer(1e-4).minimize(loss, global_step=global_step) # 5. initialize
init_op = tf.group(tf.global_variables_initializer(), tf.local_variables_initializer()) # 6.train
saver = tf.train.Saver()
save_path = './cnn_mnist.ckpt' # Set sess configuration
# ============================== config GPU
sess_config = tf.ConfigProto(allow_soft_placement=True)
# sess_config.gpu_options.per_process_gpu_memory_fraction = 0.95
sess_config.gpu_options.allow_growth = True
sess_config.gpu_options.allocator_type = 'BFC'
# ============================== with tf.Session(config=sess_config) as sess:
sess.run(init_op)
# =================
merge_op = tf.summary.merge_all()
train_writer = tf.summary.FileWriter('logs/train', sess.graph)
test_writer = tf.summary.FileWriter('logs/test', sess.graph)
# tensorboard --logdir=logs --host=127.0.0.1
# =================
for epoch in range(20):
pbar = tqdm(trainset)
train_epoch_loss = []
for train_data in pbar:
_, ls, train_output, global_step_val = sess.run([optimizer_op, loss, merge_op, global_step],
feed_dict={tf_x: train_data[0], tf_y: train_data[1],
tf_flag: train_data[2], is_training: True})
train_writer.add_summary(train_output, global_step=global_step_val)
pbar.set_description(("train loss:{:.4f}").format(ls))
for test_data in testset:
acc_testM, acc_testF, test_ouput = sess.run([accuracyM, accuracyF, merge_op],
feed_dict={tf_x: test_data[0], tf_y: test_data[1],
tf_flag: test_data[2], is_training: False})
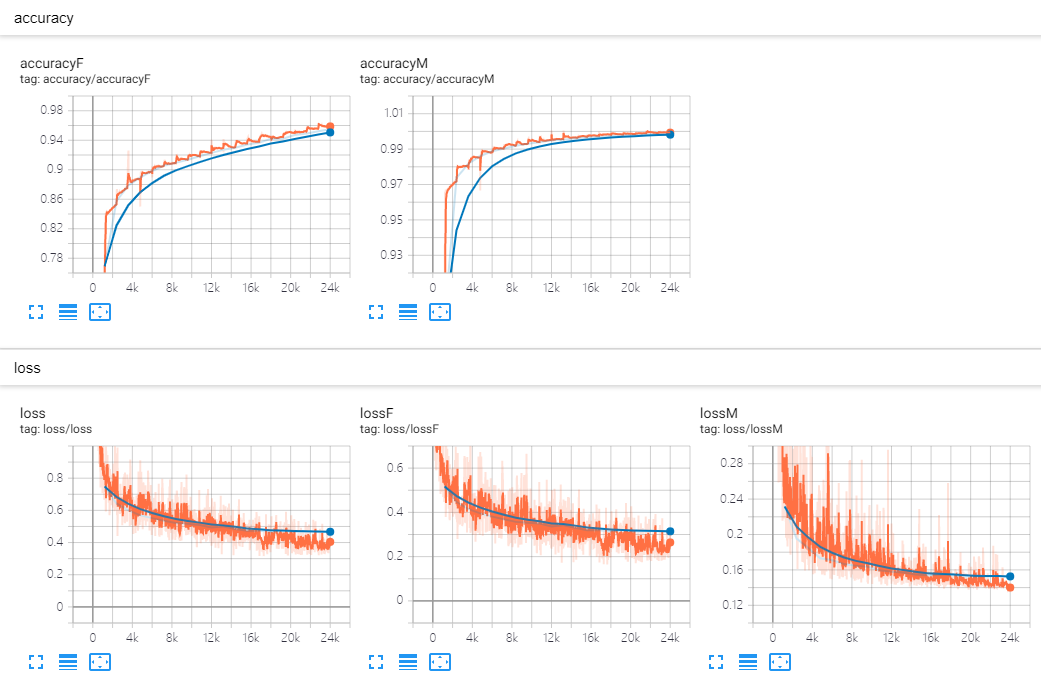
print('epoch: ', epoch, ' | test accuracyM: {:.3f}, test accuracyF: {:.3f}'.format(acc_testM, acc_testF))
sess.run(tf.local_variables_initializer()) # 不加上这句的话 accuracy 就是个累积平均值了
test_writer.add_summary(test_ouput, global_step=global_step_val)
saver.save(sess, save_path)
"""

train loss:0.9148: 100%|██████████| 1200/1200 [01:00<00:00, 19.70it/s]

epoch:  0  | test accuracyM: 0.895, test accuracyF: 0.769

train loss:0.9703: 100%|██████████| 1200/1200 [00:57<00:00, 20.88it/s]

epoch:  1  | test accuracyM: 0.974, test accuracyF: 0.858

train loss:0.6034: 100%|██████████| 1200/1200 [00:57<00:00, 20.92it/s]

epoch:  2  | test accuracyM: 0.982, test accuracyF: 0.879

train loss:0.5603: 100%|██████████| 1200/1200 [01:00<00:00, 19.84it/s]

epoch:  3  | test accuracyM: 0.986, test accuracyF: 0.890

train loss:0.6326: 100%|██████████| 1200/1200 [01:01<00:00, 19.61it/s]

epoch:  4  | test accuracyM: 0.989, test accuracyF: 0.898

train loss:0.6328: 100%|██████████| 1200/1200 [00:57<00:00, 20.91it/s]

epoch:  5  | test accuracyM: 0.990, test accuracyF: 0.906

train loss:0.4472: 100%|██████████| 1200/1200 [01:01<00:00, 19.64it/s]

epoch:  6  | test accuracyM: 0.992, test accuracyF: 0.909

train loss:0.7271: 100%|██████████| 1200/1200 [01:01<00:00, 19.58it/s]

epoch:  7  | test accuracyM: 0.993, test accuracyF: 0.914

train loss:0.4884: 100%|██████████| 1200/1200 [00:57<00:00, 20.95it/s]

epoch:  8  | test accuracyM: 0.994, test accuracyF: 0.918

train loss:0.6024: 100%|██████████| 1200/1200 [01:01<00:00, 19.59it/s]

epoch:  9  | test accuracyM: 0.995, test accuracyF: 0.923

train loss:0.4632: 100%|██████████| 1200/1200 [01:02<00:00, 19.24it/s]

epoch:  10  | test accuracyM: 0.995, test accuracyF: 0.927

train loss:0.5326: 100%|██████████| 1200/1200 [01:03<00:00, 19.00it/s]

epoch:  11  | test accuracyM: 0.996, test accuracyF: 0.930

train loss:0.5155: 100%|██████████| 1200/1200 [01:02<00:00, 20.04it/s]

epoch:  12  | test accuracyM: 0.997, test accuracyF: 0.934

train loss:0.4652: 100%|██████████| 1200/1200 [01:00<00:00, 19.77it/s]

epoch:  13  | test accuracyM: 0.997, test accuracyF: 0.936

train loss:0.5368: 100%|██████████| 1200/1200 [00:58<00:00, 20.63it/s]

epoch:  14  | test accuracyM: 0.997, test accuracyF: 0.942

train loss:0.3480: 100%|██████████| 1200/1200 [01:01<00:00, 19.38it/s]

epoch:  15  | test accuracyM: 0.998, test accuracyF: 0.942

train loss:0.3544: 100%|██████████| 1200/1200 [01:09<00:00, 17.75it/s]

epoch:  16  | test accuracyM: 0.998, test accuracyF: 0.947

train loss:0.4082: 100%|██████████| 1200/1200 [01:02<00:00, 21.23it/s]

epoch:  17  | test accuracyM: 0.998, test accuracyF: 0.949

train loss:0.4467: 100%|██████████| 1200/1200 [00:59<00:00, 20.02it/s]

epoch:  18  | test accuracyM: 0.998, test accuracyF: 0.952

train loss:0.4393: 100%|██████████| 1200/1200 [01:00<00:00, 19.92it/s]

epoch:  19  | test accuracyM: 0.999, test accuracyF: 0.955

groundtruth: [5 0 3 4 2 4 6 5 1 8]

predict:     [5 0 3 4 2 4 6 5 1 8]

"""
可以看出,Fashion_MNIST 数据集更难一点(accuracy 更低),因此可以考虑调整两个数据集的比例。
TensorFlow使用记录 (十四): Multi-task to MNIST + Fashion MNIST的更多相关文章
- Spring学习记录(十四)---JDBC基本操作
先看一些定义: 在Spring JDBC模块中,所有的类可以被分到四个单独的包:1.core即核心包,它包含了JDBC的核心功能.此包内有很多重要的类,包括:JdbcTemplate类.SimpleJ ...
- TensorFlow使用记录 (十): Pretraining
上一篇的模型保存和恢复熟练后,我们就可以大量使用 pretrain model 来训练任务了 Tweaking, Dropping, or Replacing the Upper Layers The ...
- TensorFlow系列专题(十四): 手把手带你搭建卷积神经网络实现冰山图像分类
目录: 冰山图片识别背景 数据介绍 数据预处理 模型搭建 结果分析 总结 一.冰山图片识别背景 这里我们要解决的任务是来自于Kaggle上的一道赛题(https://www.kaggle.com/c/ ...
- TensorFlow 学习(十四)—— contrib
1. tensorflow.contrib.layers tf.contrib.layers.xavier_initializer():一种经典的权值矩阵的初始化方式:
- TensorFlow使用记录 (十二): ℓ1 and ℓ2 Regularization
实现方式 以 ℓ2 Regularization 为例,主要有两种实现方式 1. 手动累加 with tf.name_scope('loss'): loss = tf.losses.softmax_c ...
- Linux时间子系统之(十四):tick broadcast framework
专题文档汇总目录 Notes:BroadcastTick作为cpuidle的waker,硬件基础.BroadcastTick嵌入在当前系统Tick框架中.BroadcastTick设备初始化:周期性T ...
- 第十四章——循环神经网络(Recurrent Neural Networks)(第一部分)
由于本章过长,分为两个部分,这是第一部分. 这几年提到RNN,一般指Recurrent Neural Networks,至于翻译成循环神经网络还是递归神经网络都可以.wiki上面把Recurrent ...
- 只需十四步:从零开始掌握 Python 机器学习(附资源)
分享一篇来自机器之心的文章.关于机器学习的起步,讲的还是很清楚的.原文链接在:只需十四步:从零开始掌握Python机器学习(附资源) Python 可以说是现在最流行的机器学习语言,而且你也能在网上找 ...
- 只需十四步:从零开始掌握Python机器学习(附资源)
转载:只需十四步:从零开始掌握Python机器学习(附资源) Python 可以说是现在最流行的机器学习语言,而且你也能在网上找到大量的资源.你现在也在考虑从 Python 入门机器学习吗?本教程或许 ...
随机推荐
- @Autowired注解与@Qualifier注解搭配使用----解决多实现选择注入问题
问题:当一个接口实现由两个实现类时,只使用@Autowired注解,会报错,如下图所示 实现类1 实现类2 controller中注入 然后启动服务报错,如下所示: Exception encount ...
- Docker——手动创建镜像
启动一个进入容器: 在阿里云镜像下载一个nginx: 退出容器: 查看 : docker ps -a oldboyedu是用户名 就像githua一样也有用户名 v1是别名 在创建个容器使用刚才创建的 ...
- c#中异常捕获,回滚
语法: try { 有可能出现错误的代码写在这里 } catch { 出错后的处理 } 如果try中的代码没有出错,则程序正常运行try中的内容后,不会执行catch中的内容, 如果try中的代码一但 ...
- 安装sshpass
sshpass: 用于非交互的ssh 密码验证 ssh登陆不能在命令行中指定密码,也不能以shell中随处可见的,sshpass 的出现,解决了这一问题.它允许你用 -p 参数指定明文密码,然后直接 ...
- cookie转换成字典类型方便scraoy 使用
#bakooie装换成紫电模式方便scrapy使用 cookid = "_ga=GA1.2.1937936278.1538889470; __gads=ID=1ba11c2610acf504 ...
- requests 抓取网站
import requests from requests.exceptions import RequestException import re import json def get_one_p ...
- PHP之配置
1) 错误日志 一.相关配置 需要将php.ini中的配置指令做如下修改: . error_reporting = E_ALL ;将会向PHP报告发生的每个错误 . display_errors = ...
- 《Redis高阶应用》讲座总结
数据结构延展 常用数据结构:String,Hash,List,Set,Sorted Set(不聊这些) 高级数据结构:Bitmaps,hyperloglog,GEO 单机拓展到分布式 为什么要分区:性 ...
- REST easy with kbmMW #1
kbmMW 5.0支持REST服务器的开发,并且非常简单,下面看看如何实作一个REST服务器. 首先我们制作一个服务器应用程序,增加一个简单的Form,并放置kbmMW组件. 在Delphi中单击Fi ...
- 第三章·Logstash入门-部署与测试
1.Logstash环境准备与安装 Logstash环境准备 关闭防火墙 #CentOS6 关闭防火墙 [root@elkstack01 ~]# /etc/init.d/iptables stop # ...