springsecurity学习
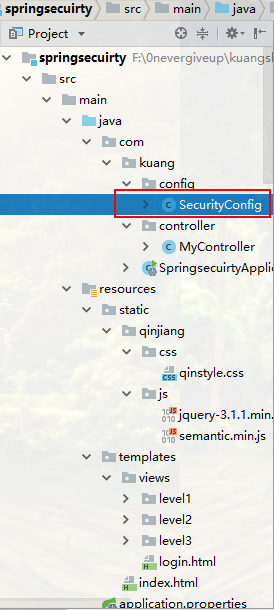
首先讲一下,没有用到数据库,然后觉得重要的就是security的配置securityConfig.class,不太会说(好像也不太会用),上图吧,也是学习狂神过来的
项目结构

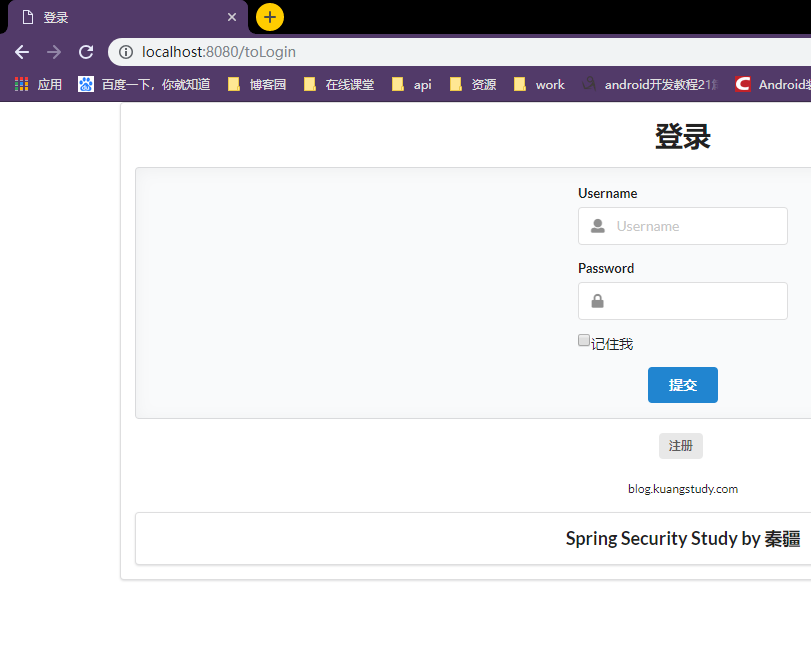
大致效果


pom.xml
<dependencies>

        <!-- thymeleaf整合security -->

        <dependency>

            <groupId>org.thymeleaf.extras</groupId>

            <artifactId>thymeleaf-extras-springsecurity5</artifactId>

            <version>3.0.4.RELEASE</version>

        </dependency>

        <!-- spring整合security -->

        <dependency>

            <groupId>org.springframework.boot</groupId>

            <artifactId>spring-boot-starter-security</artifactId>

            <version>2.1.4.RELEASE</version>

        </dependency>

        <!--thymeleaf模板-->

        <dependency>

            <groupId>org.thymeleaf</groupId>

            <artifactId>thymeleaf-spring5</artifactId>

        </dependency>

        <dependency>

            <groupId>org.thymeleaf.extras</groupId>

            <artifactId>thymeleaf-extras-java8time</artifactId>

        </dependency>

        <dependency>

            <groupId>org.springframework.boot</groupId>

            <artifactId>spring-boot-starter-web</artifactId>

        </dependency>

        <dependency>

            <groupId>org.springframework.boot</groupId>

            <artifactId>spring-boot-starter-test</artifactId>

            <scope>test</scope>

            <exclusions>

                <exclusion>

                    <groupId>org.junit.vintage</groupId>

                    <artifactId>junit-vintage-engine</artifactId>

                </exclusion>

            </exclusions>

        </dependency>

    </dependencies>

重点来了SecurityConfig.class
@EnableWebSecurity

public class SecurityConfig extends WebSecurityConfigurerAdapter {

    @Override   //授权

    protected void configure(HttpSecurity http) throws Exception {

        //首页所有人都可以访问,但是功能页只有对应权限的人才能访问

        //请求授权的规则

        http.authorizeRequests()

                .antMatchers("/").permitAll()

                .antMatchers("/level1/**").hasRole("vip1")

                .antMatchers("/level2/**").hasRole("vip2")

                .antMatchers("/level3/**").hasRole("vip3");

        /*

            没有授权会自动跳转到登录页面        http://localhost:8080/login

               定制登录页.loginPage("/toLogin")  http://localhost:8080/toLogin

               最后,走回   http://localhost:8080/login(因为要认证用户),页面的action动作为th:action="@{/login}"

               其对应      http.formLogin().loginPage("/toLogin").loginProcessingUrl("/login")

         */

        http.formLogin().loginPage("/toLogin").usernameParameter("name").passwordParameter("pwd").loginProcessingUrl("/login");

        //防攻击网站工具

        http.csrf().disable();   //关闭csrf功能,登出失败可能的原因

        //注销   bug:注销完,应该跳到首页

        http.logout().logoutSuccessUrl("/");

        //开启记住我的功能,勾上才生效

        http.rememberMe().rememberMeParameter("remember-me");

        //http.rememberMe();  //cookie 来的,关闭浏览器还存在,默认时间两周

    }

    @Override   //认证

    protected void configure(AuthenticationManagerBuilder auth) throws Exception {

        //在内存中认证(因为没有连接数据库啊)

        //密码编码  no PasswordEncoder mapped for the id "null"

        //在spring security5+  之后,新增了许多的加密方法

        auth.inMemoryAuthentication().passwordEncoder(new BCryptPasswordEncoder())

                .withUser("kuangshen").password(new BCryptPasswordEncoder().encode("123")).roles("vip2","vip3")

                .and()

                .withUser("root").password(new BCryptPasswordEncoder().encode("123")).roles("vip1","vip2","vip3")

                .and()

                .withUser("sajia").password(new BCryptPasswordEncoder().encode("123")).roles("vip1");

    }

}
MyController.class
@Controller

public class MyController {

    @RequestMapping({"/","/index"})

    public String index(){

        return "index";

    }

    @RequestMapping("/hello")

    public String hello(){

        return "hello springsecurity  !";

    }

    @RequestMapping("/toLogin")

    public String toLogin(){

        return "views/login";

    }

    //9个页面

    @RequestMapping("/level1/{id}")

    public String level1(@PathVariable("id") String id){

        return "views/level1/"+id;

    }

    @RequestMapping("/level2/{id}")

    public String level2(@PathVariable("id") String id){

        return "/views/level2/"+id;

    }

    @RequestMapping("/level3/{id}")

    public String level3(@PathVariable("id")String id){

        return "/views/level3/"+id;

    }

}
application.properties
#关闭模板引擎的缓存

spring.thymeleaf.cache=false
首页index.html
<!DOCTYPE html>

<html lang="en" xmlns:th="http://www.thymeleaf.org"

      xmlns:sec="http://www.thymeleaf.org/thymeleaf-extras-springsecurity5">

<head>

    <meta charset="UTF-8">

    <meta name="viewport" content="width=device-width, initial-scale=1, maximum-scale=1">

    <title>首页</title>

    <!--semantic-ui-->

    <link href="https://cdn.bootcss.com/semantic-ui/2.4.1/semantic.min.css" rel="stylesheet">

    <link th:href="@{/qinjiang/css/qinstyle.css}" rel="stylesheet">

</head>

<body>

<!--主容器-->

<div class="ui container">

    <div class="ui segment" id="index-header-nav" th:fragment="nav-menu">

        <div class="ui secondary menu">

            <a class="item"  th:href="@{/index}">首页</a>

            <!--登录注销-->

            <div class="right menu">

                <!--未登录-->

                <div sec:authorize="!isAuthenticated()">

                    <a class="item" th:href="@{/toLogin}">

                        <i class="address card icon"></i> 登录

                    </a>

                </div>

                <!--登录了:显示注销,用户名-->

                <div sec:authorize="isAuthenticated()">

                    <a class="item">

                        用户名:<span sec:authentication="name"></span>  |

                        角  色:<span sec:authentication="principal.authorities"></span>

                    </a>

                </div>

                <div sec:authorize="isAuthenticated()">

                    <a class="item" th:href="@{/logout}">

                        <i class="sign-out icon"></i> 注销

                    </a>

                </div>

            </div>

        </div>

    </div>

    <div class="ui segment" style="text-align: center">

        <h3>Spring Security Study by 秦疆</h3>

    </div>

    <div>

        <br>

        <div class="ui three column stackable grid">

            <!--菜单的动态效果显示,根据用户的角色-->

            <div class="column" sec:authorize="hasRole('vip1')">

                <div class="ui raised segment">

                    <div class="ui">

                        <div class="content">

                            <h5 class="content">Level 1</h5>

                            <hr>

                            <div><a th:href="@{/level1/1}"><i class="bullhorn icon"></i> Level-1-1</a></div>

                            <div><a th:href="@{/level1/2}"><i class="bullhorn icon"></i> Level-1-2</a></div>

                            <div><a th:href="@{/level1/3}"><i class="bullhorn icon"></i> Level-1-3</a></div>

                        </div>

                    </div>

                </div>

            </div>

            <div class="column" sec:authorize="hasRole('vip2')">

                <div class="ui raised segment">

                    <div class="ui">

                        <div class="content">

                            <h5 class="content">Level 2</h5>

                            <hr>

                            <div><a th:href="@{/level2/1}"><i class="bullhorn icon"></i> Level-2-1</a></div>

                            <div><a th:href="@{/level2/2}"><i class="bullhorn icon"></i> Level-2-2</a></div>

                            <div><a th:href="@{/level2/3}"><i class="bullhorn icon"></i> Level-2-3</a></div>

                        </div>

                    </div>

                </div>

            </div>

            <div class="column" sec:authorize="hasRole('vip3')">

                <div class="ui raised segment">

                    <div class="ui">

                        <div class="content">

                            <h5 class="content">Level 3</h5>

                            <hr>

                            <div><a th:href="@{/level3/1}"><i class="bullhorn icon"></i> Level-3-1</a></div>

                            <div><a th:href="@{/level3/2}"><i class="bullhorn icon"></i> Level-3-2</a></div>

                            <div><a th:href="@{/level3/3}"><i class="bullhorn icon"></i> Level-3-3</a></div>

                        </div>

                    </div>

                </div>

            </div>

        </div>

    </div>

</div>

<script th:src="@{/qinjiang/js/jquery-3.1.1.min.js}"></script>

<script th:src="@{/qinjiang/js/semantic.min.js}"></script>

</body>

</html>
login.html
<!DOCTYPE html>

<html lang="en" xmlns:th="http://www.thymeleaf.org">

<head>

    <meta charset="UTF-8">

    <meta name="viewport" content="width=device-width, initial-scale=1, maximum-scale=1">

    <title>登录</title>

    <!--semantic-ui-->

    <link href="https://cdn.bootcss.com/semantic-ui/2.4.1/semantic.min.css" rel="stylesheet">

</head>

<body>

<!--主容器-->

<div class="ui container">

    <div class="ui segment">

        <div style="text-align: center">

            <h1 class="header">登录</h1>

        </div>

        <div class="ui placeholder segment">

            <div class="ui column very relaxed stackable grid">

                <div class="column">

                    <div class="ui form">

                        <form th:action="@{/login}" method="post">

                            <div class="field">

                                <label>Username</label>

                                <div class="ui left icon input">

                                    <input type="text" placeholder="Username" name="name">

                                    <i class="user icon"></i>

                                </div>

                            </div>

                            <div class="field">

                                <label>Password</label>

                                <div class="ui left icon input">

                                    <input type="password" name="pwd">

                                    <i class="lock icon"></i>

                                </div>

                            </div>

                            <!--记住我-->

                            <div class="field">

                                <input type="checkbox" id="remember-me" name="remember-me"/>记住我

                            </div>

                            <input type="submit" class="ui blue submit button"/>

                        </form>

                    </div>

                </div>

            </div>

        </div>

        <div style="text-align: center">

            <div class="ui label">

                </i>注册

            </div>

            <br><br>

            <small>blog.kuangstudy.com</small>

        </div>

        <div class="ui segment" style="text-align: center">

            <h3>Spring Security Study by 秦疆</h3>

        </div>

    </div>

</div>

<script th:src="@{/qinjiang/js/jquery-3.1.1.min.js}"></script>

<script th:src="@{/qinjiang/js/semantic.min.js}"></script>

</body>

</html>
剩下就是头疼的静态资源了
1.html(剩下八个都一样的,改下<h3>Level-1-1</h3>这个就好了)

<!DOCTYPE html>

<html lang="en" xmlns:th="http://www.thymeleaf.org">

<head>

    <meta charset="UTF-8">

    <meta name="viewport" content="width=device-width, initial-scale=1, maximum-scale=1">

    <title>首页</title>

    <!--semantic-ui-->

    <link href="https://cdn.bootcss.com/semantic-ui/2.4.1/semantic.min.css" rel="stylesheet">

    <link th:href="@{/qinjiang/css/qinstyle.css}" rel="stylesheet">

</head>

<body>

<!--主容器-->

<div class="ui container">

    <div th:replace="~{index::nav-menu}"></div>

    <div class="ui segment" style="text-align: center">

        <h3>Level-1-1</h3>

    </div>

</div>

<script th:src="@{/qinjiang/js/jquery-3.1.1.min.js}"></script>

<script th:src="@{/qinjiang/js/semantic.min.js}"></script>

</body>

</html>
qinstyle.css
body{

    min-width: 1150px;

    overflow: auto;

}

#index-header-nav{

    font-size: 0px;

}

#blog-lable>a{

    margin: 1px;

}
剩下就是加油,多学多看多动手,加油
springsecurity学习的更多相关文章
- SpringSecurity学习之自定义过滤器
我们系统中的认证场景通常比较复杂,比如说用户被锁定无法登录,限制登录IP等.而SpringSecuriy最基本的是基于用户与密码的形式进行认证,由此可知它的一套验证规范根本无法满足业务需要,因此扩展势 ...
- SpringSecurity学习之基于数据库的用户认证
SpringSecurity给我们提供了一套最基本的认证方式,可是这种方式远远不能满足大多数系统的需求.不过好在SpringSecurity给我们预留了许多可扩展的接口给我们,我们可以基于这些接口实现 ...
- SpringSecurity学习之快速上手
互联网项目中,安全与权限控制是不可回避的问题,为了解决这一些列问题,许多安全框架应运而生了.这些框架旨在帮我们解决公用的安全问题,让我们的程序更加健壮,从而让程序员全身心投入到业务开发当中.那么Spr ...
- SpringSecurity学习四----------基于不同角色跳转到不同URL
© 版权声明:本文为博主原创文章,转载请注明出处 1.项目结构 2.pom.xml <project xmlns="http://maven.apache.org/POM/4.0.0& ...
- SpringSecurity学习三----------通过Security标签库简单显示视图
© 版权声明:本文为博主原创文章,转载请注明出处 1.项目结构 2.pom.xml <project xmlns="http://maven.apache.org/POM/4.0.0& ...
- SpringSecurity学习二----------实现自定义登录界面
© 版权声明:本文为博主原创文章,转载请注明出处 1.项目结构 2.pom.xml <project xmlns="http://maven.apache.org/POM/4.0.0& ...
- SpringSecurity学习一----------最简单的权限控制系统
© 版权声明:本文为博主原创文章,转载请注明出处 1.项目结构 2.pom.xml <project xmlns="http://maven.apache.org/POM/4.0.0& ...
- SpringSecurity学习笔记(一):搭建最简单的SpringSecurity应用
学习过程参考自:http://www.mossle.com/docs/auth/html/pt01-quickstart.html 一.搭建Maven项目: 所需引用的jar包如下: pom.xml文 ...
- SpringSecurity学习总结
第一.SpringSecurity-简介 1.1简介 SpringSecurity融合Spring技术栈,提供JavaEE应 用的整体安全解决方案: Spring Security为基于Java EE ...
随机推荐
- 通过Vagrant搭建PHP环境(一) Vagrant box添加配置
系统Windows10 Vagrant 1.8.1 VirtualBox 5.0.20 vagrant box下载地址:http://cloud.centos.org/centos/7/vagrant ...
- Linux学习:Makefile简介及模板
一.基本概念介绍: Makefile 文件就是告诉make命令需要怎么样的去编译和链接程序. 编写Makefile的基本规则: 1.如果这个工程没有编译过,那么我们的所有C文件都要编译并被链接. 2. ...
- python包中__init__.py文件的作用
python包中__init__.py文件的作用 __init__.py文件最常用的作用是标识一个文件夹是一个 python包. __init__.py文件的另一个作用是定义模糊导入时要导入的内容. ...
- haproxy配置文件实例
[root@kube-node1 ~]# cat /etc/haproxy/haproxy.cfg global log /dev/log local0 log /dev/log local1 not ...
- python中dict对象和字符串string对象互相转换
使用json包 import json dict1 = {"A":"a","B":"b"} # 转换为字符串 json. ...
- python遍历文件夹中所有文件夹和文件,os.walk
python中可以用os.walk来遍历某个文件夹中所有文件夹和文件. 例1: import os filePath = 'C:/Users/admin/Desktop/img' for dirpat ...
- IEEE754二进制浮点数算术标准
对于32位浮点数 sign: 符号,1位 exponent: 指数,8位,偏码 fraction: 分数,23位,原码 特殊值 指数域的编码值 = 指数的实际值 + 127 这样按照字典序的顺序就 ...
- Git常用命令速查表,新手必备版本控制
Git 跟 SVN 一样,都是用于管理代码的版本控制工具.无论在项目中,我们负责哪一块,只要需要编写代码,就必须熟悉Git(依公司要求而定). 当然,用的越熟练,处理的项目越顺利,离出任CTO.迎娶白 ...
- centos(linux)--vsftpd配置
1.安装 执行 yum -y install vsftpd 注:(1)是否使用sudo权限根据个人的具体情况 (2)rpm -qa | grep vsftpd 可以通过这个检查是否已经安装vsftpd ...
- zabbix案例实例
1 案例1:实现Zabbix报警功能 1.1 问题 沿用第5天Zabbix练习,使用Zabbix实现报警功能,实现以下目标: 监控Linux服务器系统账户 创建Media,设置邮件服务器及收件人邮箱 ...
