ZK客户端
说明:本文为读《从Paxos到Zookeeper 分布式一致性原理与实践》读书笔记
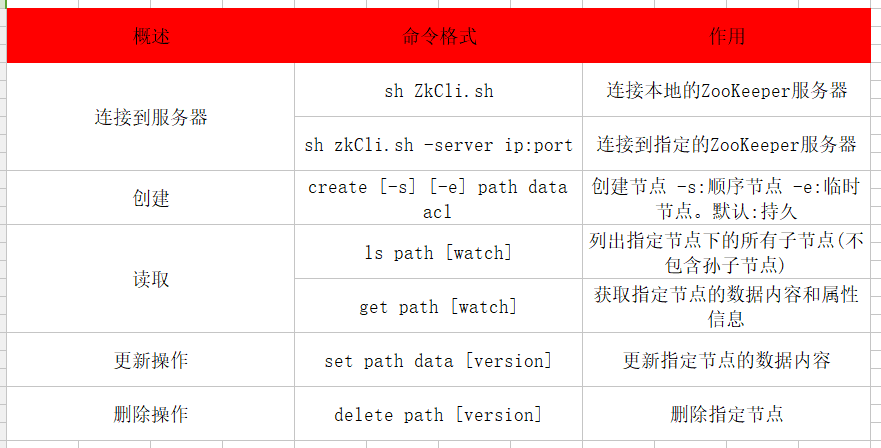
shell操作
Java客户端
原始API
pom文件:
<dependency>

    <groupId>org.apache.zookeeper</groupId>

    <artifactId>zookeeper</artifactId>

    <version>3.4.10</version>

</dependency>
Java代码:
public class ZkClientUtil {

    private static final Logger logger = LoggerFactory.getLogger(ZkDemo.class);

    private static ZooKeeper zk;

    //  /zfpt 必须提前创建好

    private static String zkPath = "master:2181,slave1:2181,slave2:2181/zfpt" ;

    static CountDownLatch connectedSemaphore = new CountDownLatch( 1 );

    static {

        try {

            zk = new ZooKeeper(zkPath, 1000 , new Watcher() {

                // 监控所有被触发的事件

                public void process(WatchedEvent event) {

                    logger.info("已经触发了 {} 事件! ", event.getType());

                    connectedSemaphore.countDown();

                }

            });

        }catch (Exception e) {

            System.err.println("系统异常");

        }

    }

    public static ZooKeeper getZKConnection() {

        try {

            if (zk == null) {

                connectedSemaphore.await();

            }

            return zk ;

        }catch (Exception e) {

            System.err.printf("ZK初始化失败");

        }

        return null ;

    }

}

/**

 * 相应操作

 */

public class ZkDemoTest {

    /**

     * 同步创建 zk节点

     * @throws Exception

     */

    @Test

    public void create() throws Exception {

        String response = getZKConnection().create("/aa3","test".getBytes(), ZooDefs.Ids.OPEN_ACL_UNSAFE, CreateMode.PERSISTENT);

        System.out.println(response) ;

    }

    /**

     * 异步回调创建 zk节点

     * @throws Exception

     */

    @Test

    public void createASync() throws Exception {

        CountDownLatch countDownLatch = new CountDownLatch(1) ;

        //StringCallback 异步回调  ctx:用于传递给回调方法的一个参数。通常是放一个上下文(Context)信息

        getZKConnection().create("/aa2", "test".getBytes(), ZooDefs.Ids.OPEN_ACL_UNSAFE, CreateMode.EPHEMERAL, (rc, path, ctx, name) -> {

            System.out.println("rc:" + rc + "&path:" + path + "&ctx:" + ctx + "&name:" + name );

            countDownLatch.countDown();

        },"1212121");

        countDownLatch.await();

    }

    /**

     * 同步删除

     * @throws Exception

     */

    @Test

    public void delete() throws Exception {

        // version 表示此次删除针对于的版本号。 传-1 表示忽略版本号

        getZKConnection().delete("/aa1",-1);

    }

    /**

     * 异步删除

     * @throws Exception

     */

    @Test

    public void deleteASync() throws Exception {

        CountDownLatch countDownLatch = new CountDownLatch(1) ;

        getZKConnection().delete("/aa1",-1, (rc, path, ctx) -> {

            System.out.println("rc:" + rc +"&path:" + path + "&ctx:" + ctx);

            countDownLatch.countDown();

        },"删除操作");

        countDownLatch.await();

    }

    /**

     * 同步获取数据,包括子节点列表的获取和当前节点数据的获取

     * @throws Exception

     */

    @Test

    public void getChildren() throws Exception {

        Stat stat = new Stat() ;

        // path:指定数据节点的节点路径, 即API调用的目的是获取该节点的子节点列表,但不包括孙子节点

        // Watcher : 注册的Watcher。一旦在本次获取子节点之后,子节点列表发生变更的话,就会向该Watcher发送通知。Watcher仅会被触发一次。

        // state: 获取指定数据节点(也就是path参数对应的节点)的状态信息(无节点名和数据内容),传入旧的state将会被来自服务端响应的新state对象替换。

        List<String> list = ZkClientUtil.getZKConnection().getChildren("/", event -> {

            System.out.println("我是监听事件,监听子节点变化");

        } ,stat);

        System.out.println(list);

        System.out.println(stat);

    }

    /**

     * 异步获取子节点

     * @throws Exception

     */

    @Test

    public void getChildrenASync() throws Exception {

        CountDownLatch countDownLatch = new CountDownLatch(1) ;

        ZkClientUtil.getZKConnection().getChildren("/",event -> {

            System.out.println("我是监听事件,监听子节点变化");

        } , (rc, path, ctx, children) -> {

            //异步回调

            System.out.println("children:" + children);

            countDownLatch.countDown();

        },"context");

        countDownLatch.await();

    }

    /**

     * 同步获取数据

     * @throws Exception

     */

    @Test

    public void getDataTest() throws Exception {

        Stat stat = new Stat() ;

        byte[] bytes = ZkClientUtil.getZKConnection().getData("/aa1",event -> {

            System.out.println("我是监听事件,监听数据状态发生变化");

        },stat);

        System.out.println(new String(bytes));

    }

    @Test

    public void getDataASync() throws Exception {

        CountDownLatch countDownLatch = new CountDownLatch(1) ;

        ZkClientUtil.getZKConnection().getData("/aa1",event -> {

            System.out.println("我是监听事件,监听数据状态发生变化");

        }, (rc, path, ctx, data, stat) -> {

            System.out.println("获取到的内容是:"+new String(data));

            countDownLatch.countDown();

        },"121");

        countDownLatch.await();

    }

    /**

     * 同步更新数据

     */

    @Test

    public void setData() throws Exception{

        byte[] oldValue = ZkClientUtil.getZKConnection().getData("/aa1",false,null);

        System.out.println("更新前值是:" + new String(oldValue));

        Stat stat = ZkClientUtil.getZKConnection().setData("/aa1","helloWorld".getBytes(),-1);

        byte[] newValue = ZkClientUtil.getZKConnection().getData("/aa1",false,null);

        System.out.println("更新后值是:" + new String(newValue));

    }

    /**

     * 异步更新数据

     * @throws Exception

     */

    @Test

    public void setDataASync() throws Exception {

        CountDownLatch countDownLatch = new CountDownLatch(1) ;

        ZkClientUtil.getZKConnection().setData("/aa1","helloChina".getBytes(),-1, (rc, path, ctx, name) -> {

            System.out.println("更新成功");

            countDownLatch.countDown();

        },"1111");

        countDownLatch.await();

        byte[] newValue = ZkClientUtil.getZKConnection().getData("/aa1",false,null);

        System.out.println("更新前值是:" + new String(newValue));

    }

}
使用ZkClient客户端
pom.xml
<dependency>

    <groupId>org.apache.zookeeper</groupId>

    <artifactId>zookeeper</artifactId>

    <version>3.4.10</version>

</dependency>

<!-- https://mvnrepository.com/artifact/com.101tec/zkclient -->

<dependency>

    <groupId>com.101tec</groupId>

    <artifactId>zkclient</artifactId>

    <version>0.10</version>

</dependency>
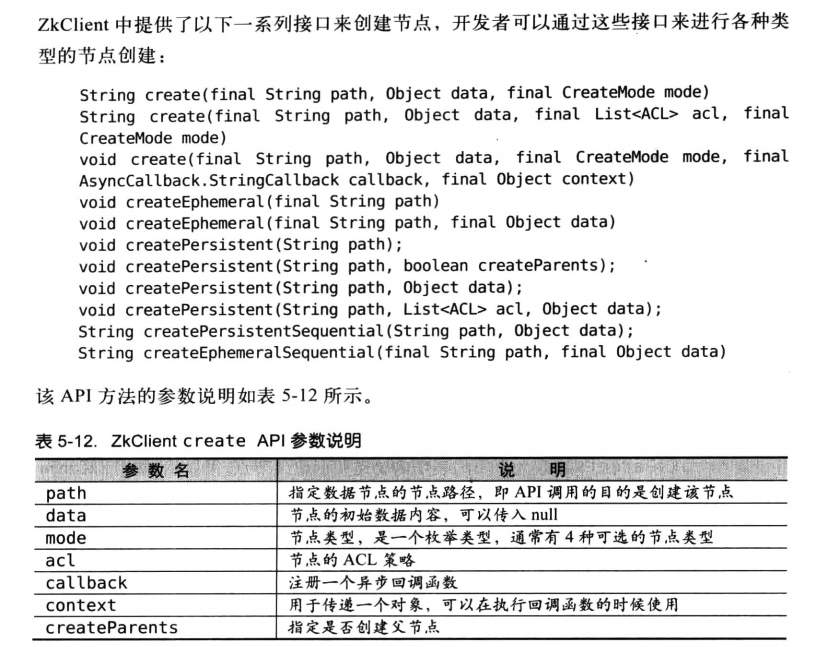
创建节点:
public class ZKClientTest {

    private static final String zkPath = "master:2181,slave1:2181,slave2:2181/zfpt";

    private static  ZkClient zkClient = null;

    @Before

    public void init() {

        zkClient = new ZkClient(zkPath,10000,10000);

    }

    @Test

    public void create() {

        // 创建节点

        String result = zkClient.create("/aa3","test", CreateMode.EPHEMERAL);

        System.out.println(result);

        // 递归创建

        zkClient.createPersistent("/trade/open",true);

        // 注意不要写成这种,API的问题,这种无法递归创建

        // zkClient.createPersistent("/trade/open",true);

    }

}
相比原始API,ZkClient创建Znode的特性:
- 支持同步创建。
- 更丰富更简单的序列化方式,原始的只能传递byte[]数组。
- 更简便的API,
createPersistent和createEphemeral等。 - 支持递归创建。
删除接口:


@Test

public void delete() {

    // 递归删除

    Boolean results = zkClient.deleteRecursive("/trade");

    System.out.println("删除结果:" + results);

}
特性:
- 递归删除。原始ZooKeeper只支持删除叶子节点。ZkClient支持层级遍历递归删除。
读取子节点:
/**

 * 获取子节点

 */

@Test

public void getChildren() {

    List<String> childrenList = zkClient.getChildren("/trade");

    System.out.println(childrenList);

}
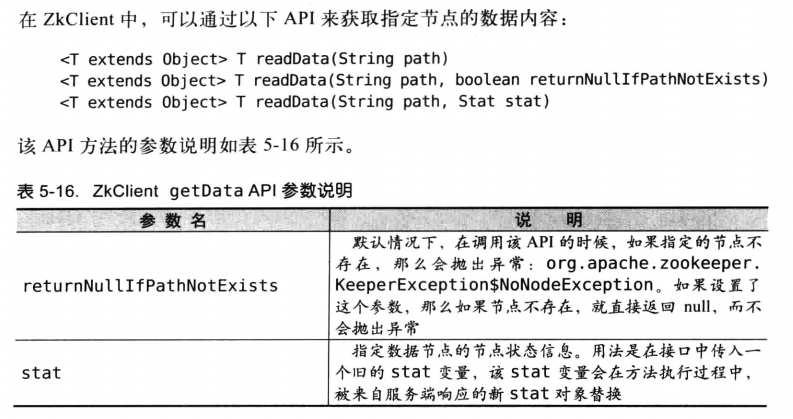
获取节点数据:
@Test

public void readData() {

    String data = zkClient.readData("/trade");

    System.out.println(data);

}
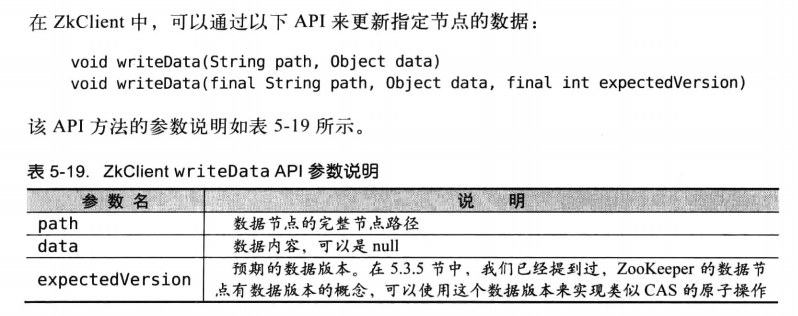
更新数据:
@Test

public void setData() {

    String oldValue = zkClient.readData("/trade");

    System.out.println("获取前:" + oldValue);

    zkClient.writeData("/trade","I am trade");

    String newValue = zkClient.readData("/trade");

    System.out.println("更新后:" + newValue);

}
监听器:
//监听子节点变化

zkClient.subscribeChildChanges("/trade",(parentPath,currenChilds)->{

    System.out.println("子节点发生变化");

});

zkClient.subscribeDataChanges("/trade",new IZkDataListener() {

    @Override

    public void handleDataChange(String dataPath, Object data) throws Exception {

        System.out.println("dataPath:" + dataPath +"发生变化,最新数据是:" + data);

    }

    @Override

    public void handleDataDeleted(String dataPath) throws Exception {

        System.out.printf("dataPath被删除");

    }

});
原生Watcher只支持一次注册,但是ZkClient的listener已经支持重复注册。
Curator
Curator在ZooKeeper原生API的基础上进行了包装,提供了一套易用性和可读性更强的Fluent风格的客户端API框架。
除此之外,Curator中还提供了ZooKeeper各种应用场景(Recipe 如共享锁服务、Master选举机制和分布式计数器等)的抽象封装。
pom.xml
<dependency>

    <groupId>org.apache.curator</groupId>

    <artifactId>curator-framework</artifactId>

    <version>RELEASE</version>

</dependency>

<!-- https://mvnrepository.com/artifact/org.apache.curator/curator-recipes -->

<dependency>

    <groupId>org.apache.curator</groupId>

    <artifactId>curator-recipes</artifactId>

    <version>RELEASE</version>

</dependency>
创建节点:
@Before

public void before() {

    //  非Fluent风格

    //  CuratorFramework curatorFramework = CuratorFrameworkFactory.newClient(zkPath, new RetryOneTime(100));

    //  System.out.println(curatorFramework.getState());

    //  curatorFramework.start();

    //  System.out.println(curatorFramework.getState());

    // Fluent风格

    curatorFramework = CuratorFrameworkFactory.builder()

            .connectString("master:2181,slave1:2181,slave2:2181")

            .retryPolicy(new RetryOneTime(1000)) //重试策略

            .namespace("zfpt") // 命名空间

            .build();

    curatorFramework.start();

}

@Test

public void create() throws Exception {

    // 创建一个持久化节点,初始化内容为空

    curatorFramework.create().forPath("/dus");

    // 创建一个持久化节点,初始化内容不为空

    curatorFramework.create().forPath("/dus1","test".getBytes());

    // 创建一个临时节点  初始化内容为空

    curatorFramework.create().withMode(CreateMode.EPHEMERAL).forPath("/dus2");

    // 创建一个临时节点,并递归创建不存在的父节点

    // ZooKeeper中规定所有非叶子节点必须为持久节点。因此下面创建出来只有dus2会是临时节点。

    curatorFramework.create().creatingParentsIfNeeded().withMode(CreateMode.EPHEMERAL).forPath("/dj/dus2");

}
删除节点:
//删除一个节点

client.delete().forPath(path);

// 删除一个节点,并递归删除其所有子节点

client.delete().deletingChildrenIfNeeded().forPath(path)

// 删除一个节点,强制指定版本进行删除

client.delete().withVersion(version).forPath(path);

//删除一个节点,强制保证删除成功

client.delete().delete().guaranteed().forPath(path);
guaranteed() 保证删除失败后,Curator会在后台持续进行删除操作。
读取数据:
// 读取一个节点的数据内容

client.getData().forPath(path);

// 读取一个节点的数据内容,同时获取到该节点的stat

client.getData().storingStatIn(stat).forPath(path);
更新数据:
// 更新一个节点的数据内容

client.setData().forPath(path);

// 更新一个节点的数据内容,强制指定版本进行更新

client.setData().withVersion(version).forPath(path);
异步接口:
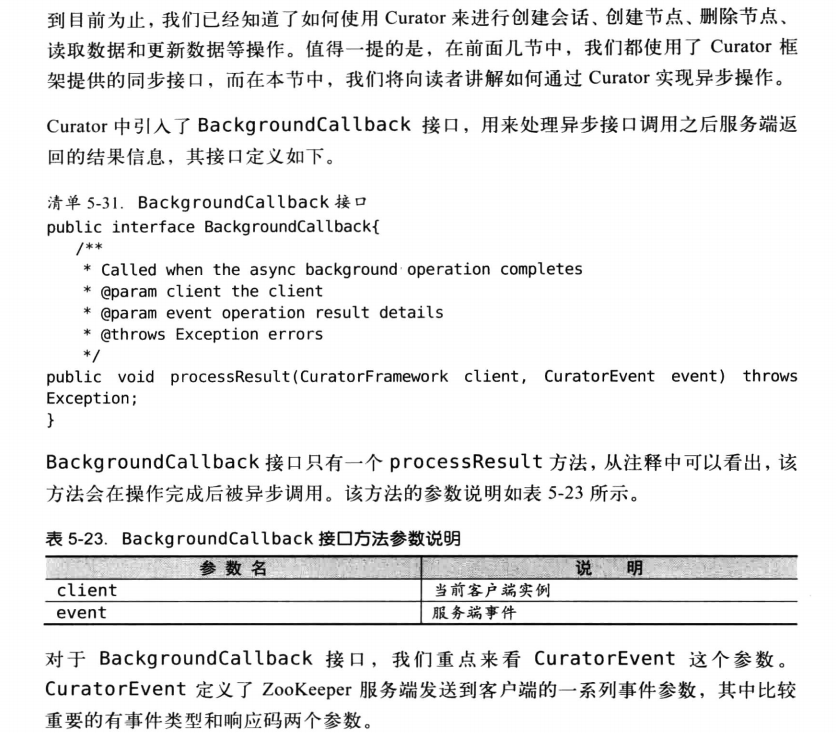
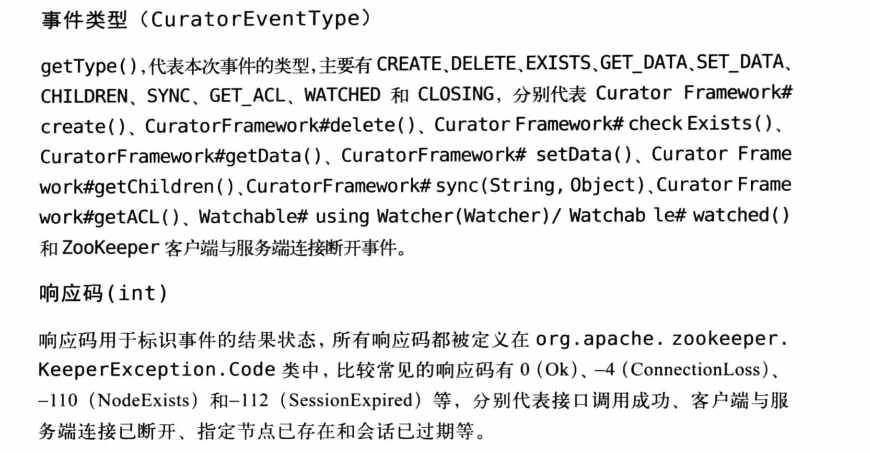
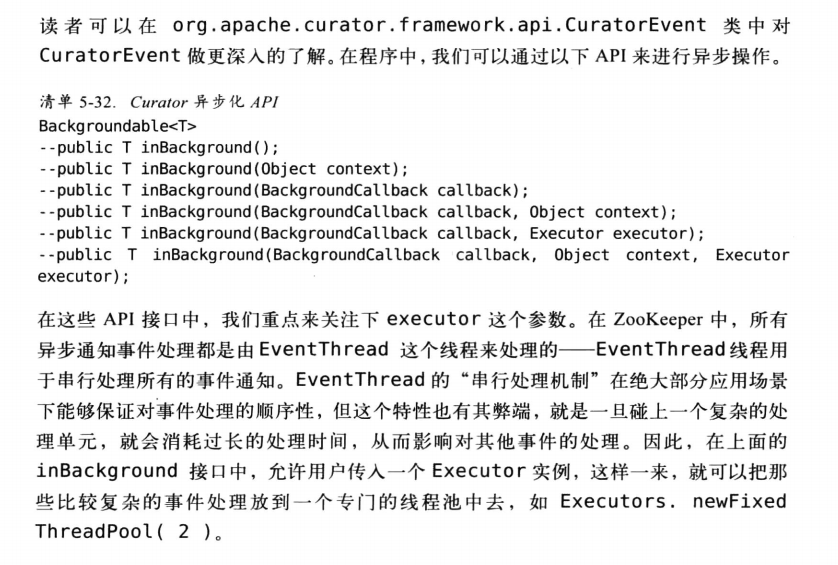
也就是说如果没有传入自定义线程池,就由EventThread这个线程串行处理所有的事件通知,如果传入了,则由自定义线程池去处理。
@Test

public void BackgroundCallbackTest() throws Exception{

    CountDownLatch countDownLatch = new CountDownLatch(2);

    curatorFramework.getData().inBackground((client,event)->{

        System.out.println(Thread.currentThread().getName());

        System.out.println(event);

        System.out.println(client);

    }).forPath("/trade");

    Executor executor = Executors.newFixedThreadPool(2,new ThreadFactoryBuilder().setNameFormat("curator-%d").build() );

    curatorFramework.getData().inBackground((client,event)->{

        System.out.println(Thread.currentThread().getName());

        System.out.println(event);

        System.out.println(client);

    },executor).forPath("/trade");

    countDownLatch.await();

}
事件监听:
Curator引入了Cache来实现对ZooKeeper服务端事件的监听,Cache是Curator中对事件监听的包装,其对事件的监听其实可以近似看作是一个本地缓存视图和远程ZooKeeper视图的对比过程。同时Curator能够自动为开发人员处理反复注册监听,从而大大简化了原生API开发的繁琐过程。Cache分为两类监听类型:节点监听和子节点监听。
NodeCache:
NodeCache即可以用于监听指定ZooKeeper数据节点内容的变化,也能监听指定节点是否存在,如果原本节点不存在,那么Cache就会在节点被创建后出发NodeCacheListener。但是如果该数据节点被删除,那么Curator就无法再出发NodeCacheListener了。
@Test

public void NodeCacheTest() throws Exception{

    // client : Curator 客户端实例 。 path: 监听节点的节点路径 。 dataIsCompressed:是否进行数据压缩

    NodeCache nodeCache = new NodeCache(curatorFramework,"/trade",false);

    // buildInitial:如果设置为true 则NodeCache在第一次启动的时候就会立刻从ZK上读取对应节点的数据内容 保存到Cache中。

    nodeCache.start(false);

    nodeCache.getListenable().addListener(()->{

        System.out.println("Node data update , new data:" + new  String(nodeCache.getCurrentData().getData()));

    });

    //******************** 监听一个不存在的节点 当节点被创建后,也会触发监听器 **********************//

    // client : Curator 客户端实例 。 path: 监听节点的节点路径 。 dataIsCompressed:是否进行数据压缩

    NodeCache nodeCache2 = new NodeCache(curatorFramework,"/trade1",false);

    // buildInitial:如果设置为true 则NodeCache在第一次启动的时候就会立刻从ZK上读取对应节点的数据内容 保存到Cache中。

    nodeCache2.start(false);

    nodeCache2.getListenable().addListener(()->{

        System.out.println("Node data update , new data:" + new  String(nodeCache.getCurrentData().getData()));

    });

    Thread.sleep(Integer.MAX_VALUE);

}
PathChildrenCache:
用于监听指定ZooKeeper数据节点的子节点变化情况。当指定节点的子节点发生变化时,就会回调该方法。PathChildrenCacheEvent类中定义了所有的事件类型,主要包括新增子节点(CHILD_ADDED)、子节点数据变更(CHILD_UPDATED)和子节点删除(CHILD_REMOVED)三类。但是该数据节点的变化不会被此监听器监听到。无法监听孙子节点的变更。
@Test

public void PathChildrenCacheTest() throws Exception {

    PathChildrenCache nodeCache = new PathChildrenCache(curatorFramework,"/trade",true);

    // buildInitial:如果设置为true 则NodeCache在第一次启动的时候就会立刻从ZK上读取对应节点的数据内容 保存到Cache中。

    nodeCache.start();

    nodeCache.getListenable().addListener((client , event)->{

        switch (event.getType()) {

            case CHILD_ADDED :

                System.out.println("新增子节点,数据内容是" + new String(event.getData().getData())); break;

            case CHILD_UPDATED:

                System.out.println("子节点被更新,数据内容是" + new String(event.getData().getData())); break;

            case CHILD_REMOVED:

                System.out.println("删除子节点,数据内容是" + new String(event.getData().getData())); break;

            default: break;

        }

    });

    curatorFramework.create().withMode(CreateMode.PERSISTENT).forPath("/trade/PathChildrenCache","new".getBytes());

    Thread.sleep(100L);

    curatorFramework.setData().forPath("/trade/PathChildrenCache","update".getBytes());

    Thread.sleep(100L);

    curatorFramework.delete().withVersion(-1).forPath("/trade/PathChildrenCache");

}
Master选举:
在分布式系统中,经常会碰到这样的场景:对于一个复杂的任务,仅需要从集群中选举出一台进行处理即可。诸如此类的分布式问题,我们统称为“Master选举”。借助于ZooKeeper,我们可以比较方便地实现Master选举的功能,其大体思路非常简单:
选择一个根节点,例如/master_select,多台机器同时向该节点创建一个子节点/master_select/lock,利用ZooKeeper的特性,最终只有一台机器能够创建成功,成功的那台机器就作为Master。
Curator也是基于这个思路,但是它将节点创建、事件监听和自动选举过程进行了封装,开发人员只需要调用简单的API即可实现Master选举。
@Test

public void leaderSelector() throws Exception {

    AtomicInteger masterCount = new AtomicInteger(0);

    ExecutorService executor = Executors.newFixedThreadPool(4,new ThreadFactoryBuilder().setNameFormat("master_selector-%d").build() );

    for( int i = 0 ; i < 4; i++) {

        executor.execute(()-> {

            LeaderSelector leaderSelector = new LeaderSelector(curatorFramework, "/master_selector", new LeaderSelectorListenerAdapter() {

                @Override

                public void takeLeadership(CuratorFramework curatorFramework) throws Exception {

                    masterCount.incrementAndGet();

                    System.out.println(Thread.currentThread().getName() + "成为Master, 当前Master数量:" + masterCount);

                    Thread.sleep(1000L);

                    System.out.println(Thread.currentThread().getName() + "宕机,失去Master角色,剩下master数量:" + masterCount.decrementAndGet());

                }

            });

            leaderSelector.autoRequeue();

            leaderSelector.start();

        });

    }

    Thread.sleep(Integer.MAX_VALUE);

}
分布式锁:
为了保证数据的一致性,临界资源加锁,保持有序访问。
/**

 * 观察  Lock【n】 抢到锁  和 Lock【n】 释放锁  是不是成对出现。 如果不是,则说明有重复加锁的

 * @throws Exception

 */

@Test

public void InterProcessMutex() throws Exception {

    InterProcessMutex lock = new InterProcessMutex(curatorFramework,"/trade/mylock") ;

    for (int i = 0 ; i < 100 ; i++) {

        Thread currentThread = new Thread(() -> {

            try {

                // 加锁

                lock.acquire();

                System.out.println(Thread.currentThread().getName() + " 抢到锁");

            }catch (Exception e) {

            } finally {

                try {

                    System.out.println(Thread.currentThread().getName() + " 释放锁");

                    // 释放锁

                    lock.release();

                } catch (Exception e) {

                    e.printStackTrace();

                }

            }

        });

        currentThread.setName("Lock【" + i  + "】");

        currentThread.start();

    }

    Thread.sleep(Integer.MAX_VALUE);

}
分布式计数器:
@Test

public void DistributedAtomicInteger() throws Exception {

    DistributedAtomicInteger distributedAtomicInteger = new DistributedAtomicInteger(curatorFramework,"/trade/PathChildrenCache", new RetryNTimes(1000,3)) ;

    System.out.println(distributedAtomicInteger.increment().postValue());

}
分布式Barrier:
与CyClicBarrir同样的语义。
/**

 * 没有定义成员数量。直接通过removeBarrier();释放屏障

 * @throws Exception

 */

@Test

public void barrier() throws Exception {

    ExecutorService executor = Executors.newFixedThreadPool(4,new ThreadFactoryBuilder().setNameFormat("barrier-%d").build() );

    for( int i = 0 ; i < 4; i++) {

        executor.execute(()-> {

            CuratorFramework client = CuratorFrameworkFactory.builder()

                    .connectString("master:2181,slave1:2181,slave2:2181")

                    .retryPolicy(new RetryOneTime(1000)) //重试策略

                    .namespace("zfpt") // 命名空间

                    .build();

            client.start();

             distributedBarrier = new DistributedBarrier(curatorFramework,"/trade/PathChildrenCache") ;

            System.out.println(Thread.currentThread().getName() + "到达Barrier前");

            try {

                distributedBarrier.setBarrier();

                distributedBarrier.waitOnBarrier();

                System.out.println(Thread.currentThread().getName() + "越过屏障");

            } catch (Exception e) {

                e.printStackTrace();

            }

        });

    }

    Thread.sleep(3000L);

    distributedBarrier.removeBarrier();

}

/**

 * 定义成员数量,到齐了就 越过屏障

 * @throws Exception

 */

@Test

public void barrier2() throws Exception {

    ExecutorService executor = Executors.newFixedThreadPool(4,new ThreadFactoryBuilder().setNameFormat("barrier-%d").build() );

    for( int i = 0 ; i < 4; i++) {

        executor.execute(()-> {

            CuratorFramework client = CuratorFrameworkFactory.builder()

                    .connectString("master:2181,slave1:2181,slave2:2181")

                    .retryPolicy(new RetryOneTime(1000)) //重试策略

                    .namespace("zfpt") // 命名空间

                    .build();

            client.start();

            DistributedDoubleBarrier distributedDoubleBarrier = new DistributedDoubleBarrier(client,"/trade/PathChildrenCache",4) ;

            try {

                Thread.sleep(1000L);

                System.out.println(Thread.currentThread().getName() + "到达Barrier前");

                distributedDoubleBarrier.enter();

                System.out.println(Thread.currentThread().getName() + "越过屏障");

                Thread.sleep(1000L);

                distributedDoubleBarrier.leave();

                System.out.println(Thread.currentThread().getName() + "已经离开");

            } catch (Exception e) {

                e.printStackTrace();

            }

        });

    }

    Thread.sleep(Integer.MAX_VALUE);

}
ZK客户端的更多相关文章
- ZK客户端脚本的简单使用
sh zkCli.sh [-server ip:port] :连接节点zk客户端[-server ip:port 用于连接集群中指定节点的客户端] 1.创建节点 create [-s] [-e] pa ...
- zk客户端的ClientCnxn类
ClientCnxn是客户端的类:该类管理zk客户端的socket io,维持一个可用服务器的列表. //ClientCnxn类 private final LinkedList<Packet& ...
- 利用zk客户端删除solr shard
进入zk客户端 ./bin/zkCli.sh -server ip:2181 显示所有的内容: ls / 删除数据: rmr /filename path
- 第4章 ZK基本特性与基于Linux的ZK客户端命令行学习
第4章 ZK基本特性与基于Linux的ZK客户端命令行学习 4-1 zookeeper常用命令行操作 4-2 session的基本原理与create命令的使用
- zk客户端及锁的使用
1.生成zk客户端对象 private CuratorFramework buildClient() { logger.info("zookeeper registry center ini ...
- dubbo使用的zk客户端
在使用dubbo的过程中,当注册中心的数据修改后,新的配置是怎样刷到consumer和provider的?本文以consumer为例,进行分析. dubbo使用的是zkclient的jar,而zkcl ...
- 第4章 ZK基本特性与基于Linux的ZK客户端命令行学习 4-2 session的基本原理与create命令的使用
客户端与服务端之间存在的连接,那么这样的一个连接我们就称之为会话,也就是session.其实就相当于是我们在做JSP或者说是Service的时候,那么服务端是Servlet,客户端使用的是浏览器.浏览 ...
- 查看Dubbo服务-通过zk客户端
一.基本概念 https://www.cnblogs.com/huasky/p/8268568.html 二.下载与安装 1.进入要下载的版本的目录,选择.tar.gz文件下载 下载链接:http:/ ...
- 第4章 ZK基本特性与基于Linux的ZK客户端命令行学习 4-1 zookeeper常用命令行操作
ls path [watch] watch是一个监督者.quota是zookeeper的子目录.目录就是节点的意思,对于zookeeper来说它是以一个节点来说的,所以说/就是根节点,zookeepe ...
随机推荐
- bzoj1867: [Noi1999]钉子和小球(DP)
一眼题...输出分数格式才是这题的难点QAQ 学习了分数结构体... #include<iostream> #include<cstring> #include<cstd ...
- jq的$.each遍历数组
<!DOCTYPE html> <html lang="en"> <head> <meta charset="UTF-8&quo ...
- Python数据处理和数据可视化
工具1:numpy 下载地址:http://www.lfd.uci.edu/~gohlke/pythonlibs/#numpy 入门文档:https://docs.scipy.org/doc/nump ...
- C#学习之泛型
//主函数//主函数里面调用的类都在后面有具体描述 using System; using System.Collections.Generic; using System.Linq; using S ...
- [洛谷P2610] [ZJOI2012]旅游
洛谷题目链接:[ZJOI2012]旅游 题目描述 到了难得的暑假,为了庆祝小白在数学考试中取得的优异成绩,小蓝决定带小白出去旅游~~ 经过一番抉择,两人决定将T国作为他们的目的地.T国的国土可以用一个 ...
- [Luogu 3224] HNOI2012 永无乡
[Luogu 3224] HNOI2012 永无乡 特别水一个平衡树题. 不认真的代价是调试时间指数增长. 我写的 SBT,因为 Treap 的 rand() 实在写够了. 用并查集维护这些点的关系, ...
- 【游记】GDOI 2017
Day 0 学校好大>_<! 酒店好高级>_<! 晚上复习代码的时候很困QAQ,中间和hwh面基.复习到SA的时候因为太久没看忘记板子的意思了又背不下来,于是不看了,相信考了也 ...
- PHP练习4 留言板
一.要求 二.示例页面 三.网页代码及网页显示 1.denglu.php 登录页面 <!DOCTYPE html PUBLIC "-//W3C//DTD XHTML 1.0 Tran ...
- 高精度模板_C++
高精度压位,压9位 read:读入 write:输出 copy:赋值 change:交换 empty:清0 cmp:比较大小,相当于小于号 plus:加法 dec:减法 multy:乘法 除法实在不会 ...
- 科猫网项目总结(基于SSM框架)
1.配置文件的添加 SSM整合需要web.xml配置文件,springmvc的配置文件,spring和mybatis整合的配置文件. 1.web.xml文件的配置 1.在WEB-INF下新建web.x ...
