ASP.NET中进行消息处理(MSMQ) 二(转)
建议:如果你对MSMQ不够了解,在你阅读本文前请先阅读第一部分:《ASP.NET中进行消息处理(MSMQ)一》。
一、消息传递的优先级
在MSMQ中消息在队列里传输是分有优先级的,这里我就以实例的形式介绍下关于优先级的使用,优先级一共有七种,MessagePriority枚举里全部进行了封装。因这里只作程序演示就不一一列举出,仅用了Highest和Normal两种类型,关于消息队列上进行消息传输的七种优先级大家可以参考我下面提供的MessagePriority枚举源代码定义。
那么在发送消息的时候怎么指定消息的优先级呢?在Message对象里封装有一个属性Priority,接受一个枚举MessagePriority类型的值来设置消息传输的优先级。如下:
1System.Messaging.Message message = new System.Messaging.Message();

2message.Priority = MessagePriority.Highest;  //最高消息优先级
下面来看看一个在消息传输中使用优先级的示例程序,通过示例程序会学习得更明白。示例程序界面:
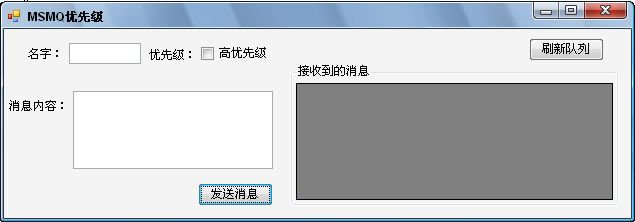
根据界面可知,提供了消息名字,消息优先级和消息内容三个输入项,前面曾经说过,这里为了方便演示就仅用了Highest和Normal两种类型,当点击发送消息的时候就通过是否选择优先级来设置消息的优先级,代码如下:
 1private void btnSend_Click(object sender, EventArgs e)

 2{

 3    //连接到本地的专用队列myQueue

 4    MessageQueue myQueue = new MessageQueue(".\\private$\\myQueue");

 5    System.Messaging.Message message = new System.Messaging.Message();

 6    message.Label = tbName.Text;

 7    message.Body = tbContext.Text;

 8

 9    if (cbPriority.Checked)

10    {

11        message.Priority = MessagePriority.Highest;

12    }

13    else

14    {

15        message.Priority = MessagePriority.Normal;

16    }

17    myQueue.Send(message);

18    MessageBox.Show("成功发送消息到队列");

19}
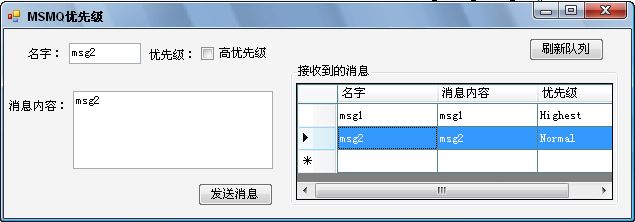
这里我们可以向队列里发送两条消息,以便后面测试读取方法,发送两条消息到队列,此时,从队列消息中可以看到:

"刷新队列"实质上就是把队列里的消息全部读取出来,具体的实现在《ASP.NET中进行消息处理(MSMQ)一》里已经作了详细的介绍,这里就不在多说,看看下面的代码:
 1private void DisplayMessage()

 2        {

 3            //连接到本地队列

 4            MessageQueue myQueue = new MessageQueue(".\\private$\\myQueue");

 5            myQueue.MessageReadPropertyFilter.Priority = true;

 6            DataTable messageTable = new DataTable();

 7            messageTable.Columns.Add("名字");

 8            messageTable.Columns.Add("消息内容");

 9            messageTable.Columns.Add("优先级");

10            XmlMessageFormatter formatter = new XmlMessageFormatter(new string[] { "System.String" });

11            try

12            {

13                //从队列中接收消息

14                System.Messaging.Message[] messages = myQueue.GetAllMessages();

15                for (int index = 0; index < messages.Length; index++)

16                {

17                    messages[index].Formatter = formatter;

18

19                    string label = messages[index].Label;

20                    string body = messages[index].Body.ToString();

21                    string priority = messages[index].Priority.ToString();

22

23                    messageTable.Rows.Add(new string[] { label, body, priority });

24                }

25                this.dgvMessage.DataSource = messageTable;

26            }

27            catch (MessageQueueException e1)

28            {

29                MessageBox.Show(e1.Message);

30            }

31        }

32    }
这里封装了一方法,专门负责从队列里读取全部消息并绑定在DataGridView控件上,这里我们只需要在按扭Click事件里调用这方法就OK。
1private void btnRec_Click(object sender, EventArgs e)

2{

3    DisplayMessage();

4}
这就完成了给消息设置优先级的消息传输的应用,最终的测试结果如下:
注:要完成以上应用还需注意一点,由于消息的优先级是枚举类型,在直接messages[index].Priority.ToString();这种方式来获取优先级转化到字符串的时候,他需要一个过滤器(Filter),否则会抛出一个InvalidCastExceptionle类型的异常,异常信息"接收消息时未检索到属性 Priority。请确保正确设置了 PropertyFilter。",要解决这问题只需要把消息对象的MessageReadPropertyFilter(过滤器) 的Priority设置为true就OK了。见上面代码里!^.^
MessagePriority枚举源代码定义详细如下:
 1// 摘要:

 2//     指定消息队列在消息传递到队列的过程中应用于该消息的优先级,以及指定何时将消息插入目标队列。

 3public enum MessagePriority

 4{

 5    // 摘要:

 6    //     最低消息优先级。

 7    Lowest = 0,

 8    //

 9    // 摘要:

10    //     位于 Low 和 Lowest 消息优先级之间。

11    VeryLow = 1,

12    //

13    // 摘要:

14    //     低消息优先级。

15    Low = 2,

16    //

17    // 摘要:

18    //     普通消息优先级。

19    Normal = 3,

20    //

21    // 摘要:

22    //     位于 System.Messaging.MessagePriority.High 和 System.Messaging.MessagePriority.Normal

23    //     消息优先级之间。

24    AboveNormal = 4,

25    //

26    // 摘要:

27    //     高消息优先级。

28    High = 5,

29    //

30    // 摘要:

31    //     位于 Highest 和 High 消息优先级之间。

32    VeryHigh = 6,

33    //

34    // 摘要:

35    //     最高消息优先级。

36    Highest = 7,

37}
二、事务性消息处理
事务我想大家对这个词应该都不会陌生,在操作数据库的时候经常都会用到事务,确保操作成功,要么全部完成(成功),要么全部不完成(失败)。在MSMQ中利用事务性处理,可以确保事务中的消息按照顺序传送,只传送一次,并且从目的队列成功地被检索。
那么,在MSMQ上使用事务性处理怎么实现呢?可以通过创建MessageQueueTransation类的实例并将其关联到MessageQueue组件的实例来执行,执行事务的Begin方法,并将其实例传递到收发方法。然后,调用Commit以将事务的更改保存到目的队列。
创建事务性消息和普通的消息有一点小小的区别,大家可从下图上体会到:
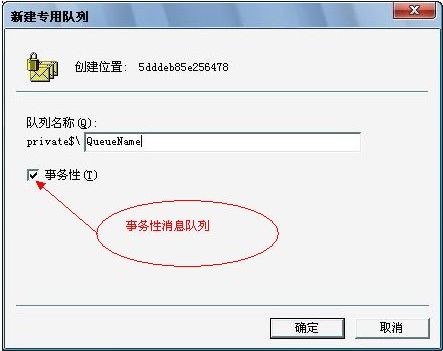
通过代码方式建立事务性消息队列只在Create方法的参数上动动手脚就OK,详细如下:
1//创建普通的专用消息队列

2MessageQueue myMessage = MessageQueue.Create(@".\private$\myQueue");

3//创建事务性的专用消息队列

4MessageQueue myTranMessage =MessageQueue.Create(@".\private$\myQueueTrans", true);
启动了事务,那么在发送和接收消息的时候肯定是与原来有一定的差别的,这里我就不做详细介绍,下面给出示意性代码,有兴趣的朋友可以直接下载本文示例程序代码了解更多。
普通的消息发送示意性代码:
1//连接到本地的队列

2MessageQueue myQueue = new MessageQueue(".\\private$\\myQueue");

3Message myMessage = new Message();

4myMessage.Body = "消息内容";

5myMessage.Formatter = new XmlMessageFormatter(new Type[] { typeof(string) });

6//发送消息到队列中

7myQueue.Send(myMessage);
启动了事务后的消息发送示意性代码:
 1//连接到本地的队列

 2MessageQueue myQueue = new MessageQueue(".\\private$\\myQueueTrans");

 3

 4Message myMessage = new Message();

 5myMessage.Body = "消息内容";

 6myMessage.Formatter = new XmlMessageFormatter(new Type[] { typeof(string) });

 7

 8MessageQueueTransaction myTransaction = new MessageQueueTransaction();

 9//启动事务

10myTransaction.Begin();

11//发送消息到队列中

12myQueue.Send(myMessage, myTransaction);  //加了事务

13//提交事务

14myTransaction.Commit();

15Console.WriteLine("消息发送成功!");
读取消息示意性代码:
 1//连接到本地队列

 2MessageQueue myQueue = new MessageQueue(".\\private$\\myQueueTrans");

 3myQueue.Formatter = new XmlMessageFormatter(new Type[] { typeof(string) });

 4if (myQueue.Transactional)

 5{

 6    MessageQueueTransaction myTransaction = new MessageQueueTransaction();

 7    //启动事务

 8    myTransaction.Begin();

 9    //从队列中接收消息

10    Message myMessage = myQueue.Receive(myTransaction);

11    string context = myMessage.Body as string; //获取消息的内容

12    myTransaction.Commit();

13    Console.WriteLine("消息内容为:" + context);

14}
三、异步消息处理
在MSMQ中对消息的操作分有同步化操作和异步化操作两种,那两者到底有何区别呢?简单的说同步化操作就是一项操作没有完成前它将堵塞整个进程直到操作完成,下一项操作才会执行。所谓异步化操作则相反,不会堵塞启动操作的调用线程。如果你想在检索消息但不想堵塞其他程序的执行,则可使用异步消息处理。
在MSMQ中异步接收消息使用BeginReceive方法和EndReceive方法来标记操作的开始和结束,异步查看消息则使用BeginPeek和EndPeek两个方法来标记异步读取的开始和结束。同时,异步接收和查看消息还可以指定超时时间,关于这点我在后续文章里再做详细的介绍,有兴趣的朋友可以关注。
这里我将使用《ASP.NET中进行消息处理(MSMQ)一》一文里使用过的Book类来作为消息传输,没阅读过的朋友请先阅读这篇文章,了解Book类的结构。下面提供了一个示例,创建队列和发送消息到队列在前面我们已经使用多次了这里就不贴代码了,发送消息这里与第一篇文章中介绍如何发送一个复杂的类型信息到队列比,只是多了事务处理,详细如下:
 1/// <summary>

 2/// 发送消息到队列

 3/// </summary>

 4private static void SendMessage()

 5{

 6    MessageQueue myQueue = new MessageQueue(".\\private$\\myAsyncQueue");

 7    if (myQueue.Transactional)

 8    {

 9        Book book = new Book();

10        book.BookId = 1001;

11        book.BookName = "ASP.NET";

12        book.BookAuthor = "ZhangSan";

13        book.BookPrice = 88.88;

14        Message message = new Message(book);

15        message.Formatter = new XmlMessageFormatter(new Type[] { typeof(MSMQ.Async.Book) });

16

17        MessageQueueTransaction myTransaction = new MessageQueueTransaction();

18        myTransaction.Begin();

19        myQueue.Send(message, myTransaction);

20        myTransaction.Commit();

21        Console.WriteLine("消息成功发送到队列!");

22    }

23}
异步接收消息:
 1/// <summary>

 2/// 异步接收消息

 3/// </summary>

 4private static void AsyncReceiveMessage()

 5{

 6    MessageQueue myQueue = new MessageQueue(".\\private$\\myAsyncQueue");

 7    if (myQueue.Transactional)

 8    {

 9        MessageQueueTransaction myTransaction = new MessageQueueTransaction();

10        //这里使用了委托,当接收消息完成的时候就执行MyReceiveCompleted方法

11        myQueue.ReceiveCompleted += new ReceiveCompletedEventHandler(MyReceiveCompleted);

12        myQueue.Formatter = new XmlMessageFormatter(new Type[] { typeof(MSMQ.Async.Book) });

13        myTransaction.Begin();

14        myQueue.BeginReceive();//启动一个没有超时时限的异步操作

15        signal.WaitOne();

16        myTransaction.Commit();

17    }

18}
 1private static void MyReceiveCompleted(Object source, ReceiveCompletedEventArgs asyncResult)

 2{

 3    try

 4    {

 5        MessageQueue myQueue = (MessageQueue)source;

 6        //完成指定的异步接收操作

 7        Message message = myQueue.EndReceive(asyncResult.AsyncResult);

 8        signal.Set();

 9        Book book = message.Body as Book;

10        Console.WriteLine("图书编号:{0}--图书名称:{1}--图书作者:{2}--图书定价:{3}",

11            book.BookId.ToString(),

12            book.BookName,

13            book.BookAuthor,

14            book.BookPrice.ToString());

15        myQueue.BeginReceive();

16    }

17    catch (MessageQueueException me)

18    {

19        Console.WriteLine("异步接收出错,原因:" + me.Message);

20

21    }

22}
四、MSMQ在邮件发送程序中的应用
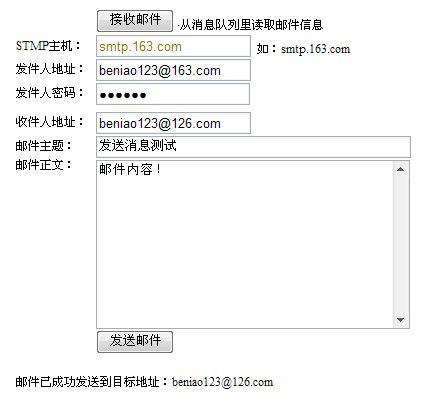
在邮件程序的应用中,实现发送邮件的方法有很多种,很多朋友都比较喜欢邮件发送组件(如:JMail),在.NET Framework里也给我们提供了发送邮件的类StmpClient,位于System.Net下。我想很多朋友都曾用到过此类,如果说是在一个小型的邮件应用里,完全没有使用MSMQ的必要,因为数据量不大,直接处理就OK,这里我以邮件程序来说只是出于对MSMQ应用的介绍。说实在的,我也不知道怎么才能把这个东东给介绍清楚,先看看一张图吧!

现在的需求是这样的,有一个邮件发送客户端(SendMail.aspx,界面效果如上图所示)和一个邮件发送管理的服务端(MailServer.aspx),当在SendMail.aspx里发送邮件的时候,我们不直接将其发到目标地址去,而是将其发送到消息队列,然后由MailServer.aspx来负责从消息队列里读取出邮件信息在将其发送到目标地址。其实SendMail.aspx的职责就是完成把邮件信息发送到消息队列,示意性代码如下:
 1protected void btnSendMail_Click(object sender, EventArgs e)

 2{

 3    //取出数据存入MailInfo对象

 4    MailInfo info = new MailInfo();

 5    info.Title = tbTitle.Text;

 6    info.Content = tbContent.Text;

 7    info.StmpServer = tbSmtpServer.Text;

 8    info.Sender = tbSender.Text;

 9    info.SenderPwd = tbSenderPwd.Text;

10    info.ReceiveAddress = tbReceive.Text;

11

12    if (info != null)

13    {

14        CreateQueue();

15        SendMessage(info);

16    }

17}
CreateQueue和SendMessage这两个方法完成消息队列的创建和发送信息到队列,MailInfo类封装的是邮件的详细信息(既邮件的属性),详细定义如下:
封装了邮件的属性
转到邮件管理端(MailServer.aspx),他负责从消息队列里读取出邮件信息并把此邮件发送到目标地址去。其实现很简单,说直接点他也就是完成了两项操作(从队列读消息、将消息发送到目的邮箱),从队列读取消息的代码如下:
 1/// <summary>

 2/// 连接消息队列并从队列中接收消息

 3/// </summary>

 4private MailInfo ReceiveMessage()

 5{

 6    MailInfo info = null;

 7    //连接到本地队列

 8    MessageQueue myQueue = new MessageQueue(".\\private$\\myMailQueue");

 9    myQueue.Formatter = new XmlMessageFormatter(new Type[] { typeof(MailInfo) });

10    try

11    {

12        if (myQueue.Transactional)

13        {

14            MessageQueueTransaction myTransaction = new MessageQueueTransaction();

15            //启动事务

16            myTransaction.Begin();

17            //从队列中接收消息

18            Message myMessage = myQueue.Receive(myTransaction);

19            info = myMessage.Body as MailInfo; //获取消息的内容

20            myTransaction.Commit();

21            return info;

22        }

23

24    }

25    catch (MessageQueueException e)

26    {

27        this.tdError.InnerText = e.Message;

28    }

29    return info;

30}
该方法(ReceiveMessage)返回的是从队列里读取到的邮件信息,本示例中只是做了读一条信息的实现,如果要把队列里的全部信息读出并发送到目的邮箱,可以参考我前面所介绍的相关知识点来实现。得到了邮件的详细信息,我们就可以使用相应的技术将这信息发送到目标邮箱去,本示例中我采用的是.NET Framework里提供的SmtpClient类来完成的邮件发送,关于SmtpClient类的使用网上有相当丰富的资料介绍,这里我就不做详细的说明,核心代码如下:
 1protected void Button2_Click(object sender, EventArgs e)

 2{

 3    if (info != null)

 4    {

 5        SmtpClient client = new SmtpClient();

 6        client.Host = info.StmpServer;

 7        client.UseDefaultCredentials = false;

 8        client.Credentials = new NetworkCredential(info.Sender, info.SenderPwd);

 9        client.DeliveryMethod = SmtpDeliveryMethod.Network;

10

11        MailMessage message = new MailMessage(info.Sender, info.ReceiveAddress);

12        message.Subject = info.Title;

13        message.Body = info.Content;

14        message.BodyEncoding = Encoding.UTF8;

15        message.IsBodyHtml = true;

16

17        try

18        {

19            //发送邮件到目标地址

20            client.Send(message);

21            this.tdSucces.InnerText = "邮件已成功发送到目标地址:" + info.ReceiveAddress;

22        }

23        catch (Exception ex)

24        {

25            this.tdError.InnerText = "发送失败,失败原因:" + ex.Message;

26        }

27    }

28}
运行后的效果图如下:
本文中的所有示例程序全部通过调试,能力有限,文中所介绍的不是很清楚,详细可直接下载源代码了解。本代码包里也包含有第一篇文章里的全部示例程序代码。
点击连接下载示例程序代码:示例程序代码下载
ASP.NET中进行消息处理(MSMQ) 二(转)的更多相关文章
- ASP.NET中进行消息处理(MSMQ) 二
在我上一篇文章<ASP.NET中进行消息处理(MSMQ)一>里对MSMQ做了个通俗的介绍,最后以发送普通文本消息和复杂的对象消息为例介绍了消息队列的使用. 本文在此基础上继续介绍MSMQ的 ...
- ASP.NET中进行消息处理(MSMQ) 三(转)
在本文的前两篇文章里对MSMQ的相关知识点进行了介绍,很多阅读过这前两篇文章的朋友都曾问到过这样一些问题: 1.如何把MSMQ应用到实际的项目中去呢? 2.可不可以介绍一个实际的应用实例? 3. ...
- ASP.NET中进行消息处理(MSMQ) 三
在本文的前两篇文章里对MSMQ的相关知识点进行了介绍,很多阅读过这前两篇文章的朋友都曾问到过这样一些问题: 1.如何把MSMQ应用到实际的项目中去呢? 2.可不可以介绍一个实际的应用实例? 3. ...
- ASP.NET中进行消息处理(MSMQ) 一(转)
MSMQ是微软消息队列的英文缩写.那么什么是消息队列?这些介绍网上一大片这里就不多说了.本文对于大虾级的人物来说这只是小玩意而已,对于初学者来说这文章还是有一定的帮助,希望路过的大虾们别笑话我班门弄斧 ...
- ASP.NET中进行消息处理(MSMQ) 一
MSMQ是微软消息队列的英文缩写.那么什么是消息队列?这些介绍网上一大片这里就不多说了.本文对于大虾级的人物来说这只是小玩意而已,对于初学者来说这文章还是有一定的帮助,希望路过的大虾们别笑话我班门弄斧 ...
- Asp.Net中的消息处理---MSMQ系列学习(一)
刚刚毕业一年,比较浮躁,上次面试被问到消息队列,觉得非常的惭愧因为不知道,所以下定决心一定要学会使用它.以前只是听说过有这么个东西,要说是什么,在什么场景下使用却是无从知晓,因为自己也确实没有在项目中 ...
- 细说Asp.Net Web API消息处理管道(二)
在细说Asp.Net Web API消息处理管道这篇文章中,通过翻看源码和实例验证的方式,我们知道了Asp.Net Web API消息处理管道的组成类型以及Asp.Net Web API是如何创建消息 ...
- ASP.NET Core中使用IOC三部曲(二.采用Autofac来替换IOC容器,并实现属性注入)
前言 本文主要是详解一下在ASP.NET Core中,自带的IOC容器相关的使用方式和注入类型的生命周期. 这里就不详细的赘述IOC是什么 以及DI是什么了.. emm..不懂的可以自行百度. 目录 ...
- 探索ASP.Net Core 3.0系列二:聊聊ASP.Net Core 3.0 中的Startup.cs
原文:探索ASP.Net Core 3.0系列二:聊聊ASP.Net Core 3.0 中的Startup.cs 前言:.NET Core 3.0 SDK包含比以前版本更多的现成模板. 在本文中,我将 ...
随机推荐
- Octopus系列之js公共函数
货币选择 ChangeCurrency(this.value) 示例 <select name="currency" id="sl_currency" c ...
- PHP数据库登陆注册简单做法
<!DOCTYPE html PUBLIC "-//W3C//DTD XHTML 1.0 Transitional//EN" "http://www.w3.org/ ...
- HDU 1561 树形DP入门
The more, The Better Time Limit: 6000/2000 MS (Java/Others) Memory Limit: 32768/32768 K (Java/Oth ...
- 安装了VS2010 sp1 后再安装ASP.NET MVC 3.0的问题
安装了VS2010 sp1 后再安装ASP.NET MVC 3.0的问题(Final Result: Installation failed with error code: (0x80070643) ...
- C++不用任何算术运算符实现整数加法
这本是careerup的一道题,看到了以后自己做了一下,主要的难点就是加法里面的进位.直接上代码: int add(int a, int b) { ; }; int first = a, second ...
- 二叉搜索树 C++代码实现
暂未发现什么bug,如果发现请指出. #include<iostream> using namespace std; //定义二叉搜索树的结点 struct Node { int data ...
- CF 628C --- Bear and String Distance --- 简单贪心
CF 628C 题目大意:给定一个长度为n(n < 10^5)的只含小写字母的字符串,以及一个数d,定义字符的dis--dis(ch1, ch2)为两个字符之差, 两个串的dis为各个位置上字符 ...
- [原创]cocos2d-x研习录-第二阶 基本框架
了解完Cocos2D-x的基本概念和概念类之后,是不是有一种蠢蠢欲动的冲动,想要探究Cocos2D-x是如何完成这一切的.接着我将通过对Cocos2D-x自代的HelloCpp项目进行分析,初步了解C ...
- supervisor使用详解
1.什么是supervisorsupervisor是用python写的一个进程管理工具,用来启动,重启,关闭进程. 2.supervisor的安装 pip install supervisor 3.s ...
- spring-实现配置文件读取
spring 实现配置读取 Java 的配置读取方式一般是采用java.utils.Properties 或是apache的Configuration工具:然而 spring 框架内置了配置文件的读取 ...