SpringMVC&Maven进阶
3. SpringMVC
3.1 了解SpringMVC
- 概述
- SpringMVC技术与Servlet技术功能等同,均属于web层开发技术
- 学习路线
- 请求与响应
- REST分割
- SSM整合
- 拦截器
- 目标:
- 掌握基于SpringMVC获取请求参数与响应json数据操作
- 熟练应用基于REST风格的请求路径设置与参数传递
- 能够根据实际业务建立前后端开发通信协议并进行实现
- 基于SSM整合技术开发任意业务模块功能
3.2 SpringMVC简介
3.2.1 SpringMVC概述
- SpringMVC是一种基于Java实现MVC模型的轻量级Web框架
- 优点
- 使用简单,开发便捷(相比于Servlet)
- 灵活性强
3.2.2 SpringMVC入门案例
使用SpringMVC需要先导入SpringMVC坐标与Servlet坐标
<dependencies><!--1.导入坐标--><!--Servlet--><dependency><groupId>javax.servlet</groupId><artifactId>javax.servlet-api</artifactId><version>3.1.0</version><!--由于可能会和tomcat插件冲突,添加范围provided--><scope>provided</scope></dependency><!--SpringMVC--><dependency><groupId>org.springframework</groupId><artifactId>spring-webmvc</artifactId><version>5.2.10.RELEASE</version></dependency></dependencies>
创建SpringMVC控制器类(等同于Servlet功能)
//2.定义controller//2.1 使用@Controller定义bean@Controllerpublic class UserController {//2.2 设置当前操作的访问路径@RequestMapping("/save")//2.3 设置当前操作的返回值类型@ResponseBodypublic String save(){System.out.println("user save..");return "{'module':'Spring MVC'}";}}
初始化SpringMVC环境(同Spring环境),设定SpringMVC加载对应Bean
//3.创建SpringMVC的配置文件,加载Controller对应的bean@Configuration@ComponentScan("com.mark.controller")public class SpringMVC {}
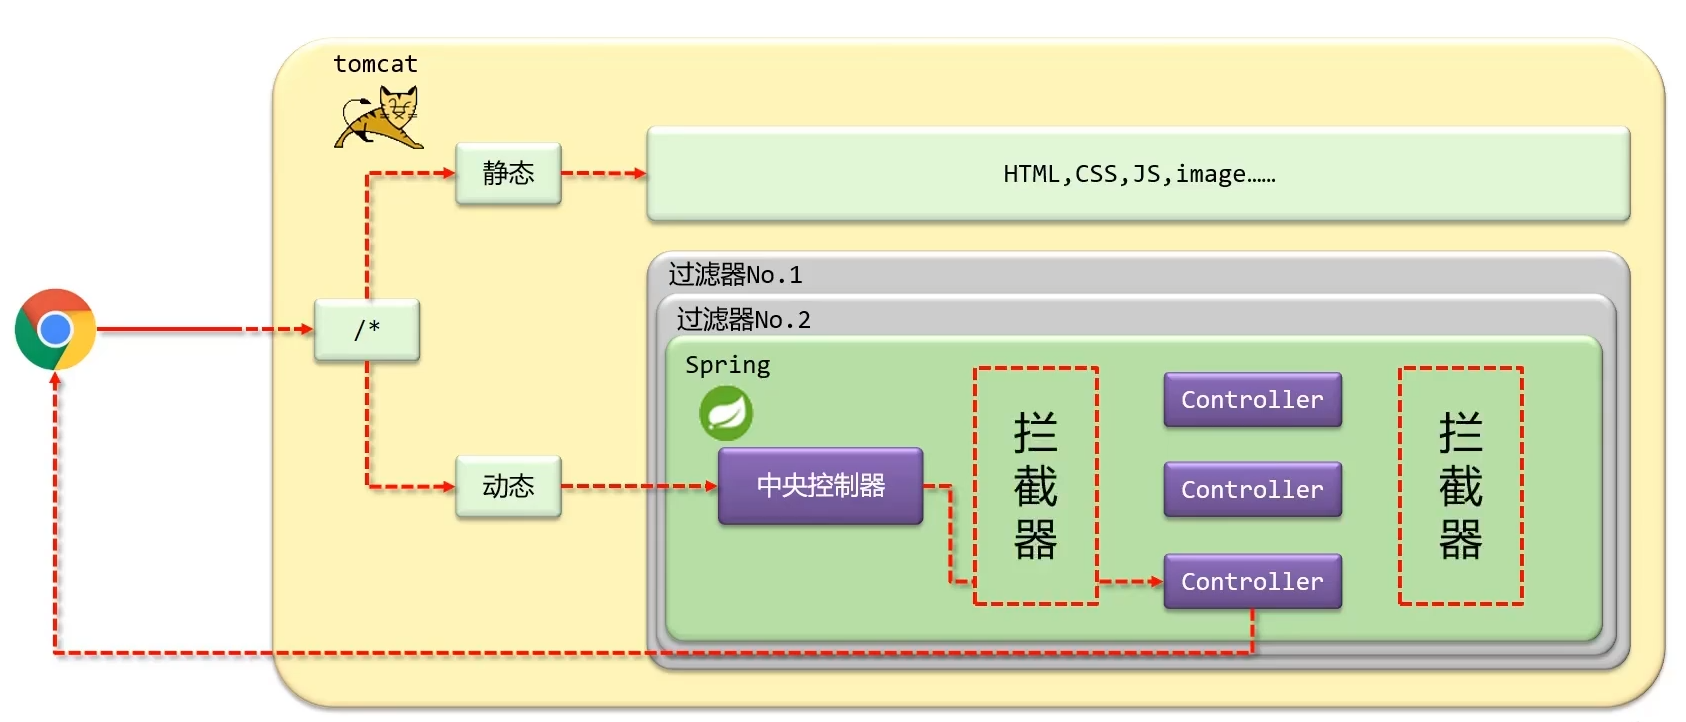
初始化Servlet容器,加载SpringMVC环境,并设置SpringMVC技术处理的请求
//4.定义一个Servlet容器启动的配置类,在里面加载Spring的配置,告知服务器使用SpringMVCpublic class ServletContainerInitConfig extends AbstractDispatcherServletInitializer {//加载SpringMVC容器配置@Overrideprotected WebApplicationContext createServletApplicationContext() {//原来Spring获取容器:ApplicationContext ctx= new AnnotationConfigApplicationContext()//获取容器AnnotationConfigWebApplicationContext ctx = new AnnotationConfigWebApplicationContext();//注册配置ctx.register(SpringMVCConfig.class);return ctx;}//设置哪些请求归属SpringMVC处理@Overrideprotected String[] getServletMappings() {//所有请求都归SpringMVC处理return new String[]{"/"};}//加载Spring容器配置@Overrideprotected WebApplicationContext createRootApplicationContext() {return null;}}
注意:此时web.xml可以删除,之后配置tomcat服务器
<build><plugins><plugin><groupId>org.apache.tomcat.maven</groupId><artifactId>tomcat7-maven-plugin</artifactId><version>2.1</version><configuration><port>80</port><path>/</path></configuration></plugin></plugins></build>
这时浏览器访问http://localhost/save 即可看到结果 {'module':'Spring MVC'}
3.2.3 注解介绍
@Controller
类型:类注解
位置:SpringMVC控制器类定义上方
作用:设定SpringMVC的核心控制器bean
范例:
@Controllerpublic class UserController {}
@RequestMapping
类型:方法注解
位置:SpringMVC控制器方法定义上方
作用:设置当前控制器方法请求访问路径
范例:
@RequestMapping("/save")public void save(){System.out.println("user save ...");}
相关属性
- value(默认):请求访问路径
@ResponseBody
类型:方法注解
位置:SpringMVC控制器方法定义上方
作用:设置当前控制器方法响应内容为当前返回值,无需解析
范例
@RequestMapping("/save")@ResponseBodypublic String save(){System.out.println("user save ...");return "{'info':'springmvc'}";}
3.2.4 SpringMVC入门程序开发总结(1+N)
- 一次性工作
- 创建工程,设置服务器,加载工程
- 导入坐标
- 创建web容器启动类,加载SpringMVC配置,并设置SpringMVC请求拦截路径
- SpringMVC核心配置类(设置配置类,扫描controller包,加载Controller控制器bean)
- 多次工作
- 定义处理请求的控制器类(@Controller)
- 定义处理请求的控制器方法,并配置映射路径(@RequestMapping)与返回json数据(@ResponseBody)
3.2.5 Servlet配置类详解
AbstractDispatcherServletInitializer类是SpringMVC提供的快速初始化Web3.0容器的抽象类AbstractDispatcherServletInitializer提供三个接口方法供用户实现
createServletApplicationContext()方法:
创建Servlet容器时,加载SpringMVC对应的bean并放入WebApplicationContext对象范围中,而WebApplicationContext的作用范围为ServletContext范围,即整个web容器范围@Overrideprotected WebApplicationContext createServletApplicationContext() {//原来Spring获取容器:ApplicationContext ctx= new AnnotationConfigApplicationContext()//获取容器AnnotationConfigWebApplicationContext ctx = new AnnotationConfigWebApplicationContext();//注册配置ctx.register(SpringMVCConfig.class);return ctx;}
getServletMappings()方法:
设定SpringMVC对应的请求映射路径,设置为/表示拦截所有请求,任意请求都将转入到SpringMVC进行处理@Overrideprotected String[] getServletMappings() {//所有请求都归SpringMVC处理return new String[]{"/"};}
createRootApplicationContext()方法:
如果创建Servlet容器时需要加载非SpringMVC对应的bean,使用当前方法进行,使用方式同createServletApplicationContext()。如果没有返回null即可@Overrideprotected WebApplicationContext createRootApplicationContext() {AnnotationConfigWebApplicationContext ctx = new AnnotationConfigWebApplicationContext();ctx.register(SpringConfig.class);return ctx;}
3.2.6 入门案例工作流程分析
启动服务器初始化过程
- 服务器启动,执行ServletContainersInitConfig类,初始化web容器
- 执行createServletApplicationContext方法,创建了WebApplicationContext对象
- 加载SpringMvcConfig
- 执行@ComponentScan加载对应的bean
- 加载UserController,每个@RequestMapping的名称对应一个具体的方法
- 执行getServletMappings方法,定义所有的请求都通过SpringMVC
单次请求过程
- 发送请求localhost/save
- web容器发现所有请求都经过SpringMVC,将请求交给SpringMVC处理
- 解析请求路径/save
- 由/save匹配执行对应的方法save()
- 执行save()
- 检测到有@ResponseBody直接将save()方法的返回值作为响应求体返回给请求方
3.2.7 Controller加载控制与业务bena加载控制
不同的bean由不同的容器管理
- SpringMVC相关的bean:表现层bean
- Spring控制的bean:
- 业务bean(Service)
- 功能bean(DataSource等)
因为功能不同,如何避免Spring错误的加载到SpringMVC的bean?
- 加载Spring控制的bean的时候排除掉SpringMVC控制的bean
不同bean的加载控制:
SpringMVC相关bean加载控制
- SpringMVC加载的bean对应均在com.mark.controller包内
Spring相关bean加载控制
方式一:Spring加载的bean设定扫描范围为com.mark,排除掉controller包内的bean
@Configuration//@ComponentScan({"com.mark.service","com.mark.dao"})//扫描com.mark下的所有,但是按照注解排除掉使用了Controller注解的bean@ComponentScan(value = "com.mark",excludeFilters = @ComponentScan.Filter(type = FilterType.ANNOTATION,classes = Controller.class))public class SpringConfig {}
方式二:Spring加载的bean设定扫描范围为精准范围,例如service包、dao包
@Configuration@ComponentScan({"com.mark.service","com.mark.dao"})public class SpringConfig {}
方式三:不区分Spring与SpringMVC的环境,加载到同一个环境
相关注解介绍
@ComponentScan类型:类注解
范例:
@Configuration@ComponentScan(value = "com.mark",excludeFilters = @ComponentScan.Filter(type = FilterType.ANNOTATION,classes = Controller.class))public class SpringConfig {}
属性
- excludeFilters:排除扫描路径中加载的bean,需要指定类别(type)与具体项(classes)
- includeFilters:加载指定的bean,需要指定类别(type)与具体项(classes)
配置Web容器启动类改进、简化:继承
AbstractAnnotationConfigDispatcherServletInitializer类public class ServletContainerInitConfig extends AbstractAnnotationConfigDispatcherServletInitializer {@Overrideprotected Class<?>[] getRootConfigClasses() {return new Class[]{SpringConfig.class};}@Overrideprotected Class<?>[] getServletConfigClasses() {return new Class[]{SpringMVCConfig.class};}@Overrideprotected String[] getServletMappings() {return new String[]{"/"};}}
3.2.8 PostMan
- PostMan简介
- PostMan是一款功能强大的网页调试与发送网页HTTP请求的Chrome插件
- 作用:常用于进行接口测试
- 特征:
- 简单
- 实用
- 美观
- 大方
- PostMan基础操作
- 注册登录
- 创建/进入工作空间
- 发起请求测试结果
3.3 请求与响应
3.3.1 请求映射路径
思考:
团队多人开发,每个人设置不同的请求路径,冲突如何解决?
设置模块名作为请求路径前缀
@Controllerpublic class BookController {@RequestMapping("/book/save")@ResponseBodypublic String save(){System.out.println("book save ...");return "{'module':'book save'}";}}
@Controller//请求路径前缀@RequestMapping("/user")public class UserController {@RequestMapping("/save")@ResponseBodypublic String save() {System.out.println("user save ...");return "{'module':'user save'}";}@RequestMapping("/delete")@ResponseBodypublic String delete() {System.out.println("user delete ...");return "{'module':'user delete'}";}}
注解介绍
名称:
@RequestMapping类型:方法注解 类注解
位置:SpringMVC控制器方法定义上方
作用:设置当前控制器方法请求访问路径,如果设置在类上统一设置当前控制器方法请求访问路径前缀
范例:
@Controller@RequestMapping("/book")public class BookController {@RequestMapping("/save")@ResponseBodypublic String save() {System.out.println("book save ...");return "{'module':'book save'}";}}
属性
- value(默认):请求访问路径,或访问路径前缀
3.3.2 各种请求参数传递
请求方式
- Get请求
- Post请求
Get请求参数
普通参数:url地址传参,地址参数名与形参变量名相同,定义形参即可接收参数
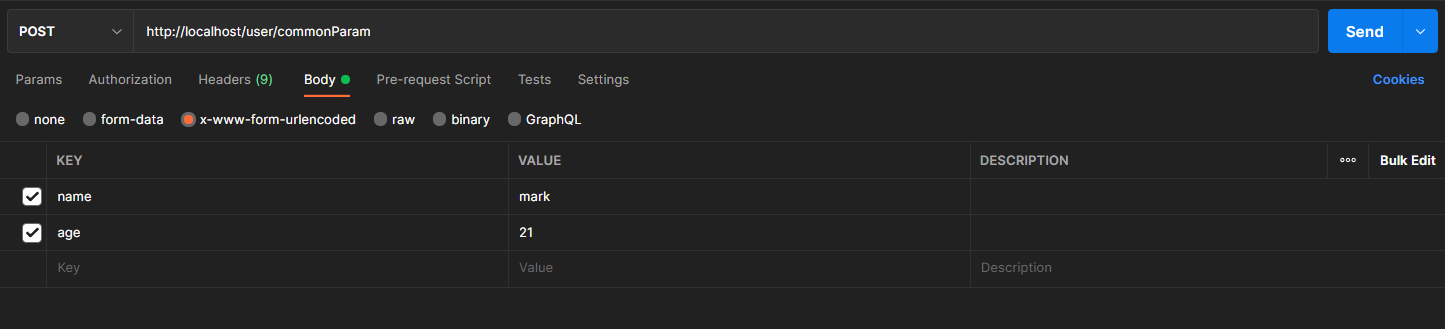
@Controller@RequestMapping("/user")public class UserController {//普通参数@RequestMapping("/commonParam")@ResponseBodypublic String commonParam(String name,int age){System.out.println("普通参数传递 name ==>"+name);System.out.println("普通参数传递 age ==>"+age);return "{'module':'common param'}";}}
请求参数名与形参变量名不同,使用
@RequestParam绑定参数关系@Controller@RequestMapping("/user")public class UserController {//普通参数@RequestMapping("/commonParam")@ResponseBodypublic String commonParam(@RequestParam("name") String username,int age){System.out.println("普通参数传递 name ==>"+username);System.out.println("普通参数传递 age ==>"+age);return "{'module':'common param'}";}}
这时发送请求的名字为name,username可以接收到name的值
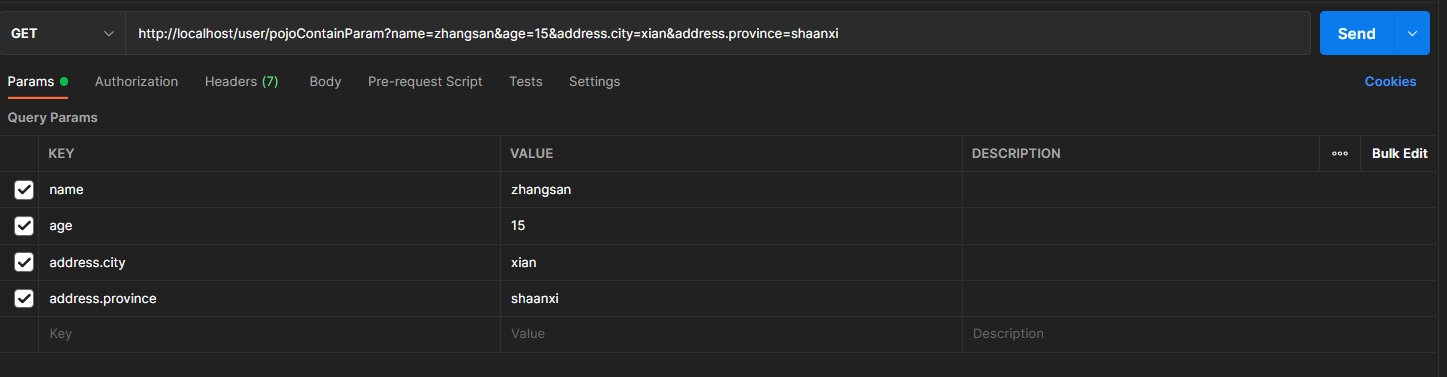
POJO参数:请求参数名与形参对象属性名相同,定义POJO类型形参即可接收参数
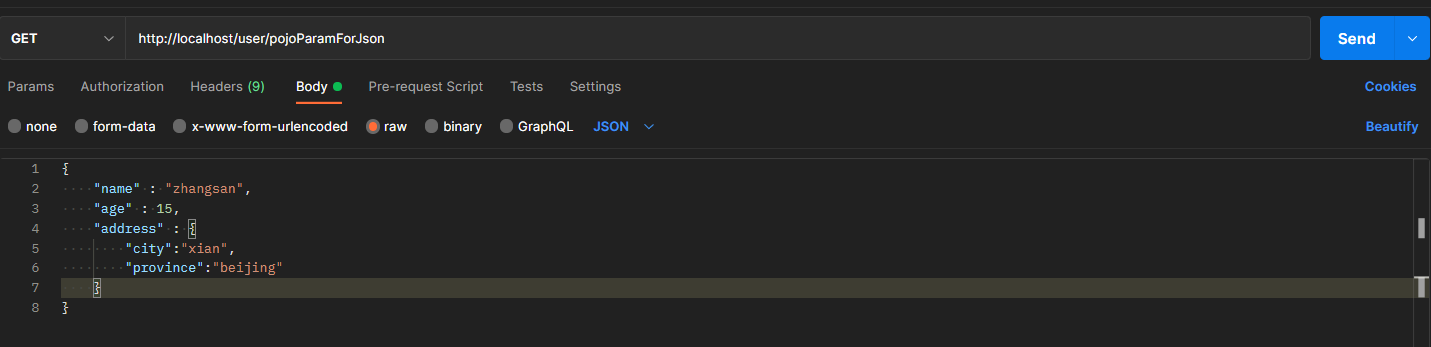
//POJO参数@RequestMapping("/pojoParam")@ResponseBodypublic String pojoParam(User user){System.out.println("POJO参数传递 user ==>"+user);return "{'module':'pojo param'}";}
嵌套POJO参数:POJO对象中包含POJO对象
请求参数名与形参对象属性名相同,按照对象层次结构关系即可接收嵌套POJO属性参数public class User {private String name;private int age;private Address address;}
public class Address {private String province;private String city;}
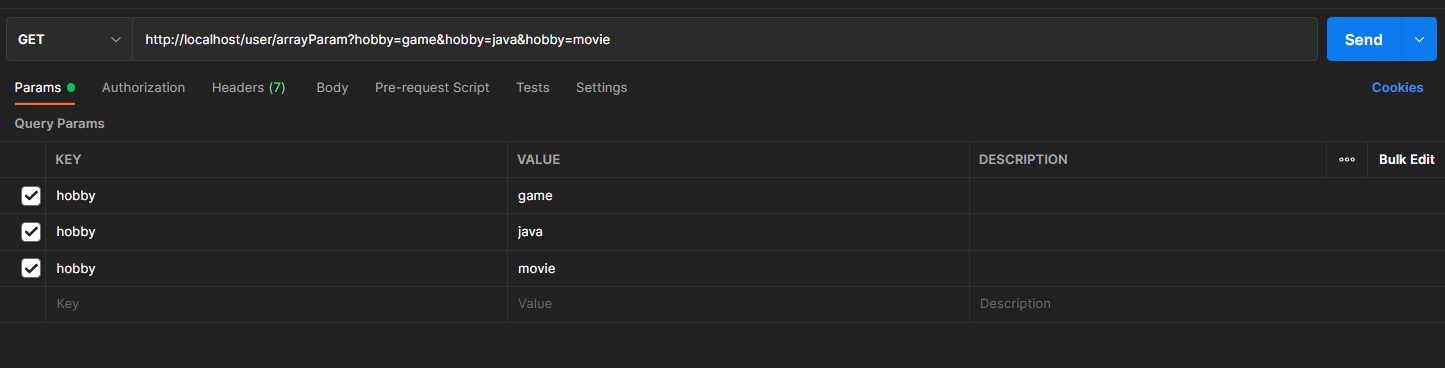
数组参数:请求参数名与形参数组名相同且请求参数为多个,定义数组类型形参即可接收参数
@RequestMapping("arrayParam")@ResponseBodypublic String arrayParam(String[] hobby){System.out.println(("数组参数传递 hobby ==> "+ Arrays.toString(hobby)));return "{'module':'array param'}";}
集合保存普通参数:请求参数名与形参集合对象名相同且请求参数为多个,@RequestParam绑定参数关系
@RequestMapping("listParam")@ResponseBodypublic String listParam(@RequestParam List<String> hobby){System.out.println("集合参数传递 hobby ==> "+ hobby);return "{'module':'list param'}";}
Post请求参数
普通参数:form表单post请求传参,表单参数名与形参变量名相同,定义形参即可接收参数,代码与Get相同。
Post请求中文乱码处理
在Servlet启动类配置中添加过滤器
//乱码处理@Overrideprotected Filter[] getServletFilters() {CharacterEncodingFilter filter = new CharacterEncodingFilter();filter.setEncoding("UTF-8");return new Filter[]{filter};}
其他类型与Get方式规则一样
3.3.3 响应json数据
添加json数据转换相关坐标
<dependency><groupId>com.fasterxml.jackson.core</groupId><artifactId>jackson-databind</artifactId><version>2.9.0</version></dependency>
设置发送json数据(请求body中添加json数据)
开启json数据格式的自动转换,在配置类中开启
@EnableWebMvc@Configuration@ComponentScan("com.mark.controller")@EnableWebMvcpublic class SpringMvcConfig {}
使用
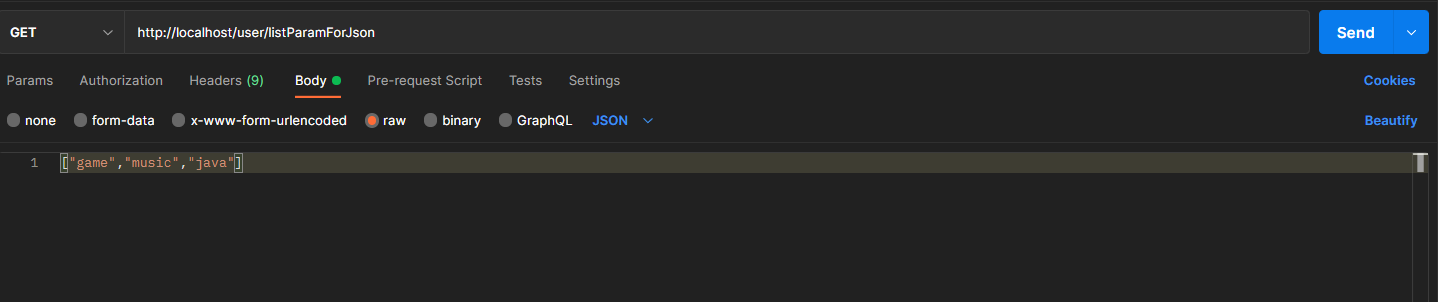
@RequestBody注解将外部传递的json数组数据映射到形参的集合对象中作为数据集合类数据:
@RequestMapping("/listParamForJson")@ResponseBodypublic String listParamForJson(@RequestBody List<String> hobby){System.out.println("list common(json)参数传递 list ==> "+hobby);return "{'module':'list common for json param'}";}
POJO类数据:json数据与形参对象属性名相同,定义POJO类型形参即可接收参数
@RequestMapping("/pojoParamForJson")@ResponseBodypublic String pojoParamForJson(@RequestBody User user){System.out.println("pojo(json)参数传递 user ==> "+user);return "{'module':'pojo for json param'}";}
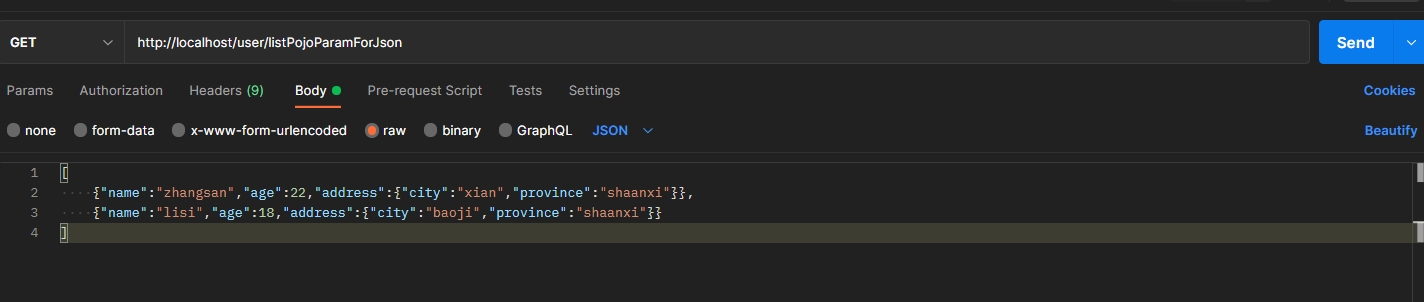
POJO集合参数
@RequestMapping("/listPojoParamForJson")@ResponseBodypublic String listPojoParamForJson(@RequestBody List<User> list){System.out.println("list pojo(json)参数传递 list ==> "+list);return "{'module':'list pojo for json param'}";}
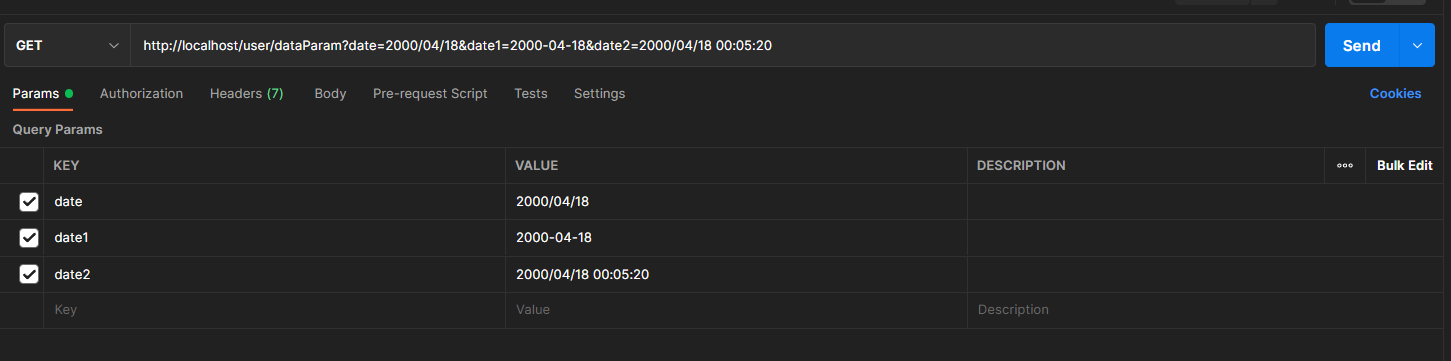
3.3.4 日期类型参数传递
- 日期类型数据基于不同系统 格式也不尽相同
- 2000-04-18
- 2000/04/18
- 04/18/2000
- 接收形参时,根据不同的日期格式设置不同的接收方式,默认格式:yyyy/MM/dd。实用
@DateTimeFormat设定日期时间型数据格式,属性:pattern = 日期时间格式字符串
@RequestMapping("/dataParam")@ResponseBodypublic String dataParam(Date date,@DateTimeFormat(pattern="yyyy-MM-dd") Date date1,@DateTimeFormat(pattern="yyyy/MM/dd HH:mm:ss") Date date2){System.out.println("参数传递 date ==> "+date);System.out.println("参数传递 date1(yyyy-MM-dd) ==> "+date1);System.out.println("参数传递 date2(yyyy/MM/dd HH:mm:ss) ==> "+date2);return "{'module':'data param'}";}/*参数传递 date ==> Tue Apr 18 00:00:00 CST 2000参数传递 date1(yyyy-MM-dd) ==> Tue Apr 18 00:00:00 CST 2000参数传递 date2(yyyy/MM/dd HH:mm:ss) ==> Tue Apr 18 00:05:20 CST 2000*/
3.3.5 响应
响应页面(了解)
返回值为String类型,设置返回值为页面名称,即可实现页面跳转
@RequestMapping("/toJumpPage")public String toJumpPage(){System.out.println("跳转页面");return "page.jsp";}
响应数据
文本数据(了解)
返回值为String类型,设置返回值为任意字符串信息,即可实现返回指定字符串信息,需要依赖@ResponseBody注解
@RequestMapping("/toText")@ResponseBodypublic String toText(){System.out.println("返回纯文本数据");return "response text";}
json数据(重点)
响应POJO对象
返回值为实体类对象,设置返回值为实体类类型,即可实现返回对应对象的json数据,需要依赖@ResponseBody注解和@EnableWebMvc注解
@RequestMapping("/toJsonPOJO")@ResponseBodypublic User toJsonPOJO(){System.out.println("返回json对象数据");User user = new User();user.setName("itcast");user.setAge(15);return user;}
响应POJO集合对象
返回值为集合对象,设置返回值为集合类型,即可实现返回对应集合的json数组数据,需要依赖@ResponseBody注解和@EnableWebMvc注解
@RequestMapping("/toJsonList")@ResponseBodypublic List<User> toJsonList(){System.out.println("返回json集合数据");User user1 = new User();user1.setName("传智播客");user1.setAge(15);User user2 = new User();user2.setName("黑马程序员");user2.setAge(12);List<User> userList = new ArrayList<User>();userList.add(user1);userList.add(user2);return userList;}
3.4 REST风格
3.4.1 REST风格简介
- REST(Representational State Transfer),表现形式状态转换
- 优点:
- 书写简化
- 隐藏资源的访问行为,无法通过地址得知对资源是何种操作
- 按照REST风格访问资源时使用行为动作区分对资源进行了何种操作
- http://localhost/users:查询全部用户信息 GET(查询)
- http://localhost/users/1:查询指定用户信息 GET(查询)
- http://localhost/users:添加用户信息 POST(新增/保存)
- http://localhost/users:修改用户信息 PUT(修改/更新)
- http://localhost/users/1:删除用户信息 DELETE(删除)
- 上述行为是约定方式,约定不是规范,可以打破,所以称REST风格,而不是REST规范。
描述模块的名称通常使用复数,也就是加s的格式描述,表示此类资源,而非单个资源,例如:users、books、accounts…… - 根据REST风格对资源进行访问称为RESTful
3.4.2 RESTful入门案例
步骤:
修改@RequestMapping路径为模块名称复数
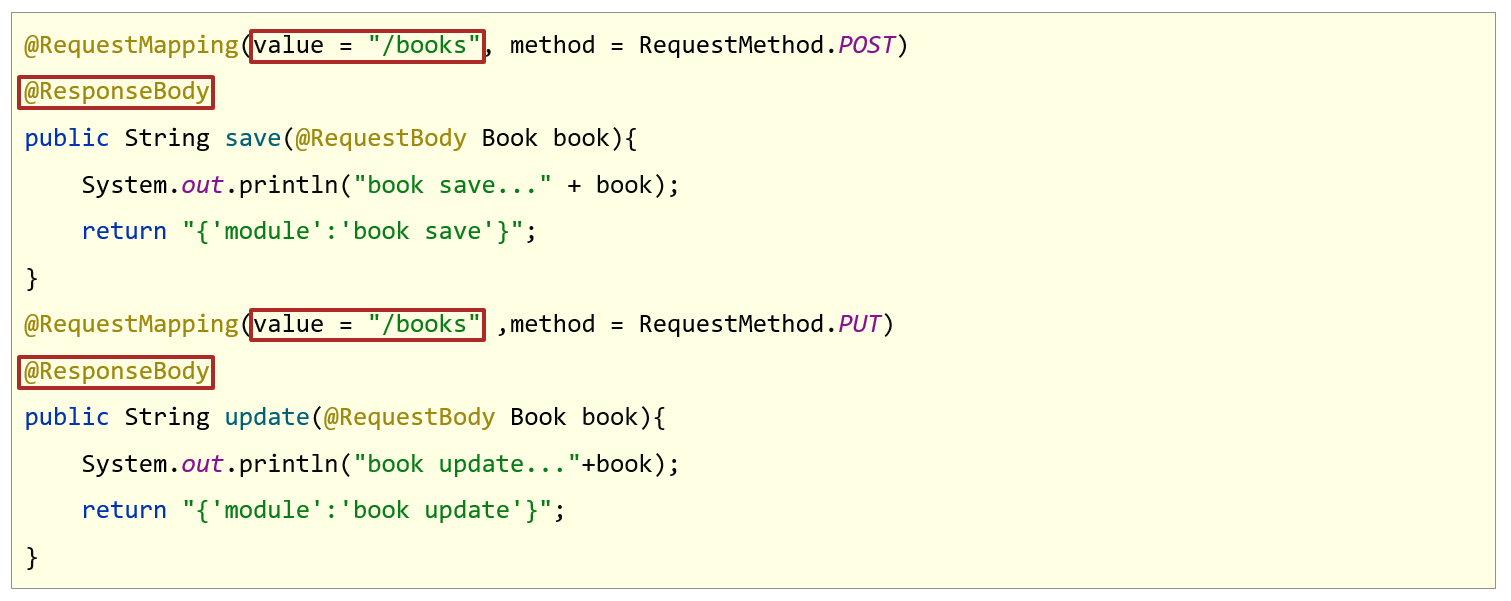
@RequestMapping("/users")设置请求行为(http请求动作)
@RequestMapping(value = "/users",method = RequestMethod.POST)设定请求参数(路径变量)
@RequestMapping(value = "/users/{id}",method = RequestMethod.DELETE)@ResponseBodypublic String delete(@PathVariable Integer id) {System.out.println("user delete..." + id);return "{'module':'user delete'}";}
实现:
@Controllerpublic class UserController {//设置当前请求方法为POST,表示REST风格中的添加操作@RequestMapping(value = "/users",method = RequestMethod.POST)@ResponseBodypublic String save(@RequestBody User user) {System.out.println("user save..."+user);return "{'module':'user save'}";}//设置当前请求方法为DELETE,表示REST风格中的删除操作//@PathVariable注解用于设置路径变量(路径参数),要求路径上设置对应的占位符,并且占位符名称与方法形参名称相同@RequestMapping(value = "/users/{id}",method = RequestMethod.DELETE)@ResponseBodypublic String delete(@PathVariable Integer id) {System.out.println("user delete..." + id);return "{'module':'user delete'}";}//设置当前请求方法为PUT,表示REST风格中的修改操作@RequestMapping(value = "/users",method = RequestMethod.PUT)@ResponseBodypublic String update(@RequestBody User user) {System.out.println("user update..." + user);return "{'module':'user update'}";}//设置当前请求方法为GET,表示REST风格中的查询操作//@PathVariable注解用于设置路径变量(路径参数),要求路径上设置对应的占位符,并且占位符名称与方法形参名称相同@RequestMapping(value = "/users/{id}",method = RequestMethod.GET)@ResponseBodypublic String getById(@PathVariable Integer id) {System.out.println("user getById..." + id);return "{'module':'user getById'}";}//设置当前请求方法为GET,表示REST风格中的查询操作@RequestMapping( value = "/users",method = RequestMethod.GET)@ResponseBodypublic String getAll() {System.out.println("user getAll...");return "{'module':'user getAll'}";}}
POST、DELETE、PUT、GET分别对应增删改查
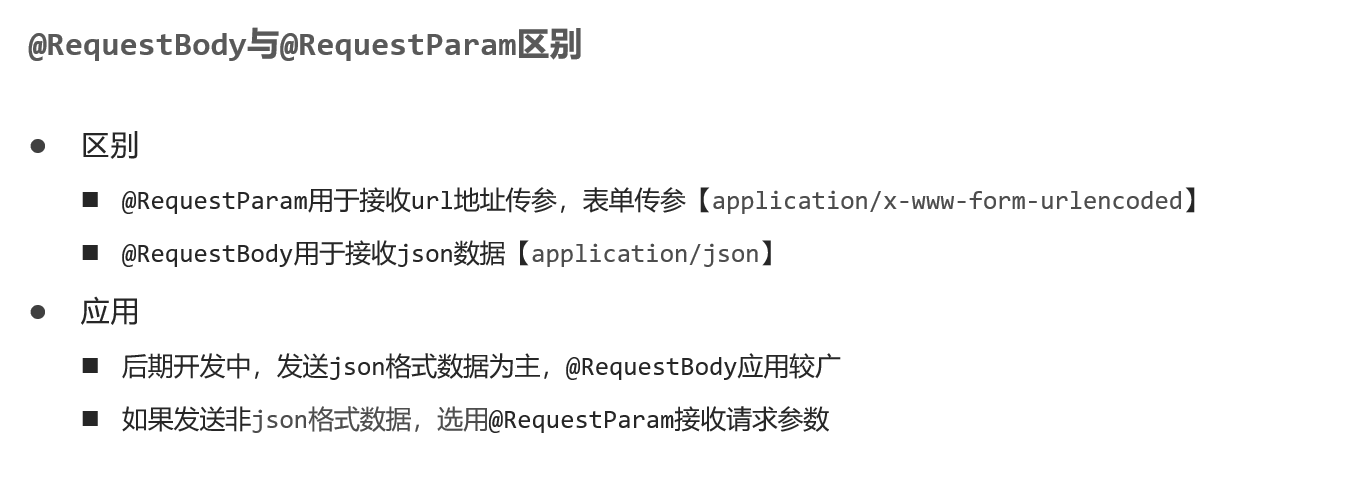
@PathVariable注解用于设置路径变量(路径参数),要求路径上设置对应的占位符,并且占位符名称与方法形参名称相同截至目前,见到过的接收参数注解有三种
- @RequestParam:用于接收url地址传参或表单传参 绑定参数
- @RequestBody:用于接收json数据映射到形参中作为数据
- @PathVariable:用于接收路径参数,@RequestMapping中使用{参数名称}描述路径参数
应用
- 后期开发中,发送请求参数超过1个时,以json格式为主,@RequestBody应用较广
- 采用RESTful进行开发,当参数数量较少时,例如1个,可以采用@PathVariable接收请求路径变量,通常用于传递id值
- 如果发送非json格式数据,选用@RequestParam接收请求参数
3.4.3 REST快速开发
在上面的案例中,有很多重复编写的代码
将每个方法的value中的模块名提取到类前
将每个方法的@ResponseBody提取到类前
而类的@Controller和@ResponseBody可以合并成@RestController
每个方法@PostMapping中的请求行为设置可以用对应的@xxxMapping注解替换
//@Controller//@ResponseBody配置在类上可以简化配置,表示设置当前每个方法的返回值都作为响应体//@ResponseBody@RestController//使用@RestController注解替换@Controller与@ResponseBody注解,简化书写@RequestMapping("/books")public class BookController {//@RequestMapping( method = RequestMethod.POST)@PostMapping//使用@PostMapping简化Post请求方法对应的映射配置public String save(@RequestBody Book book) {System.out.println("book save..." + book);return "{'module':'book save'}";}//@RequestMapping(value = "/{id}" ,method = RequestMethod.DELETE)@DeleteMapping("/{id}")//使用@DeleteMapping简化DELETE请求方法对应的映射配置public String delete(@PathVariable Integer id) {System.out.println("book delete..." + id);return "{'module':'book delete'}";}//@RequestMapping(method = RequestMethod.PUT)@PutMapping//使用@PutMapping简化Put请求方法对应的映射配置public String update(@RequestBody Book book) {System.out.println("book update..." + book);return "{'module':'book update'}";}//@RequestMapping(value = "/{id}" ,method = RequestMethod.GET)@GetMapping("/{id}")//使用@GetMapping简化GET请求方法对应的映射配置public String getById(@PathVariable Integer id) {System.out.println("book getById..." + id);return "{'module':'book getById'}";}//@RequestMapping(method = RequestMethod.GET)@GetMapping//使用@GetMapping简化GET请求方法对应的映射配置public String getAll() {System.out.println("book getAll...");return "{'module':'book getAll'}";}}
3.4.4 案例:基于RESTful页面数据交互
POSTMan实现后台接口开发
@RestController@RequestMapping("/books")public class BookController {/*** 保存新增数据* @param book* @return*/@PostMappingpublic String save(@RequestBody Book book) {System.out.println("book save" + book);return "{'module':'book save success'}";}/*** 获取全部* @return*/@GetMappingpublic List<Book> getAll() {Book book1 = new Book();book1.setType("计算机");book1.setName("SpringMVC入门");book1.setDescription("我是小白");Book book2 = new Book();book2.setType("计算机");book2.setName("SpringMVC实战");book2.setDescription("我是大佬");List<Book> list = new ArrayList<Book>();list.add(book1);list.add(book2);return list;}}
实现页面数据交互:
由于在访问静态资源页面时,SpringMVC的Sevlet容器配置中设置了protected String[] getServletMappings() { return new String[]{"/"};}会拦截所有请求,导致无法打开页面
因此创建SpringMvcSupport配置类,设置对静态资源的访问放行
@Configurationpublic class SpringMVCSupport extends WebMvcConfigurationSupport {@Overrideprotected void addResourceHandlers(ResourceHandlerRegistry registry) {//当访问/pages/???的时候,不要走MVC,走/pages目录下的内容registry.addResourceHandler("/pages/**").addResourceLocations("/pages/");registry.addResourceHandler("/css/**").addResourceLocations("/css/");registry.addResourceHandler("/js/**").addResourceLocations("/js/");registry.addResourceHandler("/plugins/**").addResourceLocations("/plugins/");}}
前端页面通过异步提交访问后台控制器
//添加saveBook() {axios.post("/books", this.formData).then((res) => {});},//主页列表查询getAll() {axios.get("/books").then((res) => {this.dataList = res.data;});},
3.5 SSM整合
3.5.1 整合配置
创建工程
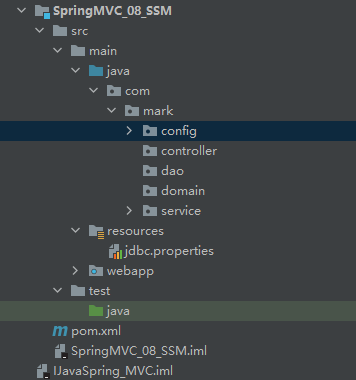
SSM整合
Spring
SpringConfig
@Configuration@ComponentScan({"com.mark.service"})@PropertySource("classpath:jdbc.properties")@Import({JdbcConfig.class,MybatisConfig.class})public class SpringConfig {}
MyBatis
JdbcConfig
public class JdbcConfig {@Value("${jdbc.driver}")private String driver;@Value("${jdbc.url}")private String url;@Value("${jdbc.username}")private String username;@Value("${jdbc.password}")private String password;@Beanpublic DataSource dataSource() {DruidDataSource dataSource = new DruidDataSource();dataSource.setDriverClassName(driver);dataSource.setUrl(url);dataSource.setUsername(username);dataSource.setPassword(password);return dataSource;}}
MyBatisConfig
public class MybatisConfig {@Beanpublic SqlSessionFactoryBean sqlSessionFactory(DataSource dataSource) {SqlSessionFactoryBean factoryBean = new SqlSessionFactoryBean();factoryBean.setDataSource(dataSource);factoryBean.setTypeAliasesPackage("com.mark.domain");return factoryBean;}@Beanpublic MapperScannerConfigurer mapperScannerConfigurer() {MapperScannerConfigurer msc = new MapperScannerConfigurer();msc.setBasePackage("com.mark.dao");return msc;}}
jdbc.properties
jdbc.driver=com.mysql.cj.jdbc.Driverjdbc.url=jdbc:mysql://localhost:3306/ssm_dbjdbc.username=rootjdbc.password=123
SpringMVC
SpringMVCConfig
@Configuration@ComponentScan({"com.mark.controller","com.mark.config"})@EnableWebMvcpublic class SpringMvcConfig {}
ServletConfig
public class ServletConfig extends AbstractAnnotationConfigDispatcherServletInitializer {@Overrideprotected Class<?>[] getRootConfigClasses() {return new Class[]{SpringConfig.class};}@Overrideprotected Class<?>[] getServletConfigClasses() {return new Class[]{SpringMvcConfig.class};}@Overrideprotected String[] getServletMappings() {return new String[]{"/"};}@Overrideprotected Filter[] getServletFilters() {CharacterEncodingFilter characterEncodingFilter =new CharacterEncodingFilter();characterEncodingFilter.setEncoding("UTF-8");return new Filter[]{characterEncodingFilter};}}
SpringMVCSupport
@Configurationpublic class SpringMvcSupport extends WebMvcConfigurationSupport {@Overrideprotected void addResourceHandlers(ResourceHandlerRegistry registry) {registry.addResourceHandler("/pages/**").addResourceLocations("/pages/");registry.addResourceHandler("/js/**").addResourceLocations("/js/");registry.addResourceHandler("/css/**").addResourceLocations("/css/");registry.addResourceHandler("/plugins/**").addResourceLocations("/plugins/");}}
3.5.2 功能模块开发
表与实体类
创建表:
-- ------------------------------ Table structure for tbl_book-- ----------------------------DROP TABLE IF EXISTS `tbl_book`;CREATE TABLE `tbl_book` (`id` int(11) NOT NULL AUTO_INCREMENT,`type` varchar(20) CHARACTER SET utf8 COLLATE utf8_general_ci NULL DEFAULT NULL,`name` varchar(50) CHARACTER SET utf8 COLLATE utf8_general_ci NULL DEFAULT NULL,`description` varchar(255) CHARACTER SET utf8 COLLATE utf8_general_ci NULL DEFAULT NULL,PRIMARY KEY (`id`) USING BTREE) ENGINE = InnoDB AUTO_INCREMENT = 13 CHARACTER SET = utf8 COLLATE = utf8_general_ci ROW_FORMAT = Dynamic;-- ------------------------------ Records of tbl_book-- ----------------------------INSERT INTO `tbl_book` VALUES (1, '计算机理论', 'Spring实战 第5版', 'Spring入门经典教程,深入理解Spring原理技术内幕');INSERT INTO `tbl_book` VALUES (2, '计算机理论', 'Spring 5核心原理与30个类手写实战', '十年沉淀之作,手写Spring精华思想');INSERT INTO `tbl_book` VALUES (3, '计算机理论', 'Spring 5 设计模式', '深入Spring源码剖析Spring源码中蕴含的10大设计模式');INSERT INTO `tbl_book` VALUES (4, '计算机理论', 'Spring MVC+MyBatis开发从入门到项目实战', '全方位解析面向Web应用的轻量级框架,带你成为Spring MVC开发高手');INSERT INTO `tbl_book` VALUES (5, '计算机理论', '轻量级Java Web企业应用实战', '源码级剖析Spring框架,适合已掌握Java基础的读者');INSERT INTO `tbl_book` VALUES (6, '计算机理论', 'Java核心技术 卷I 基础知识(原书第11版)', 'Core Java 第11版,Jolt大奖获奖作品,针对Java SE9、10、11全面更新');INSERT INTO `tbl_book` VALUES (7, '计算机理论', '深入理解Java虚拟机', '5个维度全面剖析JVM,大厂面试知识点全覆盖');INSERT INTO `tbl_book` VALUES (8, '计算机理论', 'Java编程思想(第4版)', 'Java学习必读经典,殿堂级著作!赢得了全球程序员的广泛赞誉');INSERT INTO `tbl_book` VALUES (9, '计算机理论', '零基础学Java(全彩版)', '零基础自学编程的入门图书,由浅入深,详解Java语言的编程思想和核心技术');INSERT INTO `tbl_book` VALUES (10, '市场营销', '直播就该这么做:主播高效沟通实战指南', '李子柒、李佳琦、薇娅成长为网红的秘密都在书中');INSERT INTO `tbl_book` VALUES (11, '市场营销', '直播销讲实战一本通', '和秋叶一起学系列网络营销书籍');INSERT INTO `tbl_book` VALUES (12, '市场营销', '直播带货:淘宝、天猫直播从新手到高手', '一本教你如何玩转直播的书,10堂课轻松实现带货月入3W+');
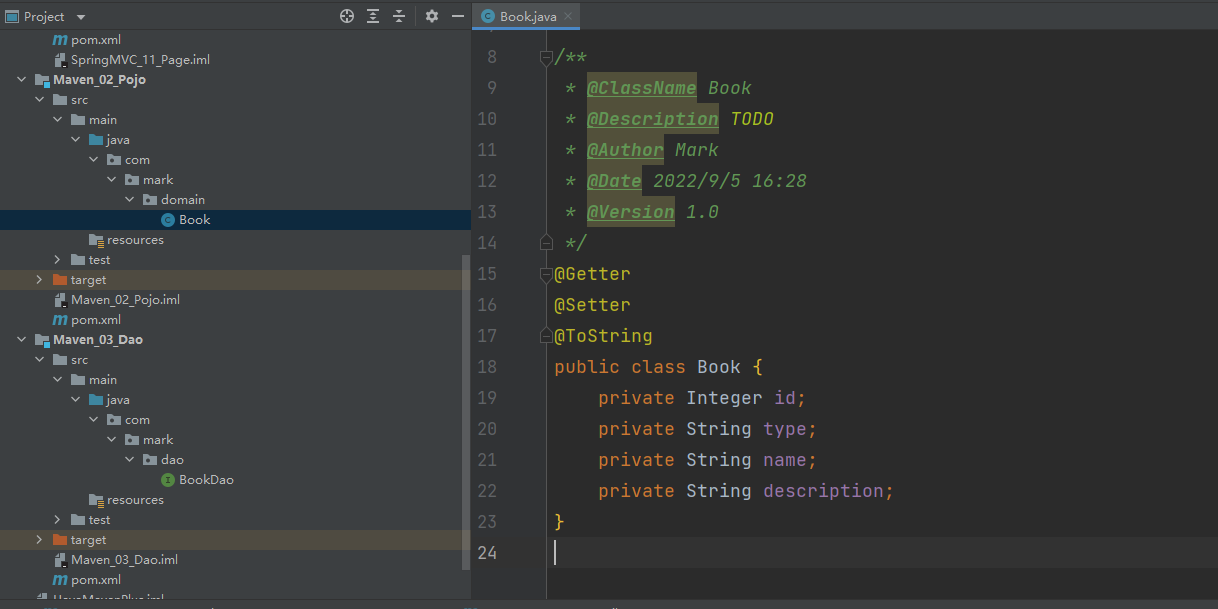
实体类:
@Getter@Setter@ToStringpublic class Book {private Integer id;private String type;private String name;private String description;}
创建好所有的接口和实现类
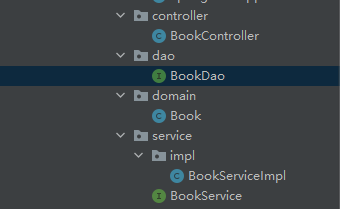
dao(接口+自动代理实现)
public interface BookDao {//@Insert("insert into tbl_book values (null,#{type},#{name},#{description})")//上面语句中type指的是Book类的属性名,id需要为null//下面语句中第一个type指的是表里的属性名 第二个type指的是Book类的属性名,不需要为id赋值/*** 保存* @param book*/@Insert("insert into tbl_book (type, name, description) values (#{type}, #{name}, #{description})")public void save(Book book);/*** 修改/更新* @param book*/@Update("update tbl_book set type = #{type}, name = #{name}, description = #{description} where id = #{id}")public void update(Book book);/*** 删除* @param id*/@Delete("delete from tbl_book where id = #{id}")public void delete(Integer id);/*** 根据id获取book* @param id* @return*/@Select("select id, type, name, description from tbl_book where id = #{id}")public Book getById(Integer id);/*** 获取所有book* @return*/@Select("select id, type, name, description from tbl_book")public List<Book> getAll();}
service(接口+实体类)
public interface BookService {/*** 保存* @param book*/public boolean save(Book book);/*** 修改/更新* @param book*/public boolean update(Book book);/*** 根据id删除* @param id*/public boolean delete(Integer id);/*** 根据id查询* @param id* @return*/public Book getById(Integer id);/*** 获取所有* @return*/public List<Book> getAll();}
@Servicepublic class BookServiceImpl implements BookService {@Autowiredprivate BookDao bookDao;@Overridepublic boolean save(Book book) {bookDao.save(book);return true;}@Overridepublic boolean update(Book book) {bookDao.update(book);return true;}@Overridepublic boolean delete(Integer id) {bookDao.delete(id);return true;}@Overridepublic Book getById(Integer id) {//Book book = bookDao.getById(id);//return book;return bookDao.getById(id);}@Overridepublic List<Book> getAll() {return bookDao.getAll();}}
controller
@RestController@RequestMapping("/books")public class BookController {@Autowiredprivate BookService bookService;/*** 保存* @param book*/@PostMappingpublic boolean save(@RequestBody Book book) {return bookService.save(book);}/*** 修改/更新* @param book*/@PutMappingpublic boolean update(@RequestBody Book book) {return bookService.update(book);}/*** 根据id删除* @param id*/@DeleteMapping("/{id}")public boolean delete(@PathVariable Integer id) {return bookService.delete(id);}/*** 根据id查询* @param id* @return*/@GetMapping("/{id}")public Book getById(@PathVariable Integer id) {return bookService.getById(id);}/*** 获取所有* @return*/@GetMappingpublic List<Book> getAll() {return bookService.getAll();}}
3.5.3 接口测试
业务层接口测试(整合Junit)
@RunWith(SpringJUnit4ClassRunner.class)@ContextConfiguration(classes = SpringConfig.class)public class BookServiceTest {@Autowiredprivate BookService bookService;@Testpublic void testGetById() {Book book = bookService.getById(2);System.out.println(book);}@Testpublic void testGetAll() {List<Book> list = bookService.getAll();System.out.println(list);}}
表现层接口测试(PostMan)
3.5.4 添加事务
在Spring配置类中打开使用注解式事务驱动
@EnableTransactionManagement在JDBC配置类中添加事务管理器配置
PlatformTransactionManager@Beanpublic PlatformTransactionManager transactionManager(DataSource dataSource){DataSourceTransactionManager ptm = new DataSourceTransactionManager();ptm.setDataSource(dataSource);return ptm;}
给要添加事务的实现类的接口添加注解
@Transactional
3.5.5 表现层数据封装协议
前端接收数据格式
增删改:true
查单条:
{"id": 1,"type": "计算机理论","name": "Spring实战 第5版","description": "Spring入门经典教程,深入理解Spring原理技术内幕"}
查全部:
[{"id": 1,"type": "计算机理论","name": "Spring实战 第5版","description": "Spring入门经典教程,深入理解Spring原理技术内幕"},{"id": 2,"type": "计算机理论","name": "Spring 5核心原理与30个类手写实战","description": "十年沉淀之作,手写Spring精华思想"}]
统一格式,前端接收数据格式:封装数据到data属性中,封装操作到code属性中,封装特殊消息到message(msg)属性中
增删改:
{"code":20031"data":true}
查单条:
{"code":20041"data":{"id": 1,"type": "计算机理论","name": "Spring实战 第5版","description": "Spring入门经典教程,深入理解Spring原理技术内幕"}}
查单条数据为空
{"code":20040"data":null"msg":"数据查询失败,请重试!"}
查全部:
{"code":20041"data":[{"id": 1,"type": "计算机理论","name": "Spring实战 第5版","description": "Spring入门经典教程,深入理解Spring原理技术内幕"},{"id": 2,"type": "计算机理论","name": "Spring 5核心原理与30个类手写实战","description": "十年沉淀之作,手写Spring精华思想"}]}
设置统一数据返回结果类
public class Result {private Object data;private Integer code;private String msg;}
- Result类中的字段并不是固定的,可以根据需要自行删减
- 提供若干个构造方法,方便操作
3.5.5 表现层与前端数据传输数据协议实现
添加Result结果数据
@Getter@Setterpublic class Result {private Object data;private Integer code;private String msg;public Result(Integer code, Object data, String msg) {this.data = data;this.code = code;this.msg = msg;}public Result(Integer code, Object data) {this.data = data;this.code = code;}public Result() {}}
修改Controller的return数据
@RestController@RequestMapping("/books")public class BookController {@Autowiredprivate BookService bookService;/*** 保存* @param book*/@PostMappingpublic Result save(@RequestBody Book book) {boolean flag = bookService.save(book);return new Result(flag ? Code.SAVE_OK : Code.SAVE_ERR, flag);}/*** 修改/更新* @param book*/@PutMappingpublic Result update(@RequestBody Book book) {boolean flag = bookService.update(book);return new Result(flag ? Code.UPDATE_OK : Code.UPDATE_ERR, flag);}/*** 根据id删除* @param id*/@DeleteMapping("/{id}")public Result delete(@PathVariable Integer id) {boolean flag = bookService.delete(id);return new Result(flag ? Code.DELETE_OK : Code.DELETE_ERR, flag);}/*** 根据id查询* @param id* @return*/@GetMapping("/{id}")public Result getById(@PathVariable Integer id) {Book book = bookService.getById(id);Integer code = book != null ? Code.GET_OK : Code.GET_ERR;String msg = book != null ? "" : "数据查询失败,请重试";return new Result(code, book, msg);}/*** 获取所有* @return*/@GetMappingpublic Result getAll() {List<Book> books = bookService.getAll();Integer code = books.isEmpty() ? Code.GET_OK : Code.GET_ERR;String msg = books.isEmpty() ? "" : "数据查询失败,请重试";return new Result(code, books, msg);}}
3.5.6 异常处理器
程序开发过程中不可避免的会遇到异常现象
出现异常现象的常见位置与常见诱因如下
- 框架内部抛出的异常:因使用不合规导致
- 数据层抛出的异常:因外部服务器故障导致(例如:服务器访问超时)
- 业务层抛出的异常:因业务逻辑书写错误导致(例如:遍历业务书写操作,导致索引异常等)
- 表现层抛出的异常:因数据收集、校验等规则导致(例如:不匹配的数据类型间导致异常)
- 工具类抛出的异常:因工具类书写不严谨不够健壮导致(例如:必要释放的连接长期未释放等)
各个层级都会出现异常,异常处理代码书写在哪一层?
- 所有的异常均抛出到表现层进行处理
表现层处理异常,每个方法中单独书写,代码书写量巨大且意义不强,如何解决?
- AOP思想
异常处理器
- 集中的、统一的处理项目中出现的异常
@RestControllerAdvicepublic class ProjectExceptionAdvice {@ExceptionHandler(Exception.class)public Result doException(Exception ex){System.out.println("异常别跑");return new Result(666,null,"异常别跑");}}
@RestControllerAdvice:声明一个类作为异常处理器
@ExceptionHandler:定义当前方法处理哪一种异常
项目异常分类
- 业务异常(BusinessException)
- 规范的用户行为产生的异常
- 不规范的用户行为操作产生的异常
- 系统异常(SystemException)
- 项目运行过程中可预计且无法避免的异常
- 其他异常(Exception)
- 编程人员未预期到的异常
- 业务异常(BusinessException)
项目异常处理方案
- 业务异常(BusinessException)
- 发送对应消息传递给用户,提醒规范操作
- 系统异常(SystemException)
- 发送固定消息传递给用户,安抚用户
- 发送特定消息给运维人员,提醒维护
- 记录日志
- 其他异常(Exception)
- 发送固定消息传递给用户,安抚用户
- 发送特定消息给编程人员,提醒维护(纳入预期范围内)
- 记录日志
- 业务异常(BusinessException)
实现:
新建exception包
创建Exception类,自定义系统、业务级异常
@Getter@Setterpublic class SystemException extends RuntimeException {private Integer code;public SystemException(Integer code, String message) {super(message);this.code = code;}public SystemException(Integer code, String message, Throwable cause) {super(message, cause);this.code = code;}}
@Getter@Setterpublic class BusinessException extends RuntimeException{private Integer code;public BusinessException(Integer code, String message) {super(message);this.code = code;}public BusinessException(Integer code, String message, Throwable cause) {super(message, cause);this.code = code;}}
自定义异常编码
public class Code {public static final Integer SYS_ERR = 50001;public static final Integer SYS_TIMEOUT_ERR = 50002;public static final Integer SYS_UNKNOW_ERR = 59999;public static final Integer Business_ERR = 60002;}
将可能出现的异常进行包装,转换成自定义异常,触发自定义异常
@Overridepublic Book getById(Integer id) {if (id == 1){throw new BusinessException(Code.Business_ERR,"请不要乱来!");}//将可能出现的异常进行包装,转换成自定义异常try {int i = 1 / 0;}catch (Exception e){throw new SystemException(Code.SYS_TIMEOUT_ERR,"服务器访问超时,请重试",e);}return bookDao.getById(id);}
在异常处理器中分别进行处理
@RestControllerAdvicepublic class ProjectExceptionAdvice {@ExceptionHandler(SystemException.class)public Result doSystemException(SystemException ex){//记录日志//发送消息给运维//发送邮件给开发文件,ex对象发送给开发人员return new Result(ex.getCode(),null,ex.getMessage());}@ExceptionHandler(BusinessException.class)public Result doBusinessException(BusinessException ex){return new Result(ex.getCode(),null,ex.getMessage());}@ExceptionHandler(Exception.class)public Result doException(Exception ex){//记录日志//发送消息给运维//发送邮件给开发文件,ex对象发送给开发人员return new Result(Code.SYS_UNKNOW_ERR,null,"系统繁忙,请稍后再试");}}
3.5.7 前后台协议联调
列表功能
getAll() {//发送ajax请求axios.get("/books").then((res)=>{this.dataList = res.data.data;})},
添加功能
//弹出添加窗口handleCreate() {this.dialogFormVisible = true;},
//添加handleAdd() {//发送ajax请求axios.post("/books", this.formData).then((res) => {//console.log(res.data)if (res.data.code == 20011){//如果操作成功,关闭弹窗,显示数据this.dialogFormVisible = false;this.$message.success("添加成功")}else if (res.data.code ==20010){this.$message.error("添加失败")}else {this.$message.error(res.data.msg)}}).finally(()=>{this.getAll();})},
//重置表单resetForm() {this.formData = {}},
//弹出添加窗口handleCreate() {this.dialogFormVisible = true;this.resetForm();},
修改功能
//弹出编辑窗口handleUpdate(row) {//查询数据,根据id查询axios.get("/books/"+row.id).then((res)=>{if (res.data.code== 20041){//展示弹层,加载数据this.formData = res.data.data;this.dialogFormVisible4Edit = true;}else{this.$message.error(res.data.msg)}})},
//编辑handleEdit() {//发送ajax请求axios.put("/books", this.formData).then((res) => {//如果操作成功,关闭弹层,显示数据if (res.data.code == 20031){this.dialogFormVisible4Edit = false;this.$message.success("修改成功")}else if (res.data.code ==20030){this.$message.error("修改失败")}else {this.$message.error(res.data.msg)}}).finally(()=>{this.getAll();})},
删除功能
// 删除handleDelete(row) {//弹出提示框this.$confirm("此操作不可逆,永久删除数据,是否继续", "提示", {type: 'info'}).then(() => {//删除业务//查询数据,根据id查询axios.delete("/books/" + row.id).then((res) => {if (res.data.code == 20021) {this.$message.success("删除成功")} else {this.$message.error("删除失败")}}).finally(() => {this.getAll();});}).catch(() => {//取消删除this.$message.info("取消删除操作")});}
3.6 拦截器
3.6.1 拦截器概念
- 拦截器(Interceptor)是一种动态拦截方法调用的机制,在SpringMVC中动态拦截控制器方法的执行
- 作用
- 在指定的方法调用前后执行预先设定的代码
- 组织原始方法的执行
- 拦截器和过滤器的区别
- 归属不同:Filter属于Servlet技术,Interceptor属于SpringMVC技术
- 拦截内容不同:Filter对所有访问进行增强,Interceptor仅针对SpringMVC的访问进行增强
3.6.2 入门案例
制作拦截器功能类:声明拦截器的bean,并实现HanderInterceptor接口(注意:扫描加载bean)
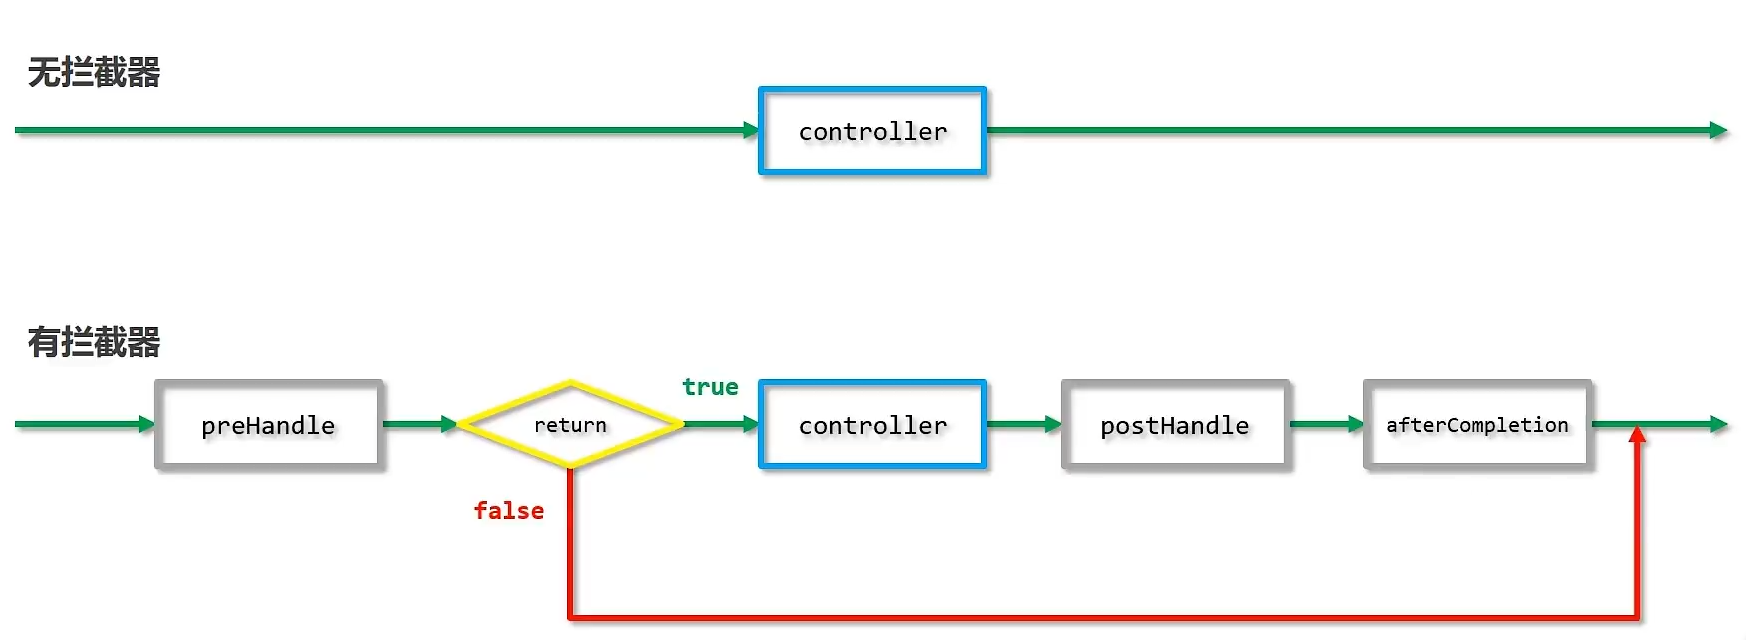
@Componentpublic class ProjectInterceptor implements HandlerInterceptor {//在原始被拦截之前运行的代码@Overridepublic boolean preHandle(HttpServletRequest request, HttpServletResponse response, Object handler) throws Exception {System.out.println("preHandle");//false时,只执行preHandle,终止原始操作的运行return true;}//在原始被拦截之后运行的代码@Overridepublic void postHandle(HttpServletRequest request, HttpServletResponse response, Object handler, ModelAndView modelAndView) throws Exception {System.out.println("postHandle");}//在原始被拦截之后运行的代码并且在post之后@Overridepublic void afterCompletion(HttpServletRequest request, HttpServletResponse response, Object handler, Exception ex) throws Exception {System.out.println("afterCompletion");}}
配置拦截器的执行位置:定义配置类,继承WebMvcConfigurationSupport,实现addInterceptor方法设定拦截的访问路径(注意:扫描加载配置)
@Configurationpublic class SpringMVCSupport extends WebMvcConfigurationSupport {@Autowiredprivate ProjectInterceptor projectInterceptor;@Overrideprotected void addResourceHandlers(ResourceHandlerRegistry registry) {registry.addResourceHandler("/pages/**").addResourceLocations("/pages");}//可以配置多个拦截路径@Overrideprotected void addInterceptors(InterceptorRegistry registry) {registry.addInterceptor(projectInterceptor).addPathPatterns("/books","/books/*");}}
在访问books时输出:
preHandlebook save...Book{书名='haha', 价格=200.0}postHandleafterCompletion
简化开发:
不需要SpringMVCSupport类,直接在SpringMvcConfig中实现(侵入式较强)
@Configuration@ComponentScan({"com.mark.controller"})@EnableWebMvcpublic class SpringMvcConfig implements WebMvcConfigurer {@Autowiredprivate ProjectInterceptor projectInterceptor;@Overridepublic void addInterceptors(InterceptorRegistry registry) {registry.addInterceptor(projectInterceptor).addPathPatterns("/books","/books/*");}}
3.6.3 拦截器参数
前置处理
@Overridepublic boolean preHandle(HttpServletRequest request, HttpServletResponse response, Object handler) throws Exception {String contentType = request.getHeader("Content-Type");HandlerMethod hm=(HandlerMethod) handler;hm.getMethod();System.out.println("preHandle..."+contentType);return true;}
- 参数
- request:请求对象
- response:响应对象
- handler:被调用的处理器对象,本质上是一个方法对象,对反射技术中的Method对象进行了再包装
- 返回值
- 返回值为false,被拦截的处理器将不再执行
后置处理
@Overridepublic void postHandle(HttpServletRequest request, HttpServletResponse response, Object handler, ModelAndView modelAndView) throws Exception {System.out.println("postHandle...");}
- 参数
- modelAndView:如果处理器执行完成具有返回结果,可以读取到对应数据与页面信息,并进行调整
完成后处理
@Overridepublic void afterCompletion(HttpServletRequest request, HttpServletResponse response, Object handler, Exception ex) throws Exception {System.out.println("afterCompletion");}
- 参数
- ex:如果处理器执行过程中出现异常对象,可以针对异常情况精选单独处理
3.6.4 拦截器链配置
当配置多个拦截器时,形成拦截器链
配置两个拦截器后运行顺序:
preHandle...preHandle...222book getById...1postHandle...222postHandle...afterCompletion...222afterCompletion
先进后出
拦截器链的运行顺序参照拦截器添加顺序为准
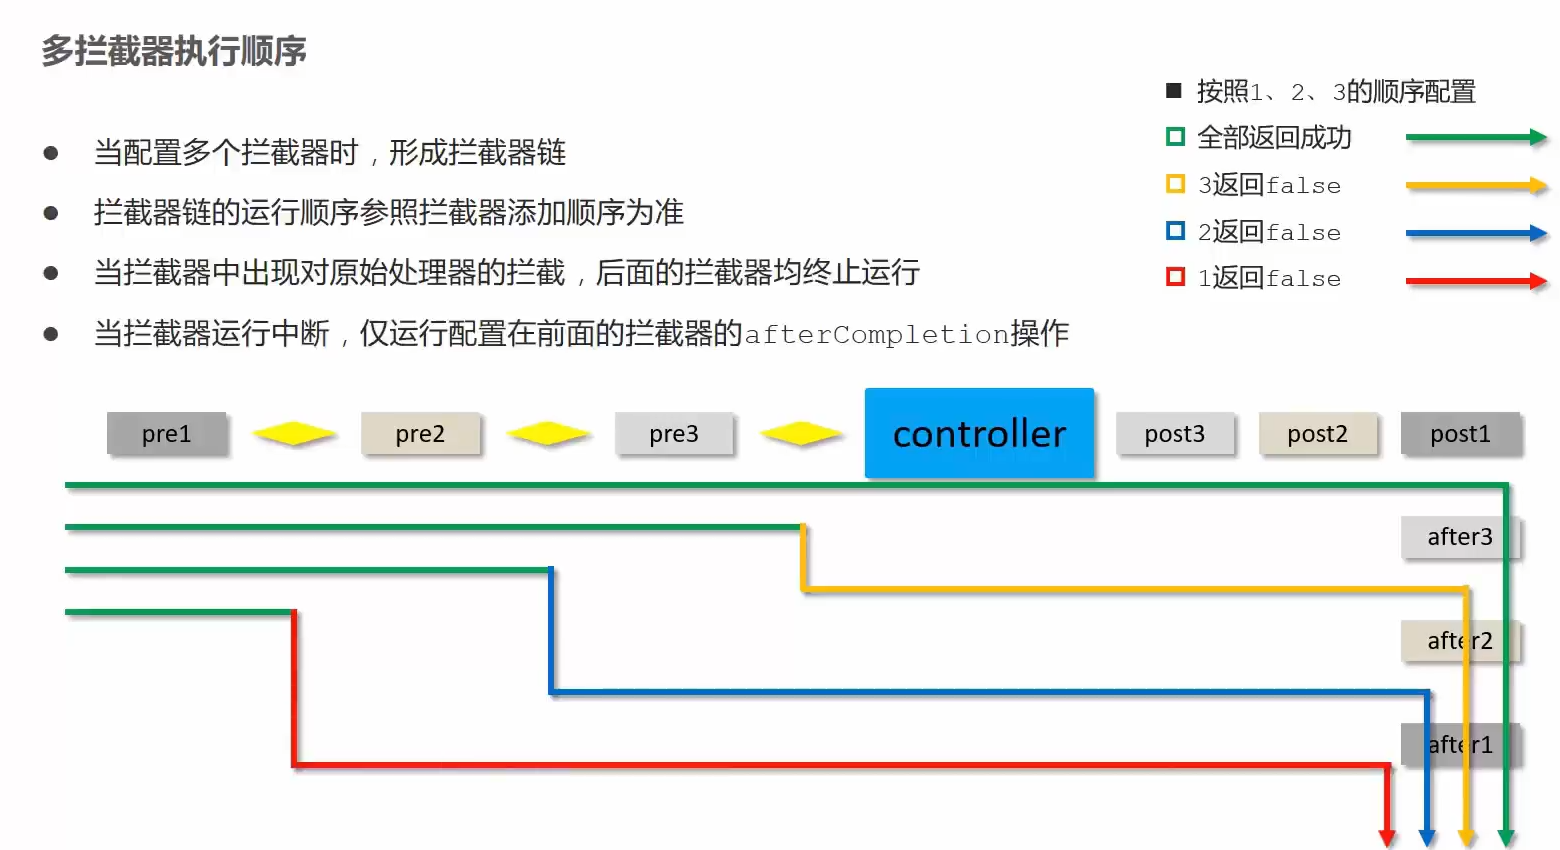
拦截器运行中断,post都不会执行
4. Maven进阶
4.1 分模块开发与设计
分模块开发意义
- 将原始模块按照功能拆分成若干个子模块,方便模块间的相互调用,接口共享
分模块开发步骤
- 创建Maven模块
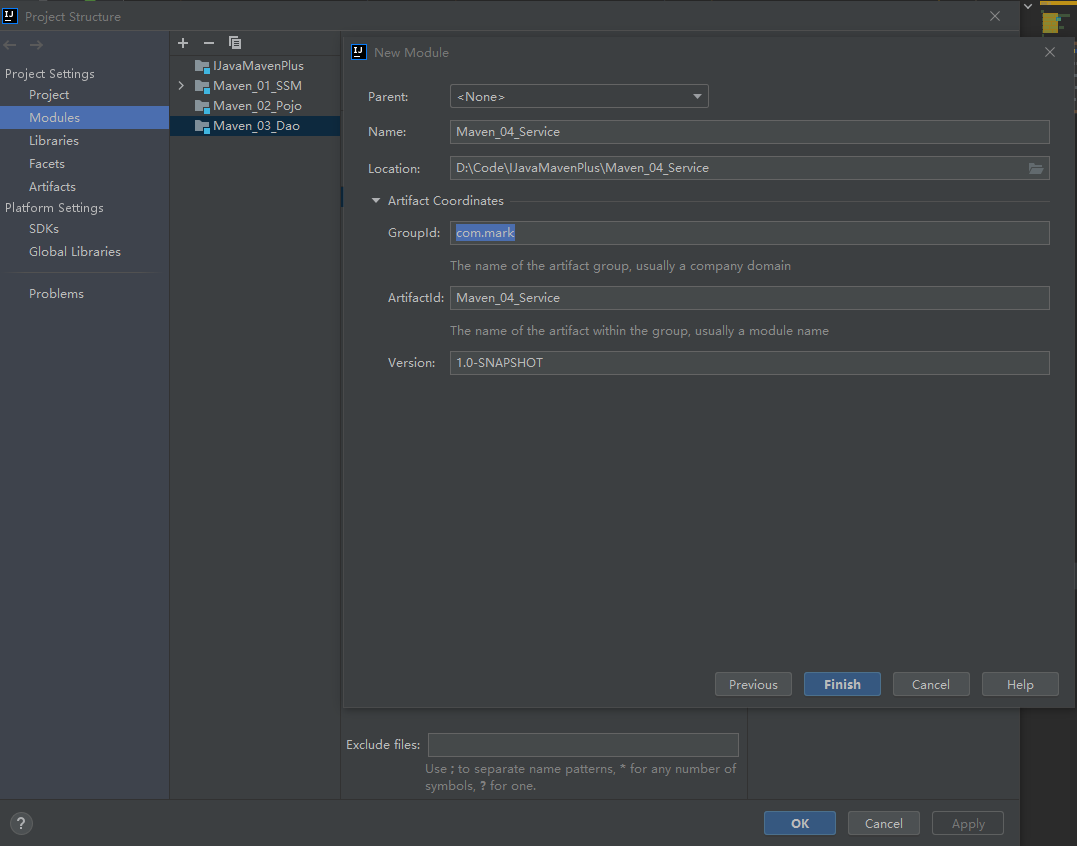
书写模块代码
分模块开发需要先针对模块功能进行设计,再进行编码。不会先将工程开发完毕,然后进行拆分
通过maven指令安装模块到本地仓库(install命令)
团队内部开发需要发布模块到团队内部可共享的仓库中(私服)
在主项目pom中引入各个模块坐标
4.2 依赖管理
依赖指当前项目运行所需的jar,一个项目可以设置多个依赖
格式:
<!--设置当前项目所依赖的所有jar--><dependencies><!--设置具体的依赖--><dependency><!--依赖所属群组的id--><groupId>com.mark</groupId><!--依赖所属项目的id--><artifactId>Maven_02_Pojo</artifactId><!--依赖版本号--><version>1.0-SNAPSHOT</version></dependency><dependency><groupId>org.springframework</groupId><artifactId>spring-webmvc</artifactId><version>5.2.10.RELEASE</version></dependency></dependencies>
依赖传递
- 依赖具有传递性
- 直接依赖:在当前项目中通过依赖配置建立的依赖关系
- 间接依赖:被建立依赖关系的资源如果依赖其他资源,当前项目简介依赖其他资源
- 依赖具有传递性
依赖传递冲突问题
- 路径优先:当依赖中出现相同的资源时,层级越深,优先级越低,层级越浅,优先级越高
- 声明优先:当资源在相同层级被依赖时,配置顺序靠前的覆盖配置顺序靠后的
- 特殊优先:当同级配置了相同资源的不同版本,后配置的覆盖先配置的
可选依赖:
optional标签。对外隐藏当前资源。——不透明可选依赖是隐藏当前工程所依赖的资源,隐藏后对应资源将不具有依赖传递性
<dependency><groupId>com.mark</groupId><artifactId>Maven_02_Pojo</artifactId><version>1.0-SNAPSHOT</version><!--可选依赖是隐藏当前工程所依赖的资源,隐藏后对应资源将不具有依赖传递性--><optional>true</optional></dependency>
排除依赖:主动端来依赖的资源。——不需要
在引入其他模块坐标时,该有不需要的依赖可使用排除依赖标签
exclusions,被排除的资源无需指定版本<dependency><groupId>com.mark</groupId><artifactId>Maven_03_Dao</artifactId><version>1.0-SNAPSHOT</version><!--隐藏当前资源对应的依赖关系--><exclusions><exclusion><groupId>log4j</groupId><artifactId>log4j</artifactId></exclusion></exclusions></dependency>
可选依赖和排除依赖区别:
- 可选依赖:控制当前模块资源能不能被别人发现
- 排除依赖:用别人的资源发现不好的资源可以去掉
4.3 聚合与继承
聚合
聚合就是将多个模块组织成一个整体,同时进行项目构建的过程称为聚合
聚合工程:通常是一个不具有业务功能的“空”工程(有且仅有一个pom文件)
作用:使用聚合工程可以将多个工程编组,通过对聚合工程进行构建,实现对所包含的模块进行同步构建
- 当工程中某个模块发生更新(变更)时,必须保障工程中与已更新模块关联的模块同步更新,此时可以使用聚合工程来解决批量模块同步构建的问题
步骤:
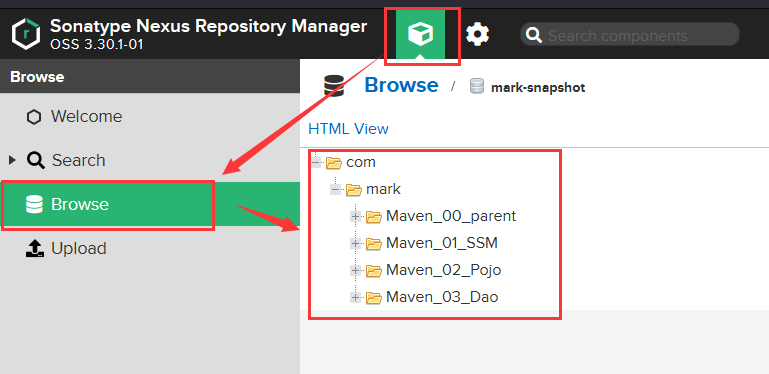
创建新的模块
修改打包方式为pom
<groupId>com.mark</groupId><artifactId>Maven_00_parent</artifactId><version>1.0-SNAPSHOT</version><packaging>pom</packaging>
设置管理的模块名称
<!--设置管理的模块名称--><modules><module>../Maven_01_SSM</module><module>../Maven_02_Pojo</module><module>../Maven_03_Dao</module></modules>
继承
概念:继承描述的是两个工程间的关系,与java中的继承相似,子工程可以继承父工程中的配置信息,常见于依赖关系的继承。简单来说,父工程的依赖子工程可以使用。
作用:
- 简化配置
- 减少版本冲突
实现:
在父工程的pom中设置打包类型为pom
在父工程的pom文件中配置依赖关系(子工程将沿用父工程的依赖关系)
<dependencies><dependency><groupId>org.springframework</groupId><artifactId>spring-webmvc</artifactId><version>5.2.10.RELEASE</version></dependency><dependency><groupId>org.springframework</groupId><artifactId>spring-test</artifactId><version>5.2.10.RELEASE</version></dependency>......</dependencies>
在父工程中配置子工程可以选择的依赖
<!--定义依赖管理--><dependencyManagement><dependencies><dependency><groupId>junit</groupId><artifactId>junit</artifactId><version>4.12</version><scope>test</scope></dependency></dependencies></dependencyManagement>
在子工程中配置当前工程所继承的父工程
<parent><groupId>com.mark</groupId><artifactId>Maven_00_parent</artifactId><version>1.0-SNAPSHOT</version><!--相对路径,可以快速地找到继承的工程。可以不写--><relativePath>../Maven_00_parent/pom.xml</relativePath></parent>
子工程这时就可以使用父工程的依赖,同时还可以配置父工程中可选的依赖坐标
<dependencies><dependency><groupId>junit</groupId><artifactId>junit</artifactId><scope>test</scope></dependency></dependencies>
子工程中使用父工程中的可选依赖时,仅需要提供群组id和项目id,无需提供版本,版本由父工程统一提供,避免版本冲突
子工程中还可以定义父工程中没有定义的依赖关系
聚合与继承的区别
- 作用
- 聚合用于快速构建项目
- 继承用于快速配置
- 相同点:
- 聚合与继承的pom.xml文件打包方式均为pom,可以将两种关系制作到同一个pom文件中
- 聚合与继承均属于设计型模块,并无实际的模块内容
- 不同点:
- 聚合是在当前模块中配置关系,聚合可以感知到参与聚合的模块有哪些
- 继承是在子模块中配置关系,父模块无法感知哪些子模块继承了自己
- 作用
4.4 属性管理
属性的配置与使用
- 定义属性
<properties><spring.version>5.2.10.RELEASE</spring.version><junit.version>4.12</junit.version></properties>
- 引用属性
<dependencies><dependency><groupId>org.springframework</groupId><artifactId>spring-webmvc</artifactId><version>${spring.version}</version></dependency><dependency><groupId>org.springframework</groupId><artifactId>spring-test</artifactId><version>${spring.version}</version></dependency><dependency><groupId>org.springframework</groupId><artifactId>spring-jdbc</artifactId><version>${spring.version}</version></dependency></dependencies><!--定义依赖管理--><dependencyManagement><dependencies><dependency><groupId>junit</groupId><artifactId>junit</artifactId><version>${junit.version}</version><scope>test</scope></dependency></dependencies></dependencyManagement>
配置文件加载属性
定义属性
<properties><spring.version>5.2.10.RELEASE</spring.version><junit.version>4.12</junit.version><jdbc.url>jdbc:mysql://127.0.0.1:3306/ssm_db</jdbc.url></properties>
配置文件中引用属性
jdbc.driver=com.mysql.cj.jdbc.Driverjdbc.url=${jdbc.url}jdbc.username=rootjdbc.password=123
开启资源文件目录加载属性的过滤器
<build><!--扩大maven构建范围--><resources><resource><!--使指定的目录里的文件可以解析${}的格式--><directory>${project.basedir}/src/main/resources</directory><filtering>true</filtering></resource></resources></build>
配置maven打war包时,可以忽略web.xml的检查
<plugins><plugin><groupId>org.apache.maven.plugins</groupId><artifactId>maven-war-plugin</artifactId><version>3.2.3</version><configuration><failOnMissingWebXml>false</failOnMissingWebXml></configuration></plugin></plugins>
其他属性(了解)
- 属性列表
- 自定义属性(常用)
- 内置属性
- Setting属性
- Java系统属性
- 环境变量属性

- 属性列表
版本管理
- 工程版本:
- SNAPSHOT(快照版本)
- 项目开发过程中临时输出的版本,称为快照版本
- 快照版本会随着开发的进展不断更新
- RELEASE(发布版本)
- 项目开发到进入阶段里程碑后,向团队外部发布较为稳定的版本,这种版本所对应的构件文件是稳定的,即便进行功能的后续开发,也不会改变当前发布版本内容,这种版本称为发布版本
- SNAPSHOT(快照版本)
- 发布版本
- alpha版
- beta版
- 纯数字版
- 工程版本:
4.5 多环境配置与应用
多环境开发
- maven提供配置多种环境的设定,帮助开发者使用过程中快速切换环境
<!--配置多环境开发--><profiles><!--定义开发环境:生产环境--><profile><!--定义环境对应的唯一名称--><id>env_dep</id><!--定义环境中专属的属性值--><properties><jdbc.url>jdbc:mysql://127.1.1.1:3306/ssm_db</jdbc.url></properties><!--设定是否为默认启动环境--><activation><activeByDefault>true</activeByDefault></activation></profile><!--定义开发环境:开发环境--><profile><id>env_pro</id><properties><jdbc.url>jdbc:mysql://127.2.2.2:3306/ssm_db</jdbc.url></properties></profile><!--定义开发环境:测试环境--><profile><id>env_test</id><properties><jdbc.url>jdbc:mysql://127.3.3.3:3306/ssm_db</jdbc.url></properties></profile></profiles>
使用多环境(构建过程)
mvn 指令 -P 环境定义id范例:
mvn install -P env_pro
跳过测试
应用场景
- 功能更新中并且没有开发完毕
- 快速打包
- ......
方式一:快速跳过
方式二:配置跳过
<plugins><plugin><artifactId>maven-surefire-plugin</artifactId><version>2.12.4</version><configuration><!--false:不跳过所有test--><skipTests>false</skipTests><!--排除掉不参与测试的内容--><excludes>**/BookServiceTest.java</excludes></configuration></plugin></plugins>
方式三:命令跳过
mvn package -D skipTests
4.6 私服
私服简介
- 私服就是一台独立的服务器,用于解决团队内部的资源共享与资源同步问题
Nexus
- Sonatype公司的一款maven私服产品
- 下载地址:https://help.sonatype.com/repomanager3/product-information/download
使用:
启动服务器(命令行启动)
nexus.exe /run nexus访问服务器(默认端口8081)
修改基础配置信息
- 安装路径下etc目录中nexus-default.properties文件保存有nexus基础配置信息,例如默认访问端口
修改服务器运行配置信息
- 安装路径下bin目录中nexus.vmoptions文件保存有nexus服务器启动的配置信息,例如默认占用内存空间
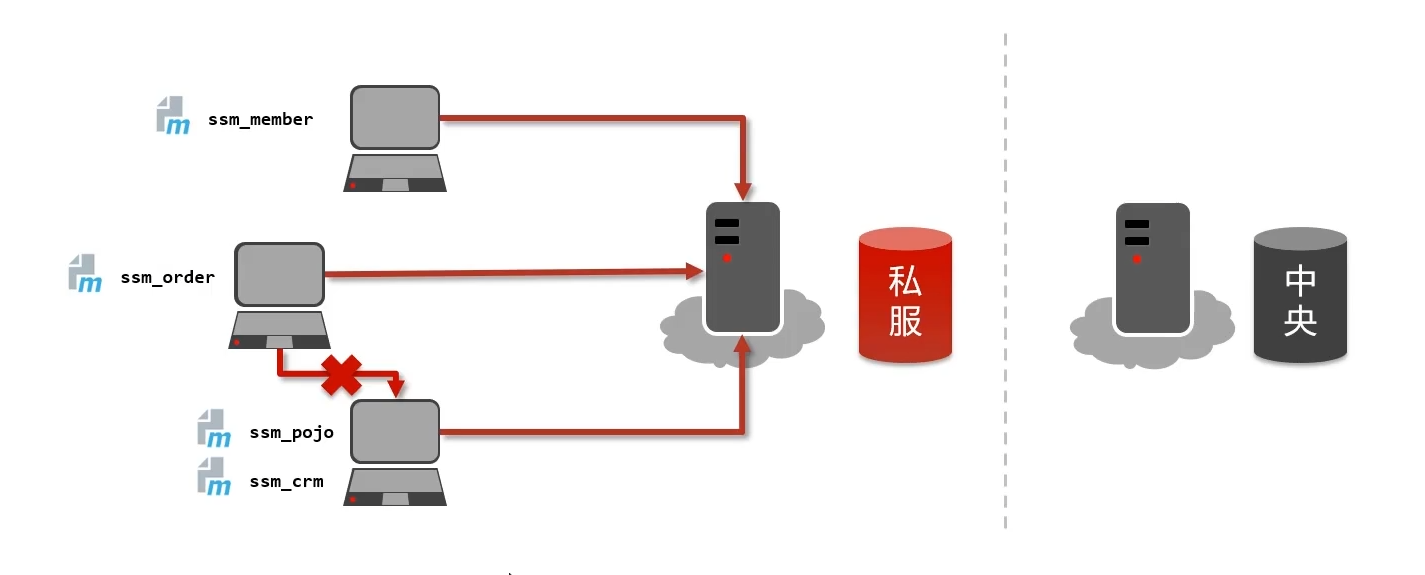
私服仓库分类
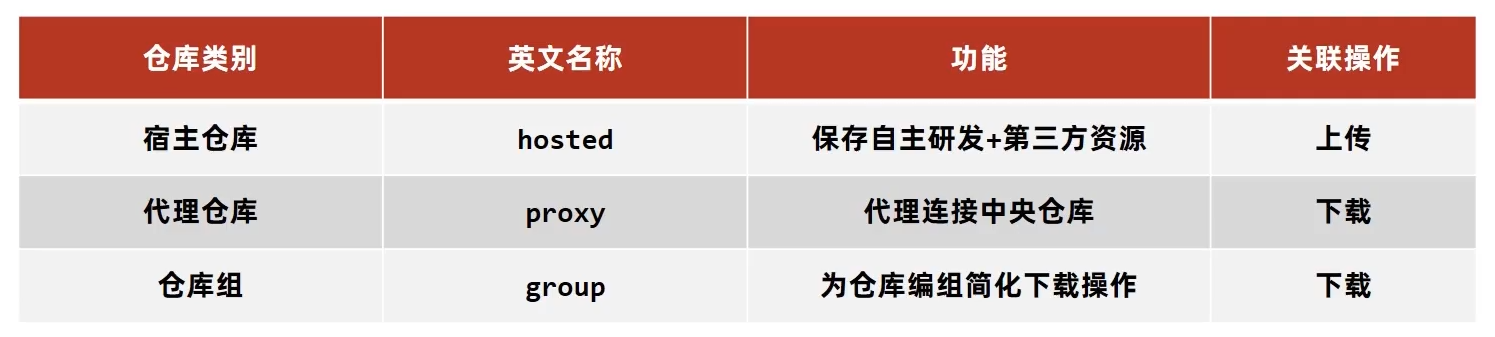
仓库组是小组内共享资源用的,宿主仓库是小组内自己用的,代理仓库是所有项目组公用的
资源上传与下载

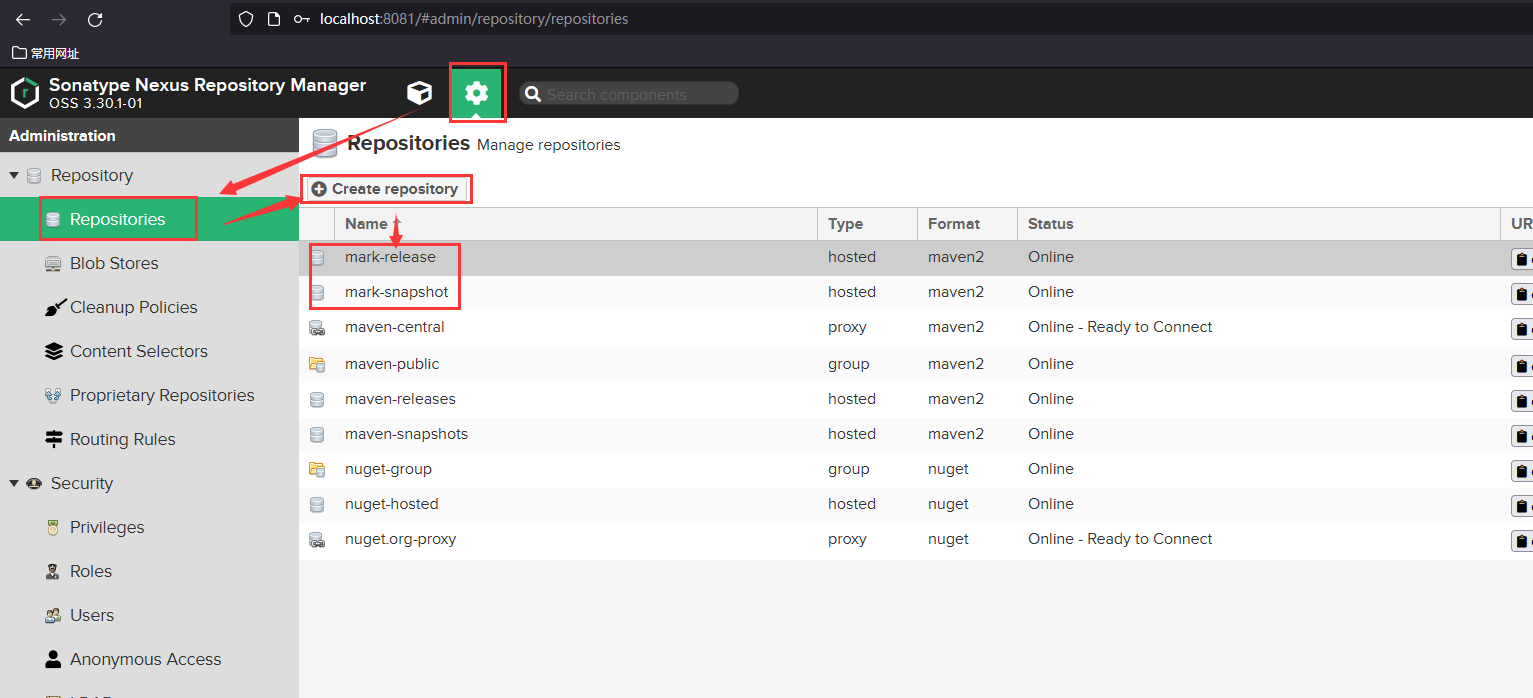
本地仓库访问私服配置
创建自己的两个仓库
配置本地仓库对私服的访问权限:打开maven的settings.xml文件,找到servers
<!-- 配置访问私服的权限 --><server><!-- 私服中的服务器id名称 --><id>mark-snapshot</id><!-- admin --><username>admin</username><!-- 123 --><password>123</password></server><server><!-- 私服中的服务器id名称 --><id>mark-release</id><!-- admin --><username>admin</username><!-- 123 --><password>123</password></server>
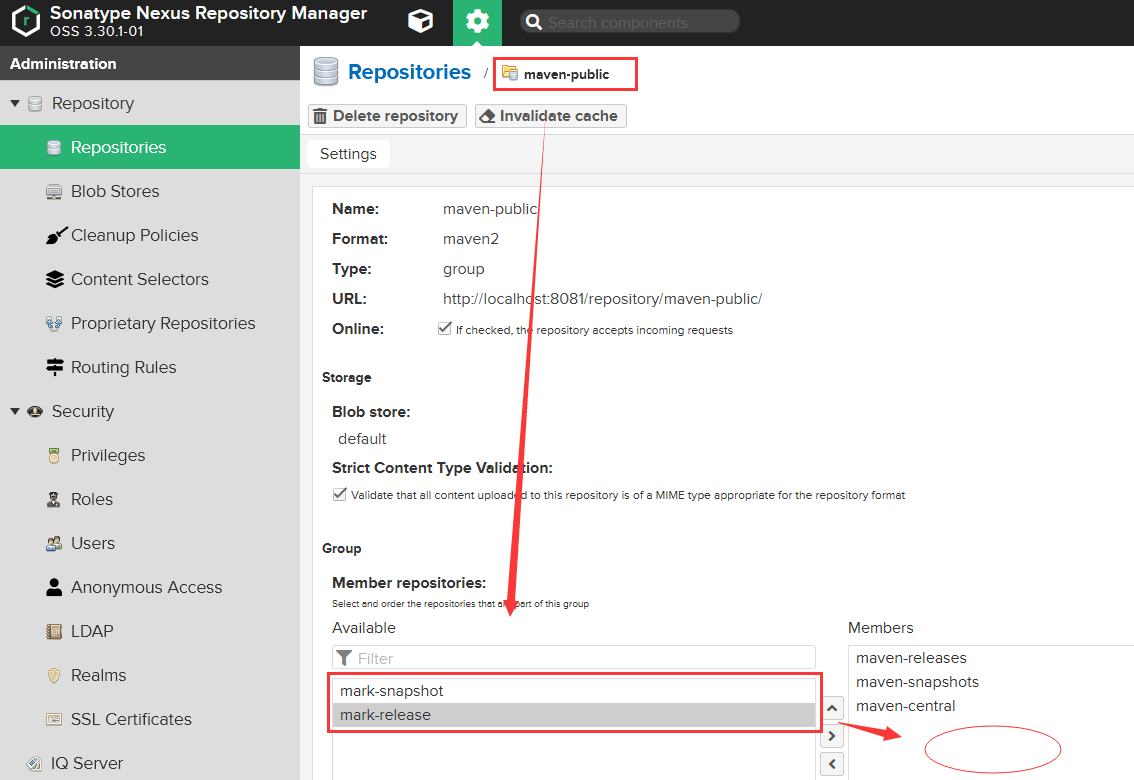
设置仓库组管理范围
配置映射关系
<!-- 私服的访问路径 --><mirror><!-- 仓库组的id --><id>maven-public</id><mirrorOf>*</mirrorOf><url>http://localhost:8081/repository/maven-public/h</url></mirror>
私服资源上传与下载
配置工程保存在私服中的位置
<!--配置当前工程保存在私服中的具体位置--><distributionManagement><repository><id>mark-release</id><url>http://localhost:8081/repository/mark-release/</url></repository><snapshotRepository><id>mark-snapshot</id><url>http://localhost:8081/repository/mark-snapshot/</url></snapshotRepository></distributionManagement>
上传指令:deploy(在上传前要为所有的模块配置继承关系)
然后接可以在仓库中看到上传的资源了
因为pom.xml中设置了版本为SNAPSHOT,因此只上传到了snapshot仓库,当修改为RELEASE时便可上传到mark-release仓库中
<groupId>com.mark</groupId><artifactId>Maven_00_parent</artifactId><version>1.0-RELEASE</version><packaging>pom</packaging>
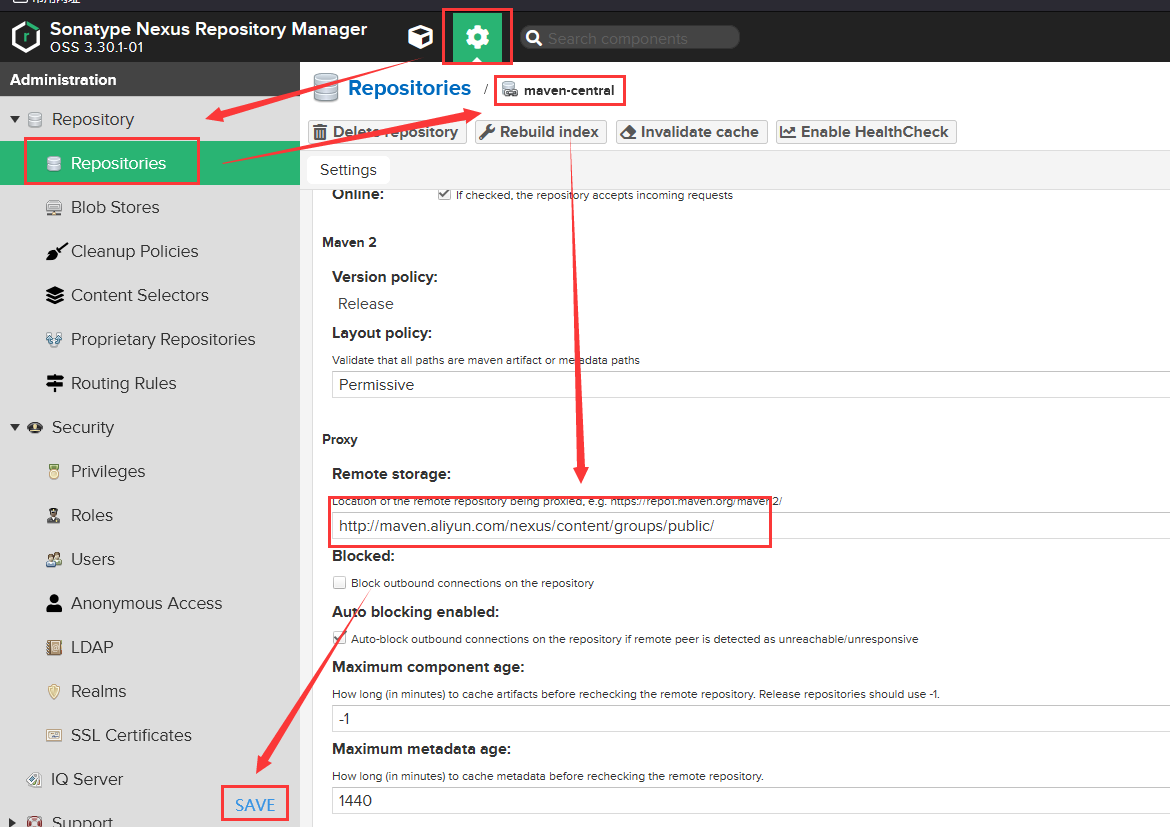
可以更换中央仓库:
SpringMVC&Maven进阶的更多相关文章
- Spirng+SpringMVC+Maven+Mybatis+MySQL项目搭建(转)
这篇文章主要讲解使用eclipse对Spirng+SpringMVC+Maven+Mybatis+MySQL项目搭建过程,包括里面步骤和里面的配置文件如何配置等等都会详细说明. 如果还没有搭建好环境( ...
- eclipse下SpringMVC+Maven+Mybatis+MySQL项目搭建
这篇文章主要讲解使用eclipse对Spirng+SpringMVC+Maven+Mybatis+MySQL项目搭建过程,包括里面步骤和里面的配置文件如何配置等等都会详细说明. 接下来马上进入项目搭建 ...
- JEECG(二) JEECG框架下调用webservice java springmvc maven 调用 webservice
JEECG系列教程二 如何在JEECG框架下使用webservice 本文所使用的webservice是c#开发的 其实无论是什么语言开发的webservice用法都一样 java springmvc ...
- IDEA 搭建 springmvc maven 项目
前言:将搭建 java springmvc maven 项目的过程及问题记录下来,以及配置文件.这次没有涉及到数据库,后续再写. 目录: 一.首先在 IDEA 中创建 springmvc maven ...
- 解决:springmvc maven 项目搭建完后没有src目录,而且maven导入很慢
前言:在搭建springmvc maven项目中遇到的问题做总结,比如搭建后没有src,同时这里也解决了搭建后maven导入很慢的问题. 问题: 1.发现创建出来的maven项目没有src文件 ,而且 ...
- spring+springmvc+maven+mongodb
1.前言 最近项目开发使用到了spring+springmvc+maven+mongodb,项目中的框架是用springboot进项开发的,对于我们中级开发人员来说,有利有弊,好处呢是springbo ...
- SpringMVC+Maven开发项目源码详细介绍
代码地址如下:http://www.demodashi.com/demo/11638.html Spring MVC概述 Spring MVC框架是一个开源的Java平台,为开发强大的基于Java的W ...
- [Java] Spring + SpringMVC + Maven + JUnit 搭建
示例项目下载: https://github.com/yangyxd/SpringDemo 利用前面 SpringMVC 项目的配置方式,完成初步的项目创建.下面只讲一些不同之处. 传送门: [Jav ...
- Mybatis + SpringMVC + Maven实现分页查询
使用Mybatis + Maven + SpringMVC 运行时,突然被需要分页查询的功能给难住了 这里推荐采用的插件是PageHelper这个插件,使用起来十分方便.该插件支持以下数据库: Ora ...
随机推荐
- 超实用在线工具!能将文字加密为Emoji表情
试想一下,如果你需要将一段比较敏感的内容发送给你的好友. 但如果这段内容不小心外泄,被别人看到了,可能会带来很多麻烦. 那么,有什么方法能够让传输的文本内容不那么容易被"看破"呢? ...
- 「学习笔记」斜率优化dp
目录 算法 例题 任务安排 题意 思路 代码 [SDOI2012]任务安排 题意 思路 代码 任务安排 再改 题意 思路 练习题 [HNOI2008]玩具装箱 思路 代码 [APIO2010]特别行动 ...
- 业务流程可视化-让你的流程图"Run"起来(7.运行状态持久化&轻量工作流支持)
前言 感谢大家阅读本项目系列文章和对项目的支持.分享一下我对这个项目的新的改进. 之前项目做到了流程设计可视化和流程运行结果可视化. 本期发布的版本中实现了中间的运行过程的实时可视化,和流程状态持久化 ...
- RabbitMQ 入门系列:8、扩展内容:接收信息时:可否根据RoutingKey过滤监听信息,答案是不能。
系列目录 RabbitMQ 入门系列:1.MQ的应用场景的选择与RabbitMQ安装. RabbitMQ 入门系列:2.基础含义:链接.通道.队列.交换机. RabbitMQ 入门系列:3.基础含义: ...
- 强大多云混合多K8S集群管理平台Rancher入门实战
@ 目录 概述 定义 为何使用 其他产品 安装 简述 规划 基础环境 Docker安装 Rancher安装 创建用户 创建集群 添加Node节点 配置kubectl 创建项目和名称空间 发布应用 偏好 ...
- 关于使用docker volume挂载的注意事项
Content 在用Docker进行持久化的存储的时候,有两种方式: 使用数据卷(volume) -v 容器绝对路径 或者 -v 已经创建的volume名称:容器绝对路径 2. 使用挂载点(共享宿主目 ...
- KingbaseES sys_prewarm 扩展
Oracle 在查询数据 可以通过cache hint 所访问的数据cache 到数据库buffer,对于KingbaseES,如何将数据加载到cache 了?sys_prewarm 扩展插件可以实现 ...
- 使用『jQuery』『原生js』制作一个选项卡盒子 —— { }
效果 HTML 部分 <body> <div id="main-box"> <div id="left-nav"></ ...
- flutter系列之:flutter中常用的container layout详解
目录 简介 Container的使用 旋转Container Container中的BoxConstraints 总结 简介 在上一篇文章中,我们列举了flutter中的所有layout类,并且详细介 ...
- 安装配置docker&maven环境
原文视频:(https://blog.sechelper.com/20220919/code-review/docker-maven-install-guid/) Docker是什么 Docker ...