centos7+cobbler安装

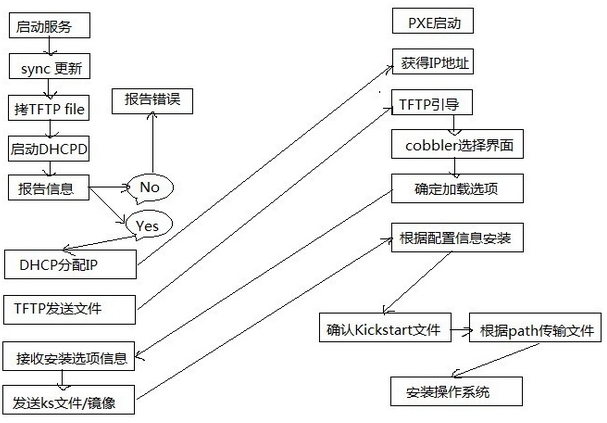
cobbler工作流程
1、安装软件包:
yum -y install httpd dhcp tftp python-ctypes cobbler xinetd cobbler-web pykickstart
ip addr add dev ens3 10.0.0.101/24 配置文件目录:
/etc/cobbler
/etc/cobbler/settings : cobbler 主配置文件
/etc/cobbler/iso/: iso模板配置文件
/etc/cobbler/pxe: pxe模板文件
/etc/cobbler/power: 电源配置文件
/etc/cobbler/user.conf: web服务授权配置文件
/etc/cobbler/users.digest: web访问的用户名密码配置文件
/etc/cobbler/dhcp.template : dhcp服务器的的配置末班
/etc/cobbler/dnsmasq.template : dns服务器的配置模板
/etc/cobbler/tftpd.template : tftp服务的配置模板
/etc/cobbler/modules.conf : 模块的配置文件 数据目录:
/var/lib/cobbler/config/: 用于存放distros,system,profiles 等信 息配置文件
/var/lib/cobbler/triggers/: 用于存放用户定义的cobbler命令
/var/lib/cobbler/kickstart/: 默认存放kickstart文件
/var/lib/cobbler/loaders/: 存放各种引导程序 镜像目录
/var/www/cobbler/ks_mirror/: 导入的发行版系统的所有数据
/var/www/cobbler/images/ : 导入发行版的kernel和initrd镜像用于 远程网络启动
/var/www/cobbler/repo_mirror/: yum 仓库存储目录 日志目录:
/var/log/cobbler/installing: 客户端安装日志
/var/log/cobbler/cobbler.log : cobbler日志 cobbler命令介绍:
cobbler check 核对当前设置是否有问题
cobbler list 列出所有的cobbler元素
cobbler report 列出元素的详细信息
cobbler sync 同步配置到数据目录,更改配置最好都要执行下
cobbler reposync 同步yum仓库
cobbler distro 查看导入的发行版系统信息
cobbler system 查看添加的系统信息
cobbler profile 查看配置信息
2、配置cobbler:
1、安装完成后执行cobbler check(会报以下错误):

The following are potential configuration items that you may want to fix:

 1 : The 'server' field in /etc/cobbler/settings must be set to something other than localhost, or kickstarting features will not work.  This should be a resolvable hostname or IP for the boot server as reachable by all machines that will use it.

 2 : For PXE to be functional, the 'next_server' field in /etc/cobbler/settings must be set to something other than 127.0.0.1, and should match the IP of the boot server on the PXE network.

 3 : change 'disable' to 'no' in /etc/xinetd.d/tftp

 4 : Some network boot-loaders are missing from /var/lib/cobbler/loaders, you may run 'cobbler get-loaders' to download them, or, if you only want to handle x86/x86_64 netbooting, you may ensure that you have installed a *recent* version of the syslinux package installed and can ignore this message entirely.  Files in this directory, should you want to support all architectures, should include pxelinux.0, menu.c32, elilo.efi, and yaboot. The 'cobbler get-loaders' command is the easiest way to resolve these requirements.

 5 : enable and start rsyncd.service with systemctl

 6 : debmirror package is not installed, it will be required to manage debian deployments and repositories

 7 : The default password used by the sample templates for newly installed machines (default_password_crypted in /etc/cobbler/settings) is still set to 'cobbler' and should be changed, try: "openssl passwd -1 -salt 'random-phrase-here' 'your-password-here'" to generate new one

 8 : fencing tools were not found, and are required to use the (optional) power management features. install cman or fence-agents to use them

Restart cobblerd and then run 'cobbler sync' to apply changes.

 错误1:

 sed -i 's/^server: 127.0.0.1/server: 10.0.0.101/' /etc/cobbler/settings   #修改server的ip地址为本机ip

 错误2:

 sed -i 's/^next_server: 127.0.0.1/next_server: 10.0.0.101/' /etc/cobbler/settings  #TFTP Server 的IP地址

 错误3:

 修改/etc/xinetd.d/tftp文件:

 service tftp

 {

    socket_type = dgram

    protocol = udp

    wait = yes

    user = root

    server = /usr/sbin/in.tftpd

    server_args = -s /var/lib/tftpboot

    disable = no  #修改为no

    per_source = 11

    cps = 100 2

    flags = IPv4

 }

 错误4:

 cobbler get-loaders  # 下载缺失的文件

 错误5:

 添加rsync到自启动并启动rsync

 systemctl enable rsyncd

 systemctl start rsyncd

 错误6: 跟debian 相关,可以忽略

 错误7:

 修改root密码为123456:

 [root@localhost ~]# openssl passwd -1 -salt '123456' '123456'

 $1$123456$wOSEtcyiP2N/IfIl15W6Z0

 [root@localhost ~]# vi /etc/cobbler/settings #修改settings配置文件中下面位置,把新生成的密码加进去

 default_password_crypted: "$1$123456$wOSEtcyiP2N/IfIl15W6Z0”

 错误8:

 # fence设备相关,不用配置

2、 修改settings中参数,由cobbler控制dhcp:

vi /etc/cobbler/settings

manage_dhcp: 1

修改dhcp.templates配置文件

vi /etc/cobbler/dhcp.template

subnet 10.0.0.0 netmask 255.255.255.0 {

     option routers             10.0.0.2;

     option domain-name-servers 10.0.0.2;

     option subnet-mask         255.255.255.0;

     range dynamic-bootp        10.0.0.100 10.0.0.250;

}

3、重启服务并同步配置,改完dhcp必须要sync同步配置:

systemctl restart cobblerd

systemctl start httpd

systemctl enable httpd

systemct1 enable cobblerd

cobbler sync   #同步数据

cobbler check  #再检查一遍

4、检查dhcp:

netstat -lnup|grep dhcp
3、导入镜像:
1、挂载系统镜像:

mount /dev/centos7.1.iso  /mnt

2、导入系统镜像:

cobbler import --path=/mnt/ --name=CentOS-7.1-x86_64 --arch=x86_64

参数解释:

# --path 镜像路径

# --name 为安装源定义一个名字

# --arch 指定安装源是32位、64位、ia64, 目前支持的选项有: x86│x86_64│ia64

# 安装源的唯一标示就是根据name参数来定义,本例导入成功后,安装源的唯一标示就是:CentOS-7.1-x86_64,如果重复,系统会提示导入失败。

cobbler distro list #查看镜像列表

镜像存放目录:

#cobbler会将镜像中的所有安装文件拷贝到本地一份,放在/var/www/cobbler/ks_mirror下的CentOS-7.1-x86_64目录下。因此/var/www/cobbler目录必须具有足够容纳安装文件的空间。

3、指定ks.cfg文件及调整内核参数:

cd /var/lib/cobbler/kickstarts/   #Cobbler的ks.cfg文件存放位置

上传或编辑ks.cfg文件: CentOS-7.1-x86_64.cfg

查看安装镜像文件信息:

cobbler distro report --name=CentOS-7.1-x86_64

查看所有的profile设置:

cobbler profile report

查看指定的profile设置:

cobbler profile report --name=CentOS-7.1-x86_64

# 编辑profile,修改关联的ks文件

cobbler profile edit --name=CentOS-7.1-x86_64 --kickstart=/var/lib/cobbler/kickstarts/CentOS-7.1-x86_64.cfg

# 修改安装系统的内核参数,在CentOS7系统有一个地方变了,就是网卡名变成eno16777736这种形式,但是为了运维标准化,我们需要将它变成我们常用的eth0,因此使用下面的参数。但要注意是CentOS7才需要下面的步骤,CentOS6不需要。

cobbler profile edit --name=CentOS-7.1-x86_64 --kopts='net.ifnames=0 biosdevname=0'

cobbler profile report CentOS-7.1-x86_64

# 每次修改完都要同步一次

cobbler sync

cobbler的web页面地址:https://10.0.0.101/cobbler_web
之后就可以通过pxe安装系统
4、cobbler-api
cobbler也是通过restful-api来调用对应的接口,下面请看两个小脚本:
都是采用opython2.7版本运行的
[root@linux-node1 ~]# cat cobbler_list.py

#!/usr/bin/python

import xmlrpclib

server = xmlrpclib.Server("http://192.168.56.11/cobbler_api")

print server.get_distros()

print server.get_profiles()

print server.get_systems()

print server.get_images()

print server.get_repos()
下面看看创建system模版的:
[root@linux-node1 ~]# cat cobbler-api.py

#!/usr/bin/env python

# -*- coding: utf-8 -*-

import xmlrpclib

class CobblerAPI(object):

    def __init__(self,url,user,password):

        self.cobbler_user= user

        self.cobbler_pass = password

        self.cobbler_url = url

    def add_system(self,hostname,ip_add,mac_add,profile):

        '''

        Add Cobbler System Infomation

        '''

        ret = {

            "result": True,

            "comment": [],

        }

        #get token

        remote = xmlrpclib.Server(self.cobbler_url)

        token = remote.login(self.cobbler_user,self.cobbler_pass)

        #add system

        system_id = remote.new_system(token)

        remote.modify_system(system_id,"name",hostname,token)

        remote.modify_system(system_id,"hostname",hostname,token)

        remote.modify_system(system_id,'modify_interface', {

            "macaddress-eth0" : mac_add,

            "ipaddress-eth0" : ip_add,

            "dnsname-eth0" : hostname,

        }, token)

        remote.modify_system(system_id,"profile",profile,token)

        remote.save_system(system_id, token)

        try:

            remote.sync(token)

        except Exception as e:

            ret['result'] = False

            ret['comment'].append(str(e))

        return ret

def main():

    cobbler = CobblerAPI("http://192.168.56.11/cobbler_api","cobbler","")

    ret = cobbler.add_system(hostname='cobbler-api-test',ip_add='192.168.56.101',mac_add='00:50:56:21:65:78',profile='CentOS-7.0-1406-x86_64')

    print ret

if __name__ == '__main__':

    main()
通过这样api的方式,也能够创建system模版实现安装主机的功能。
centos7+cobbler安装的更多相关文章
- 自动化运维之cobbler安装centos7.3
自动化运维之cobbler安装centos7.3 一.cobbler简介和服务 Cobbler是一款自动化操作系统安装的实现,与PXE安装系统的区别就是可以同时部署多个版本的系统,而PXE只能选择一种 ...
- cobbler 安装centos7.3时GPT问题(五)
磁盘分区表MBR和GPT介绍: MBR(Master Boot Record):最大只支持2 TB的盘,最多只支持4个主分区,信息只存储在一个区域. GPT(GUID partition table) ...
- Centos7 下cobbler安装及配置
1.背景介绍 作为运维,在公司经常遇到一些机械性重复工作要做,例如:为新机器装系统,一台两台机器装系统,可以用光盘.U盘等介质安装,1小时也完成了,但是如果有成百台的服务器还要用光盘.U盘去安装,就显 ...
- Centos7.4 下cobbler安装及配置
1.背景介绍 作为运维,在公司经常遇到一些机械性重复工作要做,例如:为新机器装系统,一台两台机器装系统,可以用光盘.U盘等介质安装,1小时也完成了,但是如果有成百台的服务器还要用光盘.U盘去安装,就显 ...
- centos7+cobbler+kickstart
一.cobbler简介 cobbler 是一个系统启动服务boot server,可以通过pxe得方式用来快速安装,重装系统,支持安装不同linux发行版和windows.这个工具是用python开发 ...
- centos 7 下 cobbler 安装
一.cobbler 介绍: Cobbler 是一个系统启动服务(boot server),可以通过网络启动(PXE)的方式用来快速安装.重装物理服务器和虚拟机,支持安装不同的 Linux 发行版和 W ...
- 在centos7上安装Jenkins
在centos7上安装Jenkins 安装 添加yum repos,然后安装 sudo wget -O /etc/yum.repos.d/jenkins.repo http://pkg.jenkins ...
- CentOS7 Jenkins安装
CentOS7 Jenkins安装 CentOS7 Jenkins安装 Download 从Jenkins下载apache-tomcat-8.0.18.tar.gz Install 安装 上传RPM文 ...
- 在 CentOS7 上安装 zookeeper-3.4.9 服务
在 CentOS7 上安装 zookeeper-3.4.9 服务 1.创建 /usr/local/services/zookeeper 文件夹: mkdir -p /usr/local/service ...
随机推荐
- Ubuntu vsftp复制文件到远端时错误,Permission denied
Ubuntu 下复制文件到远端时错误,Permission denied 失败原因如下: (1)vsftp默认配置不允许上传文件 解决办法:修改配置文件 vi /etc/vsftpd.conf. 将& ...
- 应用市场出新规,国内千款应用TargetSdkVersion调查分析
近期,谷歌针对Google Play上架应用发布强制性适配Android 8.0公告,要求自2018 年 8 月 1 日起,所有向 Google Play 首次提交的新应用都必须基于 Andro ...
- error LNK2019: unresolved external symbol 的一个解决方法
在VS2010中使用opencv时,有时会出现如下类似的连接错误: 解决方法:根据头文件手动指定lib文件 #ifdef _DEBUG #pragma comment(lib,"*.lib& ...
- Large repunit factors (Project Euler 132)
题目大意: 求出 大数111111.....1 (1e9个1) 前40个质因子的和. 思路:可以把原来的数表示成$\frac{10^k - 1}{9}$ 其中$k=10^9$ 如果一个质数$p$ 满 ...
- redhat6.5安装ntfs-3g rpm来支持ntfs文件系统挂载
linux安装ntfs-3g模块来支持ntfs文件系统挂载 所需包 fuse-2.9.3.tar.gz ntfs-3g_ntfsprogs-2011.4.12.tgz step1. 解压fuse-2. ...
- poj 3189(枚举+多重匹配)
题目链接:http://poj.org/problem?id=3189 思路:由于题目要求最小的差值,而Range最多也才20,因此我们可以枚举上下限,多重匹配验证即可. http://paste.u ...
- python3----strip lstrip rstrip
Python中的strip用于去除字符串的首位字符,同理,lstrip用于去除左边的字符,rstrip用于去除右边的字符.这三个函数都可传入一个参数,指定要去除的首尾字符.注意的是,传入的是一个字符数 ...
- iOS - 逆向 - Objective-C代码混淆 -confuse.sh文件写法
class-dump可以很方便的导出程序头文件,不仅让攻击者了解了程序结构方便逆向,还让着急赶进度时写出的欠完善的程序给同行留下笑柄. 所以,我们迫切的希望混淆自己的代码. 混淆的常规思路 混淆分许多 ...
- 用ElasticSearch搭建自己的搜索和分析引擎【转自腾讯Wetest】
本文大概地介绍了ES的原理,以及Wetest在使用ES中的一些经验总结.因为ES本身涉及的功能和知识点非常广泛,所以这里重点挑出了实际项目中可能会用到,也可能会踩坑的一些关键点进行了阐述. 一 重要概 ...
- YII配置rabbitMQ时前期工作各种坑
背景如下: 项目需要做一个订阅/发布的功能,然后一大堆讨论不做说明,确认使用rabbitMQ来做: okay,既然 要这个来做,我们下载这个东西吧!在官网上下载就okay了,不做说明,下载安装的时候会 ...
