Linux设备驱动开发基础--内核定时器
1. Linux内核定时器是内核用来控制在未来某个时间点(基于jiffies)调度执行某个函数的一种机制,其实现位于 <Linux/timer.h> 和 kernel/timer.c 文件中。
2. 被调度的函数是异步执行的,它类似于一种“软件中断”,而且是处于非进程的上下文中,所以调度函数必须遵守以下规则:
(1) 没有 current 指针、不允许访问用户空间。因为没有进程上下文,相关代码和被中断的进程没有任何联系。
(2) 不能执行休眠(或可能引起休眠的函数)和调度。
(3) 任何被访问的数据结构都应该针对并发访问进行保护,以防止竞争条件。
3. Linux内核使用struct timer_list来描述一个定时器
struct timer_list {

    struct list_head entry;

    unsigned long expires;

    void (*function)(unsigned long);

    unsigned long data;

    struct tvec_base *base;

};
(1)expires:表示期望定时器执行的 jiffies 值,到达该 jiffies 值时,将调用 function 函数,并传递 data 作为参数
(2)entry:连接该定时器到一个内核链表中
(3)base:内核内部使用
4. 定时器使用流程
(1)定义和初始化定时器
① 方法一:
DEFINE_TIMER(timer_name, function_name, expires_value, data);
DEFINE_TIMER为宏定义,源码如下
#define DEFINE_TIMER(_name, _function, _expires, _data)        \

    struct timer_list _name =                \

        TIMER_INITIALIZER(_function, _expires, _data)
② 方法二
struct timer_list my_timer;

init_timer(&my_timer);
my_timer.expires = jiffies + delay;
my_timer.data = 0;
my_timer.function = my_function;
注:以上宏和函数定义于include/linux/timer.h。
(3)注册定时器:add_timer
add_timer(&my_timer);
(4)启动定时器:mod_timer
int mod_timer(struct timer_list *timer, unsigned long expires)
注:该函数负责修改内核定时器timer的超时字段expires。该函数可以修改激活和没有激活的内核定时器的超时时间,并把它们都设置为激活状态;返回值为0表示修改的内核定时器在修改之前处于未激活状态,返回值为1表示修改的内核定时器在修改之前处于已激活状态。
(5)删除定时器:一但定时到期,内核会自动删除定时器节点。但有时需要显示的调用函数del_timer()来删除定时器节点
int del_timer(struct timer_list *timer)
5. Linux内核定时器组织架构
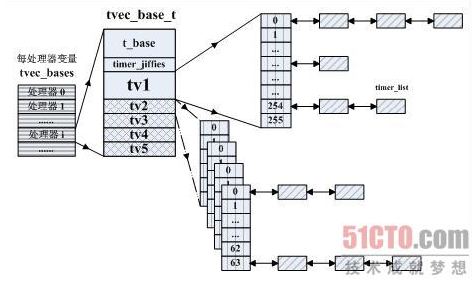
(1)与softirq、工作队列两种中断下半部的处理方法类似,每一个内核定时器节点与系统中的处理器通过一个每处理器变量联系起来。内核在文件 kernel/timer.c中使用下面的语句分配了一个名称为tvec_bases、类型为tvec_base_t的每处理器变量。
static DEFINE_PER_CPU(struct tvec_base *, tvec_bases) = &boot_tvec_bases;
(2)数据结结struct tevc_base用来记录系统中每一个处理器上待处理内核定时器节点的相关信息
struct tvec_base {

    spinlock_t lock;

    struct timer_list *running_timer;

    unsigned long timer_jiffies;

    struct tvec_root tv1;

    struct tvec tv2;

    struct tvec tv3;

    struct tvec tv4;

    struct tvec tv5;

} ____cacheline_aligned;
①lock:用于保护每处理器变量tvec_bases的本地拷贝
②running_timer:记录正在本地处理器上进行超时处理的内核定时器
③timer_jiffies:记录该数据结构中所包含的定时器中最早超时时间,根据该变量可以计算出超时定时器节点所在链表的表头。
④tv1,tv2,tv3,tv4,tv5:
#define TVN_BITS (CONFIG_BASE_SMALL ? 4 : 6)

#define TVR_BITS (CONFIG_BASE_SMALL ? 6 : 8)

#define TVN_SIZE (1 << TVN_BITS)

#define TVR_SIZE (1 << TVR_BITS)

#define TVN_MASK (TVN_SIZE - 1)

#define TVR_MASK (TVR_SIZE - 1)

struct tvec {

    struct list_head vec[TVN_SIZE];

};

struct tvec_root {

    struct list_head vec[TVR_SIZE];

};
(3)内核定时器架构示意图:

5. 简单示例
#include <linux/init.h>

#include <linux/module.h>

#include <linux/moduleparam.h>

#include <linux/time.h>

#include <linux/timer.h>

#include <linux/workqueue.h>

#include <asm/atomic.h>

MODULE_LICENSE("GPL");

static struct timer_list timer;

static void do_work(struct work_struct* work);

static DECLARE_WORK(test_work, do_work);

static DECLARE_WORK(test_work1, do_work);

static struct workqueue_struct *test_workqueue;

// 定时器超时函数

void test_timer_fn(unsigned long arg)

{

    if (queue_work(test_workqueue, &test_work)== ) {

        printk("Timer (0) add work queue failed\n");

    }

}

// work func

static void do_work(struct work_struct* work)

{

    printk("====do_work start====\n");

    printk("====do_work end====\n");

}

// init

int wq_init(void)

{

    // work queue

    test_workqueue = create_singlethread_workqueue("test-wq");

    // timer1

    init_timer(&timer);

    timer.function= test_timer_fn;

    add_timer(&timer);

    //设置超时时间,启动定时器

    mod_timer(&timer, jiffies + HZ / ); // 设置超时时间 1\100s

    return ;

}

void wq_exit(void)

{

    del_timer(&timer);

    destroy_workqueue(test_workqueue);

    printk("wq exit success\n");

}

module_init(wq_init);

module_exit(wq_exit);
Linux设备驱动开发基础--内核定时器的更多相关文章
- Linux设备驱动开发基础--阻塞型设备驱动
1. 当一个设备无法立刻满足用户的读写请求时(例如调用read时,设备没有数据提供),驱动程序应当(缺省的)阻塞进程,使它进入等待(睡眠)状态,知道请求可以得到满足. 2. Linux内核等待队列:在 ...
- 转:Linux设备驱动开发(1):内核基础概念
一.linux设备驱动的作用 内核:用于管理软硬件资源,并提供运行环境.如分配4G虚拟空间等. linux设备驱动:是连接硬件和内核之间的桥梁. linux系统按个人理解可按下划分: 应用层:包括PO ...
- 《Linux设备驱动开发具体解释(第3版)》(即《Linux设备驱动开发具体解释:基于最新的Linux 4.0内核》)网购链接
<Linux设备驱动开发具体解释:基于最新的Linux 4.0内核> china-pub spm=a1z10.3-b.w4011-10017777404.30.kvceXB&i ...
- Hasen的linux设备驱动开发学习之旅--时钟
/** * Author:hasen * 參考 :<linux设备驱动开发具体解释> * 简单介绍:android小菜鸟的linux * 设备驱动开发学习之旅 * 主题:时钟 * Date ...
- 《Linux设备驱动开发具体解释(第3版)》进展同步更新
本博实时更新<Linux设备驱动开发具体解释(第3版)>的最新进展. 2015.2.26 差点儿完毕初稿. 本书已经rebase到开发中的Linux 4.0内核,案例多数基于多核CORTE ...
- Linux 设备驱动开发 —— platform设备驱动应用实例解析
前面我们已经学习了platform设备的理论知识Linux 设备驱动开发 —— platform 设备驱动 ,下面将通过一个实例来深入我们的学习. 一.platform 驱动的工作过程 platfor ...
- Linux设备驱动开发环境的搭建(转)
经过两周的摸索,终于对Linux设备驱动开发有了个初步的认识,下面对Linux设备驱动开发环境的搭建做个小结,以方便自己以后查询,同时也能给同道的初学者一点帮助. 刚接触Linux设备驱动时,初学者往 ...
- Linux设备驱动开发详解
Linux设备驱动开发详解 http://download.csdn.net/detail/wuyouzi067/9581380
- 《Linux设备驱动开发详解(第2版)》配套视频登录51cto教育频道
http://edu.51cto.com/course/course_id-379-page-1.html http://edu.51cto.com/course/course_id-379-page ...
随机推荐
- Python3 使用requests库读取本地保存的cookie文件实现免登录访问
1. 读取selenium模块保存的本地cookie文件来访问知乎 读取http://www.cnblogs.com/strivepy/p/9233389.html保存的本地cookie来访问知乎的 ...
- 通过网页发布ios应用。
原文地址:http://www.zhihu.com/question/24304345 两种方法: 1. 测试版本 支持任何类型的开发者帐号,需要在developer后台设置授权deviceID,可以 ...
- 【leetcode】Move Zeroes
Move Zeroes 题目: Given an array nums, write a function to move all 0‘s to the end of it while maintai ...
- 如何在DOS下以管理员身份执行命令?
原创 普通User的DOS窗口: 以管理员身份运行的DOS窗口: 转换(Windows10系统下): 13:11:55 2018-10-18
- EBS取Web字段SQL操作文档
1) 安全性—>责任-à定义 在这个路径下,输入责任名称,可以查询这个责任的请求组的名称 2) organization_id 和 org_id的功能 3) 查找网页上的字段 Naviga ...
- CentOS7 yum安装lamp环境
1.安装apache yum install httpd #根据提示,输入Y安装即可成功安装 systemctl start httpd.service #启动apache systemctl sto ...
- 删除当前文件夹的bat工具
@echo off:11set /p path=Please enter delete filepath:del /f /s /q %path%rd /q /s %path%goto 11pause
- NSRect 位置和尺寸
前言 结构体 这个结构体用来表示事物的坐标点和宽高度. typedef CGRect NSRect; struct CGRect { CGPoint origin; CGSize size; }; t ...
- Codeforces Round #546 (Div. 2)D(贪心,思维,SET,VECTOR,模拟)
#include<bits/stdc++.h>using namespace std;int a[300007],b[500007],c[500007];set<int>st[ ...
- DISCUZ 各数据库表作用
链接原文:http://forum.digitser.cn/forum.php?mod=viewthread&tid=179 DISCUZ数据字典 http://w ...
