Areas in ASP.NET MVC 4
Introduction to Areas
In this article, we will learn the concept of Areas and how to use it with a practical scenario in ASP.NET MVC 4.
By convention in ASP.NET MVC project template, to separate application code based on responsibilities, we have top level folders as Controllers, Views, and Models. In Controllers folder we can have several controllers, each of them is focused on specific group of functionalities. Inside top level Views folder, there are folders, corresponding to controllers (having the same name), and containing views files for the controller. Corresponding to Action names in controller, we have view files (.cshtml file) in it. Finally in top level Models folder we have models which manages the behaviour and data for the application domain.
This approach works well for small applications having less number of controllers and views. As the number of controllers and views grow, we feel the need of grouping the controllers and views. For large applications, we often face such problem to organize the code effectively. In such cases, Areas help us to organize the code.
Areas are logical grouping of Controller, Models and Views and other related folders for a module in MVC applications. By convention, a top Areas folder can contain multiple areas. Using areas, we can write more maintainable code for an application cleanly separated according to the modules.
Debate on Alternate Approach
Few people can argue that instead of using Area to divide the code as per modules in application, we can make folders structure in top level Controllers/Models/Views folders. As shown below:
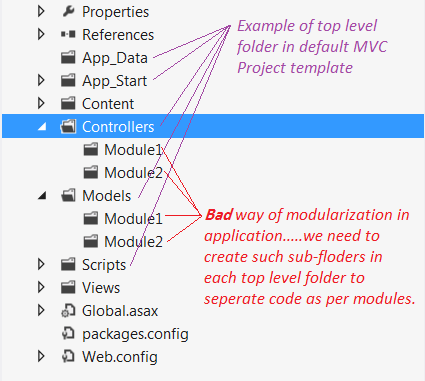
But using such approach for divisions, we may face the following problems in large applications:
- The nature of functionality of modules may be different (there would be less scope of shared code) and you may need to categorize CSS, scripts, models and other related functionalities for modules too. You have to create the same folder structure in every top level folder that mean inside Views, Models, Scripts, and Images, etc.
- There may be name conflict for controller if modules need to have the controllers with same name. For example, many modules in application may like to have its own Home Controller.
- The code of specific module will be more scattered (in comparison to the case of using Area approach for the modules)
So Area provides a better way to separate the code for modules in a much elegant way. We can keep all the specific resources needed for a module in its Area. The reusable and shared resource can be put inside corresponding top level folders in the ASP.NET MVC application. In the next section, we will see how to use Areas in real time application.
How to Avoid Name Conflict
Let's say if there is an area called "Payment" and it is having a "PaymentController". In such cases while using Areas, we need to remember the following three points in case Controller and Area is having the same name:
- In Global.asax.cs file, under the
Application_StartmethodAreaRegistration.RegisterAllAreasmethod must be called in the first place. - In RouteConfig.cs file, under the
RegisterRoutesmethod you must declare namespace to avoid the conflict between same controllers name. - In MenAreaRegistration.cs file, under
RegisterAreamethod you must declare namespace to avoid the conflict between same controllers name.
For another such example, please have a look at this question/answer on stackoverflow. The above steps will be more clear after code walkthrough given below for demo application.
Overview of Demo Application
Usually an e-commerce application has various kinds of products divided into many categories. Each product contains various kinds of information about a product like manufacturing details, availability, price, offers if any, etc. In such kinds of scenarios, it is better to divide the application module using Areas.
Here for demo, we will develop a simple sample of shopping application. Application will be divided into three modules called Home, Men and Women. As per general scenario, Men and Women are main categories having their own sub categories as shown in the below figure.
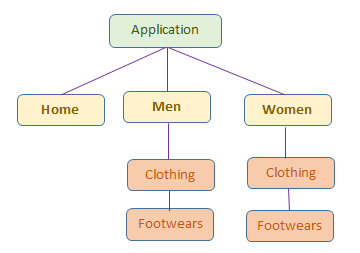
- Home: This module will have general information about the application. This is implemented using default controller/views, etc. available with project template. No use of area concept here as it provides face to entire application by having home page and standard information.
- Men: This module will have information about the products for
Men. This is implemented using Area concept. We created a "Men" area inside "Areas" top level folder. It has all sub-module and specific home page for "Men" module. - Women: This module will have information about the products for
Women. It is also implemented usingAreaand similar to "Men" module.
Note:
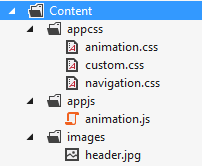
- In the demo, we will focus only on how to use Areas, so I have used same CSS and dummy data. But in real world application, display requirement in different module may be very specific.
- All common CSS files, JS files and images are placed in top level Content folder as shown below:
- To understand this article better, please download the attached code, have an overview of the code, then follow the steps given in this article.
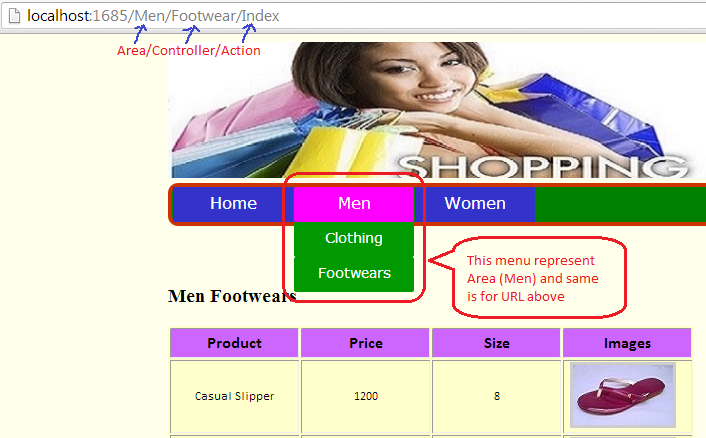
Final Output: Final output of this sample application will look as shown below:
Creating Demo Application
Let's get started by firing up Visual Studio 2012 and follow the below steps:
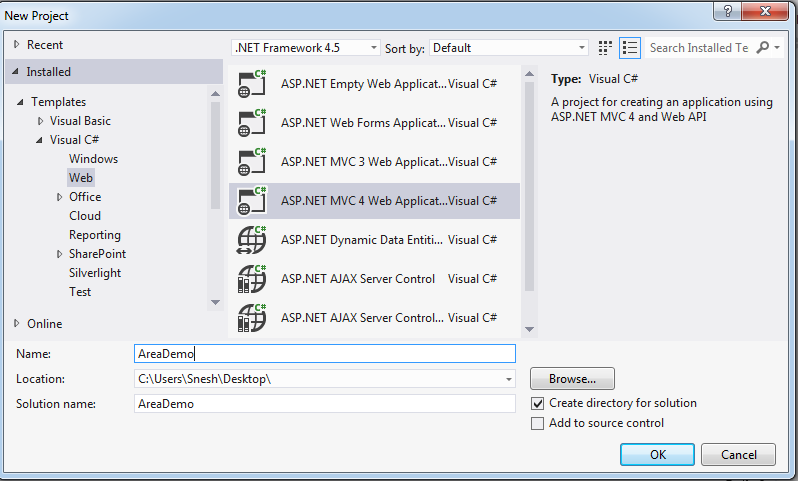
- Create a new Project by selecting ASP.NET MVC4 Web Application template and give it project name as AreaDemo and click OK.
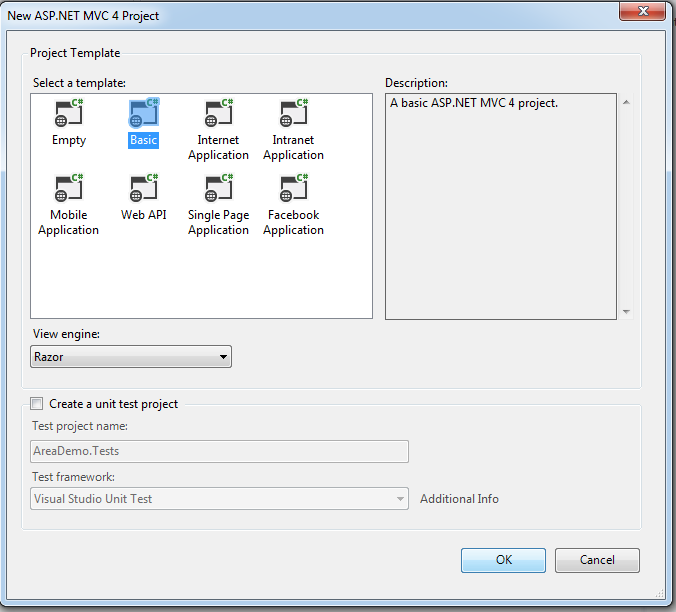
- Select a template as Basic application then click OK. Visual Studio adds AreaDemo project in solution as shown below in screenshot.
- First, we will create the header and menu of application. Please get the required CSS, JavaScript and images from downloaded code.
- Few references are required in _Layout.cshtml file as shown below:
Hide Copy Code
<script src="~/Scripts/jquery-1.8.2.min.js"></script>
- Modify the code in _Layout.cshtml file in Shared folder as written below. It will provide common layout (Header and Menu) for all screens.
Hide Shrink
 Copy Code
<body>

    <div id="container">

        <header id="pageHeader">

            <img src="~/Content/images/header.jpg" />

            <nav>

                <ul>

                    <li><a href="http://www.codeproject.com/">Home</a></li>

                    <li><a href="~/Men/Home/Index">Men</a>

                        <ul>

                            <li><a href="~/Men/Clothing/Index">Clothing</a></li>

                            <li><a href="~/Men/Footwear/Index">Footwears</a></li>

                        </ul>

                    </li>

                    <li><a href="~/Women/Home/Index">Women</a>

                        <ul>

                            <li><a href="~/Women/Clothing/Index">Clothing</a></li>

                            <li><a href="~/Women/Footwear/Index">Footwears</a></li>

                        </ul>

                    </li>

                </ul>

            </nav>

        </header>

        <br />

        <br />

        <div id="pageContainer">

            @RenderBody()

        </div>

    </div>

</body> - So far Menu is created. But if we click on link in menu, nothing would happen because we have not created Areas yet.
- Right click on project (
AreaDemo) in solution explorer, go to add and click on Areas options as shown below: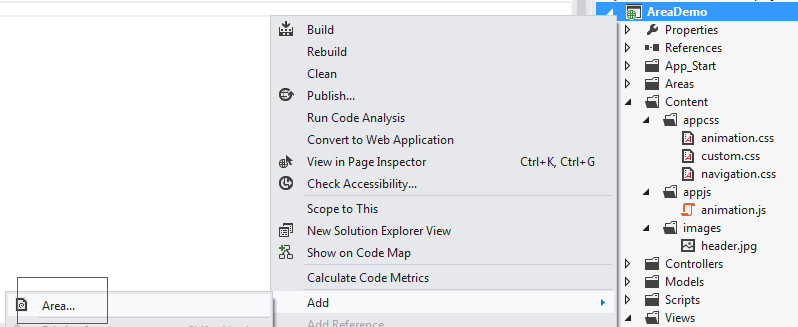
Areas folder will be added to your project. This top level Areas folder is supposed to have areas by convention. Each area has its own Models, Views, Controllers and areaRegistration.cs. areaRegistration.cs file is used to configure the routes for the area.
- Add an Area by right clicking on Areas folder you just created and give name to new area as
Men(Menis module name). Men Area folder is being added to your project as shown below: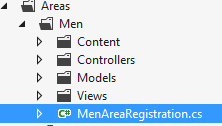
In the above screenshot, Controllers, Models, Views folders and MenAreaRegistration.cs file are being added by Visual Studio. Content folder added by me to have all images required for
Menmodule (get the images from downloaded code).Menmodule may have sub modules as we have forMen’s Clothing and another for Footwear. - Let us implement
Men-> Clothing module. Add three class files under the Models folder as shown below: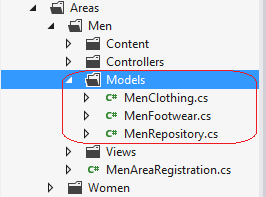
Write the following code in MenClothing.cs file:
Hide Copy Codepublic class MenClothing
{
public int Id { get; set; }
public string Name { get; set; }
public int Size { get; set; }
public double Price { get; set; }
public string imageURL { get; set; }
}Write the following code in MenFootwear.cs file:
Hide Copy Codepublic class MenFootwear
{
public int Id { get; set; }
public string Name { get; set; }
public int Size { get; set; }
public double Price { get; set; }
public string imageURL { get; set; }
}Write the following code in MenRepository.cs file:
Hide Shrink Copy Codepublic class MenRepository
{
public List<MenClothing> GetCloths()
{
List<MenClothing> result = new List<MenClothing> {
new MenClothing () { Id = 1, Name = "Formal Shirt",
Size= 40, Price = 1200, imageURL="/Areas/Men/Content/images/men_cloths/img_c1.jpg"},
new MenClothing () { Id = 2, Name = "Jeans Pant",
Size= 36, Price = 2200, imageURL="/Areas/Men/Content/images/men_cloths/img_c2.jpg"},
new MenClothing () { Id = 3, Name = "Casual Shirt",
Size= 40, Price = 1000, imageURL="/Areas/Men/Content/images/men_cloths/img_c3.jpg"},
new MenClothing () { Id = 4, Name = "Formal Pant",
Size= 36, Price = 1299, imageURL="/Areas/Men/Content/images/men_cloths/img_c4.jpg"}
}; return result;
} public List<MenFootwear> GetFootwears()
{
List<MenFootwear> result = new List<MenFootwear>
{
new MenFootwear () { Id = 1, Name = "Casual Slipper", Size= 8,
Price = 1200, imageURL="/Areas/Men/Content/images/men_footwears/img_f1.jpg"},
new MenFootwear () { Id = 2, Name = "Casual Slipper", Size= 9,
Price = 2200, imageURL="/Areas/Men/Content/images/men_footwears/img_f2.jpg"},
new MenFootwear () { Id = 3, Name = "Casual Shoes", Size= 9,
Price = 2500, imageURL="/Areas/Men/Content/images/men_footwears/img_f3.jpg"},
new MenFootwear () { Id = 4, Name = "Formal Shoes", Size= 9,
Price = 1600, imageURL="/Areas/Men/Content/images/men_footwears/img_f4.jpg"}
}; return result;
}
}The above code snippet is very simple and self-explanatory so hope you can understand it easily.
- Add a controller under the Controllers folder named as Clothing inside
MenArea as shown below: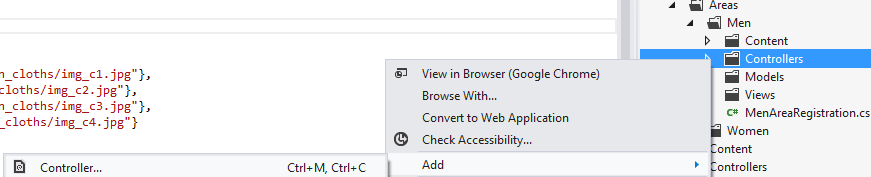
Write the following code inside the
Indexmethod in ClothingController.cs file.Hide Copy Codepublic ActionResult Index()
{
MenRepository menRepository = new MenRepository();
var cloths = menRepository.GetCloths();
return View(cloths);
}Indexis an action method that will return a view havingMenClothingmodel which has list of all clothes forMen. - Right click on
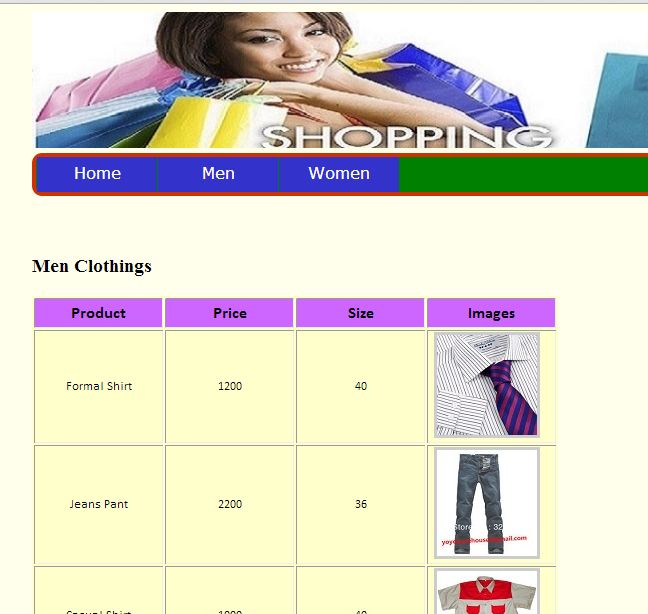
Indexaction method (in ClothingController.cs) to add a view and follow the default options. It will add Index.cshtml file inside Views > Clothing folder. Write the following code in Index.cshtml view. This view will useMenClothingModel as shown below:Hide Shrink Copy Code@model IEnumerable<AreaDemo.Areas.Men.Models.MenClothing>
@{
Layout = "~/Views/Shared/_Layout.cshtml";
} <h3 > Men Clothings</h3> <table class="tblStyle">
<tr class="tblHearerRow">
<th class="tblHearerCell">Product
</th>
<th class="tblHearerCell">Price
</th>
<th class="tblHearerCell">Size
</th>
<th class="tblHearerCell">Images
</th> </tr>
@foreach (var item in Model)
{
<tr class="tblRow">
<td class="tblColumn">
@Html.DisplayFor(modelItem => item.Name)
</td>
<td class="tblColumn">
@Html.DisplayFor(modelItem => item.Price)
</td>
<td class="tblColumn">
@Html.DisplayFor(modelItem => item.Size)
</td>
<td class="tblColumn">
<div class="thumbnail-item">
<a href="#">
<img src="@item.imageURL" class="thumbnail" />
</a>
<div class="tooltip">
<img src="@item.imageURL"
alt="" class="imageShadow" />
<span class="overlay"></span>
</div>
</div>
</td>
</tr>
} </table>The above table will display the products under clothes category for men.
- Open Global.asax.cs file and inside the
Application_Startmethod. It must be having "AreaRegistration.RegisterAllAreas();". Verify this method is having such code:Hide Copy Codeprotected void Application_Start()
{
AreaRegistration.RegisterAllAreas(); FilterConfig.RegisterGlobalFilters(GlobalFilters.Filters);
RouteConfig.RegisterRoutes(RouteTable.Routes);
} - Open MenAreaRegistration.cs file under Areas > Men folder. This file is used to define the routes for a particular module/Area. Add the following line of code in
MapRoutemethod as shown below:Hide Copy Codenamespaces: new[] { "AreaDemo.Areas.Men.Controllers" }Finally
RegisterAreamethods must look like shown below: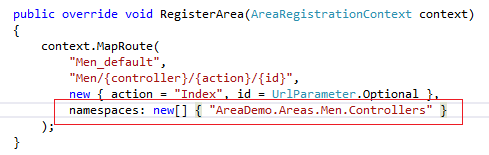
- Open RouteConfig.cs file under App_Start folder and add the following line of code inside
RegisterRoutesmethod as shown below:Hide Copy Codenamespaces: new[] { "AreaDemo.Controllers" }Final
RegisterRoutesmethod looks like shown below: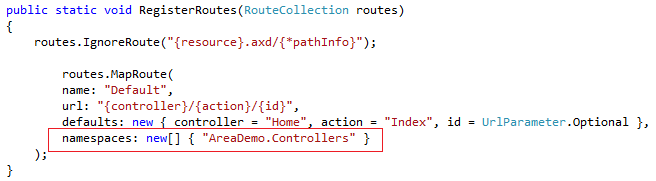
- Add another controller to Controllers folder under the
Men(Area) module named asFootwearController(as we done for Clothing Controller). Write the following code as shown below:Hide Copy Codepublic ActionResult Index()
{
MenRepository menRepository = new MenRepository();
var footwears = menRepository.GetFootwears();
return View(footwears);
} - Right click on
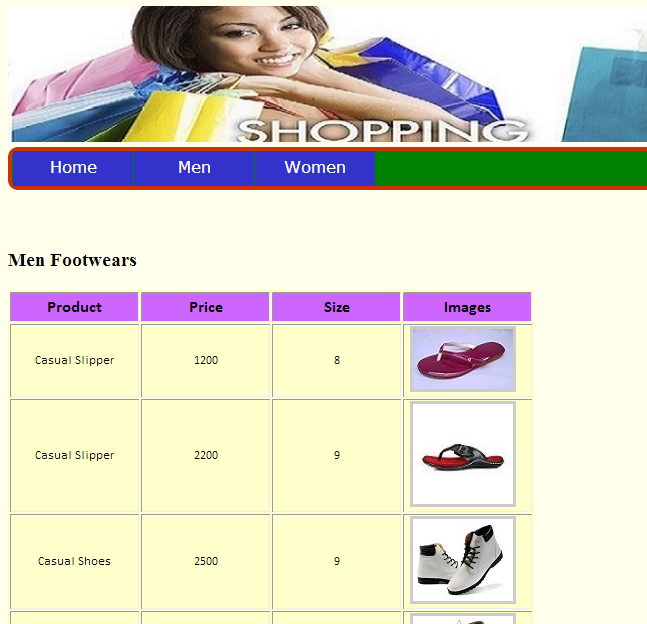
Indexaction method (in FootwearController.cs) to add a view and follow the default options. It will add Index.cshtml file inside Views > Footwear folder. This view will display all footwear for men. Write the following code in Index.cshtml file as shown below:Hide Copy Code@model IEnumerable<AreaDemo.Areas.Men.Models.MenFootwear> @{
Layout = "~/Views/Shared/_Layout.cshtml";
}
<h3> Men Footwears</h3> - Add one more controller to Controllers folder under the
Men (Area)module named asHomeController. It will be specific home page forMenModule. Write the following code as shown below:Hide Copy Codepublic ActionResult Index()
{
return View();
} - Right click on
Indexaction method (in HomeController.cs just created) to add a view and follow the default options. It will add Index.cshtml file inside Views > Home folder. Write the following code in this file as shown below:Hide Copy Code@{
Layout = "~/Views/Shared/_Layout.cshtml";
} <div id="homeDiv">
<h2>This is home page for Men module.
To view the products in Men module, please select a category from top menu.
</h2> - Now run the application and click on Clothing under the Men module. Hope you will get the following screen.
 p
p - Now click on Footwear under the Men module. Hope you will get the following screen.
- To implement the women Module, follow the same step from 6 to 20 steps with different data and images. In case of any confusion, look into the downloaded code having both modules implemented.
Conclusion
In this article, we learned how to use Areas in ASP.NET MVC application. It is a very helpful concept to organize big applications in an elegant way. Your queries and comments are most welcome in this respect. Thanks.
Areas in ASP.NET MVC 4的更多相关文章
- 使用Areas分离ASP.NET MVC项目
为什么需要分离? 我们知道MVC项目各部分职责比较清晰,相比较ASP.NET Webform而言,MVC项目的业务逻辑和页面展现较好地分离开来,这样的做法有许多优点,比如可测试,易扩展等等.但是在实际 ...
- (转)ASP.NET Mvc 2.0 - 1. Areas的创建与执行
转自:http://www.cnblogs.com/terrysun/archive/2010/04/13/1711218.html ASP.NET Mvc 2.0 - 1. Areas的创建与执行 ...
- 1.开始学习ASP.NET MVC
Hello,大家好! 好久没有开始记录博客了,是时候开始分享一下了,这个系列主要为零基础的同学,量身打造的.废话不多说,我们开干! 什么是ASP.NET MVC MVC(Model-View-Cont ...
- ASP.NET MVC 4 WebAPI. Support Areas in HttpControllerSelector
This article was written for ASP.NET MVC 4 RC (Release Candidate). If you are still using Beta versi ...
- ASP.NET MVC 及 Areas 简单控制路由
ASP.NET MVC中怎么去控制路由,这个想关的文章很多,我在这里就是自我总结一下,仅供参考. 1.我们新建一个项目,查看RouteConfig.cs,代码如下: public static voi ...
- 5. ASP.NET MVC 中的Areas【区域】是什么
[PS返回上一篇:-->4.ASP.NET MVC 5.0 视图之模型绑定] 从ASP.NET MVC 2.0开始,微软就提供了一个新特性:Areas[区域].Areas仅仅是用来将大型程序拆分 ...
- ASP.NET MVC Areas View 引用 外部母版视图
ASP.NET MVC Area => Areas View 引用 外部母版视图 创建项目:MVCSite.Area 创建mvc area 1.Areas View 引用 外部母版视图 1.1 ...
- ASP.NET MVC使用Areas后怎样获取Area(区域)的名称
写此随笔,目的只为今后在ASP.NET MVC项目中再用到Area(区域)时作为备查. 获取当前Area(区域)名称的方法是: ViewContext.RouteData.DataTokens[&qu ...
- 【Pro ASP.NET MVC 3 Framework】.学习笔记.12.ASP.NET MVC3的细节:URLs,Routing和Areas
Adam Applied ASP.NET 4 in Context 1 介绍Routing系统 在引入MVC之前,ASP.NET假定被请求的URLs和服务器硬盘上的文件之间有着直接关系.服务器的任务是 ...
随机推荐
- 从无到有开发自己的Wordpress博客主题---创建主题
上一篇教程,我们已经安装了Wordpress,我们可以成功的登录到Wordpress后台,接下来的任务就是创建我们自己的主题. 要想创建一个Wordpress主题,就必须按照Wordpress的规则, ...
- 运用 jenkins 让你的项目优雅的持续化集成
0.到系统管理->系统设置 1.安装插件 Publish over SSH 2.配置 Publish over SSH 参数 1.pass 是私钥密码,此私钥文件放在安装 jenkins 的主机 ...
- Shell 参数(1)
shell 中参数相关: ./a.sh a b c d $# 是传给脚本的参数个数 $0 是脚本本身的名字 $1 是传递给该shell脚本的第一个参数 $2 是传递给该shell脚本的第二个参数 $@ ...
- Java程序员必须掌握的知识
1.语法:Java程序员必须比较熟悉语法,在写代码的时候IDE的编辑器对某一行报错应该能够根据报错信息 知道是什么样的语法错误并且知道任何修正. 2.命令:必须熟悉JDK带的一些常用命令及其常用选项, ...
- 启动tomcat7w.exe提示"指定的服务未安装"
说下本人的情况:因为重装系统,安装在C盘的tomcat的失去作用.想要启动tomcat7w.exe(这是管理服务的)出现“指定服务未安装,无法打开tomcat7服务”的提示.原因是重装系统也导致之前安 ...
- webpack新版本4.12应用九(配置文件之入口和上下文(entry and context))
entry 对象是用于 webpack 查找启动并构建 bundle.其上下文是入口文件所处的目录的绝对路径的字符串. context string 基础目录,绝对路径,用于从配置中解析入口起点(en ...
- 一个苹果证书如何多次使用——导出p12文件[多台电脑使用]
为什么要导出.p12文件 当我们用大于三个mac设备开发应用时,想要申请新的证书,如果在我们的证书里,包含了3个发布证书,2个开发证书,可以发现再也申请不了开发证书和发布证书了(一般在我们的证书界面中 ...
- ①SpringCloud前序知识-CAP原则
本文主要介绍SpringCloud里头一些常见的原理.定理等相关SpringCloud的技术知识 一.CAP原则 CAP原则又称CAP定理,指的是在一个分布式系统中,Consistency(一致性). ...
- (转)Android之Adapter用法总结
1.概念 Adapter是连接后端数据和前端显示的适配器接口,是数据和UI(View)之间一个重要的纽带.在常见的View(ListView,GridView)等地方都需要用到Adapter.如下图直 ...
- Jenkins设置自动发邮件
安装Jenkins方法详解:https://www.cnblogs.com/lizhe860/p/9901257.html 一.设置全局变量 从首页依次进入系统工具→系统设置 二.在项目配置中设置项目 ...