网络编程NIO:BIO和NIO
BIO
BIO(Blocking I/O),同步阻塞,实现模式为一个连接一个线程,即当有客户端连接时,服务器端需为其单独分配一个线程,如果该连接不做任何操作就会造成不必要的线程开销。BIO是传统的Java io编程,其相关的类和接口在java.io 包下。
BIO适用于连接数目较小且固定的架构,对服务器资源的要求较高,是JDK1.4以前的唯一选择,但程序简单易理解。

BIO编程流程
服务器端启动一个SeverSocket
客户端启动Socket对服务器端发起通信,默认情况下服务器端需为每个客户端创建一个线程与之通讯
客户端发起请求后,先咨询服务器端是否有线程响应,如果没有则会等待或被拒绝
如果有线程响应,客户端线程会等待请求结束后,再继续执行
简单代码实现
//BIO-服务器端

public class BIOSever {

    public static void main(String[] args) throws IOException {

        //在BIO中,可以使用线程池进行优化

        ExecutorService cachedThreadPool = Executors.newCachedThreadPool();

        ServerSocket serverSocket = new ServerSocket(6666);

        System.out.println("服务器已启动");

        while (true){

            System.out.println("等待客户端连接.....(阻塞中)");

            Socket socket = serverSocket.accept();

            System.out.println("客户端连接");

            cachedThreadPool.execute(new Runnable() {

                public void run() {

                    handler(socket);

                }

            });

        }

    }

    //从客服端socket读取数据

    public static void handler(Socket socket){

        try{

            InputStream inputStream = socket.getInputStream();

            byte[] b = new byte[1024];

            while (true){

                System.out.println("等待客户端输入.....(阻塞中)");

                int read = inputStream.read(b);

                if (read != -1){

                    System.out.println(new String(b, 0, read));

                }else {

                    break;

                }

            }

            inputStream.close();

        }catch (Exception e){

            e.printStackTrace();

        }finally {

            try {

                socket.close();

            } catch (IOException e) {

                e.printStackTrace();

            }

        }

    }

}
//BIO-客户端

public class BIOClient {

    public static void main(String[] args) throws IOException {

        Socket socket = new Socket("localhost", 6666);

        OutputStream outputStream = socket.getOutputStream();

        Scanner scanner = new Scanner(System.in);

        while (scanner.hasNextLine()){

            String message = scanner.nextLine();

            if ("exit".equals(message)) {

                break;

            }

            outputStream.write(message.getBytes());

        }

        outputStream.close();

        socket.close();

    }

}
BIO问题分析
从上面代码中可以看出BIO编程的两个问题:
服务器端在监听客户端连接时(serverSocket.accept()),服务器端处于阻塞状态,不能处理其他事务
服务器端需要为每个客户端建立一个线程,虽然可以用线程池来优化,但在并发较大时,线程开销依旧很大
当连接的客户端没有发送数据时,服务器端会阻塞在read操作上,等待客户端输入,造成线程资源浪费
NIO
从JDK1.4开始,java提供了一系列改进输入/输出的新特性,统称为NIO,全称n为new I/O,是同步非阻塞的,所以也有人称为non-blocking I/O。NIO的相关类都放在java.nio包或其子包下,并对原先java.io包中许多类进行了改写。
NIO的三大核心
缓冲区(Buffer)
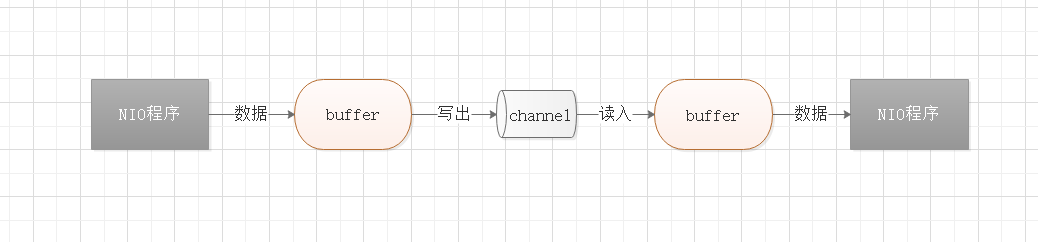
NIO是面向缓冲区, 或者说是面向块编程的。在NIO的IO传输中,数据会先读入到缓冲区,当需要时再从缓冲区写出,这样减少了直接读写磁盘的次数,提高了IO传输的效率。
缓冲区(buffer)本质上是一个可以读写数据的内存块,即在内存空间中预留了一定的存储空间,这些存储空间用来缓冲输入和输出的数据,这部分预留的存储空间就叫缓冲区。
在NIO程序中,通道channel虽然负责数据的传输,但是输入和输出的数据都必须经过缓冲区buffer。
在java中,缓冲区的相关类都在java.nio包下,其最顶层的类是 Buffer,它是一个抽象类。
Buffer类的4个重要属性:
mark:标记
position:位置,下一个要被读或写的元素的索引,每次读写缓冲区都会改变该值,为下次读写做准备
limit:表示缓冲区的终点,不能对缓冲区中超过极限的位置进行读写操作,且极限是可修改的
capacity:容量,即缓冲区的最多可容纳的数据量,该值在创建缓冲区时被设立,且不可修改
Buffer类常用方法:

Buffer的常用子类(它们之间最大区别在于底层实现数组的数据类型):
ByteBuffer:存储字节数据到缓冲区
CharBuffer:存储字符数据到缓冲区
IntBuffer:存储整型数据到缓冲区
ShortBuffer:存储短整型数据到缓冲区
LongBuffer:存储长整型数据到缓冲区
FloatBuffer:存储浮点型数据到缓冲区
DoubleBuffer:存储双精度浮点型数据到缓冲区
ByteBuffer
在Buffer的所有子类中,最常用的还是ByteBuffer,它的常用方法:

通道(Channel)
在NIO程序中服务器端和客户端之间的数据读写不是通过流,而是通过通道来读写的。
通道类似于流,都是用来读写数据的,但它们之间也是有区别的:
通道是双向的,即可以读也可以写,而流是单向的,只能读或写
通道可以实现异步读写数据
通道可以从缓冲区读数据,也可以把数据写入缓冲区
java中channel的相关类在java.nio.channel包下。Channel是一个接口,其常用的实现类有:
FileChannel:用于文件的数据读写,其真正的实现类为FileChannelImpl
DatagramChannel:用于UDP的数据读写,其真正的实现类为DatagramChannelImpl
ServerSocketChannel:用于监听TCP连接,每当有客户端连接时都会创建一个SocketChannel,功能类似ServerSocket,其真正的实现类为ServerSocketChannelImpl
SocketChannel:用于TCP的数据读写,功能类似节点流+Socket,其真正的实现类为SocketChannelImpl
FileChannel
FileChannel主要用于对本地文件进行IO操作,如文件复制等。它的常用方法有:

在文件传输流中有个属性channel,它默认是空的,可以通过流中的getChanel()方法根据当前文件流的属性生成对应的FileChannel。
public FileChannel getChannel() {

        synchronized (this) {

            if (channel == null) {

                channel = FileChannelImpl.open(fd, path, false, true, append, this);

            }

            return channel;

        }

    }

}
下面是通道使用的代码实例:
public class NIOChannel {

    public static void main(String[] args) throws IOException {

    }

    //将数据写入目标文件

    public static void writeFile() throws IOException{

        String str = "Hello, gofy";

        //创建文件输出流

        FileOutputStream fileOutputStream = new FileOutputStream("f:\\file.txt");

        //根据文件输出流生成文件通道

        FileChannel fileChannel = fileOutputStream.getChannel();

        //创建字节缓冲区,并将字符串转成字节存入

        ByteBuffer byteBuffer = ByteBuffer.allocate(1024);

        byteBuffer.put(str.getBytes());

        //注意,在存入后需要进行写出操作时,需将缓冲区翻转

        byteBuffer.flip();

        //将缓冲区数据写入通道

        fileChannel.write(byteBuffer);

        //将文件输出流关闭(该方法同时会关闭通道)

        fileOutputStream.close();

    }

    //从文件中读取数据

    public static void readFile() throws IOException{

        //创建文件输入流

        File file = new File("f:\\file.txt");

        FileInputStream fileInputStream = new FileInputStream(file);

        //根据文件输入流生成文件通道

        FileChannel fileChannel = fileInputStream.getChannel();

        //创建字节缓冲区,大小为文件大小

        ByteBuffer byteBuffer = ByteBuffer.allocate((int)file.length());

        //将通道数据读入缓冲区

        fileChannel.read(byteBuffer);

        //同样,在读入后需要取出缓冲区内所有数据时,需将缓冲区翻转

        byteBuffer.flip();

        System.out.println(new String(byteBuffer.array()));

        fileInputStream.close();

    }

    //将文件数据传输到另一个文件

    public static void readAndWriteFile() throws IOException{

        //创建文件输入流和文件输出流,并生成对应的通道

        FileInputStream fileInputStream = new FileInputStream("file1.txt");

        FileChannel inputStreamChannel= fileInputStream.getChannel();

        FileOutputStream fileOutputStream = new FileOutputStream("file2.txt");

        FileChannel outputStreamChannel = fileOutputStream.getChannel();

        //创建字节缓冲区

        ByteBuffer byteBuffer = ByteBuffer.allocate(1024);

        //进行数据读取

        while (true){

            //在读取前需清除缓冲区

            byteBuffer.clear();

            //将文件输入的通道的数据读入缓冲区

            int read = inputStreamChannel.read(byteBuffer);

            //当read为-1时,即通道数据已读取完毕

            if (read == -1){

                break;

            }

            //将缓冲区翻转后,将缓冲区数据写入文件输出的通道

            byteBuffer.flip();

            outputStreamChannel.write(byteBuffer);

        }

        fileInputStream.close();

        fileOutputStream.close();

    }

    //文件的复制粘贴

    public static void copyAndPaste() throws IOException{

        //复制的文件输入流

        FileInputStream fileInputStream = new FileInputStream("f:\\a.jpg");

        FileChannel srcChannel = fileInputStream.getChannel();

        //粘贴的文件输出流

        FileOutputStream fileOutputStream = new FileOutputStream("f:\\b.jpg");

        FileChannel targetChannel = fileOutputStream.getChannel();

        //使用transferFrom进行复制粘贴

        targetChannel.transferFrom(srcChannel, 0, srcChannel.size());

        fileInputStream.close();

        fileOutputStream.close();

    }

}
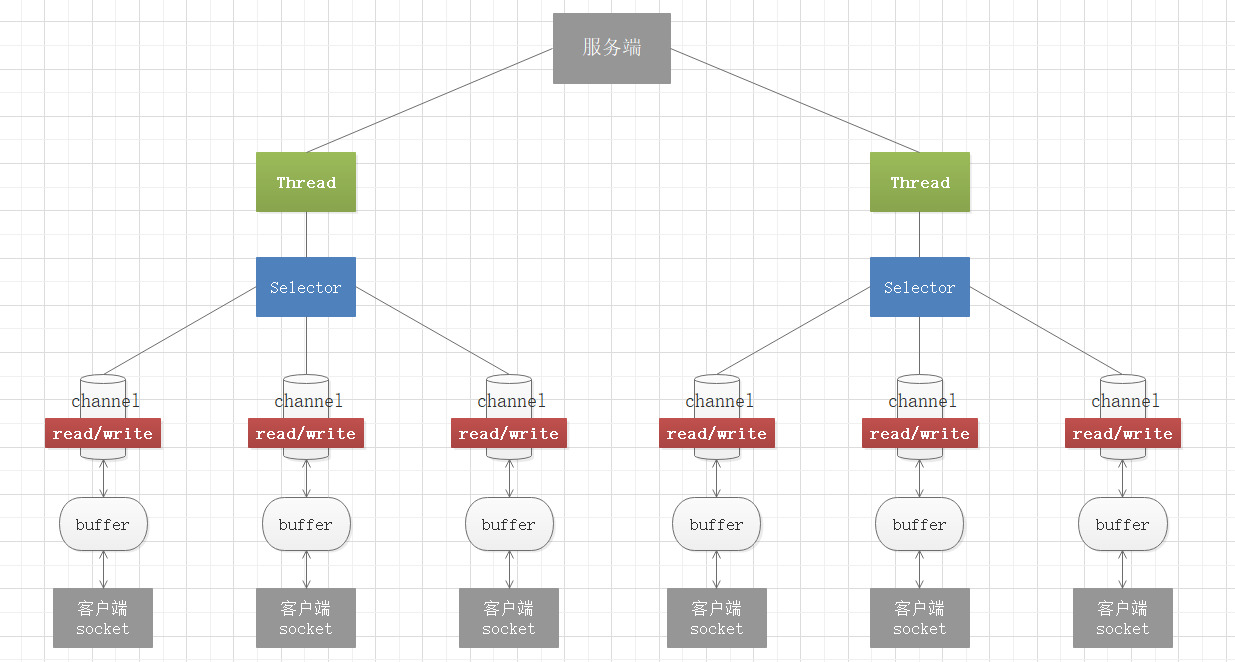
选择器(Selector)
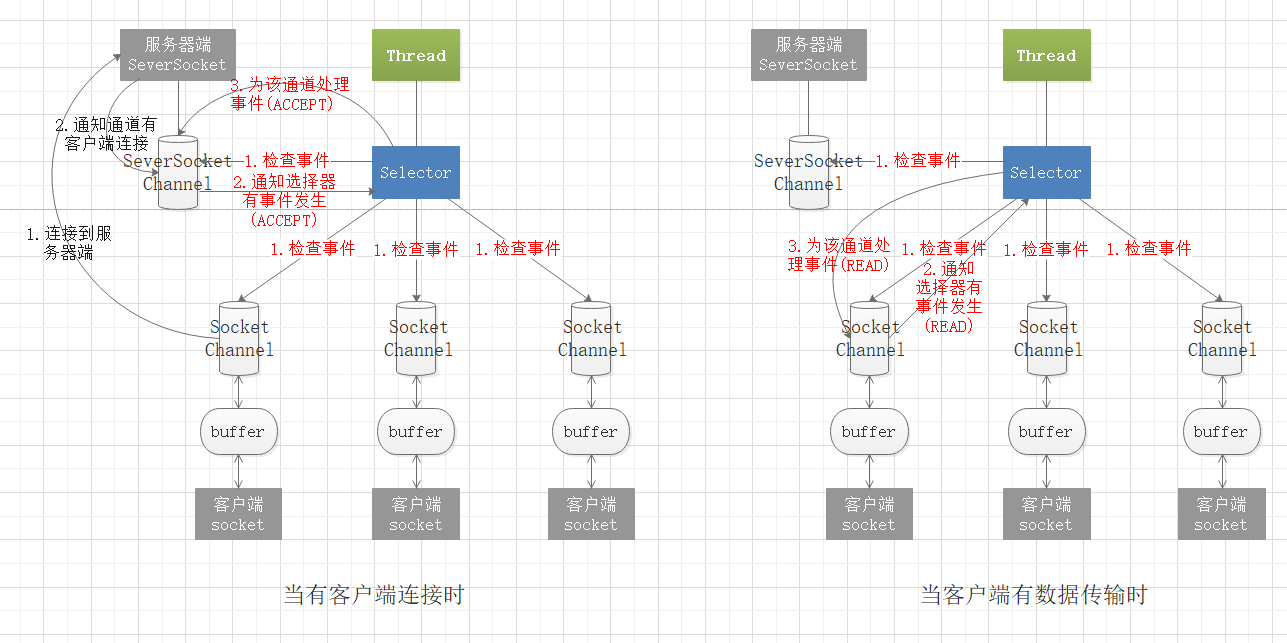
在NIO程序中,可以用选择器Selector实现一个选择器处理多个通道,即一个线程处理多个连接。只要把通道注册到Selector上,就可以通过Selector来监测通道,如果通道有事件发生,便获取事件通道然后针对每个事件进行相应的处理。这样,只有在通道(连接)有真正的读/写事件发生时,才会进行读写操作,大大减少了系统开销,并且不必为每个连接创建单独线程,就不用去维护过多的线程。
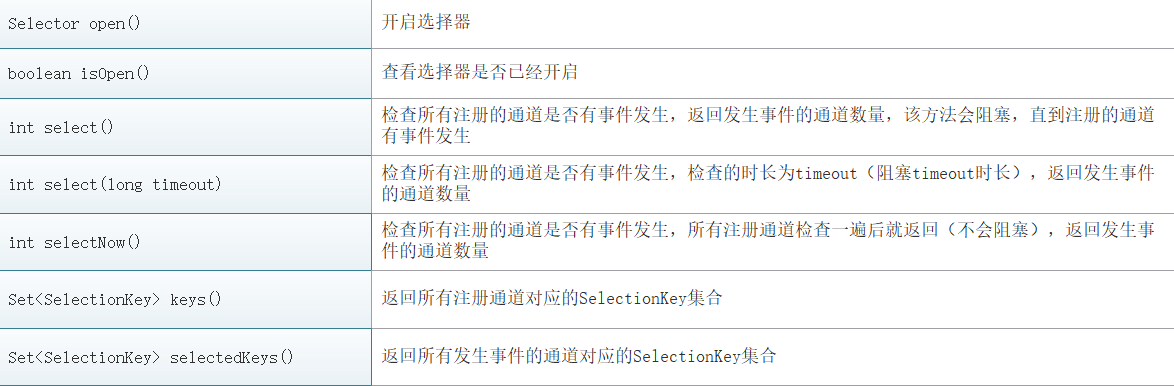
选择器的相关类在java.nio.channels包和其子包下,顶层类是Selector,它是一个抽象类,它的常用方法有:
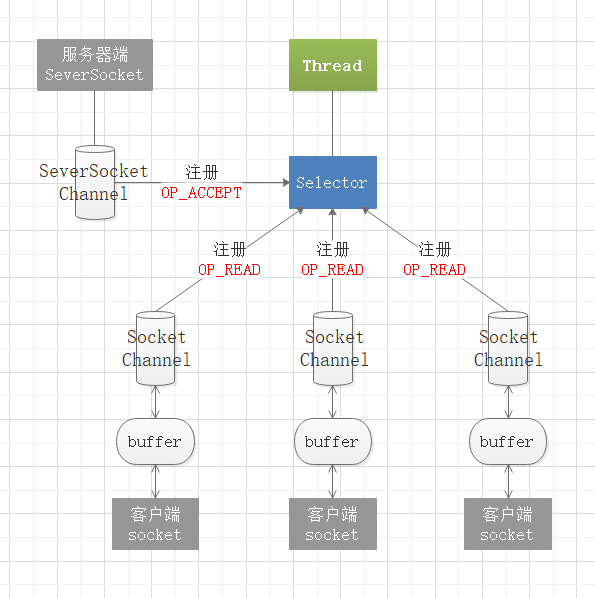
通道的注册
在ServerSocketChannel和SocketChannel类里都有一个注册方法 register(Selector sel, int ops),sel为要注册到的选择器,ops为该通道监听的操作事件的类型,可以通过该方法将ServerSocketChannel或SocketChannel注册到目标选择器中,该方法会返回一个SelectionKey(真正实现类为SelectionKeyImpl)储存在注册的Selector的publicKeys集合属性里。SelectionKey储存了通道的事件类型和该注册的通道对象,可以通过SelectionKey.channel()方法获取SelectionKey对应的通道。
每个注册到选择器的通道都需定义需进行的操作事件类型,通过查看SelectionKey类的属性可以知道操作事件的类型有4种:
public static final int OP_READ = 1 << 0; //读操作

public static final int OP_WRITE = 1 << 2; //写操作

public static final int OP_CONNECT = 1 << 3; //连接操作

public static final int OP_ACCEPT = 1 << 4; //接收操作
选择器的检查
我们可以通过选择器的检查方法,如select()来得知发生事件的通道数量,当该数量大于为0时,即至少有一个通道发生了事件,就可以使用selectedKeys()方法来获取所有发生事件的通道对应的SelectionKey,通过SelectionKey中的方法来判断对应通道中需处理的事件类型是什么,在根据事件做出相应的处理。
public final boolean isReadable() { //判断是否是读操作

    return (readyOps() & OP_READ) != 0;

}

public final boolean isWritable() { //判断是否是写操作

    return (readyOps() & OP_WRITE) != 0;

}

public final boolean isConnectable() { //判断是否是连接操作

    return (readyOps() & OP_CONNECT) != 0;

}

public final boolean isAcceptable() { //判断是否是接收操作

    return (readyOps() & OP_ACCEPT) != 0;

}
NIO实现简单的聊天群
//服务器端

public class GroupChatSever {

    private final static int PORT = 6666;//监听端口

    private Selector selector;//选择器

    private ServerSocketChannel serverSocketChannel;

    public GroupChatSever(){

        try{

            selector = Selector.open();//开启选择器

            serverSocketChannel = ServerSocketChannel.open();//开启通道

            serverSocketChannel.configureBlocking(false);//将通道设为非阻塞状态

            serverSocketChannel.socket().bind(new InetSocketAddress(PORT));//通道绑定监听端口

            serverSocketChannel.register(selector, SelectionKey.OP_ACCEPT);//将通道注册到选择器上,事件类型为接收

            listen();

        }catch (IOException e){

            e.printStackTrace();

        }

    }

    //对端口进行监听

    public void listen(){

        try {

            while (true){

                //检查注册通道是否有事件发生,检查时长为2秒

                int count = selector.select(2000);

                if (count > 0){//如果注册通道有事件发生则进行处理

                    //获取所有发生事件的通道对应的SelectionKey

                    Iterator<SelectionKey> keyIterator = selector.selectedKeys().iterator();

                    while (keyIterator.hasNext()){

                        SelectionKey key = keyIterator.next();

                        if (key.isAcceptable()){//判断该key对应的通道是否需进行接收操作

                            //虽然accept()方法是阻塞的,但是因为对通道进行过判断,

                            //可以确定是有客户端连接的,所以此时调用accept并不会阻塞

                            SocketChannel socketChannel = serverSocketChannel.accept();

                            socketChannel.configureBlocking(false);

                            //接收后,将获取的客户端通道注册到选择器上,事件类型为读

                            socketChannel.register(selector, SelectionKey.OP_READ);

                            System.out.println(socketChannel.getRemoteAddress() + "上线!");

                        }

                        if (key.isReadable()){//判断该key对应的通道是否需进行读操作

                            readFromClient(key);

                        }

                        //注意当处理完一个通道key时,需将它从迭代器中移除

                        keyIterator.remove();

                    }

                }

            }

        }catch (IOException e){

            e.printStackTrace();

        }

    }

    /**

     * 读取客户端发来的消息

     * @param key 需读取的通道对应的SelectionKey

     */

    public void readFromClient(SelectionKey key){

        SocketChannel socketChannel = null;

        try{

            //通过SelectionKey获取对应通道

            socketChannel = (SocketChannel)key.channel();

            ByteBuffer byteBuffer = ByteBuffer.allocate(1024);

            int read = socketChannel.read(byteBuffer);

            if (read > 0){

                String message = new String(byteBuffer.array());

                System.out.println("客户端: " + message);

                sendToOtherClient(message, socketChannel);

            }

        }catch (IOException e){

            //这里做了简化,将所有异常都当做是客户端断开连接触发的异常,实际项目中请不要这样做

            try{

                System.out.println(socketChannel.getRemoteAddress() + "下线");

                key.cancel();//将该SelectionKey撤销

                socketChannel.close();//再关闭对应通道

            }catch (IOException e2){

                e2.printStackTrace();

            }

        }

    }

    /**

     * 将客户端发送的消息转发到其他客户端

     * @param message 转发的消息

     * @param from 发送消息的客户端通道

     * @throws IOException

     */

    public void sendToOtherClient(String message, SocketChannel from) throws IOException{

        System.out.println("消息转发中......");

        for (SelectionKey key : selector.keys()){//遍历选择器中所有SelectionKey

            Channel channel = key.channel();//根据SelectionKey获取对应通道

            //排除掉发送消息的通道,将消息写入到其他客户端通道

            if (channel instanceof SocketChannel && channel != from){

                SocketChannel socketChannel = (SocketChannel)channel;

                ByteBuffer byteBuffer = ByteBuffer.wrap(message.getBytes());

                socketChannel.write(byteBuffer);

            }

        }

    }

    public static void main(String[] args) {

        GroupChatSever groupChatSever = new GroupChatSever();

    }

}
//客户端

public class GroupChatClient {

    private final static String SEVER_HOST = "127.0.0.1";//连接的客户端主机

    private final static int SEVER_PORT = 6666;//连接的客户端端口

    private Selector selector;//选择器

    private SocketChannel socketChannel;

    private String username;//储存客户端ip地址

    public GroupChatClient(){

        try {

            selector = Selector.open();//开启选择器

            socketChannel = SocketChannel.open(new InetSocketAddress(SEVER_HOST, SEVER_PORT));//开启通道

            socketChannel.configureBlocking(false);//将通道设为非阻塞

            socketChannel.register(selector, SelectionKey.OP_READ);//将通道注册在选择器上,事件类型为读

            username = socketChannel.getLocalAddress().toString().substring(1);//获取客户端ip地址

            String message = " 进入聊天群!";

            sendMessage(message);

        }catch (IOException e){

            e.printStackTrace();

        }

    }

    //发送消息

    public void sendMessage(String message){

        message = username+": "+message;

        try{

            ByteBuffer byteBuffer = ByteBuffer.wrap(message.getBytes());

            socketChannel.write(byteBuffer);

        }catch (IOException e){

            e.printStackTrace();

        }

    }

    //读取从服务器转发送过来的消息

    public void readMessage(){

        try{

            int read = selector.select();

            if (read > 0){

                Iterator<SelectionKey> keyIterator = selector.selectedKeys().iterator();

                while (keyIterator.hasNext()){

                    SelectionKey key = keyIterator.next();

                    if (key.isReadable()){

                        SocketChannel socketChannel = (SocketChannel)key.channel();

                        ByteBuffer byteBuffer = ByteBuffer.allocate(1024);

                        socketChannel.read(byteBuffer);

                        System.out.println(new String(byteBuffer.array()));

                    }

                    keyIterator.remove();

                }

            }

        }catch (IOException e){

            e.printStackTrace();

        }

    }

    public static void main(String[] args) {

        final GroupChatClient groupChatClient = new GroupChatClient();

        //客户端开启一个线程来监听是否有服务器转发来消息

        new Thread(){

            @Override

            public void run() {

                while (true){

                    groupChatClient.readMessage();

                    try {

                        Thread.currentThread().sleep(1000);

                    }catch (InterruptedException e){

                        e.printStackTrace();

                    }

                }

            }

        }.start();

        Scanner scanner = new Scanner(System.in);

        while (scanner.hasNextLine()){

            String message = scanner.nextLine();

            groupChatClient.sendMessage(message);

        }

    }

}
网络编程NIO:BIO和NIO的更多相关文章
- hadoop---Java 网络IO编程总结BIO、NIO、AIO
转载请注明出处:http://blog.csdn.net/anxpp/article/details/51512200,谢谢! 本文会从传统的BIO到NIO再到AIO自浅至深介绍,并附上完整的代码讲解 ...
- 网络编程之BIO和NIO
目录 OSI网络七层模型 TCP/UDP协议 TCP消息头 TCP三次握手.四次挥手 UDP协议 TCP协议/UDP协议区别 HTTP协议 HTTP协议请求头 HTTP协议响应头 HTTP状态码 so ...
- 网络编程 -- RPC实现原理 -- NIO单线程
网络编程 -- RPC实现原理 -- 目录 啦啦啦 Class : Service package lime.pri.limeNio.optimize.socket; import java.io.B ...
- 网络编程 -- RPC实现原理 -- NIO多线程 -- 迭代版本V1
网络编程 -- RPC实现原理 -- 目录 啦啦啦 V1——设置标识变量selectionKey.attach(true);只处理一次(会一直循环遍历selectionKeys,占用CPU资源). ( ...
- 网络编程 -- RPC实现原理 -- NIO多线程 -- 迭代版本V2
网络编程 -- RPC实现原理 -- 目录 啦啦啦 V2——增加WriteQueue队列,存放selectionKey.addWriteEventToQueue()添加selectionKey并唤醒阻 ...
- Java 网络IO编程(BIO、NIO、AIO)
本概念 BIO编程 传统的BIO编程 代码示例: public class Server { final static int PROT = 8765; public static void main ...
- Java高并发网络编程(二)BIO
一.阻塞 服务器端 public class BIOServer { public static void main(String[] args) throws Exception { ServerS ...
- 五分钟学Java:如何学习Java面试必考的网络编程
原创声明 本文作者:黄小斜 转载请务必在文章开头注明出处和作者. 本文思维导图 简介 Java作为一门后端语言,对于网络编程的支持是必不可少的,但是,作为一个经常CRUD的Java工程师,很多时候都不 ...
- Netty | 第1章 Java NIO 网络编程《Netty In Action》
目录 前言 1. Java 网络编程 1.1 Javs NIO 基本介绍 1.2 缓冲区 Buffer 1.2 通道 Channel 1.3 选择器 Selector 1.4 NIO 非阻塞网络编程原 ...
- NIO 源码分析(03) 从 BIO 到 NIO
目录 一.NIO 三大组件 Channels.Buffers.Selectors 1.1 Channel 和 Buffer 1.2 Selector 1.3 Linux IO 和 NIO 编程的区别 ...
随机推荐
- matlab中repmat函数的用法
转载:https://blog.csdn.net/facetosea1/article/details/83573859 B = repmat(A,m,n)B = repmat(A,[m n])B = ...
- Unicode、UTF8、GB2312、ANSI
来源:https://blog.csdn.net/osanwenyu/article/details/48439461 版权声明:本文为博主原创文章,遵循CC 4.0 BY-SA版权协议,转载请附上原 ...
- matlab中fft快速傅里叶变换
视频来源:https://www.bilibili.com/video/av51932171?t=628. 博文来源:https://ww2.mathworks.cn/help/matlab/ref/ ...
- P 2568 GCD
对于这道题,我们要求的是 \(\displaystyle \sum_{i=1}^{N}\sum_{j = 1} ^{N}\) gcd(i,j)为质数 首先我们很容易想出来怎么打暴力,我们可以对于每个 ...
- [tip:,x86/urgent] x86: Fix early boot crash on gcc-10, third try
[tip:,x86/urgent] x86: Fix early boot crash on gcc-10, third try https://lore.kernel.org/patchwork ...
- mysql通配符_,%查询
模糊查询 在使用模糊查询的时候,mysql使用的是最左原则,所以模糊查询语句: select * from sys_user where user_name like '#{userName}%' 我 ...
- vue+element ui 关闭弹窗前清空form表单的值
this.$refs['disposeConfigsform'].resetFields();
- Python:MySQL数据库环境相关问题
系统环境 Ubuntu 16.04.2 LTS mysql Ver 14.14 Distrib 5.7.18, for Linux (x86_64) using EditLine wrapper P ...
- golang API 请求队列
概要 实现思路 使用方法 启动队列服务 使用队列服务 概要 在调用第三方 API 的时候, 基本都有访问限速的限制条件. 第三方的 API 有多个的时候, 就不太好控制访问速度, 常常会导致 HTTP ...
- 【手摸手,带你搭建前后端分离商城系统】01 搭建基本代码框架、生成一个基本API
[手摸手,带你搭建前后端分离商城系统]01 搭建基本代码框架.生成一个基本API 通过本教程的学习,将带你从零搭建一个商城系统. 当然,这个商城涵盖了很多流行的知识点和技术核心 我可以学习到什么? S ...