Volley(五)—— 自定义Request
详细解读Volley(四)—— 自定义Request
Volley中提供了几个Request,如果我们有特殊的需求,完全可以自定义Request的,自定义Request自然要继承Request,那么本篇就教大家来一步一步地定义一个自己的Request类。
一、继承Request
如果我们的request的对象不是string,也不是JsonObject,而是一个奇怪的对象呢?我这里建立了一个类,叫做:Kale,然后定义了一个CustomReqeust去继承Reqeust,得到如下的代码。

package com.kale.volleytest;

import com.android.volley.NetworkResponse;

import com.android.volley.Request;

import com.android.volley.Response;

import com.android.volley.Response.ErrorListener;

import com.android.volley.Response.Listener;

public class CustomReqeust extends Request<Kale>{

    public CustomReqeust(int method, String url, ErrorListener listener) {

        super(method, url, listener);

    }

    @Override

    protected Response<Kale> parseNetworkResponse(NetworkResponse response) {

        // TODO 自动生成的方法存根

        return null;

    }

    @Override

    protected void deliverResponse(Kale response) {

        // TODO 自动生成的方法存根

    }

}
分析:
public CustomReqeust(int method, String url, ErrorListener listener)
构造函数中调用了父类的方法,初始化了当前对象。传入三个参数:①请求方式,即POST/GET,②请求的URL,③出错时的回调监听器
protected Response<Kale> parseNetworkResponse(NetworkResponse response)
解析网络响应的结果,从NetworkResponse的代码中我们就可以知道它里面有什么东西了。
/**

 * Data and headers returned from {@link Network#performRequest(Request)}.

 */

public class NetworkResponse {

    /**

     * Creates a new network response.

     * @param statusCode the HTTP status code

     * @param data Response body

     * @param headers Headers returned with this response, or null for none

     * @param notModified True if the server returned a 304 and the data was already in cache

     * @param networkTimeMs Round-trip network time to receive network response

     */

    public NetworkResponse(int statusCode, byte[] data, Map<String, String> headers,

            boolean notModified, long networkTimeMs)
响应码啊,请求头什么的,最最主要的就是这个比特数组的data,响应的结果就在里面。我们可以自由的进行处理了~
protected void deliverResponse(Kale response)
分发响应的结果,我们可以通过将这个response放到监听器里来获取响应结果。
二、分析StringRequest
我们现在已经对request的子类有了基本的认识,现在就来看看StringRequest的源码吧,别担心,很短!
package com.android.volley.toolbox;public class StringRequest extends Request<String> {

    // 建立监听器来获得响应成功时返回的结果

    private final Listener<String> mListener;

    // 传入请求方法,url,成功时的监听器,失败时的监听器

    public StringRequest(int method, String url, Listener<String> listener,

            ErrorListener errorListener) {

        super(method, url, errorListener);

        // 初始化成功时的监听器

        mListener = listener;

    }

    /**

     * Creates a new GET request.

     * 建立一个默认的GET请求,调用了上面的构造函数

     */

    public StringRequest(String url, Listener<String> listener, ErrorListener errorListener) {

        this(Method.GET, url, listener, errorListener);

    }

    @Override

    protected void deliverResponse(String response) {

        // 用监听器的方法来传递下响应的结果

        mListener.onResponse(response);

    }

    @Override

    protected Response<String> parseNetworkResponse(NetworkResponse response) {

        String parsed;

        try {

            // 调用了new String(byte[] data, String charsetName) 这个构造函数来构建String对象,

            // 将byte数组按照特定的编码方式转换为String对象

            // 主要部分是data

            parsed = new String(response.data, HttpHeaderParser.parseCharset(response.headers));

        } catch (UnsupportedEncodingException e) {

            parsed = new String(response.data);

        }

        return Response.success(parsed, HttpHeaderParser.parseCacheHeaders(response));

    }

}
分析完代码我们应该就能知道改如何自定义Request了,其实没啥高深的东西。
三、自定义XMLRequest
代码来自:http://blog.csdn.net/guolin_blog/article/details/17612763
public class XMLRequest extends Request<XmlPullParser> {

    private final Listener<XmlPullParser> mListener;

    public XMLRequest(int method, String url, Listener<XmlPullParser> listener,

            ErrorListener errorListener) {

        super(method, url, errorListener);

        mListener = listener;

    }

    public XMLRequest(String url, Listener<XmlPullParser> listener, ErrorListener errorListener) {

        this(Method.GET, url, listener, errorListener);

    }

    @Override

    protected Response<XmlPullParser> parseNetworkResponse(NetworkResponse response) {

        try {

            String xmlString = new String(response.data,

                    HttpHeaderParser.parseCharset(response.headers));

            XmlPullParserFactory factory = XmlPullParserFactory.newInstance();

            XmlPullParser xmlPullParser = factory.newPullParser();

            xmlPullParser.setInput(new StringReader(xmlString));

            return Response.success(xmlPullParser, HttpHeaderParser.parseCacheHeaders(response));

        } catch (UnsupportedEncodingException e) {

            return Response.error(new ParseError(e));

        } catch (XmlPullParserException e) {

            return Response.error(new ParseError(e));

        }

    }

    @Override

    protected void deliverResponse(XmlPullParser response) {

        mListener.onResponse(response);

    }

}
这里用到了XmlPull的知识,如果不是很了解,可以去这篇文章看看:http://www.cnblogs.com/tianzhijiexian/p/4020250.html
测试代码:
XMLRequest xmlRequest = new XMLRequest(

                "http://flash.weather.com.cn/wmaps/xml/china.xml",

                new Response.Listener<XmlPullParser>() {

                    @Override

                    public void onResponse(XmlPullParser response) {

                        try {

                            int eventType = response.getEventType();

                            while (eventType != XmlPullParser.END_DOCUMENT) {

                                switch (eventType) {

                                case XmlPullParser.START_TAG:

                                    String nodeName = response.getName();

                                    if ("city".equals(nodeName)) {

                                        String pName = response.getAttributeValue(0);

                                        Log.d("TAG", "pName is " + pName);

                                    }

                                    break;

                                }

                                eventType = response.next();

                            }

                        } catch (XmlPullParserException e) {

                            e.printStackTrace();

                        } catch (IOException e) {

                            e.printStackTrace();

                        }

                    }

                }, new Response.ErrorListener() {

                    @Override

                    public void onErrorResponse(VolleyError error) {

                        Log.e("TAG", error.getMessage(), error);

                    }

                });

        mQueue.add(xmlRequest);
结果:

四、自定义GsonRequest
代码来自:http://blog.csdn.net/guolin_blog/article/details/17612763
public class GsonRequest<T> extends Request<T> {

    private final Listener<T> mListener;

    private Gson mGson;

    private Class<T> mClass;

    public GsonRequest(int method, String url, Class<T> clazz, Listener<T> listener,

            ErrorListener errorListener) {

        super(method, url, errorListener);

        mGson = new Gson();

        mClass = clazz;

        mListener = listener;

    }

    public GsonRequest(String url, Class<T> clazz, Listener<T> listener,

            ErrorListener errorListener) {

        this(Method.GET, url, clazz, listener, errorListener);

    }

    @Override

    protected Response<T> parseNetworkResponse(NetworkResponse response) {

        try {

            String jsonString = new String(response.data,

                    HttpHeaderParser.parseCharset(response.headers));

            return Response.success(mGson.fromJson(jsonString, mClass),

                    HttpHeaderParser.parseCacheHeaders(response));

        } catch (UnsupportedEncodingException e) {

            return Response.error(new ParseError(e));

        }

    }

    @Override

    protected void deliverResponse(T response) {

        mListener.onResponse(response);

    }

}
代码十分简单,先是将服务器响应的数据解析出来,然后通过调用Gson的fromJson方法将数据组装成对象。在deliverResponse方法中仍然是将最终的数据进行回调。
用法:
建立一个对象类,比如这里的weather、WeatherInfo类,然后初始化GsonRequest对象,最后把GsonRequest对象添加到队列中。
Weather:
public class Weather {

    private WeatherInfo weatherinfo;

    public WeatherInfo getWeatherinfo() {

        return weatherinfo;

    }

    public void setWeatherinfo(WeatherInfo weatherinfo) {

        this.weatherinfo = weatherinfo;

    }

}
WeatherInfo:
public class WeatherInfo {

    private String city;

    private String temp;

    private String time;

    public String getCity() {

        return city;

    }

    public void setCity(String city) {

        this.city = city;

    }

    public String getTemp() {

        return temp;

    }

    public void setTemp(String temp) {

        this.temp = temp;

    }

    public String getTime() {

        return time;

    }

    public void setTime(String time) {

        this.time = time;

    }

}
Java测试代码:
GsonRequest<Weather> gsonRequest = new GsonRequest<Weather>(

        "http://www.weather.com.cn/data/sk/101010100.html", Weather.class,

        new Response.Listener<Weather>() {

            @Override

            public void onResponse(Weather weather) {

                WeatherInfo weatherInfo = weather.getWeatherinfo();

                Log.d("TAG", "city is " + weatherInfo.getCity());

                Log.d("TAG", "temp is " + weatherInfo.getTemp());

                Log.d("TAG", "time is " + weatherInfo.getTime());

            }

        }, new Response.ErrorListener() {

            @Override

            public void onErrorResponse(VolleyError error) {

                Log.e("TAG", error.getMessage(), error);

            }

        });

mQueue.add(gsonRequest);
五、重写getBody()方法来添加post参数
我们可以在JsonRequest类中发现如下代码:
/**

  * Returns the raw POST or PUT body to be sent.

  *

  * @throws AuthFailureError in the event of auth failure

  */

 @Override

 public byte[] getBody() {

     try {

         return mRequestBody == null ? null : mRequestBody.getBytes(PROTOCOL_CHARSET);

     } catch (UnsupportedEncodingException uee) {

         VolleyLog.wtf("Unsupported Encoding while trying to get the bytes of %s using %s",

                 mRequestBody, PROTOCOL_CHARSET);

         return null;

     }

 }
不用看代码,直接看注释,说明这里执行post请求,所以我们可以在这里设置post参数。这里
return mRequestBody == null ? null : mRequestBody.getBytes(PROTOCOL_CHARSET);
返回的就是post参数了。
如果我们想要传递POST数据,可以参考上面的代码,重写Request的getBody()方法,放入自己的参数,举例如下:
   /** http请求编码方式 */

    private static final String PROTOCOL_CHARSET = "utf-8";

    private String mUserName;
@Override

    public byte[] getBody() {

        try {

            return mUserName == null ? null : mUserName.getBytes(PROTOCOL_CHARSET);

        } catch (UnsupportedEncodingException uee) {

            VolleyLog.wtf("Unsupported Encoding while trying to get the bytes of %s using %s", mUserName, PROTOCOL_CHARSET);

            return null;

        }

    }
完整代码(来自:http://blog.csdn.net/ttdevs/article/details/17586205):
public class CustomReqeust extends Request<String> {

    /** http请求编码方式 */

    private static final String PROTOCOL_CHARSET = "utf-8";

    private Listener<String> mListener;

    private String mUserName;

    public CustomReqeust(String url, String userName, Listener<String> listener, ErrorListener errorListener) {

        super(Method.POST, url, errorListener);

        mUserName = userName;

        mListener = listener;

    }

    @Override

    protected Response<String> parseNetworkResponse(NetworkResponse response) {

        String parsed;

        try {

            parsed = new String(response.data, HttpHeaderParser.parseCharset(response.headers));

        } catch (UnsupportedEncodingException e) {

            parsed = new String(response.data);

        }

        return Response.success(parsed, HttpHeaderParser.parseCacheHeaders(response));

    }

    @Override

    protected void deliverResponse(String response) {

        mListener.onResponse(response);

    }

    @Override

    public byte[] getBody() {

        try {

            return mUserName == null ? null : mUserName.getBytes(PROTOCOL_CHARSET);

        } catch (UnsupportedEncodingException uee) {

            VolleyLog.wtf("Unsupported Encoding while trying to get the bytes of %s using %s", mUserName, PROTOCOL_CHARSET);

            return null;

        }

    }

}
测试代码:
private void customRequest() {

    CustomReqeust request = new CustomReqeust(URL, "CustomVolley", new Listener<String>() {

        @Override

        public void onResponse(String arg0) {

            Toast.makeText(getApplicationContext(), arg0, Toast.LENGTH_LONG).show();

            Log.d("onResponse", arg0);

        }

    }, new ErrorListener() {

        @Override

        public void onErrorResponse(VolleyError arg0) {

            Toast.makeText(getApplicationContext(), arg0.toString(), Toast.LENGTH_LONG).show();

            Log.d("onErrorResponse", arg0.toString());

        }

    });

    mQueue.add(request);

}
抓包结果:
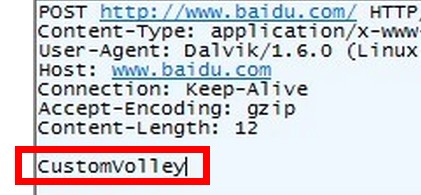
得到了传递的username = CustomVolley
Volley(五)—— 自定义Request的更多相关文章
- Android Volley 之自定义Request
转载标明出处:http://blog.csdn.net/lmj623565791/article/details/24589837 今天群里一哥们需要自定义Volley的Request的例子,于是产生 ...
- 详细解读Volley(四)—— 自定义Request
Volley中提供了几个Request,如果我们有特殊的需求,完全可以自定义Request的,自定义Request自然要继承Request,那么本篇就教大家来一步一步地定义一个自己的Request类. ...
- Volley自定义Request及使用单例封装RequestQueue
一.自定义Request Volley的所有的请求的超类型是Resuest,所有我们常用的请求都是这个类的子类,那么我们自定义View肯定也是基于这个类的. 案例: package com.zhy.v ...
- Volley 的使用以及自定义Request
Volley 的使用以及自定义Request 一.什么是 Volley 2013年Google I/O大会上推出了一个新的网络通信框架.Volley是Android平台上的网络通信库,能使网络通信更快 ...
- Android图表库MPAndroidChart(五)——自定义MarkerView实现选中高亮
Android图表库MPAndroidChart(五)--自定义MarkerView实现选中高亮 在学习本课程之前我建议先把我之前的博客看完,这样对整体的流程有一个大致的了解 Android图表库MP ...
- Android特效专辑(五)——自定义圆形头像和仿MIUI卸载动画—粒子爆炸
Android特效专辑(五)--自定义圆形头像和仿MIUI卸载动画-粒子爆炸 好的,各位亲爱的朋友,今天讲的特效还是比较炫的,首先,我们会讲一个自定义圆形的imageView,接着,我们会来实现粒子爆 ...
- 一、虚拟环境.二、路由配置主页与404.三、2.x路由分发.四、伪静态.五、request对象.六、FBV与CBV.七、文件上传.
一.虚拟环境 ''' 解决版本共存 1. 用pycharm选择File点击NewProject然后选择virtualenv创建一个纯净环境 2. 打开下载的目录将venv文件夹下的所有文件(纯净的环境 ...
- [Android] 开源框架 Volley 自定义 Request
今天在看Volley demo (https://github.com/smanikandan14/Volley-demo), 发现自定义GsonRequest那块代码不全, 在这里贴一个全的. pu ...
- Android网络开发之Volley--Volley自定义Request
1.自定义一个解析Json的Request,这里使用JackSon框架来解析Json.你也可以自定义一个解析XML的Request,或者使用FastSon来解析Json. 2.我们首先来看一下Stri ...
随机推荐
- [Tool] 透过PowerPoint Online在部落格文章里内嵌简报
[Tool] 透过PowerPoint Online在部落格文章里内嵌简报 前言 讲课的时候,用PowerPoint做简报,好像已经成了讲课的惯例.而在课后,将课堂简报整理成部落格的文章,如果单纯是在 ...
- MUI - 将tap模拟成原生click体验
mui提供了tap事件替换了html5的click事件,解决了300ms延时的问题.不过相比原生app的click体验还是有些许差距的.关于300ms延时的问题,这篇帖子分析的比较完善,其中提到了穿透 ...
- JS基本概念 -- 数据类型(一)
ECMAScript中有5种简单数据类型(也成为基本数据类型): Undefined.Null.Boolean.Number.String; 1种复杂数据类型: Object,Object本质上是由一 ...
- Google Developers中国网站
正于北京举办的谷歌开发者大会上,谷歌宣布,Google Developers中国网站 (developers.google.cn) 正式发布! 谷歌表示,Google Developers中国网站是特 ...
- 更换SAP主界面右边区域背景主题
1) Tcode:SMW0(注意,最后面是零,不是英文字母O),选择第二个单选按钮 2)点击回车后,直接点击运行按钮. 3)在SAP WEB 资源库:对象显示 页面,点击:新建 4)创建对象名称,名 ...
- CRM 2013 系统设置新功能一:界面自动保存 及 SDK 中 Xrm.Page.data.entity.save
CRM 2013 界面会自动保存了..在系统设置中默认“是”,如果不需要可以调整. CRM实体记录在新建时会有出现“保存”按钮,非新建状态下,没有“保存”按钮只有“新建”按钮,系统将会自动为你保存最后 ...
- java实现栈和队列
class Node { int val; Node next; Node(int x) { val = x; next = null; } } class Stack { Node top; pub ...
- iOS支付宝集成时遇到的问题整理(1)
1.模拟器上运行正常,但是真机调试时报编译链接错误 :ld: '/Users/wangqipeng/Desktop/iOS支付宝官方文档/AlixPayDemo/libcrypto.a(bio_lib ...
- 每日Scrum--No.8
Yesterday:学习和编写程序 Today:总结这次的冲刺和以及测试版的初步完成 Problem:在图的设计过程中掌握了图的基本运算函数的算法的理解和程序的有效吸收,包括图的深度和广度优先的遍历, ...
- HDU 4045 Machine scheduling (组合数学-斯特林数,组合数学-排列组合)
Machine scheduling Time Limit: 5000/2000 MS (Java/Others) Memory Limit: 32768/32768 K (Java/Other ...