sam9x5 sam-ba
调试参考 http://www.docin.com/p-872951702.html
AT91SAM9x5 EK Board
SoC Features
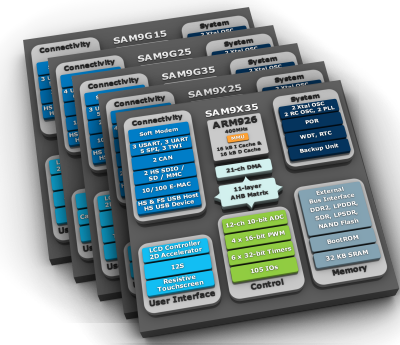
The Atmel® | SMART® ARM®-based SAM9x5 family is based on the ARM926EJ-S core. The SAM9x5 family runs at 400 MHz and features connectivity peripherals, high data bandwidth architecture, and a small footprint package option, making it an optimized solution for industrial applications. Peripherals include a soft modem supporting exclusively the Conexant SmartDAA line driver, High Speed (480Mbps) USB Host/Device ports and Full Speed USB Host with on-chip transceivers, 10/100 Ethernet MAC, two HS SDCard/SDIO/MMC interfaces, USARTs, SPIs, I2S, multiple TWIs and 10-bit ADC. It offers support for 8-bank DDR2 and for LPDDR, SDRAM/LPSDRAM, static memories, as well as specific circuitry for MLC/SLC NAND Flash with integrated ECC up to 24 bits. The SAM9x5 family is available in a 217-ball BGA package with 0.8mm ball pitch, as well as a 247-ball BGA package with 0.5mm ball pitch.
Kit Information
Kit Overview
|
Access the console
The usual serial communication parameters are 115200 8-N-1 :
| Baud rate | 115200 |
| Data | 8 bits |
| Parity | None |
| Stop | 1 bit |
| Flow control | None |
Access the console on DBGU serial port
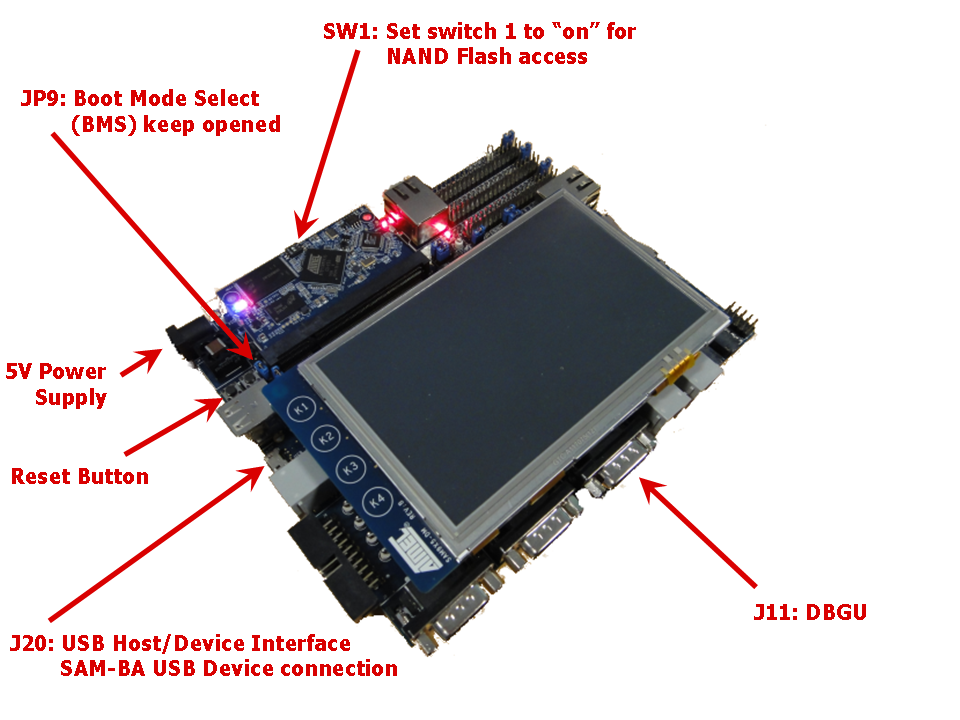
The DBGU serial console can be accessed from the RS-232 connector (marked as DBGU J11).
Using RS-232 connector (DBGU J11)
- Connect a DB9 serial cable to the J11 connector
- Now open your favorite terminal emulator with appropriate settings
- For Linux users: identify the USB connection by monitoring the last lines of
dmesgcommand. The/dev/ttyUSBxor/dev/ttyACMxnumber will be used to configure the terminal emulator.[605576.562740] usb 1-1.1.2: new full-speed USB device number 17 using ehci-pci
[605576.660920] usb 1-1.1.2: New USB device found, idVendor=0403, idProduct=6001
[605576.660933] usb 1-1.1.2: New USB device strings: Mfr=1, Product=2, SerialNumber=3
[605576.660939] usb 1-1.1.2: Product: TTL232R-3V3
[605576.660944] usb 1-1.1.2: Manufacturer: FTDI
[605576.660958] usb 1-1.1.2: SerialNumber: FTGNVZ04
[605576.663092] ftdi_sio 1-1.1.2:1.0: FTDI USB Serial Device converter detected
[605576.663120] usb 1-1.1.2: Detected FT232RL
[605576.663122] usb 1-1.1.2: Number of endpoints 2
[605576.663124] usb 1-1.1.2: Endpoint 1 MaxPacketSize 64
[605576.663126] usb 1-1.1.2: Endpoint 2 MaxPacketSize 64
[605576.663128] usb 1-1.1.2: Setting MaxPacketSize 64
[605576.663483] usb 1-1.1.2: FTDI USB Serial Device converter now attached to ttyUSB0A /dev/ttyUSB0 node has been created.
- For Linux users: identify the USB connection by monitoring the last lines of
- Now open your favorite terminal emulator with appropriate settings
Demo
Demo archives
| Media type | Board | Screen | Binary | Description |
|---|---|---|---|---|
| Yocto / Poky based demo | ||||
| NAND Flash | AT91SAM9x5-EK | - | linux4sam-poky-at91sam9x5ek-5.5.zip (~ 136 MB) (~ 136 MB) md5: 8f3ba092172b94ae5a3ca671dcc075a6 |
Linux4SAM Yocto / Poky based demo compiled from tag linux4sam_5.5 Follow procedure: #Flash_the_demo |
| SD Card image | AT91SAM9x5-EK | - | linux4sam-poky-at91sam9x5ek-5.5.img.bz2 (~ 112 MB) md5: a186147ac73476e2a0314463542b68be |
Linux4SAM Yocto / Poky based demo compiled from tag linux4sam_5.5 Follow procedure: #Create_a_SD_card_with_the_demo |
| BuildRoot based demo | ||||
| SD Card image | AT91SAM9x5-EK | - | linux4sam-buildroot-at91sam9x5ek-5.5.img.bz2 (~ 24 MB) md5: 4f45b0b0fd7a85011de7837abe0533c1 |
Linux4SAM BuildRoot based demo compiled from tag linux4sam_5.5 Follow procedure: #Create_a_SD_card_with_the_demo |
Flash the demo
Run script to flash the demo
- Download the demo package for the board.
- Extract the demo package and launch the script to flash the demo:
- For Microsoft Windows users: Launch the
.batfile corresponding to the board that you are using
This script will run SAM-BA with proper parameters. - For Linux users: if the /dev/ttyACMx that appears is different from /dev/ttyACM0, edit the
.shfile and modify /dev/ttyACMx device number - For Linux users: Launch the
.shfile corresponding to the board that you are using.
This script will runs SAM-BA with proper parameters
- For Microsoft Windows users: Launch the
- When the logfile.log appears (this will take a few minutes), check that
===== Done. =====
is written at the end of the file.
- Remove the USB cable.
- Connect a serial link on DBGU and open the terminal emulator program as explained just above
- Power cycle the board.
- Look the system booting on the LCD screen or through the serial line
Play with the demo
Build From source code
Setup ARM Cross Compiler
- Ubuntu:
In Ubuntu, you can install the ARM Cross Compiler by doing:sudo apt-get install gcc-arm-linux-gnueabi
export CROSS_COMPILE=arm-linux-gnueabi-
- Others:
For others, you can download the Linaro cross compiler and setup the environment by doing:wget -c https://releases.linaro.org/14.11/components/toolchain/binaries/arm-linux-gnueabi/gcc-linaro-4.9-2014.11-x86_64_arm-linux-gnueabi.tar.xz
tar xf gcc-linaro-4.9-2014.11-x86_64_arm-linux-gnueabi.tar.xz
export CROSS_COMPILE=`pwd`/gcc-linaro-4.9-2014.11-x86_64_arm-linux-gnueabi/bin/arm-linux-gnueabi-
Build AT91Bootstrap from sources
This section describes how to get source code from the git repository, how to configure with the default configuration, how to customize AT91Bootstrap based on the default configuration and finally to build AT91Bootstrap to produce the binary. take the default configuration to download U-Boot from NandFlash for example.
Get AT91Boostrap Source Code
You can easily download AT91Bootstrap source code on the at91bootstrap git repository.
To get the source code, you should clone the repository by doing:
$ git clone git://github.com/linux4sam/at91bootstrap.git

Cloning into 'at91bootstrap'...

remote: Reusing existing pack: 2476, done.

remote: Counting objects: 167, done.

remote: Compressing objects: 100% (167/167), done.

remote: Total 2643 (delta 135), reused 0 (delta 0)

Receiving objects: 100% (2643/2643), 2.06 MiB | 270 KiB/s, done.

Resolving deltas: 100% (1809/1809), done.

$ cd at91bootstrap/
Configure AT91Boostrap
Assuming you are at the AT91Bootstrap root directory, you will find a board/at91sam9x5ek folder which contains several default configuration files:
at91sam9x5eksd_uboot_defconfig

at91sam9x5ekdf_uboot_defconfig

at91sam9x5eknf_uboot_defconfig
 Tips:
Tips: nf means to read nandflash, df means to read serial flash, sd means to read mmc card.
Tips: linux means to load linux kernel to RAM, android means to load android kernel to RAM, uboot means to load u-boot to RAM, dt means to load dtb to RAM.
You can configure AT91Bootstrap to load U-Boot binary from NAND flash by doing:
$ make mrproper

$ make at91sam9x5eknf_uboot_defconfig
If the configuring process is successful, the .config file can be found at AT91Bootstrap root directory.
Customize AT91Bootstrap
If the default configuration doesn't meet your need, after configuring with the default configuration, you can customize it by doing:
$ make menuconfig
Now, in the menuconfig dialog, you can easily add or remove some features to/from AT91Bootstrap as the same way as kernel configuration.
Build AT91Bootstrap
Then you can build the AT91Bootstrap binary by doing:
$ make
If the building process is successful, the final .bin image is binaries/at91bootstrap.bin.
Build U-Boot from sources
Getting U-Boot sources
Dedicated page on U-Boot wiki: http://www.denx.de/wiki/U-Boot/SourceCode
You can easily download U-Boot source code from Linux4SAM GitHub U-Boot repository:
- clone the Linux4sam GitHub U-Boot repository
   $ git clone git://github.com/linux4sam/u-boot-at91.git

   Cloning into 'u-boot-at91'...

   remote: Counting objects: 219350, done.

   remote: Compressing objects: 100% (40142/40142), done.

   remote: Total 219350 (delta 175755), reused 219350 (delta 175755)

   Receiving objects: 100% (219350/219350), 56.01 MiB | 1.24 MiB/s, done.

   Resolving deltas: 100% (175755/175755), done.

   $ cd u-boot-at91
- The source code has been taken from the master branch which is pointing to the latest branch we use. If you want to use the other branch, you can list them and use one of them by doing:
   $ git branch -r

   origin/HEAD -> origin/master

   origin/master

   origin/u-boot-2012.10-at91

   origin/u-boot-2013.07-at91

   origin/u-boot-2014.07-at91

   origin/u-boot-2015.01-at91

   origin/u-boot-2016.03-at91

   origin/uboot_5series_1.x

   $ git checkout origin/u-boot-2016.03-at91 -b u-boot-2016.03-at91

   Branch u-boot-2016.03-at91 set up to track remote branch u-boot-2016.03-at91 from origin.

   Switched to a new branch 'u-boot-2016.03-at91'
Cross-compiling U-Boot
Before compile the U-Boot, you need setup cross compile toolchain in the section.
Once the AT91 U-Boot sources available, cross-compile U-Boot is made in two steps : configuration and compiling. Check the Configuration chapter in U-Boot reference manual.
 Go to the
 configs/ to find the exact target when invoking make.
The U-Boot environment variables can be store in different media, above config files can specified where to store the U-Boot environment.
   # To put environment variables in serial flash:

   at91sam9x5ek_spiflash_defconfig

   # To put environment variables in nandflash (default):

   at91sam9x5ek_nandflash_defconfig

   # To put environment variables in SD/MMC card:

   at91sam9x5ek_mmc_defconfig
Here are the building steps for the AT91SAM9x5-EK board:
# You can change the config according to your needs.

make at91sam9x5ek_nandflash_defconfig

make
The result of these operations is a fresh U-Boot binary called u-boot.bin corresponding to the binary ELF file u-boot.
u-boot.binis the file you should store on the boardu-bootis the ELF format binary file you may use to debug U-Boot through a JTag link for instance.
Build Kernel from sources
Getting Kernel sources
To get the source code, you have to clone the repository:
$ git clone git://github.com/linux4sam/linux-at91.git

Cloning into 'linux-sama9x5-github'...

remote: Counting objects: 4524288, done.

remote: Compressing objects: 100% (721/721), done.

remote: Total 4524288 (delta 385), reused 1 (delta 1), pack-reused 4523564

Receiving objects: 100% (4524288/4524288), 1.22 GiB | 1.35 MiB/s, done.

Resolving deltas: 100% (3777338/3777338), done.

Checking connectivity... done.

Checking out files: 100% (49565/49565), done.
The source code has been taken from the master branch which is pointing on the latest branch we use.
Note that you can also add this Linux4SAM repository as a remote GIT repository to your usu
$ git remote add linux4sam git://github.com/linux4sam/linux-at91.git

$ git remote update linux4sam

Fetching linux4sam

From git://github.com/linux4sam/linux-at91

 * [new branch]                linux-2.6.39-at91 -> linux4sam/linux-2.6.39-at91

 * [new branch]                linux-3.10-at91 -> linux4sam/linux-3.10-at91

 * [new branch]                linux-3.15-at91 -> linux4sam/linux-3.15-at91

 * [new branch]                linux-3.18-at91 -> linux4sam/linux-3.18-at91

 * [new branch]                linux-3.4.9-at91 -> linux4sam/linux-3.4.9-at91

 * [new branch]                linux-3.6.9-at91 -> linux4sam/linux-3.6.9-at91

 * [new branch]                linux-4.1-at91 -> linux4sam/linux-4.1-at91

 * [new branch]                linux-4.4-at91 -> linux4sam/linux-4.4-at91

 * [new branch]                master     -> linux4sam/master
If you want to use an other branch, you can list them and use one of them by doing this:
$ git branch -r

  origin/HEAD -> origin/master

  origin/linux-2.6.39-at91

  origin/linux-3.10-at91

  origin/linux-3.15-at91

  origin/linux-3.18-at91

  origin/linux-3.4.9-at91

  origin/linux-3.6.9-at91

  origin/linux-4.1-at91

  origin/linux-4.4-at91

  origin/master

$ git checkout origin/linux-4.4-at91 -b linux-4.4-at91

Branch linux-4.1-at91 set up to track remote branch linux-4.4-at91 from origin.

Switched to a new branch 'linux-4.4-at91'
Configure and Build the Linux kernel
Now you have to configure the Linux kernel according to your hardware. We have two default configuration at91 SoC in arch/arm/configs
arch/arm/configs/at91_dt_defconfig

arch/arm/configs/sama5_defconfig
at91_dt_defconfig: for at91sam ARM926 series chipssama5_defconfig: for SAMA5 series chips
At this step, you can modify default configuration using the menuconfig
$ make ARCH=arm menuconfig
And build the Linux kernel image, before you build you need set up the cross compile toolchain, check this section.
$ make ARCH=arm

[..]

  Kernel: arch/arm/boot/Image is ready

  Kernel: arch/arm/boot/zImage is ready
Now you have an usable compressed kernel image zImage.
If you need an uImage you can run this additional step:
make ARCH=arm uImage LOADADDR=0x20008000

[..]

  Kernel: arch/arm/boot/zImage is ready

  UIMAGE  arch/arm/boot/uImage

Image Name:   Linux-4.1.0-linux4sam_5.3+

Created:      Fri Sep  9 17:02:45 2016

Image Type:   ARM Linux Kernel Image (uncompressed)

Data Size:    3441072 Bytes = 3360.42 kB = 3.28 MB

Load Address: 20008000

Entry Point:  20008000

  Image arch/arm/boot/uImage is ready
make ARCH=arm dtbs

[..]

  DTC     arch/arm/boot/dts/at91rm9200ek.dtb

  DTC     arch/arm/boot/dts/mpa1600.dtb

  DTC     arch/arm/boot/dts/animeo_ip.dtb

  DTC     arch/arm/boot/dts/at91-qil_a9260.dtb

  DTC     arch/arm/boot/dts/aks-cdu.dtb

  DTC     arch/arm/boot/dts/ethernut5.dtb

  DTC     arch/arm/boot/dts/evk-pro3.dtb

  DTC     arch/arm/boot/dts/tny_a9260.dtb

  DTC     arch/arm/boot/dts/usb_a9260.dtb

  DTC     arch/arm/boot/dts/at91sam9261ek.dtb

  DTC     arch/arm/boot/dts/at91sam9263ek.dtb

  DTC     arch/arm/boot/dts/tny_a9263.dtb

  DTC     arch/arm/boot/dts/usb_a9263.dtb

  DTC     arch/arm/boot/dts/at91-foxg20.dtb

  DTC     arch/arm/boot/dts/at91-kizbox.dtb

  DTC     arch/arm/boot/dts/at91sam9g20ek.dtb

  DTC     arch/arm/boot/dts/at91sam9g20ek_2mmc.dtb

  DTC     arch/arm/boot/dts/tny_a9g20.dtb

  DTC     arch/arm/boot/dts/usb_a9g20.dtb

  DTC     arch/arm/boot/dts/usb_a9g20_lpw.dtb

  DTC     arch/arm/boot/dts/at91sam9m10g45ek.dtb

  DTC     arch/arm/boot/dts/pm9g45.dtb

  DTC     arch/arm/boot/dts/at91sam9n12ek.dtb

  DTC     arch/arm/boot/dts/at91sam9rlek.dtb

  DTC     arch/arm/boot/dts/at91-ariag25.dtb

  DTC     arch/arm/boot/dts/at91-ariettag25.dtb

  DTC     arch/arm/boot/dts/at91-cosino_mega2560.dtb

  DTC     arch/arm/boot/dts/at91-kizboxmini.dtb

  DTC     arch/arm/boot/dts/at91sam9g15ek.dtb

  DTC     arch/arm/boot/dts/at91sam9g25ek.dtb

  DTC     arch/arm/boot/dts/at91sam9g35ek.dtb

  DTC     arch/arm/boot/dts/at91sam9x25ek.dtb

  DTC     arch/arm/boot/dts/at91sam9x35ek.dtb
If the building process is successful, the final images can be found under arch/arm/boot/ directory.
Build Yocto/Poky rootfs from sources
Note that building an entire distribution is a long process. It also requires a big amount of free disk space.
The support for Atmel AT91 SoC family is included in a particular Yocto layer: meta-atmel. The source for this layer are hosted on Linux4SAM GitHub account: https://github.com/linux4sam/meta-atmel
Building environment
A step-by-step comprehensive installation is explained in the Yocto Project Quick Start. The following lines have to be considered as an add-on that is AT91 specific or that can facilitate your setup.
Prerequisite
Here are the reference pages for setting up a Yocto building environment: What You Need and How You Get It.
Step by step build procedure
 here is a copy of the README procedure available directly in the
 meta-atmel layer. This file in the meta-atmel layer repository must be considered as the reference and the following copy can be out-of-sync.
Supported SoCs / MACHINE names

==============================

- SAMA5D2 product family / sama5d2-xplained

- SAMA5D4 product family / sama5d4ek, sama5d4-xplained

- SAMA5D3 product family / sama5d3xek, sama5d3-xplained

- AT91SAM9x5 product family (AT91SAM9G15, AT91SAM9G25, AT91SAM9X25, AT91SAM9G35 and AT91SAM9X35) / at91sam9x5ek

- AT91SAM9RL / at91sam9rlek

- AT91SAM9G45 / at91sam9m10g45ek

Sources

=======

- meta-atmel

URI: git://github.com/linux4sam/meta-atmel.git

URI: https://github.com/linux4sam/meta-atmel.git

Branch: krogoth

Dependencies

============

This Layer depends on :

- meta-openembedded

URI: git://git.openembedded.org/meta-openembedded

URI: http://cgit.openembedded.org/meta-openembedded/

Branch: krogoth

Optionally:

- meta-qt5

URI: git://github.com/meta-qt5/meta-qt5.git

URI: https://github.com/meta-qt5/meta-qt5

Branch: krogoth

Build procedure

===============

0/ Create a directory

mkdir my_dir

cd my_dir

1/ Clone yocto/poky git repository with the proper branch ready

git clone git://git.yoctoproject.org/poky -b krogoth

2/ Clone meta-openembedded git repository with the proper branch ready

git clone git://git.openembedded.org/meta-openembedded -b krogoth

3/ Clone meta-qt5 git repository with the proper branch ready

git clone git://github.com/meta-qt5/meta-qt5.git -b krogoth

4/ Clone meta-atmel layer with the proper branch ready

git clone git://github.com/linux4sam/meta-atmel.git -b krogoth

5/ Enter the poky directory to configure the build system and start the build process

cd poky

6/ Initialize build directory

source oe-init-build-env build-atmel

7/ Add meta-atmel layer to bblayer configuration file

vim conf/bblayers.conf

# POKY_BBLAYERS_CONF_VERSION is increased each time build/conf/bblayers.conf

# changes incompatibly

POKY_BBLAYERS_CONF_VERSION = "2"

BBPATH = "${TOPDIR}"

BBFILES ?= ""

BSPDIR := "${@os.path.abspath(os.path.dirname(d.getVar('FILE', True)) + '/../../..')}"

BBLAYERS ?= " \

  ${BSPDIR}/poky/meta \

  ${BSPDIR}/poky/meta-poky \

  ${BSPDIR}/poky/meta-yocto-bsp \

  ${BSPDIR}/meta-atmel \

  ${BSPDIR}/meta-openembedded/meta-oe \

  ${BSPDIR}/meta-openembedded/meta-networking \

  ${BSPDIR}/meta-openembedded/meta-python \

  ${BSPDIR}/meta-openembedded/meta-ruby \

  ${BSPDIR}/meta-openembedded/meta-multimedia \

  ${BSPDIR}/meta-qt5 \

  "

BBLAYERS_NON_REMOVABLE ?= " \

  ${BSPDIR}/poky/meta \

  ${BSPDIR}/poky/meta-poky \

  "

8/ Edit local.conf to specify the machine, location of source archived, package type (rpm, deb or ipk)

Pick one MACHINE name from the "Supported SoCs / MACHINE names" chapter above

and edit the "local.conf" file. Here is an example:

vim conf/local.conf

[...]

MACHINE ??= "sama5d3-xplained"

[...]

DL_DIR ?= "your_download_directory_path"

[...]

PACKAGE_CLASSES ?= "package_ipk"

[...]

USER_CLASSES ?= "buildstats image-mklibs"

To get better performance, use the "poky-atmel" distribution by also adding that

line:

DISTRO = "poky-atmel"

9/ Build core minimal image

bitbake core-image-minimal

10/ We found that additional local.conf changes are needed for our QT demo

image. You can add these two lines at the end of the file:

vim conf/local.conf

[...]

LICENSE_FLAGS_WHITELIST += "commercial"

SYSVINIT_ENABLED_GETTYS = ""

11/ Build Atmel demo images

bitbake atmel-qt5-demo-image

Typical bitbake output

======================

Build Configuration:

BB_VERSION        = "1.30.0"

BUILD_SYS         = "x86_64-linux"

NATIVELSBSTRING   = "universal"

TARGET_SYS        = "arm-poky-linux-gnueabi"

MACHINE           = "sama5d2-xplained"

DISTRO            = "poky-atmel"

DISTRO_VERSION    = "2.1"

TUNE_FEATURES     = "arm armv7a vfp thumb neon       callconvention-hard       cortexa5"

TARGET_FPU        = "hard"

meta

meta-poky

meta-yocto-bsp    = "krogoth:6c1c01392d91f512e2949ad1d57a75a8077478ba"

meta-atmel        = "krogoth:28c4b5d70f3f7df6f8b108a01f621ca0cf23c1a4"

meta-multimedia

meta-networking

meta-python

meta-ruby

meta-oe           = "krogoth:abd1795729501a13608da67054b9cbf185404be3"

meta-qt5          = "krogoth:4ec27e218d725677279d265ac1fc256443d665f7"
Using SAM-BA to flash components to board
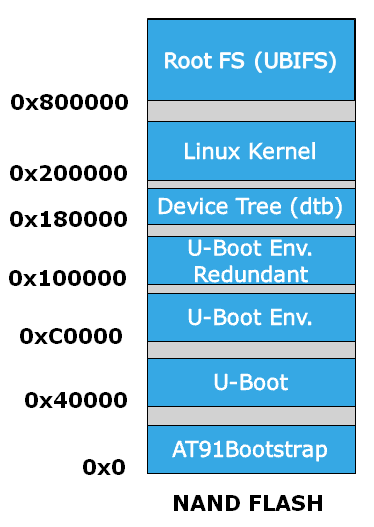
NAND Flash demo - Memory map
Launch SAM-BA tools
- According to this section make sure that the chip can execute the SAM-BA Monitor.
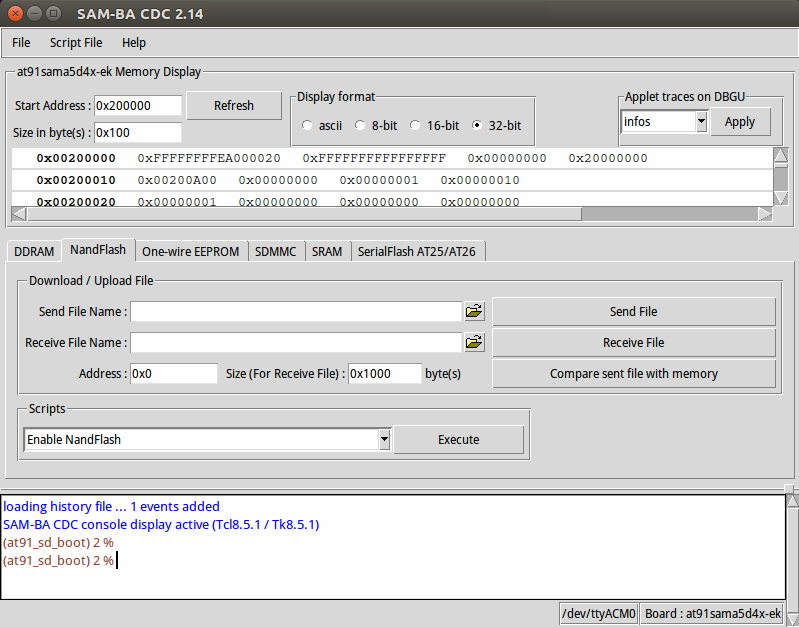
- Start SAM-BA GUI application.
- Select the board: "at91sama9x35-ek" in the drop-down menu and choose the USB connection.
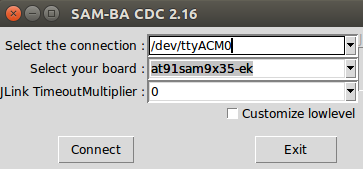
- Click the "Connect" button, the SAM-BA main window show up:
Configure NAND ECC
Using OS default PMECC parameters
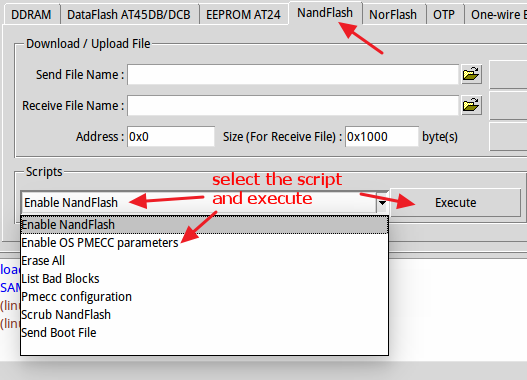
- Choose the NandFlash tab in the SAM-BA GUI interface.
- Initialize the NandFlash by choosing the Enable NandFlash action in the Scripts rolling menu, then press Execute button.
- Enable the PMECC by choosing the Enable OS PMECC parameters action, then press Execute button.
Configure PMECC parameters (optional)
Programming components into NAND
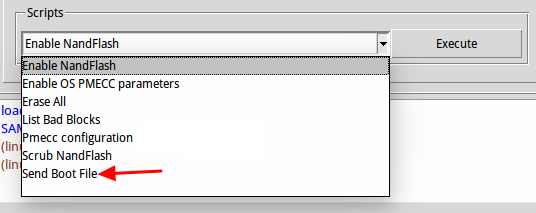
Program AT91Bootstrap binary
- Choose Send Boot File action, then press Execute button to select the at91bootstrap binary file and to program the binary to the NandFlash.
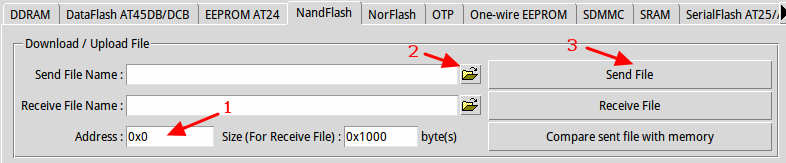
Program U-Boot binary
- Modify the Address to 0x40000
- Choose Send File Name open file dialog and select the U-Boot binary file and to program the binary to the NandFlash.
- Click Send File button to program the binary to the NandFlash in address 0x40000.
Program Linux dtb file
- Modify the Address to 0x180000
- Choose Send File Name open file dialog and select the dtb binary file and to program the binary to the NandFlash.
- Click Send File button to program the binary to the NandFlash in address 0x180000.
Program Linux Kernel file
- Modify the Address to 0x200000
- Choose Send File Name open file dialog and select the Linux kernel binary file and to program the binary to the NandFlash.
- Click Send File button to program the binary to the NandFlash in address 0x200000.
Program rootfs UBI file
Make sure you erased the nand area (0x800000~END of nand) before you program it.
- Modify the Address to 0x800000
- Choose Send File Name open file dialog and select the UBI filesystem binary file and to program the binary to the NandFlash.
- Click Send File button to program the binary to the NandFlash in address 0x800000.
Recent FAQ
- AT91sam9x5-ek boards
- • Shutdown Wake Up: Use the Wakeup Feature of the Shutdown Controller.. (Kernel, linux-4.4-at91)
• Real Time: Enable Real Time support for AT91SAM9 Soc. (Kernel)
• Yocto Project FAQ: Some Yocto Project FAQ entries. (YoctoProject)
sam9x5 sam-ba的更多相关文章
- hihocoder SAM基础概念
后缀自动机一·基本概念 时间限制:10000ms 单点时限:1000ms 内存限制:256MB 描述 小Hi:今天我们来学习一个强大的字符串处理工具:后缀自动机(Suffix Automaton,简称 ...
- 字符串(后缀数组||SAM):NOI2015 品酒大会
aaarticlea/png;base64,iVBORw0KGgoAAAANSUhEUgAAByIAAALuCAIAAABtq0bwAAAgAElEQVR4nOy9f2wb150vev4boESeln ...
- Codeforces Beta Round #94 (Div. 1 Only)B. String sam
题意:给你一个字符串,找第k大的子字符串.(考虑相同的字符串) 题解:建sam,先预处理出每个节点的出现次数,然后处理出每个节点下面的出现次数,然后在dfs时判断一下往哪边走即可,注意一下num会爆i ...
- loj#2059. 「TJOI / HEOI2016」字符串 sam+线段树合并+倍增
题意:给你一个子串,m次询问,每次给你abcd,问你子串sa-b的所有子串和子串sc-d的最长公共前缀是多长 题解:首先要求两个子串的最长公共前缀就是把反过来插入变成最长公共后缀,两个节点在paren ...
- 2019.02.27 bzoj4556: [Tjoi2016&Heoi2016]字符串(二分答案+sam+线段树合并)
传送门 题意:给一个字符串SSS. 有mmm次询问,每次给四个参数a,b,c,da,b,c,da,b,c,d,问s[a...b]s[a...b]s[a...b]的所有子串和s[x...y]s[x... ...
- bzoj4556(sam)
二分答案,(具体可见http://blog.csdn.net/neither_nor/article/details/51669114),然后就是判定问题,sa和sam都可以做,用sam写了一下,先用 ...
- 后缀自动机SAM BZOJ 2806
终于遇到了一道后缀数组不能过 一定要学SAM的题... (看了半个下午+半个上午) 现在总结一下(是给我自己总结..所以只总结了我觉得重要的 .. 看不太懂的话可以To http://blog.c ...
- 2019牛客全国多校训练四 I题 string (SAM+PAM)
链接:https://ac.nowcoder.com/acm/contest/884/I来源:牛客网 题目描述 We call a,ba,ba,b non-equivalent if and only ...
- ACM-ICPC 2018 焦作赛区网络预赛 H题 String and Times(SAM)
Now you have a string consists of uppercase letters, two integers AA and BB. We call a substring won ...
- SA & SAM
后缀数组SA \(sa[i]\)与\(rk[i]\) \(sa[i]\) 表示排名为 \(i\) 的后缀是哪一个(在原串中开头位置). \(rk[i]\)(或\(rank[i]\))表示开头位置是 \ ...
随机推荐
- jsp中的<jsp:setProperty>中的param属性
比如: <jsp:setProperty name="lader" property="edge" param="num" /> ...
- [HTML5]label标签使用以及建议
for 属性规定 label 与哪个表单元素绑定. 隐式和显式的联系 标记通常以下面两种方式中的一种来和表单控件相联系:将表单控件作为标记标签的内容,这样的就是隐式形式,或者为 <label&g ...
- U盘安装ubuntu server 12.04的问题检测不到CDROM的解决
U盘安装ubuntu server 12.04的问题检测不到CDROM的解决 ========================== 我是u盘安装ubuntu 14 64Bit 也是出现同样的问题 用u ...
- EXT 省市三级联动及默认选择
var provinceStore = Ext.create('Ext.data.Store', { fields: ['id', 'name'], proxy: { type: 'ajax', ur ...
- 61. Unique Paths && Unique Paths II
Unique Paths A robot is located at the top-left corner of a m x n grid (marked 'Start' in the diagra ...
- 使用eclipse搭建hadoop开发环境
下载一个 hadoop-eclipse-plugin-*.jar的eclipse插件,并放在plugins目录下 重启eclipse 打开视象,找“大象” 连接HDFS success 编程准 ...
- [转载]: delphi中XLSReadWrite控件的使用(1)---简介
XLSReadWrite控件简介: 一个你需要的,能在Delphi和.NET下访问Excel文件的完美解决方案. 一个经典的读写Excel的控件,对于使用Excel 开发很有帮助 官方网站: http ...
- Android IOS WebRTC 音视频开发总结(七六)-- 探讨直播低延迟低流量的粉丝连麦技术
本文主要探讨基于WebRTC的P2P直播粉丝连麦技术 (作者:郝飞,亲加云CTO,编辑:dora),最早发表在[这里] 支持原创,转载必须注明出处,欢迎关注微信公众号blacker(微信ID:blac ...
- 单链表在不知头结点的情况下对第i个元素的删除
一.首先,看看单链表中第i个元素的删除: Status ListDelete_L (LinkList &L,int i,ElemType &e){ //在带头结点的单链表L中,删除第i ...
- 移动端自动化环境搭建-Appium for Windows的安装
安装Appium for Windows版 A.安装依赖 appium就是我们做移动端自动化测试主要的软件 B.安装过程