【OpenGL(SharpGL)】支持任意相机可平移缩放的轨迹球实现
【OpenGL(SharpGL)】支持任意相机可平移缩放的轨迹球
(本文PDF版在这里。)
在3D程序中,轨迹球(ArcBall)可以让你只用鼠标来控制模型(旋转),便于观察。在这里(http://www.yakergong.net/nehe/ )有nehe的轨迹球教程。
本文提供一个本人编写的轨迹球类(ArcBall.cs),它可以直接应用到任何camera下,还可以同时实现缩放和平移。工程源代码在文末。
2016-07-08
再次更新了轨迹球代码,重命名为ArcBallManipulater。
     /// <summary>

     /// Rotate model using arc-ball method.

     /// </summary>

     public class ArcBallManipulater : Manipulater, IMouseHandler

     {

         private ICamera camera;

         private GLCanvas canvas;

         private MouseEventHandler mouseDownEvent;

         private MouseEventHandler mouseMoveEvent;

         private MouseEventHandler mouseUpEvent;

         private MouseEventHandler mouseWheelEvent;

         private vec3 _vectorRight;

         private vec3 _vectorUp;

         private vec3 _vectorBack;

         private float _length, _radiusRadius;

         private CameraState cameraState = new CameraState();

         private mat4 totalRotation = mat4.identity();

         private vec3 _startPosition, _endPosition, _normalVector = new vec3(, , );

         private int _width;

         private int _height;

         private bool mouseDownFlag;

         public float MouseSensitivity { get; set; }

         public MouseButtons BindingMouseButtons { get; set; }

         private MouseButtons lastBindingMouseButtons;

         /// <summary>

         /// Rotate model using arc-ball method.

         /// </summary>

         /// <param name="bindingMouseButtons"></param>

         public ArcBallManipulater(MouseButtons bindingMouseButtons = MouseButtons.Left)

         {

             this.MouseSensitivity = 0.1f;

             this.BindingMouseButtons = bindingMouseButtons;

             this.mouseDownEvent = new MouseEventHandler(((IMouseHandler)this).canvas_MouseDown);

             this.mouseMoveEvent = new MouseEventHandler(((IMouseHandler)this).canvas_MouseMove);

             this.mouseUpEvent = new MouseEventHandler(((IMouseHandler)this).canvas_MouseUp);

             this.mouseWheelEvent = new MouseEventHandler(((IMouseHandler)this).canvas_MouseWheel);

         }

         private void SetCamera(vec3 position, vec3 target, vec3 up)

         {

             _vectorBack = (position - target).normalize();

             _vectorRight = up.cross(_vectorBack).normalize();

             _vectorUp = _vectorBack.cross(_vectorRight).normalize();

             this.cameraState.position = position;

             this.cameraState.target = target;

             this.cameraState.up = up;

         }

         class CameraState

         {

             public vec3 position;

             public vec3 target;

             public vec3 up;

             public bool IsSameState(ICamera camera)

             {

                 if (camera.Position != this.position) { return false; }

                 if (camera.Target != this.target) { return false; }

                 if (camera.UpVector != this.up) { return false; }

                 return true;

             }

         }

         public mat4 GetRotationMatrix()

         {

             return totalRotation;

         }

         public override void Bind(ICamera camera, GLCanvas canvas)

         {

             if (camera == null || canvas == null) { throw new ArgumentNullException(); }

             this.camera = camera;

             this.canvas = canvas;

             canvas.MouseDown += this.mouseDownEvent;

             canvas.MouseMove += this.mouseMoveEvent;

             canvas.MouseUp += this.mouseUpEvent;

             canvas.MouseWheel += this.mouseWheelEvent;

             SetCamera(camera.Position, camera.Target, camera.UpVector);

         }

         public override void Unbind()

         {

             if (this.canvas != null && (!this.canvas.IsDisposed))

             {

                 this.canvas.MouseDown -= this.mouseDownEvent;

                 this.canvas.MouseMove -= this.mouseMoveEvent;

                 this.canvas.MouseUp -= this.mouseUpEvent;

                 this.canvas.MouseWheel -= this.mouseWheelEvent;

                 this.canvas = null;

                 this.camera = null;

             }

         }

         void IMouseHandler.canvas_MouseWheel(object sender, MouseEventArgs e)

         {

         }

         void IMouseHandler.canvas_MouseDown(object sender, MouseEventArgs e)

         {

             this.lastBindingMouseButtons = this.BindingMouseButtons;

             if ((e.Button & this.lastBindingMouseButtons) != MouseButtons.None)

             {

                 var control = sender as Control;

                 this.SetBounds(control.Width, control.Height);

                 if (!cameraState.IsSameState(this.camera))

                 {

                     SetCamera(this.camera.Position, this.camera.Target, this.camera.UpVector);

                 }

                 this._startPosition = GetArcBallPosition(e.X, e.Y);

                 mouseDownFlag = true;

             }

         }

         private void SetBounds(int width, int height)

         {

             this._width = width; this._height = height;

             _length = width > height ? width : height;

             var rx = (width / ) / _length;

             var ry = (height / ) / _length;

             _radiusRadius = (float)(rx * rx + ry * ry);

         }

         void IMouseHandler.canvas_MouseMove(object sender, MouseEventArgs e)

         {

             if (mouseDownFlag && ((e.Button & this.lastBindingMouseButtons) != MouseButtons.None))

             {

                 if (!cameraState.IsSameState(this.camera))

                 {

                     SetCamera(this.camera.Position, this.camera.Target, this.camera.UpVector);

                 }

                 this._endPosition = GetArcBallPosition(e.X, e.Y);

                 var cosAngle = _startPosition.dot(_endPosition) / (_startPosition.length() * _endPosition.length());

                 if (cosAngle > 1.0f) { cosAngle = 1.0f; }

                 else if (cosAngle < -) { cosAngle = -1.0f; }

                 var angle = MouseSensitivity * (float)(Math.Acos(cosAngle) / Math.PI * );

                 _normalVector = _startPosition.cross(_endPosition).normalize();

                 if (!

                     ((_normalVector.x ==  && _normalVector.y ==  && _normalVector.z == )

                     || float.IsNaN(_normalVector.x) || float.IsNaN(_normalVector.y) || float.IsNaN(_normalVector.z)))

                 {

                     _startPosition = _endPosition;

                     mat4 newRotation = glm.rotate(angle, _normalVector);

                     this.totalRotation = newRotation * totalRotation;

                 }

             }

         }

         private vec3 GetArcBallPosition(int x, int y)

         {

             float rx = (x - _width / ) / _length;

             float ry = (_height /  - y) / _length;

             float zz = _radiusRadius - rx * rx - ry * ry;

             float rz = (zz >  ? (float)Math.Sqrt(zz) : 0.0f);

             var result = new vec3(

                 rx * _vectorRight.x + ry * _vectorUp.x + rz * _vectorBack.x,

                 rx * _vectorRight.y + ry * _vectorUp.y + rz * _vectorBack.y,

                 rx * _vectorRight.z + ry * _vectorUp.z + rz * _vectorBack.z

                 );

             //var position = new vec3(rx, ry, rz);

             //var matrix = new mat3(_vectorRight, _vectorUp, _vectorBack);

             //result = matrix * position;

             return result;

         }

         void IMouseHandler.canvas_MouseUp(object sender, MouseEventArgs e)

         {

             if ((e.Button & this.lastBindingMouseButtons) != MouseButtons.None)

             {

                 mouseDownFlag = false;

             }

         }

     }
ArcBallManipulater
注意,在GetArcBallPosition(int x, int y);中,获取位置实际上是一个坐标变换的过程,所以可以用矩阵*向量实现。详见被注释掉的代码。
         private vec3 GetArcBallPosition(int x, int y)

         {

             float rx = (x - _width / ) / _length;

             float ry = (_height /  - y) / _length;

             float zz = _radiusRadius - rx * rx - ry * ry;

             float rz = (zz >  ? (float)Math.Sqrt(zz) : 0.0f);

             var result = new vec3(

                 rx * _vectorRight.x + ry * _vectorUp.x + rz * _vectorBack.x,

                 rx * _vectorRight.y + ry * _vectorUp.y + rz * _vectorBack.y,

                 rx * _vectorRight.z + ry * _vectorUp.z + rz * _vectorBack.z

                 );

             // Get position using matrix * vector.

             //var position = new vec3(rx, ry, rz);

             //var matrix = new mat3(_vectorRight, _vectorUp, _vectorBack);

             //result = matrix * position;

             return result;

         }
2016-02-10
我已在CSharpGL中集成了最新的轨迹球代码。轨迹球只负责旋转。
 using GLM;

 using System;

 using System.Collections.Generic;

 using System.Diagnostics;

 using System.Drawing;

 using System.IO;

 using System.Linq;

 using System.Text;

 using System.Threading.Tasks;

 namespace CSharpGL.Objects.Cameras

 {

     /// <summary>

     /// 用鼠标旋转模型。

     /// </summary>

     public class ArcBallRotator

     {

         vec3 _vectorCenterEye;

         vec3 _vectorUp;

         vec3 _vectorRight;

         float _length, _radiusRadius;

         CameraState cameraState = new CameraState();

         mat4 totalRotation = mat4.identity();

         vec3 _startPosition, _endPosition, _normalVector = new vec3(, , );

         int _width;

         int _height;

         float mouseSensitivity = 0.1f;

         public float MouseSensitivity

         {

             get { return mouseSensitivity; }

             set { mouseSensitivity = value; }

         }

         /// <summary>

         /// 标识鼠标是否按下

         /// </summary>

         public bool MouseDownFlag { get; private set; }

         /// <summary>

         ///

         /// </summary>

         public ICamera Camera { get; set; }

         const string listenerName = "ArcBallRotator";

         /// <summary>

         /// 用鼠标旋转模型。

         /// </summary>

         /// <param name="camera">当前场景所用的摄像机。</param>

         public ArcBallRotator(ICamera camera)

         {

             this.Camera = camera;

             SetCamera(camera.Position, camera.Target, camera.UpVector);

 #if DEBUG

             const string filename = "ArcBallRotator.log";

             if (File.Exists(filename)) { File.Delete(filename); }

             Debug.Listeners.Add(new TextWriterTraceListener(filename, listenerName));

             Debug.WriteLine(DateTime.Now, listenerName);

             Debug.Flush();

 #endif

         }

         private void SetCamera(vec3 position, vec3 target, vec3 up)

         {

             _vectorCenterEye = position - target;

             _vectorCenterEye.Normalize();

             _vectorUp = up;

             _vectorRight = _vectorUp.cross(_vectorCenterEye);

             _vectorRight.Normalize();

             _vectorUp = _vectorCenterEye.cross(_vectorRight);

             _vectorUp.Normalize();

             this.cameraState.position = position;

             this.cameraState.target = target;

             this.cameraState.up = up;

         }

         class CameraState

         {

             public vec3 position;

             public vec3 target;

             public vec3 up;

             public bool IsSameState(ICamera camera)

             {

                 if (camera.Position != this.position) { return false; }

                 if (camera.Target != this.target) { return false; }

                 if (camera.UpVector != this.up) { return false; }

                 return true;

             }

         }

         public void SetBounds(int width, int height)

         {

             this._width = width; this._height = height;

             _length = width > height ? width : height;

             var rx = (width / ) / _length;

             var ry = (height / ) / _length;

             _radiusRadius = (float)(rx * rx + ry * ry);

         }

         /// <summary>

         /// 必须先调用<see cref="SetBounds"/>()方法。

         /// </summary>

         /// <param name="x"></param>

         /// <param name="y"></param>

         public void MouseDown(int x, int y)

         {

             Debug.WriteLine("");

             Debug.WriteLine("=================>MouseDown:", listenerName);

             if (!cameraState.IsSameState(this.Camera))

             {

                 SetCamera(this.Camera.Position, this.Camera.Target, this.Camera.UpVector);

                 Debug.WriteLine(string.Format(

                     "update camera state: {0}, {1}, {2}",

                     this.cameraState.position, this.cameraState.target, this.cameraState.up), listenerName);

             }

             this._startPosition = GetArcBallPosition(x, y);

             Debug.WriteLine(string.Format("Start position: {0}", this._startPosition), listenerName);

             MouseDownFlag = true;

             Debug.WriteLine("-------------------MouseDown end.", listenerName);

         }

         private vec3 GetArcBallPosition(int x, int y)

         {

             var rx = (x - _width / ) / _length;

             var ry = (_height /  - y) / _length;

             var zz = _radiusRadius - rx * rx - ry * ry;

             var rz = (zz >  ? Math.Sqrt(zz) : );

             var result = new vec3(

                 (float)(rx * _vectorRight.x + ry * _vectorUp.x + rz * _vectorCenterEye.x),

                 (float)(rx * _vectorRight.y + ry * _vectorUp.y + rz * _vectorCenterEye.y),

                 (float)(rx * _vectorRight.z + ry * _vectorUp.z + rz * _vectorCenterEye.z)

                 );

             return result;

         }

         public void MouseMove(int x, int y)

         {

             if (MouseDownFlag)

             {

                 Debug.WriteLine("    =================>MouseMove:", listenerName);

                 if (!cameraState.IsSameState(this.Camera))

                 {

                     SetCamera(this.Camera.Position, this.Camera.Target, this.Camera.UpVector);

                     Debug.WriteLine(string.Format(

                         "    update camera state: {0}, {1}, {2}",

                         this.cameraState.position, this.cameraState.target, this.cameraState.up), listenerName);

                 }

                 this._endPosition = GetArcBallPosition(x, y);

                 Debug.WriteLine(string.Format(

                     "    End position: {0}", this._endPosition), listenerName);

                 var cosAngle = _startPosition.dot(_endPosition) / (_startPosition.Magnitude() * _endPosition.Magnitude());

                 if (cosAngle > ) { cosAngle = ; }

                 else if (cosAngle < -) { cosAngle = -; }

                 Debug.Write(string.Format("    cos angle: {0}", cosAngle), listenerName);

                 var angle = mouseSensitivity * (float)(Math.Acos(cosAngle) / Math.PI * );

                 Debug.WriteLine(string.Format(

                     ", angle: {0}", angle), listenerName);

                 _normalVector = _startPosition.cross(_endPosition);

                 _normalVector.Normalize();

                 if ((_normalVector.x ==  && _normalVector.y ==  && _normalVector.z == )

                     || float.IsNaN(_normalVector.x) || float.IsNaN(_normalVector.y) || float.IsNaN(_normalVector.z))

                 {

                     Debug.WriteLine("    no movement recorded.", listenerName);

                 }

                 else

                 {

                     Debug.WriteLine(string.Format(

                         "    normal vector: {0}", _normalVector), listenerName);

                     _startPosition = _endPosition;

                     mat4 newRotation = glm.rotate(angle, _normalVector);

                     Debug.WriteLine(string.Format(

                         "    new rotation matrix:   {0}", newRotation), listenerName);

                     this.totalRotation = newRotation * totalRotation;

                     Debug.WriteLine(string.Format(

                         "    total rotation matrix: {0}", totalRotation), listenerName);

                 }

                 Debug.WriteLine("    -------------------MouseMove end.", listenerName);

             }

         }

         public void MouseUp(int x, int y)

         {

             Debug.WriteLine("=================>MouseUp:", listenerName);

             MouseDownFlag = false;

             Debug.WriteLine("-------------------MouseUp end.", listenerName);

             Debug.WriteLine("");

             Debug.Flush();

         }

         public mat4 GetRotationMatrix()

         {

             return totalRotation;

         }

     }

 }
ArcBallRotator
1. 轨迹球原理


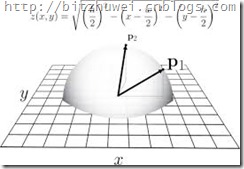
上面是我黑来的两张图,拿来说明轨迹球的原理。
看左边这个,网格代表绘制3D模型的窗口,上面放了个半球,这个球就是轨迹球。假设鼠标在网格上的某点A,过A点作网格所在平面的垂线,与半球相交于点P,P就是A在轨迹球上的投影。鼠标从A1点沿直线移动到A2点,对应着轨迹球上的点P1沿球面移动到了P2。那么,从球心O到P1和P2分别有两个向量OP1和OP2。OP1旋转到了OP2,我们就认为是模型也按照这个方式作同样的旋转。这就是轨迹球的旋转思路。
右边这个图没用上…
2. 轨迹球实现
实现轨迹球,首先要求出鼠标点A1、A2投影到轨迹球上的点P1、P2的坐标,然后计算两个向量A1P1和A2P2之间的夹角以及旋转轴,最后让模型按照求出的夹角和旋转轴,调用glRotate就可以了。
1) 计算投影点
在摄像机上应用轨迹球,才能实现适应任意位置摄像机的ArcBall类。

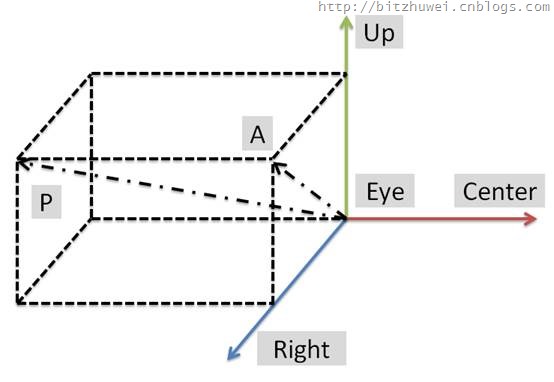
如图所示,红绿蓝三色箭头的交点是摄像机eye的位置,红色箭头指向center的位置,绿色箭头指向up的位置,蓝色箭头指向右侧。
说明:1.Up是可能在蓝色Right箭头的垂面内的任意方向的,这里我们要把它调整为与红色视线垂直的Up,即上图所示的Up。2.绿色和蓝色箭头组成的平面即为程序窗口所在位置,因为Eye就在这里嘛。而且Up指的就是屏幕正上方,Right指的就是屏幕正右方。3.显然轨迹球的半球在图中矩形所在的这一侧,球心就是Eye。
鼠标在Up和Right所在的平面移动,当它位于A点时,投影到轨迹球的点P。现在已知的是Eye、Center、原始Up、A点在屏幕上的坐标、向量Eye-P的长度、向量AP的长度。现在要求P点的坐标,只不过是一个数学问题了。
当然,开始的时候要设置相机位置。
         public void SetCamera(float eyex, float eyey, float eyez,

             float centerx, float centery, float centerz,

             float upx, float upy, float upz)

         {

             _vectorCenterEye = new Vertex(eyex - centerx, eyey - centery, eyez - centerz);

             _vectorCenterEye.Normalize();

             _vectorUp = new Vertex(upx, upy, upz);

             _vectorRight = _vectorUp.VectorProduct(_vectorCenterEye);

             _vectorRight.Normalize();

             _vectorUp = _vectorCenterEye.VectorProduct(_vectorRight);

             _vectorUp.Normalize();

         }
根据鼠标在屏幕上的位置投影点的计算方法如下。
         private Vertex GetArcBallPosition(int x, int y)

         {

             var rx = (x - _width / ) / _length;

             var ry = (_height /  - y) / _length;

             var zz = _radiusRadius - rx * rx - ry * ry;

             var rz = (zz >  ? Math.Sqrt(zz) : );

             var result = new Vertex(

                 (float)(rx * _vectorRight.X + ry * _vectorUp.X + rz * _vectorCenterEye.X),

                 (float)(rx * _vectorRight.Y + ry * _vectorUp.Y + rz * _vectorCenterEye.Y),

                 (float)(rx * _vectorRight.Z + ry * _vectorUp.Z + rz * _vectorCenterEye.Z)

                 );

             return result;

         }
这里主要应用了向量的思想,向量(Eye-P) = 向量(Eye-A) + 向量(A-P)。而向量(Eye-A)和向量(A-P)都是可以通过单位长度的Up、Center-Eye和Right向量求得的。
2) 计算夹角和旋转轴
首先,设置鼠标按下事件
         public void MouseDown(int x, int y)

         {

             this._startPosition = GetArcBallPosition(x, y);

             mouseDownFlag = true;

         }
然后,设置鼠标移动事件。此时P1P2两个点都有了,旋转轴和夹角就都可以计算了。
         public void MouseMove(int x, int y)

         {

             if (mouseDownFlag)

             {

                 this._endPosition = GetArcBallPosition(x, y);

                 var cosAngle = _startPosition.ScalarProduct(_endPosition) / (_startPosition.Magnitude() * _endPosition.Magnitude());

                 if (cosAngle > ) { cosAngle = ; }

                 else if (cosAngle < -) { cosAngle = -; }

                 var angle =  * (float)(Math.Acos(cosAngle) / Math.PI * );

                 System.Threading.Interlocked.Exchange(ref _angle, angle);

                 _normalVector = _startPosition.VectorProduct(_endPosition);

                 _startPosition = _endPosition;

             }

         }
然后,设置鼠标弹起的事件。
         public void MouseUp(int x, int y)

         {

             mouseDownFlag = false;

         }
在使用opengl(sharpgl)绘制的时候,调用
         public void TransformMatrix(OpenGL gl)

         {

             gl.PushMatrix();

             gl.LoadIdentity();

             gl.Rotate( * _angle, _normalVector.X, _normalVector.Y, _normalVector.Z);

             System.Threading.Interlocked.Exchange(ref _angle, );

             gl.MultMatrix(_lastTransform);

             gl.GetDouble(Enumerations.GetTarget.ModelviewMatix, _lastTransform);

             gl.PopMatrix();

             gl.Translate(_translateX, _translateY, _translateZ);

             gl.MultMatrix(_lastTransform);

             gl.Scale(Scale, Scale, Scale);

         }
3. 额外功能实现
缩放很容易实现,直接设置Scale属性即可。
沿着屏幕上下左右前后地移动,则需要参照着camera的方向动了。
         public void GoUp(float interval)

         {

             this._translateX += this._vectorUp.X * interval;

             this._translateY += this._vectorUp.Y * interval;

             this._translateZ += this._vectorUp.Z * interval;

         }
其余方向与此类似,不再浪费篇幅。
工程源代码在此。(http://files.cnblogs.com/bitzhuwei/Arcball6662014-02-07_20-07-00.rar)
【OpenGL(SharpGL)】支持任意相机可平移缩放的轨迹球实现的更多相关文章
- 一步一步手写GIS开源项目-(2)地图平移缩放实现
系列文章目录 一步一步手写GIS开源项目-(1)500行代码实现基础GIS展示功能 一步一步手写GIS开源项目-(2)地图平移缩放实现 项目github地址:https://github.com/Hu ...
- [OpenGL][SharpGL]用Polygon Offset解决z-fighting和stitching问题
[OpenGL][SharpGL]用Polygon Offset解决z-fighting和stitching问题 本文参考了(http://www.zeuscmd.com/tutorials/open ...
- Devrama Slider - 支持任意 HTML 的内容滑块
Devrama Slider 是一个图片滑块,支持很多特色功能.除了支持图片滑动,其它的 HTML 内容也支持.主要特色:响应式.图片预加载.图片延迟加载.进度条.自定义导航栏和控制按钮等等. 在线演 ...
- 【OpenGL】查看显卡对OpenGL的支持程度
由于开发工作中要用到OpenGL的API进行渲染,公司配的电脑又是集成显卡,所以想知道显卡对OpenGL的支持程度. 下面介绍的方法就解决了这一点. 1.下载安装EVEREST Ultimate Ed ...
- 4位或者5位led数码显示,485通信modbus,支持任意小数点写入,工业标准设置,可和plc,dcs,组态完美对接,支持定制修改
MRD-5030具有4位8段数码管,支持通过工业标注协议Modbus(Modbus-RTU)控制显示,支持任意小数点的显示.数据以半双工方式通信.电源端口和通信端口都具有防浪涌,防雷600W保护,能够 ...
- xp对opengl的支持问题
我在项目中遇到的xp显示问题是因为xp对opengl的支持问题,是通过void QCoreApplication::setAttribute(Qt::ApplicationAttribute attr ...
- WPF/Silverlight中图形的平移,缩放,旋转,倾斜变换演示
原文:WPF/Silverlight中图形的平移,缩放,旋转,倾斜变换演示 为方便描述, 这里仅以正方形来做演示, 其他图形从略. 运行时效果图:XAML代码:// Transform.XAML< ...
- 如何在MQ中实现支持任意延迟的消息?
什么是定时消息和延迟消息? 定时消息:Producer 将消息发送到 MQ 服务端,但并不期望这条消息立马投递,而是推迟到在当前时间点之后的某一个时间投递到 Consumer 进行消费,该消息即定时消 ...
- WPF中的平移缩放和矩阵变换(TranslateTransform、ScaleTransform、MatrixTransform)
在WPF中的平移缩放都是通过RenderTransform这个类来实现这些效果的,在这个类中,除了平移和缩放还有旋转.扭曲变换.矩阵变换.这些都差不多的,都是坐标的变换. 这里我就先简单弄个平移和缩放 ...
随机推荐
- 解析jquery获取父窗口的元素
("#父窗口元素ID",window.parent.document); 对应javascript版本为window.parent.document.getElementByIdx ...
- 【转】 71道经典Android面试题和答案,重要知识点都包含了
,,面试题1. 下列哪些语句关于内存回收的说明是正确的? (b ) A. 程序员必须创建一个线程来释放内存 B.内存回收程序负责释放无用内存 C.内存回收程序允许程序员直接释放内存 ...
- exp
想将远程机器上的数据库备份,搞了一上午,终于解决了: exp 用户名/密码@ip/service名 file=地址+文件名
- AngularJS学习总结
第一章 简单认识AngularJS 1.双向数据绑定 可通过ng-model监控输入 ng-app属性声明所有被其包含的内容都属于这个AngularJs应用,这也是我们在web应用中嵌套Angula ...
- win7下Arduino Mega 2560驱动安装失败解决办法
因为玩四轴用的apm的飞控板,而其需要安装此驱动,曾经在win8使用其,但是因为win8有相对应的数字证书保护措施(应该是这样的,因为好久了记不清楚了),以至于我每次都需要长按shift重启电脑关闭此 ...
- JS-concat
var arr1 = [ 1,2,3 ];var arr2 = [ 4,5,6 ];var arr3 = [ 7,8,9 ];alert( arr1.concat( arr2, arr3 ) );
- eclipse的maven项目报Missing artifact jdk.toos:jdk.toos:jar:1.6错
很多框架都会依赖jdk中的tools.jar,但是maven仓库中却没有. 如在eclipse+maven编写mapreduce代码,就会报Missing artifact jdk.toos:jdk. ...
- 快手4.0 (KSCAD)
快手 4.0 (KSCAD) 是一款简单易用的矢量绘图软件,其功能和Visio类似,可以绘制工艺流程图,流程图.组织结构图.网络拓扑图.思维导图.商业图表等. 经过二次开发,可以应用于各种领域的图形化 ...
- Postman-CI集成Jenkins
Postman-简单使用 Postman-进阶使用 Postman-CI集成Jenkins Newman 官方说明:Postman's command-line companion lets you ...
- html5+css3 制作音乐播放器
//css// body , html{ margin:0; padding:0; font:12px Arial, Helvetica, sans-serif; } .Mus ...
