SpringMvc新建实例配置
一、创建项目:
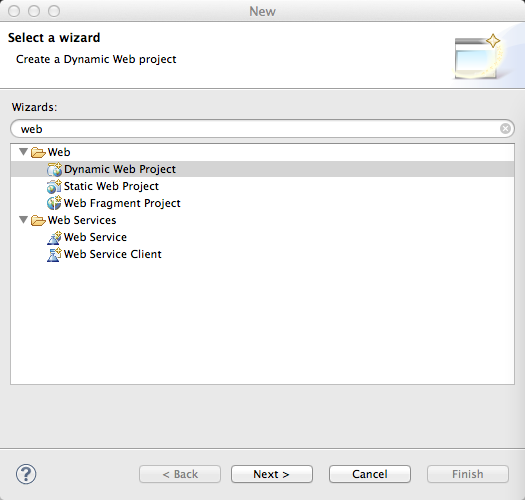
1、建立新的动态web项目:
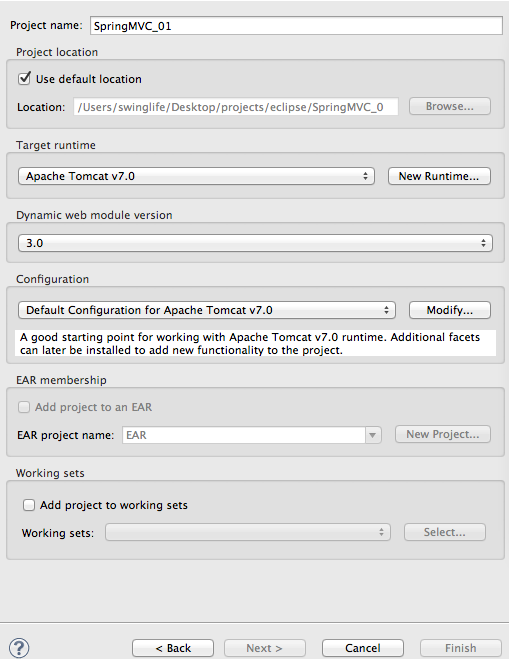
2、为项目命名为:SpringMVC_01
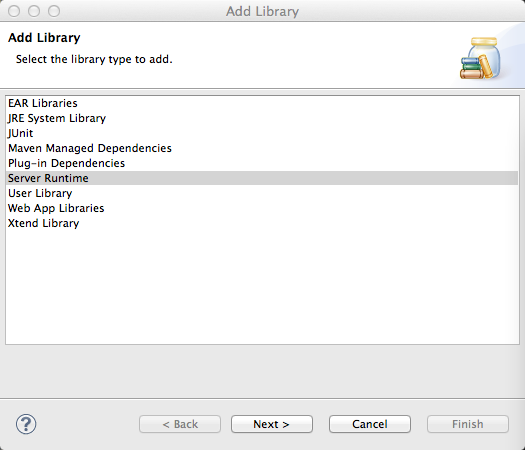
3、添加tomcat运行时环境\依赖库 如果是MyEclipse的话创建web项目时就不需要此步骤
右键项目,点击Build Path->Add Librares:
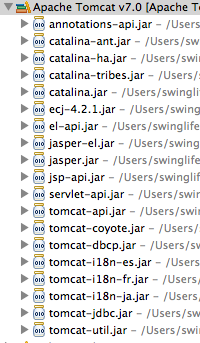
添加完后会多出tomcat 的 Servlet包
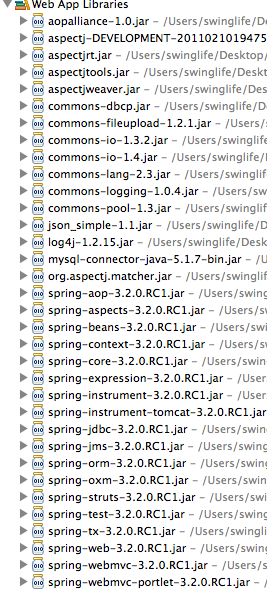
4、最后添加Spring及SpringMVC所需要的jar,我添加以下jar到项目中
二、配置文件:
1、首先在web.xml中配置一个DispatcherServlet,并通过<servlet-mapping>指定需要拦截的url。 下面xml中配置一个拦截.html为后缀的url.
[html] view plaincopyprint?

<!-- 配置Spring MVC DispatcherServlet -->
<servlet>
<servlet-name>MVC</servlet-name>
<servlet-class>org.springframework.web.servlet.DispatcherServlet</servlet-class>
<!-- 初始化参数 -->
<init-param>
<!-- 加载SpringMVC的xml到 spring的上下文容器中 -->
<param-name>contextConfigLocation</param-name>
<param-value>
/WEB-INF/classes/mvc*.*
</param-value>
</init-param>
<load-on-startup>1</load-on-startup>
</servlet>
<!-- 配置DispatcherServlet所需要拦截的 url -->
<servlet-mapping>
<servlet-name>MVC</servlet-name>
<url-pattern>*.html</url-pattern>
</servlet-mapping>
先配置一个servlet 然后 加载SpringMVC的xml文件到Spring的上下文中。然后配置servlet-mapping,servlet-name为刚刚的servlet中的配置的name,然后指定要拦截的url为*.html
2、配置Spring的上下文监听器,并且指定Spring的xml配置文件的路径。
[html] view plaincopyprint?
<!-- 监听spring上下文容器 -->
<listener>
<listener-class>
org.springframework.web.context.ContextLoaderListener
</listener-class>
</listener>
<!-- 加载spring的xml配置文件到 spring的上下文容器中 -->
<context-param>
<param-name>contextConfigLocation</param-name>
<param-value>classpath:root-context.xml</param-value>
</context-param>
这里指定的路径classpath为 项目编译后的classes文件中。
最终web.xml文件内容:
[html] view plaincopyprint?
<?xml version="1.0" encoding="UTF-8"?>
<web-app version="3.0" xmlns="http://java.sun.com/xml/ns/javaee"
xmlns:xsi="http://www.w3.org/2001/XMLSchema-instance"
xsi:schemaLocation="http://java.sun.com/xml/ns/javaee
http://java.sun.com/xml/ns/javaee/web-app_3_0.xsd">
<display-name></display-name>
<!-- 监听spring上下文容器 -->
<listener>
<listener-class>
org.springframework.web.context.ContextLoaderListener
</listener-class>
</listener>
<!-- 加载spring的xml配置文件到 spring的上下文容器中 -->
<context-param>
<param-name>contextConfigLocation</param-name>
<param-value>classpath:root-context.xml</param-value>
</context-param>
<!-- 配置Spring MVC DispatcherServlet -->
<servlet>
<servlet-name>MVC</servlet-name>
<servlet-class>org.springframework.web.servlet.DispatcherServlet</servlet-class>
<!-- 初始化参数 -->
<init-param>
<!-- 加载SpringMVC的xml到 spring的上下文容器中 -->
<param-name>contextConfigLocation</param-name>
<param-value>
/WEB-INF/classes/mvc*.*
</param-value>
</init-param>
<load-on-startup>1</load-on-startup>
</servlet>
<!-- 配置DispatcherServlet所需要拦截的 url -->
<servlet-mapping>
<servlet-name>MVC</servlet-name>
<url-pattern>*.html</url-pattern>
</servlet-mapping>
<welcome-file-list>
<welcome-file>index.html</welcome-file>
</welcome-file-list>
</web-app>
3、创建SpringMVC所需要的xml文件和applicationContext的xml文件,这里由于第一步中配置的servlet中init-param所需要加载的格式为:mvc*.* 就是去寻找为mvc开头的文件所以创建SpringMVC的xml文件时必须要有mvc开头,我命名为:mvc-context.xml,并且按照context-param中的配置,将applicationContext文件命名为:root-context.xml;

4、配置mvc-context.xml:
首先通过import标签 导入root-context.xml,然后通过component-scan标签扫描指定包名,让该包下的所有java类的spring注解生效
然后配置SpringMVC的视图渲染解析器,让其前缀为/page/ 后缀为.jsp 这样能够SpringMVC 所需要渲染的路径能够在/page/返回值.jsp中寻找。
[html] view plaincopyprint?
<!-- 加载Spring的全局配置文件 -->
<beans:import resource="root-context.xml" />
<!-- SpringMVC配置 -->
<!-- 通过component-scan 让Spring扫描org.swinglife.controller下的所有的类,让Spring的代码注解生效 -->
<context:component-scan base-package="org.swinglife.controller"></context:component-scan>
<!-- 配置SpringMVC的视图渲染器, 让其前缀为:/page/ 后缀为.jsp 将视图渲染到/page/<method返回值>.jsp中 -->
<beans:bean
class="org.springframework.web.servlet.view.InternalResourceViewResolver"
p:prefix="/page/" p:suffix=".jsp">
</beans:bean>
最后mvc-context.xml和root-context.xml为:
mvc-context.xml:
[html] view plaincopyprint?
<?xml version="1.0" encoding="UTF-8"?>
<beans:beans xmlns="http://www.springframework.org/schema/mvc"
xmlns:xsi="http://www.w3.org/2001/XMLSchema-instance" xmlns:beans="http://www.springframework.org/schema/beans"
xmlns:p="http://www.springframework.org/schema/p" xmlns:aop="http://www.springframework.org/schema/aop"
xmlns:context="http://www.springframework.org/schema/context"
xsi:schemaLocation="http://www.springframework.org/schema/mvc http://www.springframework.org/schema/mvc/spring-mvc.xsd
http://www.springframework.org/schema/aop
http://www.springframework.org/schema/aop/spring-aop-3.2.xsd http://www.springframework.org/schema/beans http://www.springframework.org/schema/beans/spring-beans.xsd
http://www.springframework.org/schema/context http://www.springframework.org/schema/context/spring-context.xsd">
<!-- 加载Spring的全局配置文件 -->
<beans:import resource="root-context.xml" />
<!-- SpringMVC配置 -->
<!-- 通过component-scan 让Spring扫描org.swinglife.controller下的所有的类,让Spring的代码注解生效 -->
<context:component-scan base-package="org.swinglife.controller"></context:component-scan>
<!-- 配置SpringMVC的视图渲染器, 让其前缀为:/ 后缀为.jsp 将视图渲染到/page/<method返回值>.jsp中 -->
<beans:bean
class="org.springframework.web.servlet.view.InternalResourceViewResolver"
p:prefix="/page/" p:suffix=".jsp">
</beans:bean>
</beans:beans>
root-context.xml:
[html] view plaincopyprint?
<?xml version="1.0" encoding="UTF-8"?>
<beans xmlns="http://www.springframework.org/schema/beans"
xmlns:xsi="http://www.w3.org/2001/XMLSchema-instance" xmlns:context="http://www.springframework.org/schema/context"
xsi:schemaLocation="http://www.springframework.org/schema/beans http://www.springframework.org/schema/beans/spring-beans-3.2.xsd
http://www.springframework.org/schema/context
http://www.springframework.org/schema/context/spring-context-3.2.xsd
http://www.springframework.org/schema/tx http://www.springframework.org/schema/tx/spring-tx-3.2.xsd">
<!-- Root Context: defines shared resources visible to all other web components -->
</beans>
SpringMvc新建实例配置的更多相关文章
- SpringMVC框架入门配置 IDEA下搭建Maven项目
初衷:本人初学SpringMVC的时候遇到各种稀奇古怪的问题,网上各种技术论坛上的帖子又参差不齐,难以一步到位达到配置好的效果,这里我将我配置的总结写到这里供大家初学SpringMVC的同僚们共同学习 ...
- springmvc 项目完整示例01 需求与数据库表设计 简单的springmvc应用实例 web项目
一个简单的用户登录系统 用户有账号密码,登录ip,登录时间 打开登录页面,输入用户名密码 登录日志,可以记录登陆的时间,登陆的ip 成功登陆了的话,就更新用户的最后登入时间和ip,同时记录一条登录记录 ...
- SpringMVC简单实例(看起来有用)
SpringMVC简单实例(看起来有用) 参考: SpringMVC 基础教程 简单入门实例 - CSDN博客http://blog.csdn.net/swingpyzf/article/detail ...
- [转]SpringMVC框架入门配置 IDEA下搭建Maven项目
初衷:本人初学SpringMVC的时候遇到各种稀奇古怪的问题,网上各种技术论坛上的帖子又参差不齐,难以一步到位达到配置好的效果,这里我将我配置的总结写到这里供大家初学SpringMVC的同僚们共同学习 ...
- SpringMVC:Controller配置总结
西部开源-秦疆老师:SpringMVC系列博客 , 秦老师交流Q群号: 664386224 未授权禁止转载!编辑不易 , 转发请注明出处!防君子不防小人,共勉! SpringMVC:Controlle ...
- MySQL 5.5.35 单机多实例配置详解
一.前言 二.概述 三.环境准备 四.安装MySQL 5.5.35 五.新建支持多实例的配置文件(我这里配置的是四个实例) 六.初始化多实例数据库 七.提供管理脚本 mysqld_multi.serv ...
- seleniumRC启动及浏览器实例配置
一.firefox浏览器实例配置 1.启动用户配置文件管理器 重要:在启动用户配置文件管理器之前,Firefox必须完全关闭. 1)按 support.cdn.mozilla.net/medi ...
- SpringMVC HelloWorld实例开发及部署
SpringMVC HelloWorld实例开发及部署 2017-01-24 目录 1 Tomcat及Eclipse Tomcat插件安装配置 1.1 Tomcat的安装 1.2 Eclipse ...
- MySql5.7多实例配置教程
最近朋友在搞在Linux上配置MySql5.7多实例教程,在网上查询了很多资料,一直报各种各样的错误,后来在网上搜了一篇博客,根据其配置,最近是配置成功了 参考配置连接:https://blog.cs ...
随机推荐
- kubernetes实战篇之helm完整示例
系列目录 构建一个 Helm Chart 下面我们通过一个完整的示例来学习如何使用 Helm 创建.打包.分发.安装.升级及回退Kubernetes应用. 创建一个名为 mychart 的 Chart ...
- java内存管理机制剖析(一)
最近利用工作之余学习研究了一下java的内存管理机制,在这里记录总结一下. 1-1.java内存区域 当java程序运行时,java虚拟机会将内存划分为若干个不同的数据区域,这些内存区域创建和销毁的时 ...
- 并发编程-concurrent指南-线程池ExecutorService的使用
有几种不同的方式来将任务委托给 ExecutorService 去执行: execute(Runnable) submit(Runnable) submit(Callable) invokeAny(… ...
- 我把代码开源、托管到了GitHub、码云
前言 学习了那么多知识点,写了那么多代码,一直都没有时间整理,之前都是新学一个知识点就在同一个工程项目中进行实践测试,导致这个工程越来越臃肿.越来越乱,连我自己都快看不懂了... 这段时间整理了部分代 ...
- Windows 应用容器化
背景 在这个时间点,我们可能已经对 Linux 容器使用已经达到熟练掌握的程度,因为 Docker 与 Kubernetes 都是最早为 Linux 平台设计.当我们从容器这项技术中体会到种种收益,对 ...
- 【POJ - 1573】Robot Motion
-->Robot Motion 直接中文 Descriptions: 样例1 样例2 有一个N*M的区域,机器人从第一行的第几列进入,该区域全部由'N' , 'S' , 'W' , 'E' ,走 ...
- 跨站脚本攻击(selfxss)笔记(三)
本篇纯文字发表自己对自插型xss的看法 selfxss,顾名思义,自己输入xss脚本,输出仅自己看到,仅xss到自己. 常见的有:查询框的xss.某个账号中,添加自己的分组类等 查询框的xss: 即在 ...
- [记录]Python高并发编程
========== ==多进程== ========== 要让Python程序实现多进程(multiprocessing),我们先了解操作系统的相关知识. Unix/Linux操作系统提供了一个fo ...
- Unity游戏神经网络版坦克大战
基于遗传算法优化的神经网络来训练坦克AI是什么体验呢?下面有bulid好的demo. 包括window和安卓两个版本. 这是一个Unity项目. 下载链接:https://pan.baidu.com/ ...
- React的Context的使用方法简介
context 定义: Context提供了一种方式,能够让数据在组件树中传递,而不必一级一级手动传递. API : createContext(defaultValue?). 使用方法: 首先要引入 ...