Ansible 介绍和安装
Ansible 介绍
运维工具分类:
- agent: puppet, func
这类都需要在客户端上安装agent客户端
- agentless: ansible, fabric
这类是不需要在客户端上安装agent,只需要知道客户端的用户密码或者是秘钥验证就可以管理。
Ansible 特性:
- Minimal learning curve, auditability
入门很平滑,简单
- No bootstrapping
无需在客户端安装agent
- No DAG ordering, Fails Fast
无序,只需要按照自定义设定即可
- No agents (other than sshd) - 0 resourcee consumption when not in use
- No server
没有代理同时也没有服务器端,用户只需要手动发起命令来运行就可以了。
- No additional PKI
因为依赖于SSH工作,所以无序SSL证书的功能,
- Modules in any language
- SSH by default
模块化工作,模块可以是任何语言来编写,只需要遵循ansible的调用风格就可以。
- YAML, NOT code
简化的html或者json格式来定义文档或文本格式,非常容易学习
- Strong multi-tier solution
支持非常强大的多级的解决方案
Ansible的架构
下图:
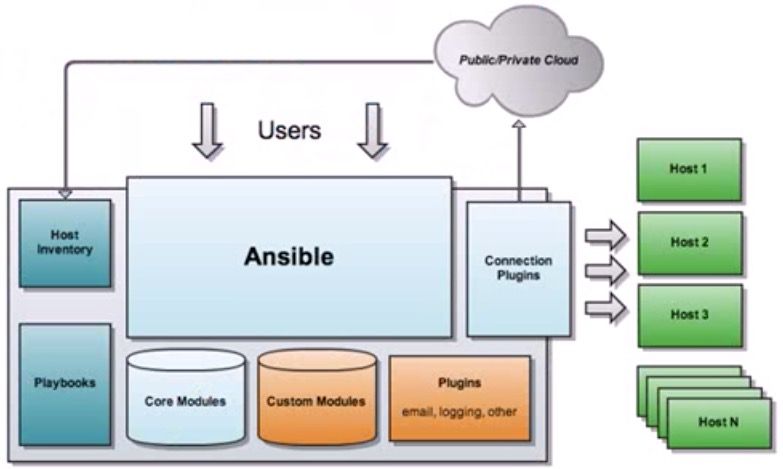
Ansible工作原理
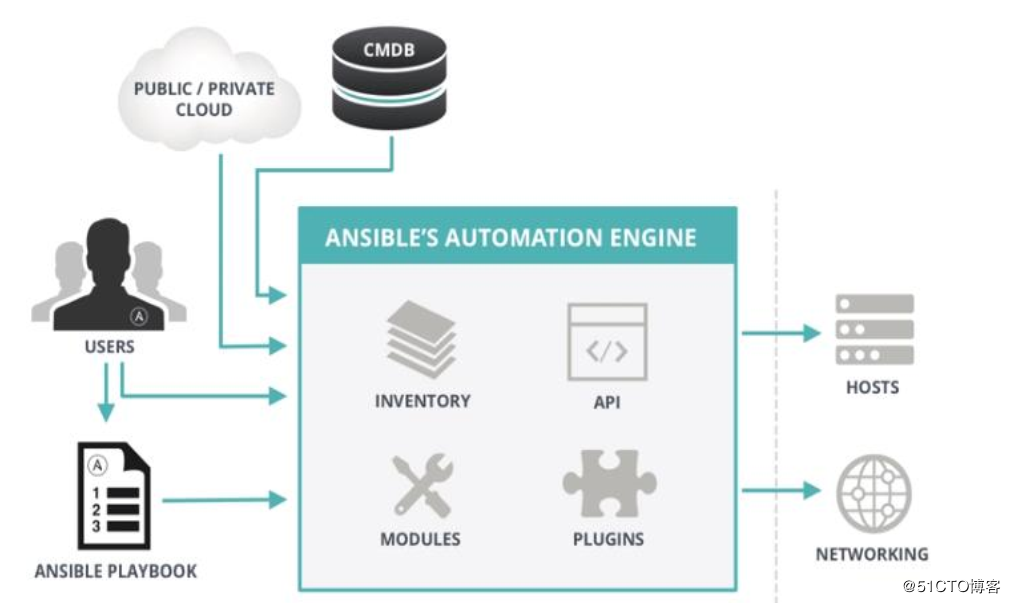
- ANSIBLE:
- 组合INVENTORY、 API、 MODULES、PLUGINS的绿框,可以理解为是ansible命令工具,其为核心执行工具
- PLAYBOOKS:
- 任务剧本(任务集),编排定义Ansible任务集的配置文件,由Ansible顺序依次执行,通常是JSON格式的YML文件
- INVENTORY:
- Ansible管理主机的清单/etc/anaible/hosts
- MODULES:
- Ansible执行命令的功能模块,多数为内置的核心模块,也可自定义,ansible-doc –l 可查看模块
- PLUGINS:
- 模块功能的补充,如连接类型插件、循环插件、变量插件、过滤插件等,该功能不常用
- API:
- 供第三方程序调用的应用程序编程接口
Ansible 特性:
- 基于Python语言实现,由Paramiko库实现连接管理主机,PyYAML和Jinjia2 三个关键模块。
- 部署简单,被管理节点无需安装agent
- 默认使用SSH协议
- 1 能够让管理机能够通过秘钥认证到每一台被管理的主机上
- 2 可以在inventory文件中指定被管理的用户密码,要确保该文件的安全
- 支持自定义模块: 支持各种编程语言
- 支持Playbook
- 基于“模块”完成各种“任务”
tasks
环境准备
| 系统版本 | 内核版本 | IP地址 |
|---|---|---|
| Centos 7.5 | 4.18.9-1.el7.elrepo.x86_64 | 10.0.0.3 |
| 角色 | IP | 用户 | 密码 |
|---|---|---|---|
| 管理节点 | 10.0.0.9 | root | 123456 |
| node-1 | 10.0.0.65 | root | 123456 |
| node-2 | 10.0.0.66 | root | 123456 |
备注 该系统采用MINI最小化安装,安装之后对系统进行了最基础的优化操作,操作过程点击这里
Ansible安装
可以使用编译安装和yum安装,本次使用较为简洁的yum安装,需要有
epel源,没有的可以在mirrors.aliyun.com上使用阿里云的epel源
在管理节点上操作
[root@node01 ~]# yum install ansible -y

...

Installed:

  ansible.noarch 0:2.7.0-1.el7

Dependency Installed:

  PyYAML.x86_64 0:3.10-11.el7            libtomcrypt.x86_64 0:1.17-26.el7            libtommath.x86_64 0:0.42.0-6.el7                             libyaml.x86_64 0:0.1.4-11.el7_0

  python-babel.noarch 0:0.9.6-8.el7      python-backports.x86_64 0:1.0-8.el7         python-backports-ssl_match_hostname.noarch 0:3.5.0.1-1.el7   python-cffi.x86_64 0:1.6.0-5.el7

  python-enum34.noarch 0:1.0.4-1.el7     python-httplib2.noarch 0:0.9.2-1.el7        python-idna.noarch 0:2.4-1.el7                               python-ipaddress.noarch 0:1.0.16-2.el7

  python-jinja2.noarch 0:2.7.2-2.el7     python-keyczar.noarch 0:0.71c-2.el7         python-markupsafe.x86_64 0:0.11-10.el7                       python-paramiko.noarch 0:2.1.1-4.el7

  python-ply.noarch 0:3.4-11.el7         python-pycparser.noarch 0:2.14-1.el7        python-setuptools.noarch 0:0.9.8-7.el7                       python-six.noarch 0:1.9.0-2.el7

  python2-crypto.x86_64 0:2.6.1-15.el7   python2-cryptography.x86_64 0:1.7.2-2.el7   python2-jmespath.noarch 0:0.9.0-3.el7                        python2-pyasn1.noarch 0:0.1.9-7.el7

  sshpass.x86_64 0:1.06-2.el7

Complete!

[root@node02 ~]# yum info ansible

Loaded plugins: fastestmirror

Loading mirror speeds from cached hostfile

 * base: mirrors.aliyun.com

 * extras: mirrors.aliyun.com

 * updates: mirrors.aliyun.com

Available Packages

Name        : ansible

Arch        : noarch

Version     : 2.7.0

Release     : 1.el7

Size        : 11 M

Repo        : epel/x86_64

Summary     : SSH-based configuration management, deployment, and task execution system

URL         : http://ansible.com

License     : GPLv3+

Description : Ansible is a radically simple model-driven configuration management,

            : multi-node deployment, and remote task execution system. Ansible works

            : over SSH and does not require any software or daemons to be installed

            : on remote nodes. Extension modules can be written in any language and

            : are transferred to managed machines automatically.
可以看到按装的ansible的版本是 2.7的版本
| 文件名 | 说明 |
|---|---|
| /etc/ansible/ansible.cfg | 主配置文件,配置ansible工作特性 |
| /etc/ansible/hosts | Inventory 被管理节点配置文件,主机清单 |
| /etc/ansible/roles | 存放角色的目录 |
| /usr/bin/ansible | 主程序,临时命令执行工具 |
| /etc/ansible/ansible-doc | 查看配置文档,模块功能查看工具 |
| /usr/bin/ansible-galaxy | 下载/上传优秀代码或Roles模块的官网平台 |
| /etc/ansible/ansible-playbook | 定制自动化任务,编排剧本工具 |
| /usr/bin/ansible-pull | 远程执行命令的工具 |
| /usr/bin/ansible-vault | 文件加密工具 |
配置秘钥管理
在管理节点上操作
生成密钥对,然后copy到node1 和nodde2 上使能够秘钥登陆
[root@node01 ~]# ssh-keygen -t rsa -P "" -f ~/.ssh/id_rsa

Generating public/private rsa key pair.

Created directory '/root/.ssh'.

Your identification has been saved in /root/.ssh/id_rsa.

Your public key has been saved in /root/.ssh/id_rsa.pub.

The key fingerprint is:

SHA256:llhKseNPXM5O8O3M6lbz1sCj1p0eXtfED8d7Wrn/hRg root@node01

The key's randomart image is:

+---[RSA 2048]----+

|      .          |

|       o         |

|      + o .      |

|     o * B .   o |

|      + S = E.. =|

|       + o +oo+==|

|        . ..==.OX|

|          ..o =+X|

|         oo. .o+=|

+----[SHA256]-----+

[root@node01 ~]# ls -l .ssh/

total 8

-rw------- 1 root root 1675 Oct 15 13:27 id_rsa

-rw-r--r-- 1 root root  393 Oct 15 13:27 id_rsa.pub
[root@node01 ~]# ssh-copy-id root@10.0.0.65

/usr/bin/ssh-copy-id: INFO: Source of key(s) to be installed: "/root/.ssh/id_rsa.pub"

The authenticity of host '10.0.0.65 (10.0.0.65)' can't be established.

ECDSA key fingerprint is SHA256:Vu10B9+4iuvebISnNca1EPQtAaBJUjquSXY7AmfhRnc.

ECDSA key fingerprint is MD5:a8:a0:32:f3:0a:07:25:1d:aa:0d:95:ec:cd:a8:c5:a0.

Are you sure you want to continue connecting (yes/no)? yes

/usr/bin/ssh-copy-id: INFO: attempting to log in with the new key(s), to filter out any that are already installed

/usr/bin/ssh-copy-id: INFO: 1 key(s) remain to be installed -- if you are prompted now it is to install the new keys

root@10.0.0.65's password:

Number of key(s) added: 1

Now try logging into the machine, with:   "ssh 'root@10.0.0.65'"

and check to make sure that only the key(s) you wanted were added.
[root@node01 ~]# ssh-copy-id root@10.0.0.66

/usr/bin/ssh-copy-id: INFO: Source of key(s) to be installed: "/root/.ssh/id_rsa.pub"

The authenticity of host '10.0.0.66 (10.0.0.66)' can't be established.

ECDSA key fingerprint is SHA256:Vu10B9+4iuvebISnNca1EPQtAaBJUjquSXY7AmfhRnc.

ECDSA key fingerprint is MD5:a8:a0:32:f3:0a:07:25:1d:aa:0d:95:ec:cd:a8:c5:a0.

Are you sure you want to continue connecting (yes/no)? yes

/usr/bin/ssh-copy-id: INFO: attempting to log in with the new key(s), to filter out any that are already installed

/usr/bin/ssh-copy-id: INFO: 1 key(s) remain to be installed -- if you are prompted now it is to install the new keys

root@10.0.0.66's password:

Number of key(s) added: 1

Now try logging into the machine, with:   "ssh 'root@10.0.0.66'"

and check to make sure that only the key(s) you wanted were added.
# 测试连接10.0.0.65

[root@node01 ~]# ssh root@10.0.0.65

Last login: Fri Oct 12 14:15:30 2018 from 10.0.0.9

[root@node02 ~]# ip a | grep -w inet | tail -1 | awk '{print $2}'

10.0.0.65/24
# 测试连接10.0.0.66

[root@node01 ~]# ssh root@10.0.0.66

Last login: Fri Oct 12 14:15:29 2018 from 10.0.0.9

[root@node03 ~]# ip a | grep -w inet | tail -1 | awk '{print $2}'

10.0.0.66/24
配置Inventory文件
在/etc/ansible/hosts文件中,我们把65 和66 的两台机器配置成两个组
[root@node01 ~]# cd /etc/ansible/

[root@node01 ansible]# ls

ansible.cfg  apache.yml  cond.yml  hosts  nginx.retry  nginx.yaml  roles  test.yml

[root@node01 ansible]# cp hosts hosts.bak

[root@node01 ansible]# cat hosts

# This is the default ansible 'hosts' file.

#

# It should live in /etc/ansible/hosts

#

#   - Comments begin with the '#' character

#   - Blank lines are ignored

#   - Groups of hosts are delimited by [header] elements

#   - You can enter hostnames or ip addresses

#   - A hostname/ip can be a member of multiple groups

[webservs]

10.0.0.65

[dbservs]

10.0.0.66
这样,Inverteroy文件就配置完成
简单测试连通性
下面使用ansible演示连通性的测试
[root@node01 ansible]# ansible all -m ping

10.0.0.65 | SUCCESS => {

    "changed": false,

    "ping": "pong"

}

10.0.0.66 | SUCCESS => {

    "changed": false,

    "ping": "pong"

}
上面显示SUCCESS,表示都正常
Ansible 介绍和安装的更多相关文章
- 自动化运维工具之 Ansible 介绍及安装使用
一.初识Ansible 介绍: Absible 使用 模块(Modules)来定义配置任务.模块可以用标准脚本语言(Python,Bash,Ruby,等等)编写,这是一个很好的做法,使每个模块幂等.A ...
- ansible介绍和安装
ansible是由 Python 编写的强大的配置管理解决方案,ansible 的特点就在于它的简洁与高效率 ansible与其他的配置管理工具不同点在于:不需要你在想要配置的每个节点上安装自己的组件 ...
- Ansible介绍及安装部署
本节内容: 运维工具 Ansible特性 Ansible架构图和核心组件 安装Ansible 演示使用示例 一.运维工具 作为一个Linux运维人员,需要了解大量的运维工具,并熟知这些工具的差异,能够 ...
- ansible入门一(Ansible介绍及安装部署)
本节内容: 运维工具 Ansible特性 Ansible架构图和核心组件 安装Ansible 演示使用示例 一.运维工具 作为一个Linux运维人员,需要了解大量的运维工具,并熟知这些工具的差异,能够 ...
- ansible介绍与安装
一.什么是ansible ansible是python中一套模块,系统中的一套自动化工具,可以用来作系统管理.自动化命令等任务. 二.ansible优势 .ansible是Python中一套完整的自动 ...
- ansible介绍、安装与配置
一.ansible简介 (1)简介: Ansible是近年越来越火的一款自动化运维工具,其主要的功能是帮助运维实现IT工作的自动化,降低人为操作失误.提高业务自动化率,常用于软件部署.配置自动化.管理 ...
- Ansible第一篇:介绍及安装
Ansible介绍 Ansible是个什么东西呢?官方的title是"Ansible is Simple IT Automation"--简单的自动化IT工具.ansible基于P ...
- 1、Ansible初识简要介绍及安装
1.Ansible简介 1.1 Ansible介绍 Ansible 是一个简单的自动化运维管理工具,基于Python开发,集合了众多运维工具(puppet.cfengine.chef.func.fab ...
- Linux centosVMware 自动化运维Ansible介绍、Ansible安装、远程执行命令、拷贝文件或者目录、远程执行脚本、管理任务计划、安装rpm包/管理服务、 playbook的使用、 playbook中的循环、 playbook中的条件判断、 playbook中的handlers、playbook实战-nginx安装、管理配置文件
一.Ansible介绍 不需要安装客户端,通过sshd去通信 基于模块工作,模块可以由任何语言开发 不仅支持命令行使用模块,也支持编写yaml格式的playbook,易于编写和阅读 安装十分简单,ce ...
随机推荐
- 第三十一章 System V信号量(二)
用信号量实现进程互斥示例 #include <unistd.h> #include <sys/types.h> #include <stdlib.h> #inclu ...
- Java自动化测试框架-09 - TestNG之依赖注入篇 (详细教程)
1.-依赖注入 TestNG支持两种不同类型的依赖项注入:本机(由TestNG本身执行)和外部(由诸如Guice的依赖项注入框架执行). 1.1-本机依赖项注入 TestNG允许您在方法中声明其他参数 ...
- 使用position设置经典的网站前端结构
能脱离文档流的设置: float:left/right position:absolute; 绝对定位 position:fixed; 固定定位 //搞清楚position的属性值的意思就容易明白 使 ...
- 安装ubuntu16虚拟机,下载android源码,配置编译环境
Android 源码编译步骤: 我考虑了一下,目前电脑装了SSD,8G内存,使用虚拟机编译源码应该够用. 首先下载虚拟机软件,由于最近一直在使用virtualbox,感觉蛮不错了,下载地址: http ...
- CSPS模拟 85
WWB大佬的bitset映射真是太强了! %%% T1 观察样例,猜规律. T2 对题目的翻译工作用了很长时间 翻译错了好几次.. 观察到奇环没法染色,选的边必须把奇环弄断 如果在偶环上,偶环就变得没 ...
- getchar()用法 【转】
1.从缓冲区读走一个字符,相当于清除缓冲区 2.前面的scanf()在读取输入时会在缓冲区中留下一个字符'\n'(输入完s[i]的值后按回车键所致),所以如果不在此加一个getchar()把这个回车符 ...
- css3 input placeholder颜色修改方法
css3 input placeholder颜色修改方法<pre> input::-webkit-input-placeholder { /* placeholder颜色 */ color ...
- SqlServer2005 查询 第四讲 in
今天我们来说sql中的命令参数in in --in用于查询某个字段的指定的值的记录信息 注意一下:--对或(or)取反是并且(and),对并且(and)取反是或(or 数据库中不等于表示有两种:!= ...
- Jquery才可以使用 this 指定当前DOM
Jquery才可以使用 this 指定当前DOM jquery获取并设置它的元素 <div class="shop-item" style="line-height ...
- webpack3、4的基本的使用方法
webpack的基本使用 webpack的安装 webpack的使用时需要借助 node 的环境的 在 node 中自动下载了 npm 这个包管理工具,之后的操作我们需要使用npm包管理工具进行相关操 ...