Spring注解之@Autowired
前言
说起Spring的@Autowired注解,想必大家已经熟悉的不能再熟悉了。本文就针对此最常用的注解,梳理一下它的功能和原理,争取从源码的角度将此注解讲通,如有写的不准确的地方,欢迎各位园友拍砖。
注:此篇博文基于Spring5.1.10.RELEASE,SpringBoot2.1.9.RELEASE
正文
首先看一下@Autowired注解的源码
 package org.springframework.beans.factory.annotation;

 import java.lang.annotation.Documented;

 import java.lang.annotation.ElementType;

 import java.lang.annotation.Retention;

 import java.lang.annotation.RetentionPolicy;

 import java.lang.annotation.Target;

 @Target({ElementType.CONSTRUCTOR, ElementType.METHOD, ElementType.PARAMETER, ElementType.FIELD, ElementType.ANNOTATION_TYPE})

 @Retention(RetentionPolicy.RUNTIME)

 @Documented

 public @interface Autowired {

     /**

      * Declares whether the annotated dependency is required.

      * <p>Defaults to {@code true}.

      */

     boolean required() default true;

 }
可以看到,此注解运行时生效,且适用范围很广,从构造器,到方法,到参数、属性、注解,都可以加上@Autowired注解。它还有一个属性required,此属性用于控制如果找不到要依赖注入的对象时是否报错,默认true即默认找不到要注入的对象时会报错。下面我们慢慢梳理,将@Autowired的使用场景一一罗列出来。
一、普通用法,依赖注入成员变量
下面将要用的测试类贴出来,首先是接口
 package com.mybokeyuan.springAutowiredDemo;

 public interface IndexInterface {

 }
再就是两个子类
 package com.mybokeyuan.springAutowiredDemo;

 import org.springframework.stereotype.Component;

 @Component

 public class IndexService implements IndexInterface{

 }
 package com.mybokeyuan.springAutowiredDemo;

 import org.springframework.stereotype.Component;

 @Component

 public class OtherIndexService implements IndexInterface{

 }
核心类(后续的各种场景演示均只基于此类进行改动)
 package com.mybokeyuan.springAutowiredDemo;

 import org.springframework.beans.factory.annotation.Autowired;

 import org.springframework.stereotype.Component;

 @Component

 public class MyService {

     @Autowired

     private IndexService indexService;

 }
扫描配置类
 package com.mybokeyuan.springAutowiredDemo;

 import org.springframework.context.annotation.ComponentScan;

 import org.springframework.context.annotation.Configuration;

 @Configuration

 @ComponentScan("com.mybokeyuan.springAutowiredDemo")

 public class AutowiredConfig {

 }
main方法类
 package com.mybokeyuan.springAutowiredDemo.client;

 import com.mybokeyuan.springAutowiredDemo.AutowiredConfig;

 import com.mybokeyuan.springAutowiredDemo.MyService;

 import org.springframework.context.annotation.AnnotationConfigApplicationContext;

 public class DemoClientTest {

     public static void main(String[] args) {

         AnnotationConfigApplicationContext ac = new AnnotationConfigApplicationContext(AutowiredConfig.class);

         System.out.println(ac.getBean(MyService.class));

     }

 }
运行main方法时,如果在第10行打了断点,会看到MyService中的indexService属性已经依赖注入了值,这是我们最常使用@Autowired注解的场景。
二、依赖注入方法
MyService类如下所示
 package com.mybokeyuan.springAutowiredDemo;

 import org.springframework.beans.factory.annotation.Autowired;

 import org.springframework.context.ApplicationContext;

 import org.springframework.stereotype.Component;

 import java.util.List;

 @Component

 public class MyService {

     private IndexService indexService;

     @Autowired

     public void getIndexInterf (IndexService index) {

         indexService = index;

     }

     @Autowired

     private ApplicationContext applicationContext;

 }
运行main方法后,会发现该类中的indexService完成了注入,这样的用法类似于set方法的功能。并且可以看到,applicationContext也注入了。所以往后就不要用ApplicationContextAware了,直接@Autowired轻快便捷的达到目的。
三、构造方法注入参数
MyService类如下所示:
 package com.mybokeyuan.springAutowiredDemo;

 import org.springframework.beans.factory.annotation.Autowired;

 import org.springframework.stereotype.Component;

 import java.util.List;

 @Component

 public class MyService {

     private IndexService indexService;

     private List<IndexInterface> indexList;

     @Autowired

     public MyService (List<IndexInterface> indexList, IndexService indexService) {

         this.indexList = indexList;

         this.indexService = indexService;

     }

 }
运行后会发现成员变量indexList和indexService中已经注入了值。此处需要注意一点,如果有两个自定义构造方法,两个都没加@Autowired注解,则会报错,因为Spring不知道你要用哪个构造方法初始化;
如果只有一个构造方法加了@Autowired注解,那么就会用这个构造方法初始化;同理,如果有多个构造方法都加了@Autowired注解,那么还是会报错。
四、注入Map、List等集合
在【一、普通用法】中的MyService里添加几个成员变量,如下所示:
 package com.mybokeyuan.springAutowiredDemo;

 import org.springframework.beans.factory.annotation.Autowired;

 import org.springframework.stereotype.Component;

 import java.util.List;

 import java.util.Map;

 import java.util.Set;

 @Component

 public class MyService {

     @Autowired

     private IndexService indexService;

     @Autowired

     private List<IndexInterface> indexList;

     @Autowired

     private Map<String, IndexInterface> indexMap;

     @Autowired

     private Set<IndexInterface> indexSet;

 }
再次运行main方法,在断点中可以看到从Spring中获取到的MyService对象中,已经完成了对后面三个集合的依赖注入,如下图所示:
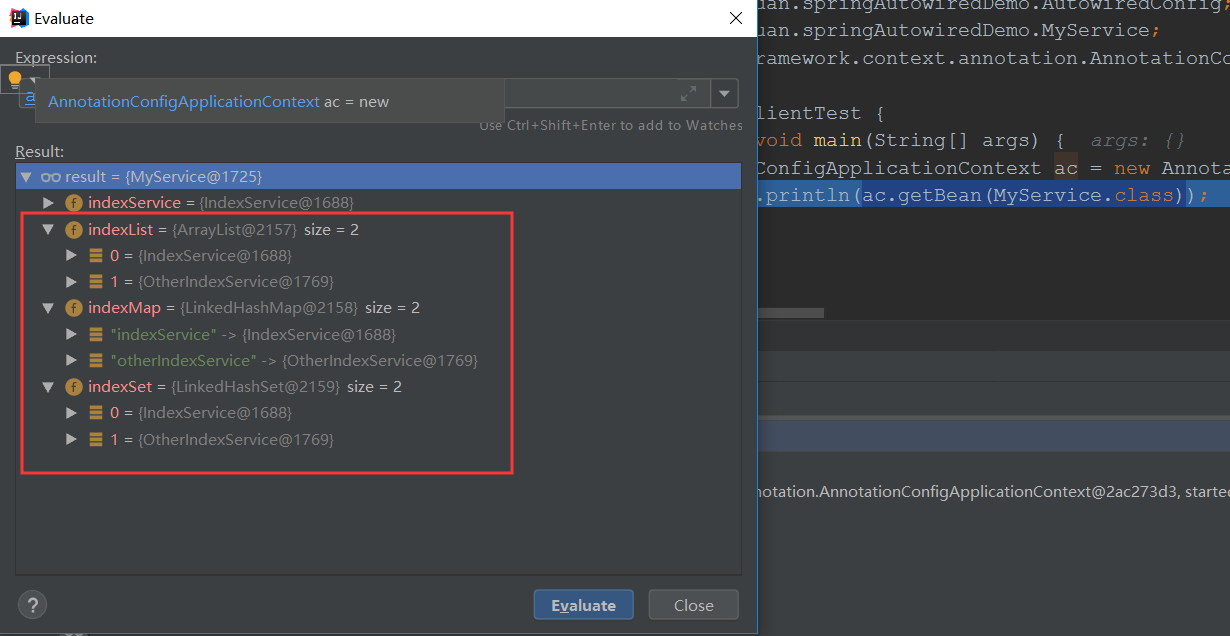
可以看到,IndexInterface接口的两个实现类全部注入到了集合中,且Map里面的key默认就是两个实现类各自的beanName。
五、源码分析
看了上面的各种使用场景,想必大家会对这个最熟悉的注解有了一丝陌生的感觉,不过不要紧,下面咱们慢慢来脱下TA的神秘衣服,对ta重新熟悉起来。我这里是以下面的MyService类为例子进行的源码debug分析。
 package com.mybokeyuan.springAutowiredDemo;

 import org.springframework.beans.factory.annotation.Autowired;

 import org.springframework.context.ApplicationContext;

 import org.springframework.stereotype.Component;

 import java.util.List;

 @Component

 public class MyService {

     private IndexService indexService;

     private List<IndexInterface> indexList;

     @Autowired

     public void getIndexInterf (IndexService index) {

         indexService = index;

     }

     @Autowired

     private ApplicationContext applicationContext;

     @Autowired

     public MyService (List<IndexInterface> indexList) {

         this.indexList = indexList;

     }

 }
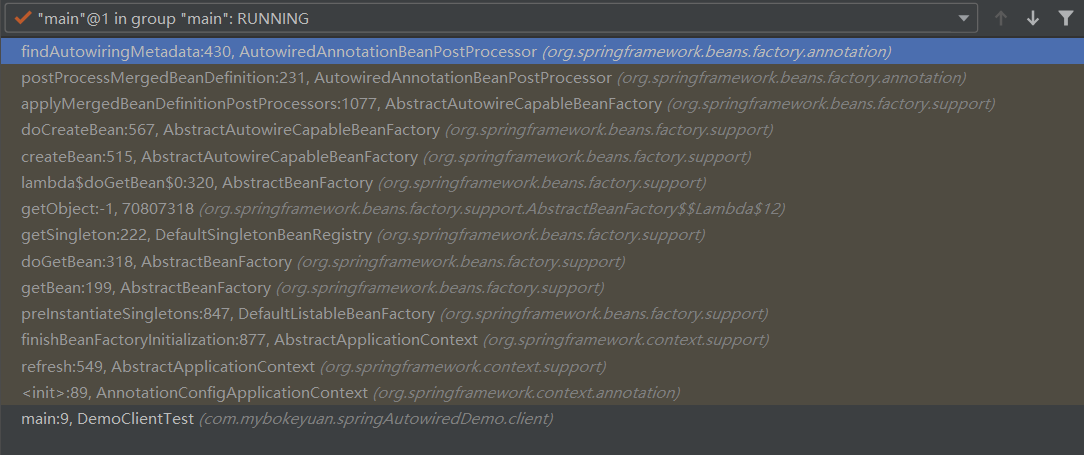
首先在AutowiredAnnotationBeanPostProcessor#postProcessProperties的方法中打上一个断点,然后右键断点加上条件过滤 beanName.equals("myService"),debug运行main方法,会在断点处停住,此时我们的调用栈是下图这样的:

相信对Spring源码有过了解的园友对调用栈中的方法都不陌生,从下往上看,先经过了refresh方法,在finishBeanFactoryInitialization方法中getBean,然后走getObject的时候触发bean的初始化。
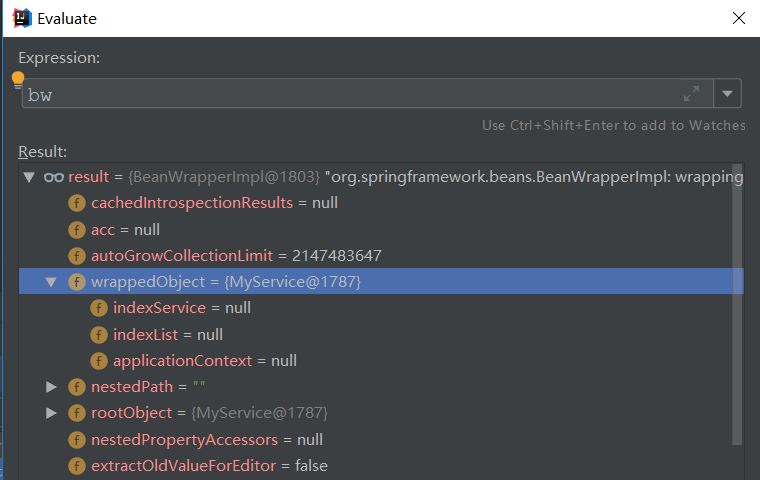
bean的初始化是一个很复杂地方,在AbstractAutowireCapableBeanFactory#doCreateBean方法中,先创建一个BeanWrapper,它的内部成员变量wrappedObject中存放的就是实例化的MyService对象,只是此时未完成初始化,所以属性都是null(如下图所示)。再往后进入populateBean方法进行属性注入,这才逐渐逼近我们的目的地。
不过在进入populateBean之前,需要先去看一下前置方法,即BeanWrapper创建的方法createBeanInstance。Spring在这个方法中先推断出合适的构造方法,然后实例化bean。在推断构造方法的时候(AbstractAutowireCapableBeanFactory#determineConstructorsFromBeanPostProcessors方法中调用了AutowiredAnnotationBeanPostProcessor#determineCandidateConstructors方法进行的推断),有一个筛选标准就是会根据是否有@Autowired注解来选择用哪个构造器,具体详见AutowiredAnnotationBeanPostProcessor#findAutowiredAnnotation方法,此方法如下所示,功能就是看看当前构造器上加没加注解。
     @Nullable

     private AnnotationAttributes findAutowiredAnnotation(AccessibleObject ao) {

         if (ao.getAnnotations().length > 0) {  // autowiring annotations have to be local

             for (Class<? extends Annotation> type : this.autowiredAnnotationTypes) {// 此集合中只有两个值,一个是Autowired注解,一个是Value注解

                 AnnotationAttributes attributes = AnnotatedElementUtils.getMergedAnnotationAttributes(ao, type);

                 if (attributes != null) {

                     return attributes;

                 }

             }

         }

         return null;

     }
此处构造器的推断和属性注入,就是使用场景三【三、构造方法注入参数】中,@Autowired注解加在构造器上发挥的作用。
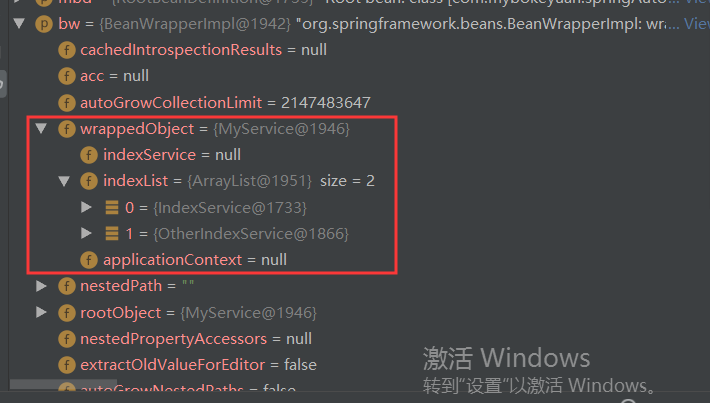
走完createBeanInstance方法得到的BeanWrapper中,可以看到属性wrappedObject中已经对indexList进行了依赖注入
进行到这里,有必要重新梳理清楚类构造器注入时的调用关系,示例的调用栈图如下所示:
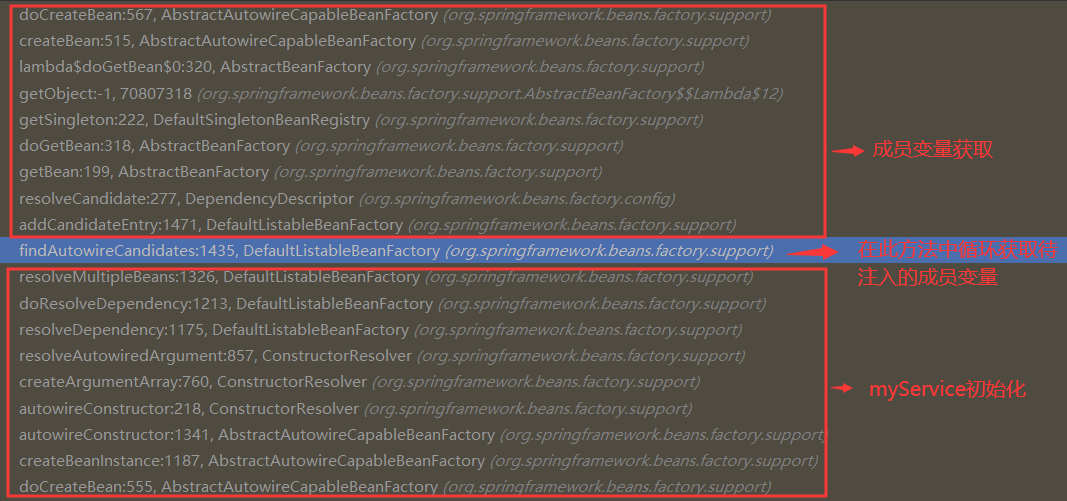
1、在myService对象进行实例化调用构造器时,执行AbstractAutowireCapableBeanFactory#autowireConstructor方法;
2、进入到另一个类ConstructorResolver的autowireConstructor方法中;
2.1、调用同类下的resolveAutowiredArgument方法,该方法会调用DefaultListableBeanFactory下的resolveDependency方法,此方法会调用到findAutowireCandidates方法,在该方法中有如下代码
1 for (String candidate : candidateNames) {

2             if (!isSelfReference(beanName, candidate) && isAutowireCandidate(candidate, descriptor)) {

3                 addCandidateEntry(result, candidate, descriptor, requiredType);

4             }

5         }
其中的candidateNames就是构造器中要注入的对象名字indexService和otherIndexService,此处通过循环调用addCandidateEntry来获取这两个name对应的bean;
2.2、在DefaultListableBeanFactory的addCandidateEntry方法中,调到了DependencyDescriptor#resolveCandidate方法,在此方法中调用的getBean方法获取它的成员变量bean。
DependencyDescriptor#resolveCandidate方法如下所示:
1     public Object resolveCandidate(String beanName, Class<?> requiredType, BeanFactory beanFactory)

2             throws BeansException {

3

4         return beanFactory.getBean(beanName);

5     }
然后又进入了下一次的getBean逻辑。此处就是这样完成的构造器方法参数注入。
下面进入populateBean中。看源码经过一个for循环和一个NAME或者TYPE模式的判断之后,进入了BeanPostProcessor的循环调用中,通过遍历后置处理器,调用了AutowiredAnnotationBeanPostProcessor#postProcessProperties,也就是一开始我们打断点的地方,该方法源码如下:
 1 @Override

 2     public PropertyValues postProcessProperties(PropertyValues pvs, Object bean, String beanName) {

 3         InjectionMetadata metadata = findAutowiringMetadata(beanName, bean.getClass(), pvs);

 4         try {

 5             metadata.inject(bean, beanName, pvs);

 6         }

 7         catch (BeanCreationException ex) {

 8             throw ex;

 9         }

10         catch (Throwable ex) {

11             throw new BeanCreationException(beanName, "Injection of autowired dependencies failed", ex);

12         }

13         return pvs;

14     }
在第13行打断点,发现到13行的时候,bean中的属性已经被注入了,所以可以知道,是在第5行进行的属性注入。
继续跟踪第5行,进入InjectionMetadata#inject方法:
 1 public void inject(Object target, @Nullable String beanName, @Nullable PropertyValues pvs) throws Throwable {

 2         Collection<InjectedElement> checkedElements = this.checkedElements;

 3         Collection<InjectedElement> elementsToIterate =

 4                 (checkedElements != null ? checkedElements : this.injectedElements);

 5         if (!elementsToIterate.isEmpty()) {

 6             for (InjectedElement element : elementsToIterate) {

 7                 if (logger.isTraceEnabled()) {

 8                     logger.trace("Processing injected element of bean '" + beanName + "': " + element);

 9                 }

10                 element.inject(target, beanName, pvs);

11             }

12         }

13     }
发现是从当前metadata对象中取的element对象,而通过断点可以看到,checkedElements中的Member对象就是当前bean中加了@Autowired注解的成员变量或者普通方法在反射包中对应的对象,随后通过element的inject方法进行的注入。那么问题来了,element对象是如何创建来的?inject方法又是如何将bean注入到成员变量中的?
对于element对象的创建,还要返回postProcessProperties方法中查看上面的findAutowiringMetadata方法:
 1 private InjectionMetadata findAutowiringMetadata(String beanName, Class<?> clazz, @Nullable PropertyValues pvs) {

 2         // Fall back to class name as cache key, for backwards compatibility with custom callers.

 3         String cacheKey = (StringUtils.hasLength(beanName) ? beanName : clazz.getName());

 4         // Quick check on the concurrent map first, with minimal locking.

 5         InjectionMetadata metadata = this.injectionMetadataCache.get(cacheKey);

 6         if (InjectionMetadata.needsRefresh(metadata, clazz)) {

 7             synchronized (this.injectionMetadataCache) {

 8                 metadata = this.injectionMetadataCache.get(cacheKey);

 9                 if (InjectionMetadata.needsRefresh(metadata, clazz)) {

10                     if (metadata != null) {

11                         metadata.clear(pvs);

12                     }

13                     metadata = buildAutowiringMetadata(clazz);

14                     this.injectionMetadataCache.put(cacheKey, metadata);

15                 }

16             }

17         }

18         return metadata;

19     }
通过断点到这个方法中,发现此时injectionMetadataCache中已经有了myService对应的InjectionMetadata,此方法只是从map中取出返回。没办法了,还要继续追寻下去,AutowiredAnnotationBeanPostProcessor中的injectionMetadataCache属性是什么时候触发的初始化?
在当前类中查询injectionMetadataCache的put方法,发现只有这一个地方,所以继续在这里断点一下,看看什么时候触发的injectionMetadataCache.put。
发现原来就是在doCreateBean的applyMergedBeanDefinitionPostProcessors方法中触发的put操作。
下面继续追寻inject方法中Spring如何完成的属性注入。
属性注入进入内部类 AutowiredFieldElement的方法inject中,方法注入进入的是AutowiredMethodElement中。在inject方法中可以看到我们的老朋友DefaultListableBeanFactory#resolveDependency方法,即通过这个方法获取到对应的bean对象,最后通过反射完成的赋值或方法调用。
这里我们第二次遇到DefaultListableBeanFactory#resolveDependency,发现它是@Autowired注解注入构造器参数、注入成员变量、注入方法参数必经的方法,所以必须继续搞明白它。
追踪resolveDependency方法,进入DefaultListableBeanFactory#resolveMultipleBeans方法,该方法属于@Autowired注解的核心方法,虽然很长,但需要贴出源代码:
 @Nullable

     private Object resolveMultipleBeans(DependencyDescriptor descriptor, @Nullable String beanName,

             @Nullable Set<String> autowiredBeanNames, @Nullable TypeConverter typeConverter) {

         final Class<?> type = descriptor.getDependencyType();

                 // 0、暂时不清楚是做什么用的...

         if (descriptor instanceof StreamDependencyDescriptor) {

             Map<String, Object> matchingBeans = findAutowireCandidates(beanName, type, descriptor);

             if (autowiredBeanNames != null) {

                 autowiredBeanNames.addAll(matchingBeans.keySet());

             }

             Stream<Object> stream = matchingBeans.keySet().stream()

                     .map(name -> descriptor.resolveCandidate(name, type, this))

                     .filter(bean -> !(bean instanceof NullBean));

             if (((StreamDependencyDescriptor) descriptor).isOrdered()) {

                 stream = stream.sorted(adaptOrderComparator(matchingBeans));

             }

             return stream;

         }

         else if (type.isArray()) { // 1、判断要注入的是不是一个数组,可见除了集合注入外,也可以以数组的形式注入bean

             Class<?> componentType = type.getComponentType();

             ResolvableType resolvableType = descriptor.getResolvableType();

             Class<?> resolvedArrayType = resolvableType.resolve(type);

             if (resolvedArrayType != type) {

                 componentType = resolvableType.getComponentType().resolve();

             }

             if (componentType == null) {

                 return null;

             }

             Map<String, Object> matchingBeans = findAutowireCandidates(beanName, componentType,

                     new MultiElementDescriptor(descriptor));

             if (matchingBeans.isEmpty()) {

                 return null;

             }

             if (autowiredBeanNames != null) {

                 autowiredBeanNames.addAll(matchingBeans.keySet());

             }

             TypeConverter converter = (typeConverter != null ? typeConverter : getTypeConverter());

             Object result = converter.convertIfNecessary(matchingBeans.values(), resolvedArrayType);

             if (result instanceof Object[]) {

                 Comparator<Object> comparator = adaptDependencyComparator(matchingBeans);

                 if (comparator != null) {

                     Arrays.sort((Object[]) result, comparator);

                 }

             }

             return result;

         }

         else if (Collection.class.isAssignableFrom(type) && type.isInterface()) { // 2、判断注入的是不是集合的接口类(List、Set等)

             Class<?> elementType = descriptor.getResolvableType().asCollection().resolveGeneric();

             if (elementType == null) {

                 return null;

             }

             Map<String, Object> matchingBeans = findAutowireCandidates(beanName, elementType,

                     new MultiElementDescriptor(descriptor));

             if (matchingBeans.isEmpty()) {

                 return null;

             }

             if (autowiredBeanNames != null) {

                 autowiredBeanNames.addAll(matchingBeans.keySet());

             }

             TypeConverter converter = (typeConverter != null ? typeConverter : getTypeConverter());

             Object result = converter.convertIfNecessary(matchingBeans.values(), type);

             if (result instanceof List) {

                 Comparator<Object> comparator = adaptDependencyComparator(matchingBeans);

                 if (comparator != null) {

                     ((List<?>) result).sort(comparator);

                 }

             }

             return result;

         }

         else if (Map.class == type) { ///3、判断要注入的是不是map类

             ResolvableType mapType = descriptor.getResolvableType().asMap();

             Class<?> keyType = mapType.resolveGeneric(0);

             if (String.class != keyType) {

                 return null;

             }

             Class<?> valueType = mapType.resolveGeneric(1);

             if (valueType == null) {

                 return null;

             }

             Map<String, Object> matchingBeans = findAutowireCandidates(beanName, valueType,

                     new MultiElementDescriptor(descriptor));

             if (matchingBeans.isEmpty()) {

                 return null;

             }

             if (autowiredBeanNames != null) {

                 autowiredBeanNames.addAll(matchingBeans.keySet());

             }

             return matchingBeans;

         }

         else { // 4、其他情况返回空,进入doResolveDependency方法做默认处理

             return null;

         }

     }
主要看1/2/3的注释,可以知道Spring支持多种注入方式就是在这里实现的。我们能发现,在获取bean的时候都是调用了findAntowireCandidates方法,而且第4中默认的情况,在外部的doResolveDenpency方法中也调用了findAutowireCandidates方法。
至于findAutowireCandidates方法是如何完成的属性获取?是通过type还是name获取到的bean?我们下期继续!
Spring注解之@Autowired的更多相关文章
- Spring注解之@Autowired、@Qualifier、@Resource、@Value
前言 @Autowired.@Qualifier.@Resource.@Value四个注解都是用于注入数据的,他们的作用就和在xml配置文件中的bean标签中写一个标签的作用是一样的!本篇中特别要讲解 ...
- spring 注解@Resource @Autowired区别
1.@Autowired寻找类的时候默认是ByType,也就是通过类的类型来寻找类.不过,也可以通过借助@Qualifier("name")来指定寻找的类名 @Autowired ...
- spring注解源码分析--how does autowired works?
1. 背景 注解可以减少代码的开发量,spring提供了丰富的注解功能.我们可能会被问到,spring的注解到底是什么触发的呢?今天以spring最常使用的一个注解autowired来跟踪代码,进行d ...
- Spring注解 @Resource和@Autowired
@Resource和@Autowired两者都是做bean的注入使用.其实@Resource并不是Spring的注解,他的包是javax.annotation.Resource 需要导入.但是Spri ...
- Spring注解标签详解@Autowired @Qualifier等 @Slf4j
@Slf4j @Slf4j注解实现日志输出 自己写日志的时候,肯定需要: private final Logger logger = LoggerFactory.getLogger(LoggerTes ...
- Spring注解@Component、@Repository、@Service、@Controller @Resource、@Autowired、@Qualifier、@scope
以下内容摘自部分网友的,并加上了自己的理解 @Service用于标注业务层组件(我们通常定义的service层就用这个) @Controller用于标注控制层组件(如struts中的action.Sp ...
- spring注解-@Autowired。@Resource。@Service
Spring的@Autowired注解.@Resource注解和@Service注解 什么是注解 传统的Spring做法是使用.xml文件来对bean进行注入或者是配置aop.事物,这么做有两个缺点: ...
- Spring AOP注解通过@Autowired,@Resource,@Qualifier,@PostConstruct,@PreDestroy注入属性的配置文件详解
本文介绍了使用Spring注解注入属性的方法.使用注解以前,注入属性通过类以及配置文件来实现.现在,注入属性可以通过引入@Autowired注解,或者@Resource,@Qualifier,@Pos ...
- Spring AOP注解通过@Autowired,@Resource,@Qualifier,@PostConstruct,@PreDestroy注入属性的
本文介绍了使用spring注解注入属性的方法. 使用注解以前,注入属性通过类以及配置文件来实现.现在,注入属性可以通过引入@Autowired注解,或者@Resource,@Qualifier,@Po ...
随机推荐
- android java socket断线重连
android java socket断线重连 thread = new Thread(new Runnable() { @Override public void run() { while (tr ...
- HTML+Jquery实现多图片上传预览功能
HTML:使用input的onchange事件,它一改变就触发事件 <p id="p3"> <input name="File" onchan ...
- 能避开很多坑的mysql面试题,你知道吗?
最近有一些朋友问我一些mysql相关的面试题,有一些比较基础,有些比较偏.这里就总结一些常见的mysql面试题吧,都是自己平时工作的总结以及经验.大家看完,能避开很多坑.而且很多问题,都是面试中也经常 ...
- MySQL必知必会(使用函数处理数据)
#文本处理函数 SELECT vend_name, Upper(vend_name) AS vend_name_upcase FROM vendors ORDER BY vend_name; SELE ...
- 解密国内BAT等大厂前端技术体系-百度篇(长文建议收藏)
1 引言 整个业界在前端框架不断迭代中,也寻找到了许多突破方向,例如跨平台中的RN.Flutter,服务端GraphQL.Serverless,前端和客户端的融合越来越紧密,前端在Node和Elect ...
- luogu P2272 [ZJOI2007]最大半连通子图
题目描述 一个有向图G=(V,E)称为半连通的(Semi-Connected),如果满足:?u,v∈V,满足u→v或v→u,即对于图中任意两点u,v,存在一条u到v的有向路径或者从v到u的有向路径.若 ...
- IPV6-ONLY
1.ipv4地址已经耗尽,未来可能只支持ipv6-only. 2.在一个纯IPV6环境下,路由器会自动将IPV4地址转成IPv6地址. 苹果这样要求,对于大多数开发者而言,并不困难.目前大多数应用无需 ...
- Docker系列-(1) 原理与基本操作
Docker是一个开源的应用容器引擎,基于Go语言,并遵从Apache2.0协议开源. Docker可以让开发者打包他们的应用以及依赖包到一个轻量级.可移植的容器中,然后发布到任何流行的Linux机器 ...
- Selenium之ActionChains类、Keys类
ActionChains类(鼠标操作)常用于模拟鼠标的行为,比如单击.双击.拖拽等行为. 一些常用的模拟鼠标的操作方法有: click(on_element=None) --- 鼠标单击 do ...
- Chapter 3 :代码的坏味道
"如果尿布臭了,就换掉它." --Beck奶奶,论保持小孩清洁的哲学 代码的坏味道这一章集中论述该何时重构.具体的重构方法在后面的章节. "没有任何度量规矩比得上见识广博 ...