SpringMVC流程源码分析及DispatcherServlet核心源码
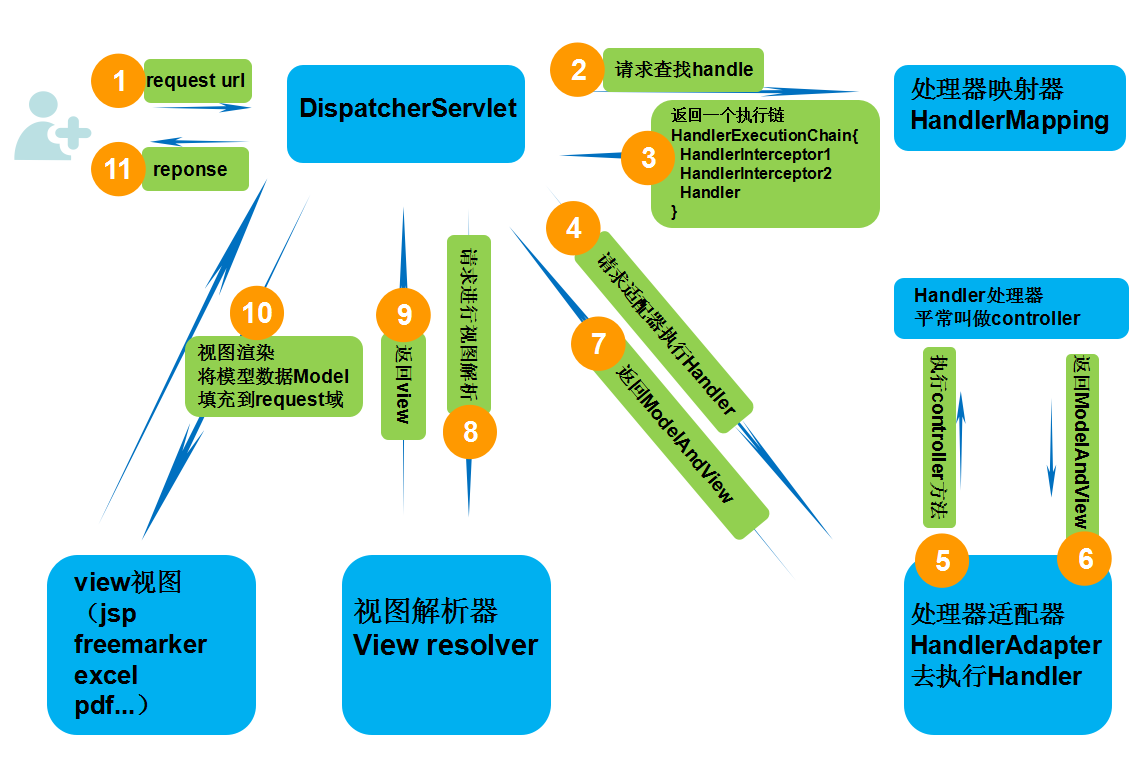
一、源码分析前还是需要一张流程图作为指导,如下:
二、简单介绍以及源码定位
DispatcherServlet其实就是一个HttpServlet,他是HttpServlet的子类,所以它和普通的HttpServlet在web.xml里同样的配置。
这个Servlet的doPost和doGet方法的实现是DispatcherServlet的父类FrameworkServlet中实现的,两个方法里都是调用processRequest方法。processRequest的实现是在FrameworkServlet中,此方法中最主要的操作就是调用doService方法。
doService方法的最终实现是在DispatcherServlet中,这样所有的Http请求(GET、POST、PUT和DELETE等)的最终操作就DispatcherServlet中实现了。
DispatcherServlet中doService的实现如下,对Request设置了一些全局属性,最终接下来的操作是在doDispatcher函数中实现了。
[java] view plain copy

//获取请求,设置一些request的参数,然后分发给doDispatch

    @Override

    protected void doService(HttpServletRequest request, HttpServletResponse response) throws Exception {

        if (logger.isDebugEnabled()) {

            String resumed = WebAsyncUtils.getAsyncManager(request).hasConcurrentResult() ? " resumed" : "";

            logger.debug("DispatcherServlet with name '" + getServletName() + "'" + resumed +

                    " processing " + request.getMethod() + " request for [" + getRequestUri(request) + "]");

        }

        // Keep a snapshot of the request attributes in case of an include,

        // to be able to restore the original attributes after the include.

        Map<String, Object> attributesSnapshot = null;

        if (WebUtils.isIncludeRequest(request)) {

            attributesSnapshot = new HashMap<String, Object>();

            Enumeration<?> attrNames = request.getAttributeNames();

            while (attrNames.hasMoreElements()) {

                String attrName = (String) attrNames.nextElement();

                if (this.cleanupAfterInclude || attrName.startsWith("org.springframework.web.servlet")) {

                    attributesSnapshot.put(attrName, request.getAttribute(attrName));

                }

            }

        }

        // Make framework objects available to handlers and view objects.

        /* 设置web应用上下文**/

        request.setAttribute(WEB_APPLICATION_CONTEXT_ATTRIBUTE, getWebApplicationContext());

        /* 国际化本地**/

        request.setAttribute(LOCALE_RESOLVER_ATTRIBUTE, this.localeResolver);

        /* 样式**/

        request.setAttribute(THEME_RESOLVER_ATTRIBUTE, this.themeResolver);

        //设置样式资源

        request.setAttribute(THEME_SOURCE_ATTRIBUTE, getThemeSource());

        //请求刷新时保存属性

        FlashMap inputFlashMap = this.flashMapManager.retrieveAndUpdate(request, response);

        if (inputFlashMap != null) {

            request.setAttribute(INPUT_FLASH_MAP_ATTRIBUTE, Collections.unmodifiableMap(inputFlashMap));

        }

        //Flash attributes 在对请求的重定向生效之前被临时存储(通常是在session)中,并且在重定向之后被立即移除

        request.setAttribute(OUTPUT_FLASH_MAP_ATTRIBUTE, new FlashMap());

        //FlashMap 被用来管理 flash attributes 而 FlashMapManager 则被用来存储,获取和管理 FlashMap 实体.

        request.setAttribute(FLASH_MAP_MANAGER_ATTRIBUTE, this.flashMapManager);

        try {

            doDispatch(request, response);

        }

        finally {

            if (!WebAsyncUtils.getAsyncManager(request).isConcurrentHandlingStarted()) {

                // Restore the original attribute snapshot, in case of an include.

                if (attributesSnapshot != null) {

                    restoreAttributesAfterInclude(request, attributesSnapshot);

                }

            }

        }

    }
doDispatch()方法源码如下:
/**

	 * Process the actual dispatching to the handler.

	 * <p>The handler will be obtained by applying the servlet's HandlerMappings in order.

	 * The HandlerAdapter will be obtained by querying the servlet's installed HandlerAdapters

	 * to find the first that supports the handler class.

	 * <p>All HTTP methods are handled by this method. It's up to HandlerAdapters or handlers

	 * themselves to decide which methods are acceptable.

	 * @param request current HTTP request

	 * @param response current HTTP response

	 * @throws Exception in case of any kind of processing failure

	 */

	protected void doDispatch(HttpServletRequest request, HttpServletResponse response) throws Exception {

		HttpServletRequest processedRequest = request;

		HandlerExecutionChain mappedHandler = null;

		boolean multipartRequestParsed = false;

		WebAsyncManager asyncManager = WebAsyncUtils.getAsyncManager(request);

		try {

			ModelAndView mv = null;

			Exception dispatchException = null;

			try {

				processedRequest = checkMultipart(request);

				multipartRequestParsed = (processedRequest != request);

				// Determine handler for the current request.

				mappedHandler = getHandler(processedRequest);

				if (mappedHandler == null || mappedHandler.getHandler() == null) {

					noHandlerFound(processedRequest, response);

					return;

				}

				// Determine handler adapter for the current request.

				HandlerAdapter ha = getHandlerAdapter(mappedHandler.getHandler());

				// Process last-modified header, if supported by the handler.

				String method = request.getMethod();

				boolean isGet = "GET".equals(method);

				if (isGet || "HEAD".equals(method)) {

					long lastModified = ha.getLastModified(request, mappedHandler.getHandler());

					if (logger.isDebugEnabled()) {

						logger.debug("Last-Modified value for [" + getRequestUri(request) + "] is: " + lastModified);

					}

					if (new ServletWebRequest(request, response).checkNotModified(lastModified) && isGet) {

						return;

					}

				}

				if (!mappedHandler.applyPreHandle(processedRequest, response)) {

					return;

				}

				// Actually invoke the handler.

				mv = ha.handle(processedRequest, response, mappedHandler.getHandler());

				if (asyncManager.isConcurrentHandlingStarted()) {

					return;

				}

				applyDefaultViewName(processedRequest, mv);

				mappedHandler.applyPostHandle(processedRequest, response, mv);

			}

			catch (Exception ex) {

				dispatchException = ex;

			}

			processDispatchResult(processedRequest, response, mappedHandler, mv, dispatchException);

		}

		catch (Exception ex) {

			triggerAfterCompletion(processedRequest, response, mappedHandler, ex);

		}

		catch (Error err) {

			triggerAfterCompletionWithError(processedRequest, response, mappedHandler, err);

		}

		finally {

			if (asyncManager.isConcurrentHandlingStarted()) {

				// Instead of postHandle and afterCompletion

				if (mappedHandler != null) {

					mappedHandler.applyAfterConcurrentHandlingStarted(processedRequest, response);

				}

			}

			else {

				// Clean up any resources used by a multipart request.

				if (multipartRequestParsed) {

					cleanupMultipart(processedRequest);

				}

			}

		}

	}
三、通过阅读源码总结分析流程如下:
1. web应用服务器接收到一个新请求是,读取web.xml中的配置,如果匹配DispatcherServlet的请求映射路径,web容器将该请求转发给DispatcherServlet进行处理
2. DispatcherServlet接收到请求后,执行doDispatch方法,此方法遍历DispatcherServlet中的HandlerMapping(处理器映射器)集合,根据请求的HttpServletRequest信息通过HandlerMapping对象方法找到HandlerExecutionChain(执行链,内含拦截器和处理器)。
3. DispatcherServlet继续执行doDispatch方法,根据得到的HandlerExecutionChain(执行链)中的handler遍历自己的HandlerAdapter(处理器适配器)集合,找到支持这个Handler的HandlerAdapter并返回。
4.继续doDispatch方法,把HandlerExecutionChain(执行链)内部的那些前置拦截器逻辑都执行完,然后再再通过得到的HandlerAdapter执行HandlerExecutionChain内部的处理器,会返回一个ModelAndView包含了视图逻辑名和模型数据信息
5.调用执行链的方法,执行拦截器的后置拦截器
6. ModelAndView中包含的是“逻辑视图名”,而非真正的视图对象,DispatcherServlet借助ViewResolver完成逻辑视图名到真实视图名对象的解析工作
7. 当得到真实的视图对象View后,DispatcherServlet就使用这个View对象对ModelAndView中的模型数据进行视图渲染
8. 最终客户端得到HTML页面什么的
SpringMVC流程源码分析及DispatcherServlet核心源码的更多相关文章
- Android版数据结构与算法(五):LinkedHashMap核心源码彻底分析
版权声明:本文出自汪磊的博客,未经作者允许禁止转载. 上一篇基于哈希表实现HashMap核心源码彻底分析 分析了HashMap的源码,主要分析了扩容机制,如果感兴趣的可以去看看,扩容机制那几行最难懂的 ...
- 并发编程之 SynchronousQueue 核心源码分析
前言 SynchronousQueue 是一个普通用户不怎么常用的队列,通常在创建无界线程池(Executors.newCachedThreadPool())的时候使用,也就是那个非常危险的线程池 ^ ...
- iOS 开源库系列 Aspects核心源码分析---面向切面编程之疯狂的 Aspects
Aspects的源码学习,我学到的有几下几点 Objective-C Runtime 理解OC的消息分发机制 KVO中的指针交换技术 Block 在内存中的数据结构 const 的修饰区别 block ...
- HashMap的结构以及核心源码分析
摘要 对于Java开发人员来说,能够熟练地掌握java的集合类是必须的,本节想要跟大家共同学习一下JDK1.8中HashMap的底层实现与源码分析.HashMap是开发中使用频率最高的用于映射(键值对 ...
- Java内存管理-掌握类加载器的核心源码和设计模式(六)
勿在流沙筑高台,出来混迟早要还的. 做一个积极的人 编码.改bug.提升自己 我有一个乐园,面向编程,春暖花开! 上一篇文章介绍了类加载器分类以及类加载器的双亲委派模型,让我们能够从整体上对类加载器有 ...
- 3 手写Java HashMap核心源码
手写Java HashMap核心源码 上一章手写LinkedList核心源码,本章我们来手写Java HashMap的核心源码. 我们来先了解一下HashMap的原理.HashMap 字面意思 has ...
- HTTP流量神器Goreplay核心源码详解
摘要:Goreplay 前称是 Gor,一个简单的 TCP/HTTP 流量录制及重放的工具,主要用 Go 语言编写. 本文分享自华为云社区<流量回放工具之 goreplay 核心源码分析> ...
- Netty 学习(六):创建 NioEventLoopGroup 的核心源码说明
Netty 学习(六):创建 NioEventLoopGroup 的核心源码说明 作者: Grey 原文地址: 博客园:Netty 学习(六):创建 NioEventLoopGroup 的核心源码说明 ...
- Backbone事件机制核心源码(仅包含Events、Model模块)
一.应用场景 为了改善酷版139邮箱的代码结构,引入backbone的事件机制,按照MVC的分层思想搭建酷版云邮局的代码框架.力求在保持酷版轻量级的基础上提高代码的可维护性. 二.遗留问题 1.b ...
随机推荐
- springboot使用Jpa连接数据库
springboot使用Jpa连接数据库 1.pom.xml: <?xml version="1.0" encoding="UTF-8"?> < ...
- django学之路01--环境安装和pycharm运行django项目
1. 环境安装 1).virtualenv安装 C:\Users\Administrator>pip install virtualenv Collecting virtualenv Using ...
- centos php7 安装mysqli扩展心得
在新配服务器时发现,php无法连接到mysql.通过phpinfo发现.根本没有显示mysqli的相关配置.经过一系列研究.总结了下.: 第一步: 在phpinfo里没有mysqli配置,原因是安装p ...
- python安装第三方包的安装路径, dist-packages和site-packages区别
简单来说 如果是系统自带的python,会使用dist-packages目录 如果你手动安装python,它会直接使用目录site-packages 这允许你让两个安装隔离开来 dist-packag ...
- python解释器安装和变量配置
python解释器安装 第一步https://www.python.org/ 下载 python-3.6.6 和 python-2.7.16 俩个版本 Downloads 下 选windows版本 4 ...
- vue-router钩子函数实现路由守卫
接上一篇,我们一起学习了vue路由的基本使用以及动态路由.路由嵌套以及路由命名等知识,今天我们一起来学习记录vue-router的钩子函数实现路由守卫: 何为路由守卫?路由守卫有点类似于ajax的请求 ...
- embedding技术
目录 word2vec 负采样 目标函数 反向梯度 层次softmax NPLM的目标函数和反向梯度 目标函数 反向梯度 GNN(图神经网络) deepwalk node2vec 附录 word2ve ...
- Git初始化项目 和 Gitignore
初始化init: git init git status git add . git commit -am "init projrct" 添加远程仓库: git remote ad ...
- AppBoxFuture: Raft快照及日志截断回收
AppBoxFuture的存储引擎依赖Raft一致性协议来保证各个分区副本的一致性,如果不处理Raft日志将不断增长,因此需要特定的机制(定期或每处理一定数量的日志)来回收那些无用的日志数据.通过 ...
- linux服务器创建虚拟路径解决文件上传路径隔离问题
需求环境 图片上传最简单的就是上传web项目下,这样图片与项目不可分离会产生很多不必要的影响.例如:重新部署项目需要把所有上传的图片再copy一份等. 图片与项目分离有好几种方式: 方式一.在linu ...