iOS开发本地推送(iOS10)UNUserNotificationCenter
1、简介
iOS10之后苹果对推送进行了封装,UNUserNotificationCenter就这样产生了。简单介绍本地推送的使用UserNotifications官方文档说明!
2、简单使用UNUserNotificationCenter
一、创建UNUserNotificationCenter,设置推送模式和代理!
        UNUserNotificationCenter *center = [UNUserNotificationCenter currentNotificationCenter];

        [center requestAuthorizationWithOptions:(UNAuthorizationOptionAlert|UNAuthorizationOptionSound|UNAuthorizationOptionBadge)

                              completionHandler:^(BOOL granted, NSError * _Nullable error) {

                                  if (!error) {

                                      NSLog(@"succeeded!");

                                  }

                              }];

        center.delegate = self;
二、设置推送内容
UNMutableNotificationContent *content = [UNMutableNotificationContent new];
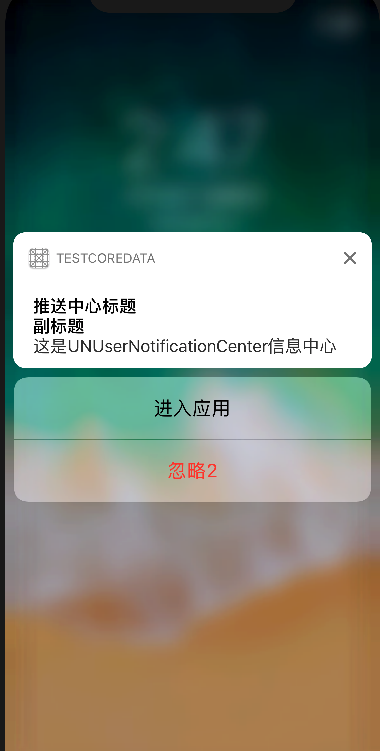
content.title = @"推送中心标题";
content.subtitle = @"副标题";
content.body = @"这是UNUserNotificationCenter信息中心";
content.badge = @;
content.categoryIdentifier = @"categoryIdentifier"; // 需要解锁显示,红色文字。点击不会进app。
// UNNotificationActionOptionAuthenticationRequired = (1 << 0),
//
// 黑色文字。点击不会进app。
// UNNotificationActionOptionDestructive = (1 << 1),
//
// 黑色文字。点击会进app。
// UNNotificationActionOptionForeground = (1 << 2), UNNotificationAction *action = [UNNotificationAction actionWithIdentifier:@"enterApp"
title:@"进入应用"
options:UNNotificationActionOptionForeground];
UNNotificationAction *clearAction = [UNNotificationAction actionWithIdentifier:@"destructive"
title:@"忽略2"
options:UNNotificationActionOptionDestructive];
UNNotificationCategory *category = [UNNotificationCategory categoryWithIdentifier:@"categoryIdentifier"
actions:@[action,clearAction]
intentIdentifiers:@[requestID]
options:UNNotificationCategoryOptionNone];
[center setNotificationCategories:[NSSet setWithObject:category]];
三、设置推送方式
        UNTimeIntervalNotificationTrigger *timeTrigger = [UNTimeIntervalNotificationTrigger triggerWithTimeInterval: repeats:YES];

        UNNotificationRequest *request = [UNNotificationRequest requestWithIdentifier:requestID content:content trigger:timeTrigger];
trigger的其它用法:
        //1分钟后提醒

        UNTimeIntervalNotificationTrigger *trigger1 = [UNTimeIntervalNotificationTrigger triggerWithTimeInterval: repeats:NO];

        //每小时重复 1 次

        UNTimeIntervalNotificationTrigger *trigger2 = [UNTimeIntervalNotificationTrigger triggerWithTimeInterval: repeats:YES];

        //周日早8点

        NSDateComponents *components = [[NSDateComponents alloc] init];

        components.weekday = ;

        components.hour = ;

        UNCalendarNotificationTrigger *trigger3 = [UNCalendarNotificationTrigger triggerWithDateMatchingComponents:components repeats:YES];

        //#import <CoreLocation/CoreLocation.h>

        CLRegion *region = [[CLRegion alloc] init];

        UNLocationNotificationTrigger *trigger4 = [UNLocationNotificationTrigger triggerWithRegion:region repeats:NO];
四、添加推送request
[center addNotificationRequest:request withCompletionHandler:^(NSError * _Nullable error) { }];
3、UNUserNotificationCenter的Delegate
//将要推送

- (void)userNotificationCenter:(UNUserNotificationCenter *)center willPresentNotification:(UNNotification *)notification withCompletionHandler:(void (^)(UNNotificationPresentationOptions))completionHandler{

    NSLog(@"----------willPresentNotification");

}

//已经完成推送

- (void)userNotificationCenter:(UNUserNotificationCenter *)center didReceiveNotificationResponse:(UNNotificationResponse *)response withCompletionHandler:(void (^)(void))completionHandler{

    NSLog(@"============didReceiveNotificationResponse");

    NSString *categoryID = response.notification.request.content.categoryIdentifier;

    if ([categoryID isEqualToString:@"categoryIdentifier"]) {

        if ([response.actionIdentifier isEqualToString:@"enterApp"]) {

            if (@available(iOS 10.0, *)) {

            } else {

                // Fallback on earlier versions

            }

        }else{

            NSLog(@"No======");

        }

    }

    completionHandler();

}
4、移除推送
        [center removePendingNotificationRequestsWithIdentifiers:@[requestID]];

        [center removeAllDeliveredNotifications];
附录:
- (BOOL)application:(UIApplication *)application didFinishLaunchingWithOptions:(NSDictionary *)launchOptions {

    // Override point for customization after application launch.

    if (@available(iOS 10.0, *)) {

        //第一步:获取推送通知中心

        UNUserNotificationCenter *center = [UNUserNotificationCenter currentNotificationCenter];

        [center requestAuthorizationWithOptions:(UNAuthorizationOptionAlert|UNAuthorizationOptionSound|UNAuthorizationOptionBadge)

                              completionHandler:^(BOOL granted, NSError * _Nullable error) {

                                  if (!error) {

                                      NSLog(@"succeeded!");

                                  }

                              }];

        center.delegate = self;

        //第二步:设置推送内容

        UNMutableNotificationContent *content = [UNMutableNotificationContent new];

        content.title = @"推送中心标题";

        content.subtitle = @"副标题";

        content.body  = @"这是UNUserNotificationCenter信息中心";

        content.badge = @;

        content.categoryIdentifier = @"categoryIdentifier";

//        需要解锁显示,红色文字。点击不会进app。

//        UNNotificationActionOptionAuthenticationRequired = (1 << 0),

//

//        黑色文字。点击不会进app。

//        UNNotificationActionOptionDestructive = (1 << 1),

//

//        黑色文字。点击会进app。

//        UNNotificationActionOptionForeground = (1 << 2),

        UNNotificationAction *action = [UNNotificationAction actionWithIdentifier:@"enterApp"

                                                                            title:@"进入应用"

                                                                          options:UNNotificationActionOptionForeground];

        UNNotificationAction *clearAction = [UNNotificationAction actionWithIdentifier:@"destructive"

                                                                                 title:@"忽略2"

                                                                               options:UNNotificationActionOptionDestructive];

        UNNotificationCategory *category = [UNNotificationCategory categoryWithIdentifier:@"categoryIdentifier"

                                                                                  actions:@[action,clearAction]

                                                                        intentIdentifiers:@[requestID]

                                                                                  options:UNNotificationCategoryOptionNone];

        [center setNotificationCategories:[NSSet setWithObject:category]];

        //第三步:设置推送方式

        UNTimeIntervalNotificationTrigger *timeTrigger = [UNTimeIntervalNotificationTrigger triggerWithTimeInterval: repeats:YES];

        UNNotificationRequest *request = [UNNotificationRequest requestWithIdentifier:requestID content:content trigger:timeTrigger];

        //第四步:添加推送request

        [center addNotificationRequest:request withCompletionHandler:^(NSError * _Nullable error) {

        }];

        [center removePendingNotificationRequestsWithIdentifiers:@[requestID]];

        [center removeAllDeliveredNotifications];

//        [center getNotificationSettingsWithCompletionHandler:^(UNNotificationSettings * _Nonnull settings) {

//            NSLog(@"settings===%@",settings);

//        }];

    } else {

    }

    return YES;

}

#pragma mark - UNUserNotificationCenterDelegate

//将要推送

- (void)userNotificationCenter:(UNUserNotificationCenter *)center willPresentNotification:(UNNotification *)notification withCompletionHandler:(void (^)(UNNotificationPresentationOptions))completionHandler{

    NSLog(@"----------willPresentNotification");

}

//已经完成推送

- (void)userNotificationCenter:(UNUserNotificationCenter *)center didReceiveNotificationResponse:(UNNotificationResponse *)response withCompletionHandler:(void (^)(void))completionHandler{

    NSLog(@"============didReceiveNotificationResponse");

    NSString *categoryID = response.notification.request.content.categoryIdentifier;

    if ([categoryID isEqualToString:@"categoryIdentifier"]) {

        if ([response.actionIdentifier isEqualToString:@"enterApp"]) {

            if (@available(iOS 10.0, *)) {

            } else {

                // Fallback on earlier versions

            }

        }else{

            NSLog(@"No======");

        }

    }

    completionHandler();

}
iOS开发本地推送(iOS10)UNUserNotificationCenter的更多相关文章
- iOS开发本地推送
1.简介 本地通知是由本地应用触发的,它是基于时间行为的一种通知形式,例如闹钟定时.待办事项提醒,又或者一个应用在一段时候后不使用通常会提示用户使用此应用等都是本地通知. 2.创建UILocalNot ...
- IOS 本地推送 IOS10.0以上 static的作用 const的作用
//需要在AppDelegate里面启动APP的函数 加上 UIUserNotificationType types = UIUserNotificationTypeBadge | UIUserNot ...
- iOS的本地推送删除不了解决方法
最近在研究苹果推送,当测试本地推送的时候,发现一个问题,就是一旦你添加了一个本地推动的通知,当你修改代码,删除应用,当你再次运行app,它还是会在横幅上面弹出推送,尼玛怎么搞都删除不了,近乎崩溃了,开 ...
- iOS关于本地推送
不多说 直接上代码 NSDate *now = [NSDate date]; UILocalNotification *reminderNotification = [[UILocalNoti ...
- iOS开发,推送消息 steps
概述:推送过程简介 一.App启动过程中,使用UIApplication::registerForRemoteNotificationTypes函数与苹果的APNS服务器通信,发出注册远程推送的申请. ...
- iOS开发——消息推送跳转
项目开发用集成是极光推送JPush 这里主要是消息推送过来处理对应界面跳转 同时看到两篇写的不错的相关博客分享一下: http://www.jianshu.com/ ...
- iOS开发——极光推送
1.到极光官网 https://www.jpush.cn/ 下载极光推送SDK. 具体如何集成最好参考官网的文档,以及一些失败的原因.文档非常详细,我也是参考集成的. 2.到极光推送官网注册自己的应用 ...
- iOS开发消息推送原理
转载自:http://www.cnblogs.com/cdts_change/p/3240893.html 一.消息推送原理: 在实现消息推送之前先提及几个于推送相关概念,如下图1-1: 1.Prov ...
- iOS之本地推送(前台模式与后台模式)
#import "AppDelegate.h" #import "GlobalDefine.h" @interface AppDelegate () @end ...
随机推荐
- RocketMQ核心技术精讲与高并发抗压实战
1:特点 比较吃内存 内存至少1g 默认8g 1:支持集群模型,强调集群无单点,负载均衡以及水平扩展能力2:亿级别的消息堆积能力3:采用零拷贝原理Consumer 消费消息过程,使用了零拷贝 顺序写盘 ...
- weblogic上传木马路径选择
对于反序列化漏洞,如果获得的是系统权限或者root权限,那就没必要上传木马,但如果只是web安装应用的权限,就上传获取更大权限. 上传需要找到几个点,获取物理路径,如下面三种: 方法1:把shell写 ...
- Apache Spark 2.2.0 中文文档 - Spark SQL, DataFrames and Datasets
Spark SQL, DataFrames and Datasets Guide Overview SQL Datasets and DataFrames 开始入门 起始点: SparkSession ...
- CSIC_716_20191028【爬小破站】
1.爬取小破站的弹幕 2.展示爬取内容 打开网页,用教的方法找到cid 和header import requests from bs4 import BeautufulSoup import pan ...
- Windows ping
用法: ping [-t] [-a] [-n count] [-l size] [-f] [-i TTL] [-v TOS] [-r count] [-s count] [[-j ...
- Date()日期转换和简单计算
/** * 判断是否为闰年 * @param year * @return */ public boolean isLeap ( int year ) { if ( (year % 4 == 0 &a ...
- 编译报错 :The method list(String, Object[]) is ambiguous for the type BaseHibernateDao<M,PK>
原因:eclipse 的个bug,具体见http://stackoverflow.com/questions/10852923/method-is-ambiguous-for-the-type-but ...
- jquery判断是pc端还是移动端
原文地址:https://www.cnblogs.com/mo-cha/p/6038872.html $(function(){ var system = { win: false, mac: fal ...
- java中 ++a 与 a++ 的区别
public static void main(String[] args) { int a = 5; a ++; System.out.println(a); int b = 5; ++ b; Sy ...
- Redis Cluste部署
一.原生搭建篇Cluster了解cluster的架构 Redis-cluster是使用的是一致性哈希算法来切分数据存储,总计16383个槽,分成16383/N(redis节点)个分区,存取时将key转 ...