【转载】SpringMVC框架介绍
转自:http://com-xpp.iteye.com/blog/1604183
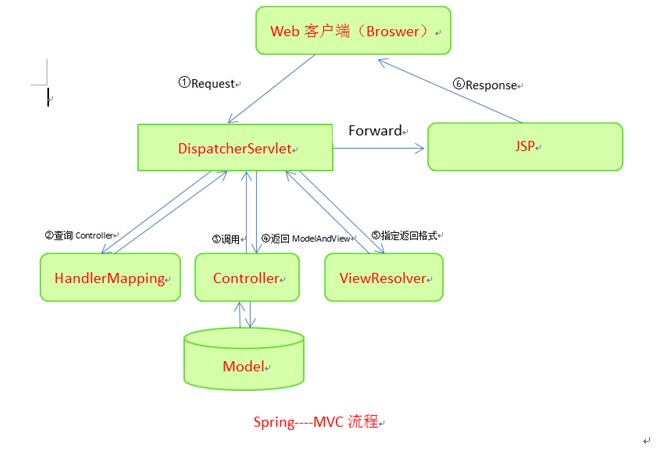
SpringMVC框架图

SpringMVC接口解释
DispatcherServlet接口:
Spring提供的前端控制器,所有的请求都有经过它来统一分发。在DispatcherServlet将请求分发给Spring Controller之前,需要借助于Spring提供的HandlerMapping定位到具体的Controller。
HandlerMapping接口:
能够完成客户请求到Controller映射。
Controller接口:
需要为并发用户处理上述请求,因此实现Controller接口时,必须保证线程安全并且可重用。Controller将处理用户请求,这和Struts Action扮演的角色是一致的。一旦Controller处理完用户请求,则返回ModelAndView对象给DispatcherServlet前端控制器,ModelAndView中包含了模型(Model)和视图(View)。从宏观角度考虑,DispatcherServlet是整个Web应用的控制器;从微观考虑,Controller是单个Http请求处理过程中的控制器,而ModelAndView是Http请求过程中返回的模型(Model)和视图(View)。
ViewResolver接口:
Spring提供的视图解析器(ViewResolver)在Web应用中查找View对象,从而将相应结果渲染给客户。
SpringMVC运行原理
1.客户端请求提交到DispatcherServlet
2.由DispatcherServlet控制器查询一个或多个HandlerMapping,找到处理请求的Controller
3.DispatcherServlet将请求提交到Controller
4.Controller调用业务逻辑处理后,返回ModelAndView
5.DispatcherServlet查询一个或多个ViewResoler视图解析器,找到ModelAndView指定的视图
6.视图负责将结果显示到客户端
SpringMVC运行实例
Account类:
- package com.pb.entity;
- public class Account {
- private String cardNo;
- private String password;
- private float balance;
- public String getCardNo() {
- return cardNo;
- }
- public void setCardNo(String cardNo) {
- this.cardNo = cardNo;
- }
- public String getPassword() {
- return password;
- }
- public void setPassword(String password) {
- this.password = password;
- }
- public float getBalance() {
- return balance;
- }
- public void setBalance(float balance) {
- this.balance = balance;
- }
- }
LoginController类:
- package com.pb.web.controller;
- import java.util.HashMap;
- import java.util.Map;
- import javax.servlet.http.HttpServletRequest;
- import javax.servlet.http.HttpServletResponse;
- import org.springframework.web.servlet.ModelAndView;
- import org.springframework.web.servlet.mvc.AbstractController;
- import com.pb.entity.Account;
- public class LoginController extends AbstractController {
- private String successView;
- private String failView;//这两个参数是返回值传给applicationContext.xml,进行页面分配
- public String getSuccessView() {
- return successView;
- }
- public void setSuccessView(String successView) {
- this.successView = successView;
- }
- public String getFailView() {
- return failView;
- }
- public void setFailView(String failView) {
- this.failView = failView;
- }
- @Override
- protected ModelAndView handleRequestInternal(HttpServletRequest request,
- HttpServletResponse response) throws Exception {
- // TODO Auto-generated method stub
- String cardNo=request.getParameter("cardNo");
- String password=request.getParameter("password");
- Account account =getAccount(cardNo,password);
- Map<String ,Object> model=new HashMap<String,Object>();
- if(account !=null){
- model.put("account", account);
- return new ModelAndView(getSuccessView(),model);
- }else{
- model.put("error", "卡号和密码不正确");
- return new ModelAndView(getFailView(),model);
- }
- }//本应该这个方法写在模型层,这地方直接给放在了逻辑层这个地方偷懒了。
- public Account getAccount(String cardNo,String password){
- if(cardNo.equals("123")&&password.equals("123")){
- Account account =new Account();
- account.setCardNo(cardNo);
- account.setBalance(88.8f);
- return account;
- }else{
- return null;
- }
- }
- }
applicationContext.xml
- <?xml version="1.0" encoding="UTF-8"?>
- <beans xmlns="http://www.springframework.org/schema/beans"
- xmlns:xsi="http://www.w3.org/2001/XMLSchema-instance"
- xmlns:aop="http://www.springframework.org/schema/aop"
- xmlns:tx="http://www.springframework.org/schema/tx"
- xsi:schemaLocation="http://www.springframework.org/schema/beans http://www.springframework.org/schema/beans/spring-beans-2.0.xsd
- http://www.springframework.org/schema/aop http://www.springframework.org/schema/aop/spring-aop-2.0.xsd
- http://www.springframework.org/schema/tx http://www.springframework.org/schema/tx/spring-tx-2.0.xsd">
- <bean id="loginController" class="com.pb.web.controller.LoginController">
- <property name="successView" value="showAccount"></property>
- <property name="failView" value="login"></property>
- </bean>
- <bean id="urlMapping" class="org.springframework.web.servlet.handler.SimpleUrlHandlerMapping">
- <property name="mappings">
- <props>
- <prop key="/login.do">loginController</prop>
- </props>
- </property>
- </bean>
- <bean id="viewResolver" class="org.springframework.web.servlet.view.InternalResourceViewResolver">
- <property name="prefix" value="/"></property>
- <property name="suffix" value=".jsp"></property>
- </bean>
- </beans>
Jsp页面:
- <%@ page language="java" contentType="text/html; charset=GB18030"
- pageEncoding="GB18030"%>
- <!DOCTYPE html PUBLIC "-//W3C//DTD HTML 4.01 Transitional//EN" "http://www.w3.org/TR/html4/loose.dtd">
- <html>
- <head>
- <meta http-equiv="Content-Type" content="text/html; charset=GB18030">
- <title>Insert title here</title>
- </head>
- <body>
- <a href="login.jsp">进入</a>
- </body>
- </html>
login.jsp
- <%@ page language="java" contentType="text/html; charset=GB18030"
- pageEncoding="GB18030"%>
- <!DOCTYPE html PUBLIC "-//W3C//DTD HTML 4.01 Transitional//EN" "http://www.w3.org/TR/html4/loose.dtd">
- <html>
- <head>
- <meta http-equiv="Content-Type" content="text/html; charset=GB18030">
- <title>Insert title here</title>
- </head>
- <body>
- ${error }
- <form action="login.do" method="post">
- 账号登陆<br>
- <hr>
- 卡号:<input type="text" name="cardNo"><br>
- 密码:<input type="text" name="password"><br>
- <input type="submit" value="登陆">
- </form>
- </body>
- </html>
showAccount.jsp
- <%@ page language="java" contentType="text/html; charset=GB18030"
- pageEncoding="GB18030"%>
- <!DOCTYPE html PUBLIC "-//W3C//DTD HTML 4.01 Transitional//EN" "http://www.w3.org/TR/html4/loose.dtd">
- <html>
- <head>
- <meta http-equiv="Content-Type" content="text/html; charset=GB18030">
- <title>Insert title here</title>
- </head>
- <body>
- 账户信息<br>
- 卡号:${account.cardNo }<br>
- 密码:${account.password }<br>
- 钱数:${account.balance }<br>
- </body>
- </html>
Web.xml
- <?xml version="1.0" encoding="UTF-8"?>
- <web-app xmlns:xsi="http://www.w3.org/2001/XMLSchema-instance"
- xmlns="http://java.sun.com/xml/ns/j2ee"
- xmlns:javaee="http://java.sun.com/xml/ns/javaee"
- xmlns:web="http://java.sun.com/xml/ns/javaee/web-app_2_5.xsd" xsi:schemaLocation="http://java.sun.com/xml/ns/j2ee http://java.sun.com/xml/ns/j2ee/web-app_2_4.xsd" version="2.4">
- <welcome-file-list>
- <welcome-file>index.jsp</welcome-file>
- </welcome-file-list>
- <servlet>
- <servlet-name>Dispatcher</servlet-name>
- <servlet-class>org.springframework.web.servlet.DispatcherServlet</servlet-class>
- <init-param>
- <param-name>contextConfigLocation</param-name>
- <param-value>classpath:applicationContext.xml</param-value>
- </init-param>
- </servlet>
- <servlet-mapping>
- <servlet-name>Dispatcher</servlet-name>
- <url-pattern>*.do</url-pattern>
- </servlet-mapping>
- </web-app>
【转载】SpringMVC框架介绍的更多相关文章
- SpringMVC 框架介绍以及环境搭建
目录 前端设计模式介绍 分析前端设计模式 Spring MVC简单介绍 Spring和Spring MVC的关系 配置Spring MVC的环境并简单测试 前端设计模式介绍 前端设计模式其实和前端没啥 ...
- SpringMVC框架介绍
1. SpringMVC通过一套MVC注解,让POJO成为处理请求的控制器,而无须实现任何接口. 2.支持REST风格的URL请求. 3.采用了松散耦合可插拔组件结构,比其他MVC框架更具扩展性和灵 ...
- springMVC框架介绍以及运行流程(图解)
1 Springmvc是什么? spring web mvc和struts2都属于表现层的框架,spring web mvc是spring框架的一部分(所以spring mvc与spring之间不需要 ...
- SpringMVC学习笔记:SpringMVC框架的执行流程
一.MVC设计模式 二.SpringMVC框架介绍 三.SpringMVC环境搭建 四.SpringMVC框架的请求处理流程及体系结构
- Spring框架介绍和原理
SpringMVC框架介绍 1) Spring MVC属于SpringFrameWork的后续产品,已经融合在Spring Web Flow里面. Spring 框架提供了构建 Web 应用程序的全功 ...
- SpringMVC由浅入深day01_1springmvc框架介绍
springmvc 第一天 springmvc的基础知识 课程安排: 第一天:springmvc的基础知识 什么是springmvc? springmvc框架原理(掌握) 前端控制器.处理器映射器.处 ...
- myBatis+Spring+SpringMVC框架面试题整理
myBatis+Spring+SpringMVC框架面试题整理(一) 2018年09月06日 13:36:01 新新许愿树 阅读数 14034更多 分类专栏: SSM 版权声明:本文为博主原创文章 ...
- YARN基本框架介绍
YARN基本框架介绍 转载请注明出处:http://www.cnblogs.com/BYRans/ 在之前的博客<YARN与MRv1的对比>中介绍了YARN对Hadoop 1.0的完善.本 ...
- MJExtension框架介绍
MJExtension框架介绍 标签: MJExtension 2015-05-01 08:22 1120人阅读 评论(0) 收藏 举报 分类: Foundation(14) 版权声明:本文为博主 ...
随机推荐
- maven依赖报红的一些解决办法
使用IDEA集成maven管理项目依赖时,经常出现更改pom文件后maven依赖列表并未更改,且依赖报红,此时建议检查maven配置文件maven仓库是否下载好jar包,如果未下载好jar包文件夹内会 ...
- 305. 岛屿数量 II
题目: 假设你设计一个游戏,用一个 m 行 n 列的 2D 网格来存储你的游戏地图. 起始的时候,每个格子的地形都被默认标记为「水」.我们可以通过使用 addLand 进行操作,将位置 (row, c ...
- axios的数据拦截(拦截器)
大家在开发项目中是否遇到过数据延迟,举个例子 你点某个功能 会有 1-2s的延迟,这1-2s可能会在你的页面显示一个一直转着圈圈的动画,不知道有没有小伙伴还不知道这个功能是如何实现的呢?其实在一个项目 ...
- LED Holiday Light -holiday Light Inspection Implementation Recommendations
China LED Holiday Light Factory & Ninghai County Haohua Electronic Appliance Co., Ltd. pointed o ...
- numpy学习(四)
练习篇(Part 4) 41. How to sum a small array faster than np.sum? (★★☆) arr = np.arange(10) print(np.add. ...
- clone()与clone(true)的用法
clone() 方法生成被选元素的副本,包含子节点.文本和属性. 使用 clone(true) 方法在clone()的基础上还包括克隆元素的事件处理器.
- bootstrap-datatimepicker插件的使用
1.引入相关的css.js文件(因为是bootstrap的,首先应该引入bootstrap.css和bootstrap.js): <link rel="stylesheet" ...
- 使用饿了么el-date-picker里及如何将后台给的时间戳js转化为时间格式
首先代码是这个样子的,使用v-model <el-date-picker v-model="formData.createTime" :disabled="true ...
- 二分-D - Can you solve this equation?
D - Can you solve this equation? Now,given the equation 8*x^4 + 7*x^3 + 2*x^2 + 3*x + 6 == Y,can you ...
- hibernate跟Mybatis/ ibatis 的区别,为什么选择?(转)
第一章 Hibernate与MyBatisHibernate 是当前最流行的O/R mapping框架,它出身于sf.NET,现在已经成为Jboss的一部分. Mybatis 是另外一种优秀的O/R ...
