吴裕雄 python 机器学习——半监督学习LabelSpreading模型
import numpy as np

import matplotlib.pyplot as plt

from sklearn import  metrics

from sklearn import datasets

from sklearn.semi_supervised.label_propagation import LabelSpreading

def load_data():

    '''

    加载数据集

    '''

    digits = datasets.load_digits()

    ######   混洗样本 ########

    rng = np.random.RandomState(0)

    indices = np.arange(len(digits.data)) # 样本下标集合

    rng.shuffle(indices) # 混洗样本下标集合

    X = digits.data[indices]

    y = digits.target[indices]

    ###### 生成未标记样本的下标集合 ####

    # 只有 10% 的样本有标记

    n_labeled_points = int(len(y)/10)

    # 后面 90% 的样本未标记

    unlabeled_indices = np.arange(len(y))[n_labeled_points:]

    return X,y,unlabeled_indices

#半监督学习LabelSpreading模型

def test_LabelSpreading(*data):

    X,y,unlabeled_indices=data

    y_train=np.copy(y) # 必须拷贝,后面要用到 y

    y_train[unlabeled_indices]=-1 # 未标记样本的标记设定为 -1

    clf=LabelSpreading(max_iter=100,kernel='rbf',gamma=0.1)

    clf.fit(X,y_train)

    ### 获取预测准确率

    predicted_labels = clf.transduction_[unlabeled_indices] # 预测标记

    true_labels = y[unlabeled_indices] # 真实标记

    print("Accuracy:%f"%metrics.accuracy_score(true_labels,predicted_labels))

    # 或者 print("Accuracy:%f"%clf.score(X[unlabeled_indices],true_labels))

# 获取半监督分类数据集

data=load_data()

# 调用 test_LabelSpreading

test_LabelSpreading(*data)

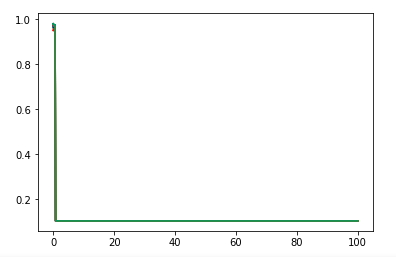
def test_LabelSpreading_rbf(*data):

    '''

    测试 LabelSpreading 的 rbf 核时,预测性能随 alpha 和 gamma 的变化

    '''

    X,y,unlabeled_indices=data

    # 必须拷贝,后面要用到 y

    y_train=np.copy(y)

    # 未标记样本的标记设定为 -1

    y_train[unlabeled_indices]=-1

    fig=plt.figure()

    ax=fig.add_subplot(1,1,1)

    alphas=np.linspace(0.01,1,num=10,endpoint=True)

    gammas=np.logspace(-2,2,num=50)

    # 颜色集合,不同曲线用不同颜色

    colors=((1,0,0),(0,1,0),(0,0,1),(0.5,0.5,0),(0,0.5,0.5),(0.5,0,0.5),(0.4,0.6,0),(0.6,0.4,0),(0,0.6,0.4),(0.5,0.3,0.2))

    ## 训练并绘图

    for alpha,color in zip(alphas,colors):

        scores=[]

        for gamma in gammas:

            clf=LabelSpreading(max_iter=100,gamma=gamma,alpha=alpha,kernel='rbf')

            clf.fit(X,y_train)

            scores.append(clf.score(X[unlabeled_indices],y[unlabeled_indices]))

        ax.plot(gammas,scores,label=r"$\alpha=%s$"%alpha,color=color)

    ### 设置图形

    ax.set_xlabel(r"$\gamma$")

    ax.set_ylabel("score")

    ax.set_xscale("log")

    ax.legend(loc="best")

    ax.set_title("LabelSpreading rbf kernel")

    plt.show()

# 调用 test_LabelSpreading_rbf

test_LabelSpreading_rbf(*data)
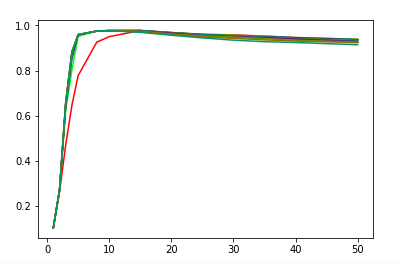
def test_LabelSpreading_knn(*data):

    '''

   测试 LabelSpreading 的 knn 核时,预测性能随 alpha 和 n_neighbors 的变化

    '''

    X,y,unlabeled_indices=data

    # 必须拷贝,后面要用到 y

    y_train=np.copy(y)

    # 未标记样本的标记设定为 -1

    y_train[unlabeled_indices]=-1

    fig=plt.figure()

    ax=fig.add_subplot(1,1,1)

    alphas=np.linspace(0.01,1,num=10,endpoint=True)

    Ks=[1,2,3,4,5,8,10,15,20,25,30,35,40,50]

    # 颜色集合,不同曲线用不同颜色

    colors=((1,0,0),(0,1,0),(0,0,1),(0.5,0.5,0),(0,0.5,0.5),(0.5,0,0.5),(0.4,0.6,0),(0.6,0.4,0),(0,0.6,0.4),(0.5,0.3,0.2))

    ## 训练并绘图

    for alpha,color in zip(alphas,colors):

        scores=[]

        for K in Ks:

            clf=LabelSpreading(kernel='knn',max_iter=100,n_neighbors=K,alpha=alpha)

            clf.fit(X,y_train)

            scores.append(clf.score(X[unlabeled_indices],y[unlabeled_indices]))

        ax.plot(Ks,scores,label=r"$\alpha=%s$"%alpha,color=color)

    ### 设置图形

    ax.set_xlabel(r"$k$")

    ax.set_ylabel("score")

    ax.legend(loc="best")

    ax.set_title("LabelSpreading knn kernel")

    plt.show()

# 调用 test_LabelSpreading_knn

test_LabelSpreading_knn(*data)
吴裕雄 python 机器学习——半监督学习LabelSpreading模型的更多相关文章
- 吴裕雄 python 机器学习——半监督学习标准迭代式标记传播算法LabelPropagation模型
import numpy as np import matplotlib.pyplot as plt from sklearn import metrics from sklearn import d ...
- 吴裕雄 python 机器学习——层次聚类AgglomerativeClustering模型
import numpy as np import matplotlib.pyplot as plt from sklearn import cluster from sklearn.metrics ...
- 吴裕雄 python 机器学习——密度聚类DBSCAN模型
import numpy as np import matplotlib.pyplot as plt from sklearn import cluster from sklearn.metrics ...
- 吴裕雄 python 机器学习——支持向量机非线性回归SVR模型
import numpy as np import matplotlib.pyplot as plt from sklearn import datasets, linear_model,svm fr ...
- 吴裕雄 python 机器学习——KNN回归KNeighborsRegressor模型
import numpy as np import matplotlib.pyplot as plt from sklearn import neighbors, datasets from skle ...
- 吴裕雄 python 机器学习——KNN分类KNeighborsClassifier模型
import numpy as np import matplotlib.pyplot as plt from sklearn import neighbors, datasets from skle ...
- 吴裕雄 python 机器学习——支持向量机线性回归SVR模型
import numpy as np import matplotlib.pyplot as plt from sklearn import datasets, linear_model,svm fr ...
- 吴裕雄 python 机器学习——分类决策树模型
import numpy as np import matplotlib.pyplot as plt from sklearn import datasets from sklearn.model_s ...
- 吴裕雄 python 机器学习——回归决策树模型
import numpy as np import matplotlib.pyplot as plt from sklearn import datasets from sklearn.model_s ...
随机推荐
- UI自动化测试的Page Object模式
在UI级的自动化测试框架中,当页面样式改变或者页面元素属性改变,那么代码也要随之进行修改,如何做到高效快速的修改代码来适应这些改变呢,这个时候可以引入Page Object模式,也是页面对象设计模式. ...
- 在macOS 上添加 JAVA_HOME 环境变量
If you are planing to develop Java Apps on your Mac, you may have to set $JAVA_HOME environment vari ...
- spring中实现基于注解实现动态的接口限流防刷
本文将介绍在spring项目中自定义注解,借助redis实现接口的限流 自定义注解类 import java.lang.annotation.ElementType; import java.lang ...
- 项目转移时发生的错误<springboot+mybatis(xml逆向工程自动生成)>
org.springframework.beans.factory.UnsatisfiedDependencyException: Error creating bean with name 'app ...
- conn (php)
<?php$host="localhost";$db_user="root"; //数据库用户$db_pass=""; //数据库密码 ...
- 2018-2019-20175334实验四《Android程序设计》实验报告
2018-2019-20175334实验四<Android程序设计>实验报告 一.实验内容及步骤 实验四 Android程序设计-1 Android Stuidio的安装测试: 参考< ...
- HTML列表标签
<ul>无序列表 有2个属性 1.compact 属性: 规定列表呈现的效果比正常情况更小巧.没啥作用 2.type 属性 disc小圆点 square小方块 circle小圆圈(默认) ...
- 第四十七篇 入门机器学习——分类的准确性(Accuracy)
No.1. 通常情况下,直接将训练得到的模型应用于真实环境中,可能会存在很多问题 No.2. 比较好的解决方法是,将原始数据中的大部分用于训练数据,而留出少部分数据用于测试,即,将数据集切分成训练数据 ...
- C++-HDU1000,1001,1002-格式是真的坑
#include <cstdio> int main(){ for(int a,b;~scanf("%d%d",&a,&b);printf(" ...
- pytorch怎么入门学习
pytorch怎么入门学习 https://www.zhihu.com/question/55720139