CentOS 6.5使用yum快速搭建LAMP环境
由于这里采用yum方式安装,前提是我们必须配置好yum源。为了加快下载速度,建议使用网易的yum源。
这种方式对于初学者来说,非常方便,但是可定制性不强,而且软件版本较低。一般用于实验和学习环境。
1、安装Apache
[root@localhost ~]# yum -y install httpd
# 开机自启动
[root@localhost ~]# chkconfig httpd on
# 启动httpd 服务
[root@localhost ~]# service httpd start
### 安装apache 一些扩展
root@localhost ~]# yum -y install httpd-manual mod_ssl mod_perl mod_auth_mysql
现在直接在浏览器键入http://localhost 或 http://本机IP ,应该会看到Apache的测试页面
这里需要注意iptables的设置哦。

2、安装配置MySQL
# mysql 客户端程序
# mysql-server 服务端程序
# mysql-devel 开发设计的库
[root@localhost ~]# yum -y install mysql mysql-server mysql-devel
# 开机启动
[root@localhost ~]# chkconfig mysqld on
# 启动mysqld服务
[root@localhost ~]# service mysqld start
# 进行一些安全性配置
[root@localhost ~]# /usr/bin/mysql_secure_installation
[root@localhost ~]# netstat -tulpn | grep -i mysql
tcp 0 0 0.0.0.0:3306 0.0.0.0:* LISTEN 1723/mysqld
OK, 我们看到mysqld已经启动,监听在3306端口上。
3、安装php
安装相关模块:为了让PHP支持MySQL,我们可以安装php-mysql软件包;也可使用以下命令搜索可用的php模块
[root@localhost ~]# yum -y install php php-mysql
# 安装php常用扩展
[root@localhost ~]# yum search php
[root@localhost ~]# yum -y install gd php-gd gd-devel php-xml php-common php-mbstring php-ldap php-pear php-xmlrpc php-imap
### 重启httpd服务,这一步很重要
[root@localhost ~]# service httpd restart
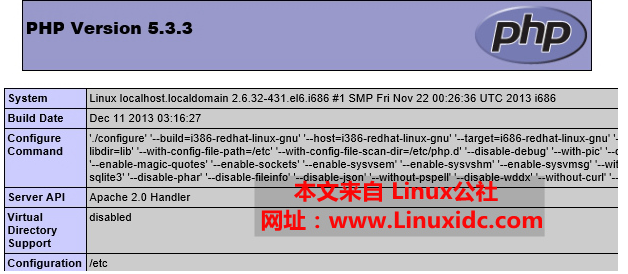
然后,我们提供php页面,测试
[root@localhost ~]# cd /var/www/html/
[root@localhost html]# vi index.php
<?php
phpinfo();
?>
然后,我们再次在浏览器键入http://localhost 或 http://本机IP ,应该会看到如下页面

4、安装配置phpMyAdmin
安装好MySQL,Apache及PHP后,为了可视化的管理MySQL数据库,我们可以安装phpMyAdmin。到其官网下载最新版本:http://www.phpmyadmin.net/home_page/
在Windows下,其实Navicat也是一个非常好用的MySQL可视化工具,推荐使用。
[root@localhost ~]# unzip phpMyAdmin-4.2.6-all-languages.zip
[root@localhost ~]# mv phpMyAdmin-4.2.6-all-languages /var/www/html/phpmyadmin
[root@localhost ~]# cd /var/www/html/phpmyadmin
[root@localhost ~]# cp libraries/config.default.php config.inc.php
[root@localhost ~]# vi cnfig.inc.php
$cfg['PmaAbsoluteUri'] = '';这里填写 phpMyAdmin 的访问网址。
$cfg['Servers'][$i]['host'] = 'localhost'; // MySQL hostname or IP address
$cfg['Servers'][$i]['port'] = ''; // MySQL port - leave blank for default port
$cfg['Servers'][$i]['user'] = 'root'; // 填写 MySQL 访问 phpMyAdmin 使用的 MySQL 用户名,默认为 root。
fg['Servers'][$i]['password'] = ''; // 填写对应上述 MySQL 用户名的密码。
# 然后重启,httpd服务
[root@localhost ~]# service httpd restart
在浏览器键入http://localhost/phpmyadmin 即可访问。
如果遇到访问权限的问题, 请检查SElinux。
CentOS 6.5使用yum快速搭建LAMP环境的更多相关文章
- redhat利用yum快速搭建LAMP环境
LAMP LAMP环境,对于PHP开发及其开源的PHP项目的部署都很关键的. LAMP的含义: L ---Linux A ---Apache web M ---Mysql datab ...
- CentOS 7使用yum快速搭建LAMP环境
1.安装Apache [root@localhost ~]# yum -y install httpd # 开机自启动 [root@localhost ~]# chkconfig httpd on # ...
- CentOS6.5使用yum快速搭建LAMP环境
1.安装Apache # yum -y install httpd # 开机自启动 # chkconfig httpd on # 启动httpd 服务 # service httpd start # ...
- Centos6 使用yum快速搭建LAMP环境
1.安装Apache [root@localhost ~]# yum -y install httpd # 开机自启动 [root@localhost ~]# chkconfig httpd on ...
- 如何《快速搭建LAMP环境》
阿里云体验平台简介 阿里云开发者实验室提供免费云资源和丰富的场景化实践,旨在帮助开发者在学习应用技术,了解阿里云产品的特性. 教程介绍 本教程引用自阿里云体验实验室介绍如何快速搭建Docker环境,并 ...
- CentOS 6.5 下源码搭建LAMP环境
参考网站: http://wenku.baidu.com/link?url=Cvkqss2E9mnxXOZigMWPaCfqwsBxnm0sZ4aKE2oLAgQ888XxeC0DWOChxVqiHz ...
- 用yum快速搭建LAMP平台
实验环境: [root@nmserver-7 html]# cat /etc/redhat-release CentOS Linux release 7.5.1804 (Core) [root@nms ...
- 通过yum命令搭建lamp环境(centos6.5)
centos 6.5 1.yum安装和源代码编译在使用的时候没啥区别,但是安装的过程就大相径庭了,yum只需要3个命令就可以完成,源代码需要13个包,还得加压编译,步骤很麻烦,而且当做有时候会出错,源 ...
- CentOS快速搭建LAMP环境
LAMP -- Linux Apache MySQL PHP 在CentOS安装的顺序,我一般是Apache -> MySQL -> PHP 第一步.安装并配置Apache 1.使用yu ...
随机推荐
- Linux下通过命令行mail发送e-mail
找到配置文件/etc/mail.rc添加如下行 # vi /etc/mail.rc set from=@qq.com set smtp=smtp.qq.com set smtp-auth-user= ...
- VSS_01
1.设置 工作目录 右击 CSDRGis --> Set Working Folder.. --> D:\CSDRGis 2.下载 源码 右击 CSDRGis --> Get Las ...
- c语言的左移和右移
转自:https://www.cnblogs.com/myblesh/articles/2431806.html 先说左移,左移就是把一个数的所有位都向左移动若干位,在C中用<<运算符.例 ...
- Python 网络编程和Socket
2017-07-24 20:43:49 Socket又称"套接字",应用程序通常通过"套接字"向网络发出请求或者应答网络请求.Http协议主要的操作流程是req ...
- php正则表达式的三个最基本原则分享
我个人认为,正则表达式的常规用法可以分为如下三个最基本的原则:1.找谁.2.怎么找.3.找它干什么. 接下来,我分享一下一个正则表达式分三个部分: 原子字符 . 匹配除换行符以外的任意字符 \w 匹配 ...
- [Android教程] Cordova开发App入门(一)创建android项目
前言 Apache Cordova是一个开源的移动开发框架.允许使用标准的web技术-HTML5,CSS3和JavaScript做跨平台开发. 应用在每个平台的具体执行被封装了起来,并依靠符合标准的A ...
- 【异常】Application failed to start due to an exception org.springframework.beans.factory.BeanCurrentlyInCreationException
一. 异常信息: 2018-05-17 18:03:22.224 -DEBUG [ restartedMain] o.s.b.d.LoggingFailureAnalysisReporter ...
- Krapo 2
The krpano Viewer is a small and very flexible high-performance viewer for all kind of panoramic ima ...
- ns-3
二.NS-3C++脚本的编写如前所述,NS-3的脚本使用C++语言(也支持python),使用四种类型的网络构件(Node.NetDevice.Channel.Application).一个简单的脚本 ...
- ubuntu修改root密码
1.我们在安装系统的时候我们会把系统的密码设置的比较简单,所以导致后面我们别人很容易操作我们的电脑.所以,我们就可以修改密码,你只要在系统上输入: sudo passwd root
