java opencv使用相关
Using OpenCV Java with Eclipse
http://docs.opencv.org/2.4/doc/tutorials/introduction/java_eclipse/java_eclipse.html
Since version 2.4.4 OpenCV supports Java. In this tutorial I will explain how to setup development environment for using OpenCV Java with Eclipse in Windows, so you can enjoy the benefits of garbage collected, very refactorable (rename variable, extract method and whatnot) modern language that enables you to write code with less effort and make less mistakes. Here we go.
Configuring Eclipse
First, obtain a fresh release of OpenCV from download page and extract it under a simple location like C:\OpenCV-2.4.6\. I am using version 2.4.6, but the steps are more or less the same for other versions.
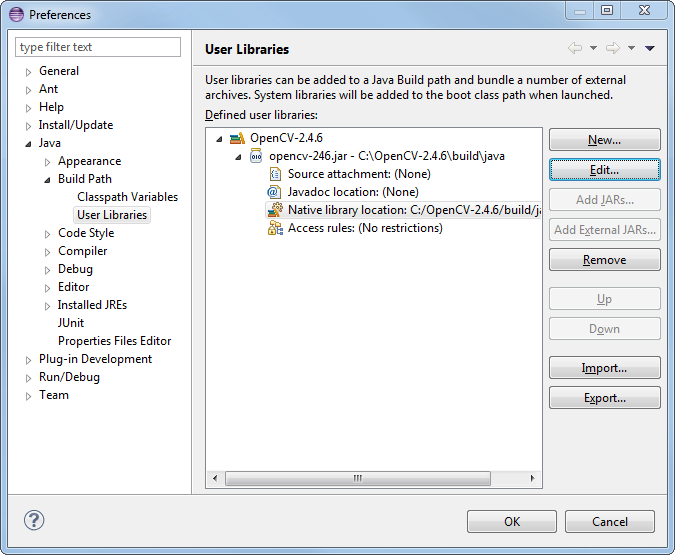
Now, we will define OpenCV as a user library in Eclipse, so we can reuse the configuration for any project. Launch Eclipse and select Window –> Preferencesfrom the menu.
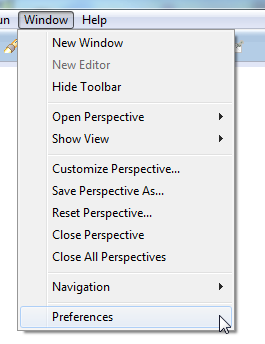
Navigate under Java –> Build Path –> User Libraries and click New....

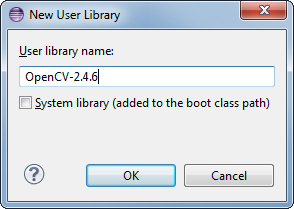
Enter a name, e.g. OpenCV-2.4.6, for your new library.
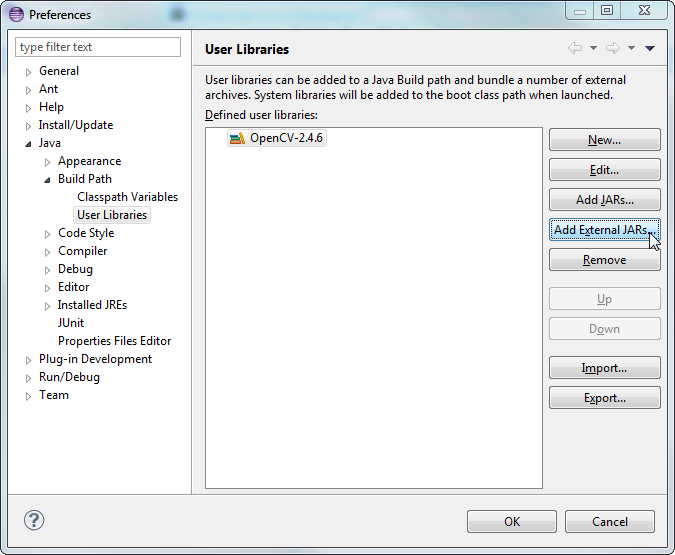
Now select your new user library and click Add External JARs....
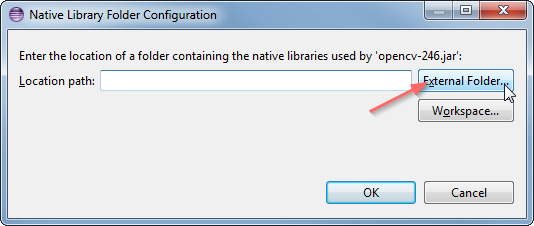
Browse through C:\OpenCV-2.4.6\build\java\ and select opencv-246.jar. After adding the jar, extend the opencv-246.jar and select Native library location and pressEdit....

Select External Folder... and browse to select the folder C:\OpenCV-2.4.6\build\java\x64. If you have a 32-bit system you need to select the x86 folder instead ofx64.
Your user library configuration should look like this:
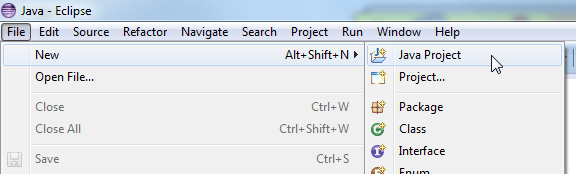
Testing the configuration on a new Java project
Now start creating a new Java project.
On the Java Settings step, under Libraries tab, select Add Library... and select OpenCV-2.4.6, then click Finish.

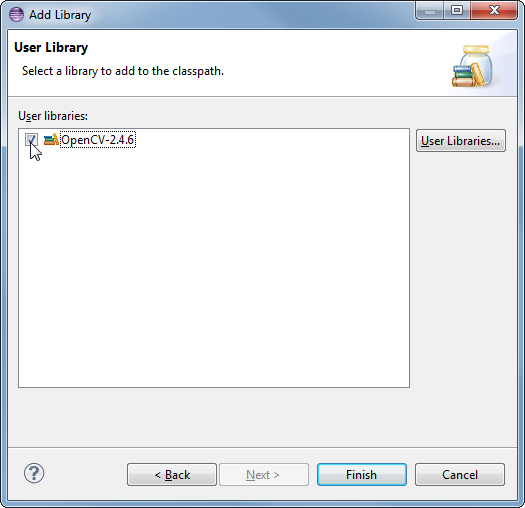
Libraries should look like this:

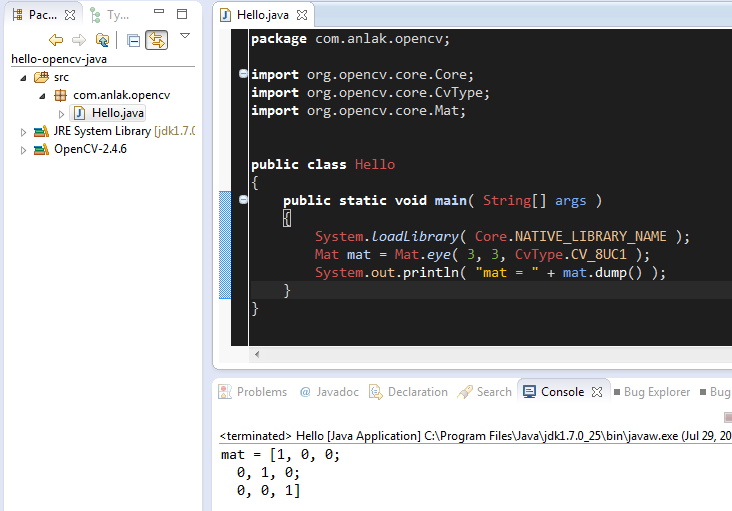
Now you have created and configured a new Java project it is time to test it. Create a new java file. Here is a starter code for your convenience:
- import org.opencv.core.Core;
- import org.opencv.core.CvType;
- import org.opencv.core.Mat;
- public class Hello
- {
- public static void main( String[] args )
- {
- System.loadLibrary( Core.NATIVE_LIBRARY_NAME );
- Mat mat = Mat.eye( 3, 3, CvType.CV_8UC1 );
- System.out.println( "mat = " + mat.dump() );
- }
- }
When you run the code you should see 3x3 identity matrix as output.
That is it, whenever you start a new project just add the OpenCV user library that you have defined to your project and you are good to go. Enjoy your powerful, less painful development environment :)
http://www.cnblogs.com/lidabo/p/3501285.html
Opencv3.1.0+opencv_contrib配置及使用SIFT测试
因为需要用到一些比较新的跟踪算法,这两天装了opencv3.1并配置了opencv_contrib,并使用了SIFT算法测试是否配置成功。
1.opencv3.1安装与配置
这里不多言,不熟悉的可以参考浅墨的博客:http://blog.csdn.net/poem_qianmo/article/details/19809337
2.opencv_contrib安装与配置
从opencv3以来,一些比较新的功能都挪到了“opencv_contrib”库里。配置这个库需要重新编译OpenCV,关于此部分可以参考教程:http://blog.csdn.net/linshuhe1/article/details/51221015
关于此教程需要补充两点:A,使用cmake编译的过程中经常会失败,因为国内网络问题ippicv_windows_20151201.zip 文件下载失败导致,可以直接从这里下载:http://download.csdn.net/detail/qjj2857/9495013 B.教程最后配置包含目录、库目录时没有提及添加环境变量,这里也是同样需要的。还有一切配置完成后别忘了重启电脑哟。
3.写个程序测试一下配置是否成功吧
opencv3.1中SIFT匹配是在opencv_contrib库中的,这里我们就用它来做一个简单的测试。
参考:
1. cv::xfeatures2d::SIFT Class Reference:http://docs.opencv.org/3.1.0/d5/d3c/classcv_1_1xfeatures2d_1_1SIFT.html#gsc.tab=0
2. OpenCV3.1 xfeatures2d::SIFT 使用:http://blog.csdn.net/lijiang1991/article/details/50855279
程序:
#include <iostream>#include <opencv2/opencv.hpp> //头文件#include <opencv2/xfeatures2d.hpp>using namespace cv; //包含cv命名空间using namespace std;int main(){//Create SIFT class pointerPtr<Feature2D> f2d = xfeatures2d::SIFT::create();//读入图片Mat img_1 = imread("1.jpg");Mat img_2 = imread("2.jpg");//Detect the keypointsvector<KeyPoint> keypoints_1, keypoints_2;f2d->detect(img_1, keypoints_1);f2d->detect(img_2, keypoints_2);//Calculate descriptors (feature vectors)Mat descriptors_1, descriptors_2;f2d->compute(img_1, keypoints_1, descriptors_1);f2d->compute(img_2, keypoints_2, descriptors_2);//Matching descriptor vector using BFMatcherBFMatcher matcher;vector<DMatch> matches;matcher.match(descriptors_1, descriptors_2, matches);//绘制匹配出的关键点Mat img_matches;drawMatches(img_1, keypoints_1, img_2, keypoints_2, matches, img_matches);imshow("【match图】", img_matches);//等待任意按键按下waitKey(0);}
- 1
- 2
- 3
- 4
- 5
- 6
- 7
- 8
- 9
- 10
- 11
- 12
- 13
- 14
- 15
- 16
- 17
- 18
- 19
- 20
- 21
- 22
- 23
- 24
- 25
- 26
- 27
- 28
- 29
- 30
- 31
- 32
- 1
- 2
- 3
- 4
- 5
- 6
- 7
- 8
- 9
- 10
- 11
- 12
- 13
- 14
- 15
- 16
- 17
- 18
- 19
- 20
- 21
- 22
- 23
- 24
- 25
- 26
- 27
- 28
- 29
- 30
- 31
- 32
原始图片: 

匹配结果:

———————————-2016/8/12———————————
1.关于Ubuntu下opencv3.1及opencv_contrib的安装与配置可参考:
官网:Installation in Linux
http://www.cnblogs.com/asmer-stone/p/5089764.html
上博文中有两点需要注意:
A.按上文参考所述,第3步build文件夹需建在~/opencv/opencv文件夹中;且cmake时按照作者示例OPENCV_EXTRA_MODULES_PATH=~/opencv/opencv_contrib/modules ,注意”<>”需要去掉;末尾的.. 表示opencv源码在上一级目录中。当然如果你了解cmake的使用方法cmake [optional] <opencv source directory>, 可以任意设置文件夹目录。
B.与在windows下相同,cmake时会因为“ippicv_linux_20151201.tgz 无法下载”而导致失败。我们可以从http://download.csdn.net/download/lx928525166/9479919下载,并放入相应文件夹中。
2. 好,现在假设你已经安装配置好了。由于在windows下我们习惯了用一个IDE来编程,这里在Ubuntu下我选择使用eclipse来作为编程环境,下边简单说一下怎么在eclipse中配置opencv。
首先参考官网: http://docs.opencv.org/3.1.0/d7/d16/tutorial_linux_eclipse.html 你就应该能配置的差不多了,或者其他类似的吧网上一大堆。
但是中间可能会出现一些小问题,我个人配置的时候出现了两个小问题:
A. 错误 undefined reference to symbol ‘_ZN2cv6imreadERKNS_6StringEi’ ,参考:http://answers.opencv.org/question/46755/first-example-code-error/
B. 错误 error while loading shared libraries: libopencv_core.so.3.0: cannot open shared object file: No such file or directory ,参考:http://stackoverflow.com/questions/27907343/error-while-loading-shared-libraries-libopencv-core-so-3-0
3. 所有配置均完成后,在上述windows下的代码可以在这里直接运行。见下图:
4.关于在ubuntu下运行其他samples程序。这里以cpp为例,直接找到opencv/samples/cpp/example_cmake,这里有一个示例已经提供了Makefile文件,make一下即可生成可执行文件。其他cpp示例文件类似。

OpenCV3如何使用SIFT和SURF Where did SIFT and SURF go in OpenCV 3?

If you’ve had a chance to play around with OpenCV 3 (and do a lot of work with keypoint
If you’ve had a chance to play around with OpenCV 3 (and do a lot of work with keypoint detectors and feature descriptors) you may have noticed that the SIFT and SURF implementations are no longer included in the OpenCV 3 library by default.
Unfortunately, you probably learned this lesson the hard way by opening up a terminal, importing OpenCV, and then trying to instantiate your favorite keypoint detector, perhaps using code like the following:
Shell
|
1
2
3
4
5
6
|
$ python
>>> import cv2
>>> detector = cv2.FeatureDetector_create("SIFT")
Traceback (most recent call last):
File "<stdin>", line 1, in <module>
AttributeError: 'module' object has no attribute 'FeatureDetector_create'
|
Oh no! There is no longer a cv2.FeatureDetector_create method!
The same is true for our cv2.DescriptorExtractor_create function as well:
Shell
|
1
2
3
4
|
>>> extractor = cv2.DescriptorExtractor_create("SIFT")
Traceback (most recent call last):
File "<stdin>", line 1, in <module>
AttributeError: 'module' object has no attribute 'DescriptorExtractor_create'
|
Furthermore, cv2.SIFT_create and cv2.SURF_create will fail as well:
Shell
|
1
2
3
4
5
6
7
8
|
>>> cv2.SIFT_create()
Traceback (most recent call last):
File "<stdin>", line 1, in <module>
AttributeError: 'module' object has no attribute 'SIFT_create'
>>> cv2.SURF_create()
Traceback (most recent call last):
File "<stdin>", line 1, in <module>
AttributeError: 'module' object has no attribute 'SURF_create'
|
I’ll be honest — this had me scratching my head at first. How am I supposed to access SIFT, SURF, and my other favorite keypoint detectors and local invariant descriptors ifcv2.FeatureDetector_create and cv2.DescriptorExtractor_create have been removed?
The cv2.FeatureDetector_create and cv2.DescriptorExtractor_create were (and still are) methods I used all the time. And personally, I really liked the OpenCV 2.4.X implementation. All you needed to do was pass in a string and the factory method would build the instantiation for you. You could then tune the parameters using the getter and setter methods of the keypoint detector or feature descriptor.
Furthermore, these methods have been part of OpenCV 2.4.X for many years. Why in the world were they removed from the default install? And where were they moved to?
In the remainder of this blog post, I’ll detail why certain keypoint detectors and local invariant descriptors were removed from OpenCV 3.0 by default. And I’ll also show you where you can find SIFT, SURF, and other detectors and descriptors in the new version of OpenCV.
Why were SIFT and SURF removed from the default install of OpenCV 3.0?
SIFT and SURF are examples of algorithms that OpenCV calls “non-free” modules. These algorithms are patented by their respective creators, and while they are free to use in academic and research settings, you should technically be obtaining a license/permission from the creators if you are using them in a commercial (i.e. for-profit) application.
With OpenCV 3 came a big push to move many of these “non-free” modules out of the default OpenCV install and into the opencv_contrib package. The opencv_contrib packages contains implementations of algorithms that are either patented or in experimental development.
The algorithms and associated implementations in opencv_contrib are not installed by default and you need to explicitly enable them when compiling and installing OpenCV to obtain access to them.
Personally, I’m not too crazy about this move.
Yes, I understand including patented algorithms inside an open source library may raise a few eyebrows. But algorithms such as SIFT and SURF are pervasive across much of computer vision. And more importantly, the OpenCV implementations of SIFT and SURF are used by academics and researchers daily to evaluate new image classification, Content-Based Image Retrieval, etc. algorithms. By not including these algorithms by default, more harm than good is done (at least in my opinion).
How do I get access to SIFT and SURF in OpenCV 3?
To get access to the original SIFT and SURF implementations found in OpenCV 2.4.X, you’ll need to pull down both the opencv and opencv_contrib repositories from GitHub and then compile and install OpenCV 3 from source.
Luckily, compiling OpenCV from source is easier than it used to be. I have gathered install instructions for Python and OpenCV for many popular operating systems over on the OpenCV 3 Tutorials, Resources, and Guides page — just scroll down the Install OpenCV 3 and Pythonsection and find the appropriate Python version (either Python 2.7+ or Python 3+) for your operating system.
How do I use SIFT and SURF with OpenCV 3?
So now that you have installed OpenCV 3 with the opencv_contrib package, you should have access to the original SIFT and SURF implementations from OpenCV 2.4.X, only this time they’ll be in the xfeatures2d sub-module through the cv2.SIFT_create andcv2.SURF_create functions.
To confirm this, open up a shell, import OpenCV, and execute the following commands (assuming you have an image named test_image.jpg in your current directory, of course):
Shell
|
1
2
3
4
5
6
7
8
9
10
11
12
|
$ python
>>> import cv2
>>> image = cv2.imread("test_image.jpg")
>>> gray = cv2.cvtColor(image, cv2.COLOR_BGR2GRAY)
>>> sift = cv2.xfeatures2d.SIFT_create()
>>> (kps, descs) = sift.detectAndCompute(gray, None)
>>> print("# kps: {}, descriptors: {}".format(len(kps), descs.shape))
# kps: 274, descriptors: (274, 128)
>>> surf = cv2.xfeatures2d.SURF_create()
>>> (kps, descs) = surf.detectAndCompute(gray, None)
>>> print("# kps: {}, descriptors: {}".format(len(kps), descs.shape))
# kps: 393, descriptors: (393, 64)
|
If all goes well, you should be able to instantiate the SIFT and SURF keypoint detectors and local invariant descriptors without error.
It’s also important to note that by using opencv_contrib you will not be interfering with any of the other keypoint detectors and local invariant descriptors included in OpenCV 3. You’ll still be able to access KAZE, AKAZE, BRISK, etc. without an issue:
Shell
|
1
2
3
4
5
6
7
8
9
10
11
12
|
>>> kaze = cv2.KAZE_create()
>>> (kps, descs) = kaze.detectAndCompute(gray, None)
>>> print("# kps: {}, descriptors: {}".format(len(kps), descs.shape))
# kps: 359, descriptors: (359, 64)
>>> akaze = cv2.AKAZE_create()
>>> (kps, descs) = akaze.detectAndCompute(gray, None)
>>> print("# kps: {}, descriptors: {}".format(len(kps), descs.shape))
# kps: 192, descriptors: (192, 61)
>>> brisk = cv2.BRISK_create()
>>> (kps, descs) = brisk.detectAndCompute(gray, None)
>>> print("# kps: {}, descriptors: {}".format(len(kps), descs.shape))
# kps: 361, descriptors: (361, 64)
|
Summary
In this blog post we learned that OpenCV has removed the cv2.FeatureDetector_create andcv2.DescriptorExtractor_create functions from the library. Furthermore, the SIFT and SURF implementations have also been removed from the default OpenCV 3 install.
The reason for SIFT and SURF removal is due to what OpenCV calls “non-free” algorithms. Both SIFT and SURF are patented algorithms, meaning that you should technically be getting permission to use them in commercial algorithms (they are free to use for academic and research purposes though).
Because of this, OpenCV has made the decision to move patented algorithms (along with experimental implementations) to the opencv_contrib package. This means that to obtain access to SIFT and SURF, you’ll need to compile and install OpenCV 3 from source withopencv_contrib support enabled. Luckily, this isn’t too challenging with the help of myOpenCV 3 install guides.
Once you have installed OpenCV 3 with opencv_contrib support you’ll be able to find your favorite SIFT and SURF implementations in the xfeatures2d package through thecv2.xfeatures2d.SIFT_create() and cv2.xfeatures2d.SURF_create() functions.
from: If you’ve had a chance to play around with OpenCV 3 (and do a lot of work with keypoint
http://www.pyimagesearch.com/2015/07/16/where-did-sift-and-surf-go-in-opencv-3/
http://blog.csdn.net/garfielder007/article/details/51260087
opencv java api提取图片sift特征 - anexplore
- import org.opencv.core.Core;
- import org.opencv.core.Mat;
- import org.opencv.core.MatOfKeyPoint;
- import org.opencv.highgui.Highgui;
- import org.opencv.features2d.*;
- public class ExtractSIFT
- {
- public static void main( String[] args )
- {
- System.loadLibrary( Core.NATIVE_LIBRARY_NAME );
- Mat test_mat = Highgui.imread("pfau.jpg");
- Mat desc = new Mat();
- FeatureDetector fd = FeatureDetector.create(FeatureDetector.SIFT);
- MatOfKeyPoint mkp =new MatOfKeyPoint();
- fd.detect(test_mat, mkp);
- DescriptorExtractor de = DescriptorExtractor.create(DescriptorExtractor.SIFT);
- de.compute(test_mat,mkp,desc );//提取sift特征
- System.out.println(desc.cols());
- System.out.println(desc.rows());
- }
- }
- 学习OpenCV——KeyPoint Matching 优化方式
今天读Mastering OpenCV with Practical Computer Vision Projects 中的第三章里面讲到了几种特征点匹配的优化方式,在此记录。
在图像特征点检测完成后(特征点检测参考:学习OpenCV——BOW特征提取函数(特征点篇)),就会进入Matching procedure。
1. OpenCV提供了两种Matching方式:
• Brute-force matcher (cv::BFMatcher)
• Flann-based matcher (cv::FlannBasedMatcher)
Brute-force matcher就是用暴力方法找到点集一中每个descriptor在点集二中距离最近的descriptor;
Flann-based matcher 使用快速近似最近邻搜索算法寻找(用快速的第三方库近似最近邻搜索算法)
一般把点集一称为 train set (训练集)对应模板图像,点集二称为 query set(查询集)对应查找模板图的目标图像。
为了提高检测速度,你可以调用matching函数前,先训练一个matcher。训练过程可以首先使用cv::FlannBasedMatcher来优化,为descriptor建立索引树,这种操作将在匹配大量数据时发挥巨大作用(比如在上百幅图像的数据集中查找匹配图像)。而Brute-force matcher在这个过程并不进行操作,它只是将train descriptors保存在内存中。
2. 在matching过程中可以使用cv::DescriptorMatcher的如下功能来进行匹配:
- 简单查找最优匹配:void match(const Mat& queryDescriptors, vector<DMatch>& matches,const vector<Mat>& masks=vector<Mat>() );
- 为每个descriptor查找K-nearest-matches:void knnMatch(const Mat& queryDescriptors, vector<vector<DMatch> >& matches, int k,const vector<Mat>&masks=vector<Mat>(),bool compactResult=false );
- 查找那些descriptors间距离小于特定距离的匹配:void radiusMatch(const Mat& queryDescriptors, vector<vector<DMatch> >& matches, maxDistance, const vector<Mat>& masks=vector<Mat>(), bool compactResult=false );
3. matching结果包含许多错误匹配,错误的匹配分为两种:
- False-positive matches: 将非对应特征点检测为匹配(我们可以对他做文章,尽量消除它)
- False-negative matches: 未将匹配的特征点检测出来(无法处理,因为matching算法拒绝)
- Cross-match filter:

- Ratio test


- void PatternDetector::getMatches(const cv::Mat& queryDescriptors, std::vector<cv::DMatch>& matches)
- {
- matches.clear();
- if (enableRatioTest)
- {
- // To avoid NaNs when best match has
- // zero distance we will use inverse ratio.
- const float minRatio = 1.f / 1.5f;
- // KNN match will return 2 nearest
- // matches for each query descriptor
- m_matcher->knnMatch(queryDescriptors, m_knnMatches, 2);
- for (size_t i=0; i<m_knnMatches.size(); i++)
- {
- const cv::DMatch& bestMatch = m_knnMatches[i][0];
- const cv::DMatch& betterMatch = m_knnMatches[i][1];
- float distanceRatio = bestMatch.distance /
- betterMatch.distance;
- // Pass only matches where distance ratio between
- // nearest matches is greater than 1.5
- // (distinct criteria)
- if (distanceRatio < minRatio)
- {
- matches.push_back(bestMatch);
- }
- }
- }
- else
- {
- // Perform regular match
- m_matcher->match(queryDescriptors, matches);
- }
- }
为了进一步提升匹配精度,可以采用随机样本一致性(RANSAC)方法。
- bool PatternDetector::refineMatchesWithHomography
- (
- const std::vector<cv::KeyPoint>& queryKeypoints,
- const std::vector<cv::KeyPoint>& trainKeypoints,
- float reprojectionThreshold,
- std::vector<cv::DMatch>& matches,
- cv::Mat& homography
- )
- {
- const int minNumberMatchesAllowed = 8;
- if (matches.size() < minNumberMatchesAllowed)
- return false;
- // Prepare data for cv::findHomography
- std::vector<cv::Point2f> srcPoints(matches.size());
- std::vector<cv::Point2f> dstPoints(matches.size());
- for (size_t i = 0; i < matches.size(); i++)
- {
- srcPoints[i] = trainKeypoints[matches[i].trainIdx].pt;
- dstPoints[i] = queryKeypoints[matches[i].queryIdx].pt;
- }
- // Find homography matrix and get inliers mask
- std::vector<unsigned char> inliersMask(srcPoints.size());
- homography = cv::findHomography(srcPoints,
- dstPoints,
- CV_FM_RANSAC,
- reprojectionThreshold,
- inliersMask);
- std::vector<cv::DMatch> inliers;
- for (size_t i=0; i<inliersMask.size(); i++)
- {
- if (inliersMask[i])
- inliers.push_back(matches[i]);
- }
- matches.swap(inliers);
- return matches.size() > minNumberMatchesAllowed;
- }
经过单应性变换的过滤结果

今天读Mastering OpenCV with Practical Computer Vision Projects 中的第三章里面讲到了几种特征点匹配的优化方式,在此记录。
在图像特征点检测完成后(特征点检测参考:学习OpenCV——BOW特征提取函数(特征点篇)),就会进入Matching procedure。
1. OpenCV提供了两种Matching方式:
• Brute-force matcher (cv::BFMatcher)
• Flann-based matcher (cv::FlannBasedMatcher)
Brute-force matcher就是用暴力方法找到点集一中每个descriptor在点集二中距离最近的descriptor;
Flann-based matcher 使用快速近似最近邻搜索算法寻找(用快速的第三方库近似最近邻搜索算法)
一般把点集一称为 train set (训练集)对应模板图像,点集二称为 query set(查询集)对应查找模板图的目标图像。
为了提高检测速度,你可以调用matching函数前,先训练一个matcher。训练过程可以首先使用cv::FlannBasedMatcher来优化,为descriptor建立索引树,这种操作将在匹配大量数据时发挥巨大作用(比如在上百幅图像的数据集中查找匹配图像)。而Brute-force matcher在这个过程并不进行操作,它只是将train descriptors保存在内存中。
2. 在matching过程中可以使用cv::DescriptorMatcher的如下功能来进行匹配:
- 简单查找最优匹配:void match(const Mat& queryDescriptors, vector<DMatch>& matches,const vector<Mat>& masks=vector<Mat>() );
- 为每个descriptor查找K-nearest-matches:void knnMatch(const Mat& queryDescriptors, vector<vector<DMatch> >& matches, int k,const vector<Mat>&masks=vector<Mat>(),bool compactResult=false );
- 查找那些descriptors间距离小于特定距离的匹配:void radiusMatch(const Mat& queryDescriptors, vector<vector<DMatch> >& matches, maxDistance, const vector<Mat>& masks=vector<Mat>(), bool compactResult=false );
3. matching结果包含许多错误匹配,错误的匹配分为两种:
- False-positive matches: 将非对应特征点检测为匹配(我们可以对他做文章,尽量消除它)
- False-negative matches: 未将匹配的特征点检测出来(无法处理,因为matching算法拒绝)
- Cross-match filter:
- Ratio test
- void PatternDetector::getMatches(const cv::Mat& queryDescriptors, std::vector<cv::DMatch>& matches)
- {
- matches.clear();
- if (enableRatioTest)
- {
- // To avoid NaNs when best match has
- // zero distance we will use inverse ratio.
- const float minRatio = 1.f / 1.5f;
- // KNN match will return 2 nearest
- // matches for each query descriptor
- m_matcher->knnMatch(queryDescriptors, m_knnMatches, 2);
- for (size_t i=0; i<m_knnMatches.size(); i++)
- {
- const cv::DMatch& bestMatch = m_knnMatches[i][0];
- const cv::DMatch& betterMatch = m_knnMatches[i][1];
- float distanceRatio = bestMatch.distance /
- betterMatch.distance;
- // Pass only matches where distance ratio between
- // nearest matches is greater than 1.5
- // (distinct criteria)
- if (distanceRatio < minRatio)
- {
- matches.push_back(bestMatch);
- }
- }
- }
- else
- {
- // Perform regular match
- m_matcher->match(queryDescriptors, matches);
- }
- }
为了进一步提升匹配精度,可以采用随机样本一致性(RANSAC)方法。
- bool PatternDetector::refineMatchesWithHomography
- (
- const std::vector<cv::KeyPoint>& queryKeypoints,
- const std::vector<cv::KeyPoint>& trainKeypoints,
- float reprojectionThreshold,
- std::vector<cv::DMatch>& matches,
- cv::Mat& homography
- )
- {
- const int minNumberMatchesAllowed = 8;
- if (matches.size() < minNumberMatchesAllowed)
- return false;
- // Prepare data for cv::findHomography
- std::vector<cv::Point2f> srcPoints(matches.size());
- std::vector<cv::Point2f> dstPoints(matches.size());
- for (size_t i = 0; i < matches.size(); i++)
- {
- srcPoints[i] = trainKeypoints[matches[i].trainIdx].pt;
- dstPoints[i] = queryKeypoints[matches[i].queryIdx].pt;
- }
- // Find homography matrix and get inliers mask
- std::vector<unsigned char> inliersMask(srcPoints.size());
- homography = cv::findHomography(srcPoints,
- dstPoints,
- CV_FM_RANSAC,
- reprojectionThreshold,
- inliersMask);
- std::vector<cv::DMatch> inliers;
- for (size_t i=0; i<inliersMask.size(); i++)
- {
- if (inliersMask[i])
- inliers.push_back(matches[i]);
- }
- matches.swap(inliers);
- return matches.size() > minNumberMatchesAllowed;
- }
经过单应性变换的过滤结果
java opencv使用相关的更多相关文章
- Atitit Java OpenCV 捕获视频
Atitit Java OpenCV 捕获视频 ,打开一段视频或默认的摄像头 有两种方法,一种是在定义类的时候,一种是用open()方法. 一. 读取视频序列 OpenCV提供了一个简便易用的框架以 ...
- 【Socket编程】Java中网络相关API的应用
Java中网络相关API的应用 一.InetAddress类 InetAddress类用于标识网络上的硬件资源,表示互联网协议(IP)地址. InetAddress类没有构造方法,所以不能直接new出 ...
- 盘点一下Github上开源的Java面试/学习相关的仓库,看完弄懂薪资至少增加10k
最近浏览 Github ,收藏了一些还算不错的 Java面试/学习相关的仓库,分享给大家,希望对你有帮助.我暂且按照目前的 Star 数量来排序. 本文由 SnailClimb 整理,如需转载请联系作 ...
- java文件夹相关操作 演示样例代码
java文件夹相关操作 演示样例代码 package org.rui.io; import java.io.File; import java.io.FilenameFilter; import ja ...
- Java Arrays.sort相关用法与重载
Java Arrays.sort() Java中的数组排序函数, 头文件 import java.util.Arrays; 相关API Arrays.sort(arys[]) Arrays.sort( ...
- Java内存模型相关原则详解
在<Java内存模型(JMM)详解>一文中我们已经讲到了Java内存模型的基本结构以及相关操作和规则.而Java内存模型又是围绕着在并发过程中如何处理原子性.可见性以及有序性这三个特征来构 ...
- Java 并发,相关术语
Java 并发,相关术语: 术语 作用 synchronize 可修饰方法.代码块.类:介绍:https://www.cnblogs.com/zyxiaohuihui/p/9096882.html L ...
- 利用Eclipse使用Java OpenCV(Using OpenCV Java with Eclipse)
最近在上计算机视觉这门课程用到了OpenCV,于是找到了"Using OpenCV Java with Eclipse"这篇博文,是英文的,我将它翻译如下与大家分享 正文: 从2. ...
- 与Java Web Service相关的若干概念(JAX-WS,JAX-RS)
WS ,JAX-WS ,JAX-RS,REST,Restlet,SOAP l JWS: 是指与webservice相关的J2EE(其实现在应该叫做Java EE吧)技术叫做 JWS(全称就是 jav ...
随机推荐
- [工具] CuteMarkEd
CuteMarkEd 是一款开源免费的.支持代码高亮的.朴素的 Markdown 本地编辑器,支持 Windows.Linux. 就因为程序员喜欢用,然后就拼命的开发 Markdown 编辑器么?青小 ...
- python基础-动态加载lazy_import(利用__import__)
看了一天动态加载,普遍有这么几种方法,总结一下,由简入深,本文仅对查到的栗子们做个引用……省去你们大把查资料的时间= = 主要思想:把模块(文件)名.类名.方法名当成了变量 然后利用__import_ ...
- 对crf++的template的理解 ©seven_clear
这是以前的一篇草稿,当初没写完,今天发出来,但总觉得水平有限,越学越觉得自己菜,写的博客水准低,发完这篇以后就谨慎发博了,毕竟自己菜,不能老吹B,下面是原稿. 好久没更了,本来年前想写篇关于爬虫的总结 ...
- 电话、地址、Email等常用正则表达式
正则表达式用于字符串处理.表单验证等场合,实用高效.现将一些常用的表达式收集于此,以备不时之需. 匹配中文字符的正则表达式: [\u4e00-\u9fa5]评注:匹配中文还真是个头疼的事,有了这个表达 ...
- php小记
php获取日期: date_default_timezone_set('PRC'); //默认时区 "今天:",date("Y-m-d",time()),&qu ...
- Nodejs express、html5实现拖拽上传
一.前言 文件上传是一个比较常见的功能,传统的选择方式的上传比较麻烦,需要先点击上传按钮,然后再找到文件的路径,然后上传.给用户体验带来很大问题.html5开始支持拖拽上传的需要的api.nodejs ...
- CodeForce 832A Sasha and Sticks
A. Sasha and Sticks time limit per test2 seconds memory limit per test256 megabytes inputstandard in ...
- ubuntu16.04下安装文献管理工具mendelay
1.首先下载mendelay的安装包 到官网下载对应版本的安装包,官网地址:Download for Ubuntu and Kubuntu 16.04 LTS, 17.04 and Debian 2. ...
- PyQT5-QPushButton切换按钮
""" QPushButton:切换按钮就是QPsuhButton的一种特殊模式,他有两种状态:按下和未按下.我们在点击的时候切换两种状态,有很多场景会用到这个功能 Au ...
- php表单身份验证
1. index.php <form method="post" action="dbtest.php"> 姓名: ...