重读源码,见证HashMap以及它的朋友们的骚操作
一。Getting Start
Again and again,until you master it.早在接触java.util包的时候,我们都会去阅读ArrayList,甚至也会去阅读HashMap(毕竟面试必考)。然而我们有可能”知道“了它们,却不一定”理解“它们。为了更深入的了解它们,笔者决定再细读一遍,然后将其写成博客,以接近理解的状态。(学习的最好方式就是将其教授给他人)
我们知道目前jdk甚至到了11都已投入生产的情况了,鉴于目前工作应用的关系我将使用jdk8的源码作为解析。
二。HashMap
作为使用空间换时间的典型案例,这种数据结构拥有这O(1)+O(len(List))的读效率和写效率,在数据结构基础课上介绍的哈希表,就是此物。
它拥有以下结构。

作为数据结构基础,它的结构是外层一个数组,数组中存着具体的元素Node,Node是单链表基本元素。
它在查找元素的O(1)的效率在于利用了作为key元素的hash值(那是一种标记Java元素的long型数据),查询通过(hash & len - 1)的方式计算数组下标,然后遍历链表(O(len-1))找到key对应的Node中的value。
因为一些原因(懒),1.7的代码就不从IDE中阅读了,借鉴了这位仁兄的博客:https://www.cnblogs.com/williamjie/p/9358291.html
jdk1.7的hashmap易于理解,put的时候找到链表中是否存在key,存在则替换value不存在就链在最后(尾插法);而它在resize的时候,会遍历数组对数组上链表的每一个元素进行重新hash,并放到扩容后的数组上(头插法),所以被链接到同一个位置上的元素是倒序的。
接下来我们进入1.8的HashMap源码阅读。
对一个类的了解,就从他怎么来的开始吧。(构造函数)
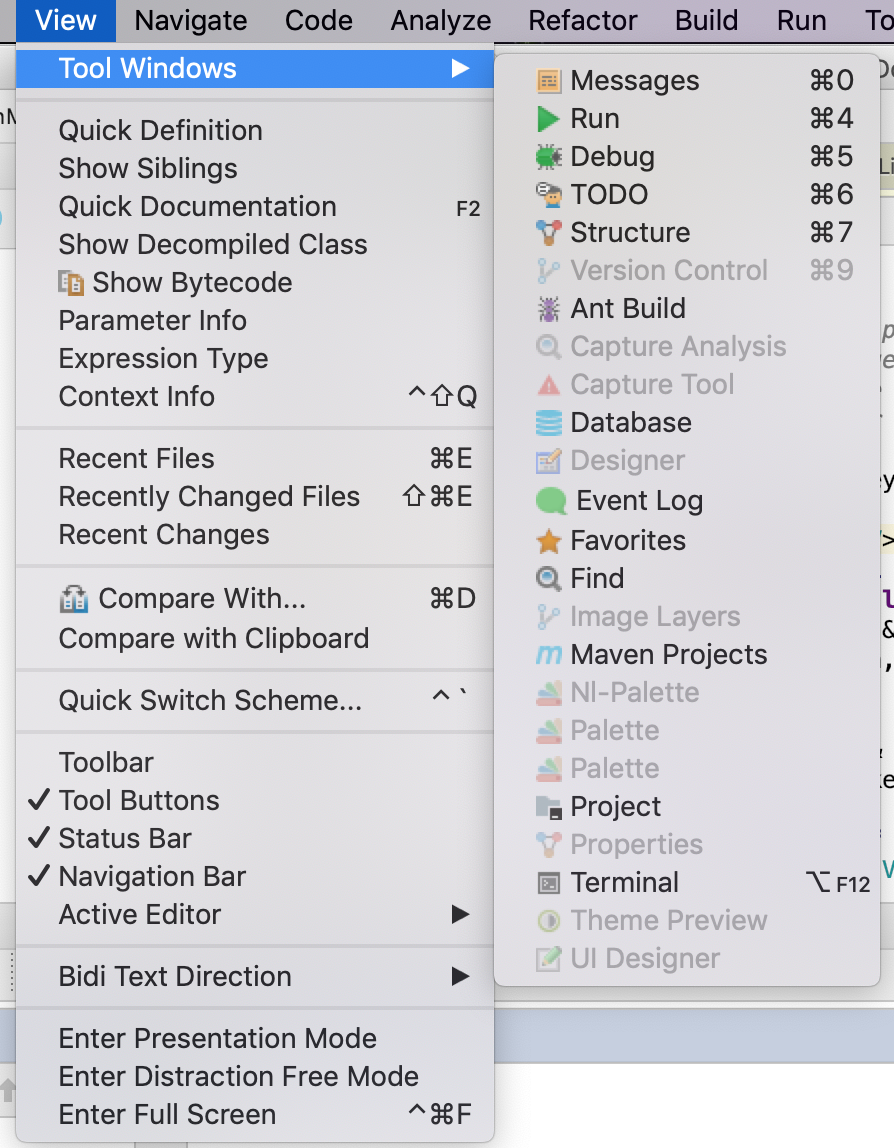
tips:打开IDEA,选择view的tool查看structure,便于对类有个全局感
打开HashMap源码,在左侧窗口中看到他的成员变量,以及构造函数,成员函数。
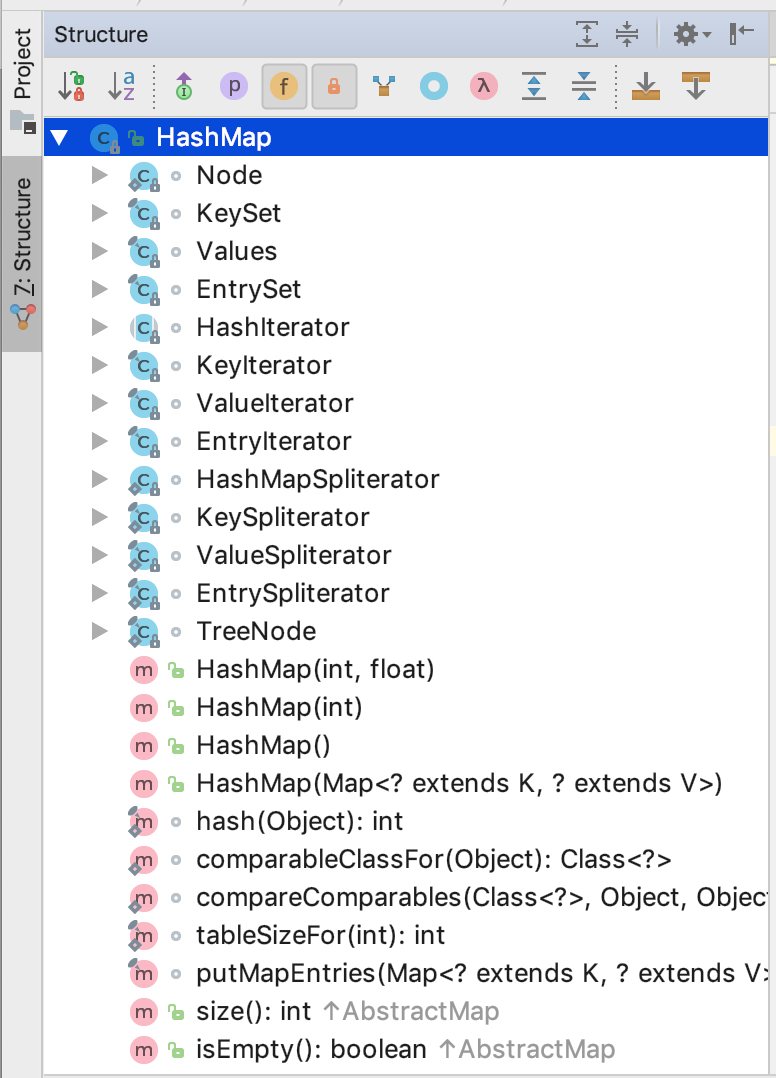
我们看到四个构造函数,无参构造仅仅是把负载因子设为默认值(0.75)

而使用initialCapacity的构造函数与initialCapacity & loadFactor的构造函数,操作是一样的。
解析:(1)如果初始化容量是一个负数,则会抛出不合法异常;
(2)初始化容量大于最大整型值,则使用最大整型值;
(3)负载因子是负数或者NaN(前端经常见到这个)会抛出不合法异常
(4)将负载因子赋予本对象的负载因子属性并计算threhold,最后赋予本对象threhold属性。


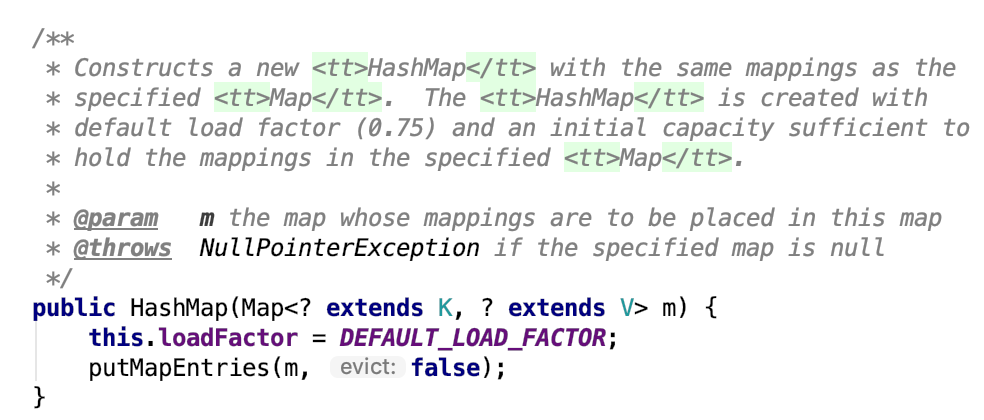
最后一个构造函数,加载默认负载因子,并将传入Map中的元素拷贝到本实例的数组存储中。
在jdk1.8的HashMap中,它们遵循一个原则:HashMap的数组长度是2的n次方,所以在你使用初始化容量的时候,它会计算离你这个数最近的2的n次方这个数值。
而计算方法也是非常的精彩(sao)
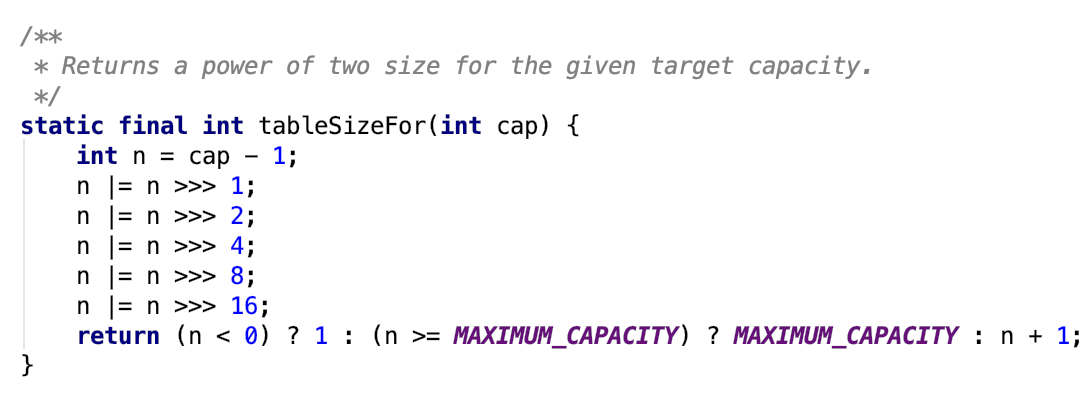
这里有一个位运算(>>>),它表示的是无符号右移,在二进制(例如0100 >>> 1 = 0010)操作中,将它们每一位右移,高位使用0补齐。这个算法目的在于将cap最高位的左边一位置为1,其他置为0(比如01011 -> 10000)。
以01011为例:(1)01011 - 1 = 01010
(2) 01010 | 00101 = 01111
(3)01111 | 00011 = 01111
(4)01111 | 00000 = 01111
(5)...(后边都是00000了)
(6)在return的那一步,表示的是如果 n < 0 则返回1,也就是cap原本就为0的情况,否则判断n是否为整型最大值,如果不是则加1(10000);这样就找出了最接近cap的2次幂的值。
至于为什么最后只移位16,因为一个int值只有4个byte(32个bit,也就是32个0101),而正数负数使用一个符号位,so,int的MaxValue = 2的31次方 - 1。
接下来我们进入put方法的阅读。
    /**

     * Associates the specified value with the specified key in this map.

     * If the map previously contained a mapping for the key, the old

     * value is replaced.

     *

     * @param key key with which the specified value is to be associated

     * @param value value to be associated with the specified key

     * @return the previous value associated with <tt>key</tt>, or

     *         <tt>null</tt> if there was no mapping for <tt>key</tt>.

     *         (A <tt>null</tt> return can also indicate that the map

     *         previously associated <tt>null</tt> with <tt>key</tt>.)

     */

    public V put(K key, V value) {

        return putVal(hash(key), key, value, false, true);

    }

/**

     * Implements Map.put and related methods

     *

     * @param hash hash for key

     * @param key the key

     * @param value the value to put

     * @param onlyIfAbsent if true, don't change existing value

     * @param evict if false, the table is in creation mode.

     * @return previous value, or null if none

     */

    final V putVal(int hash, K key, V value, boolean onlyIfAbsent,

                   boolean evict) {

        Node<K,V>[] tab; Node<K,V> p; int n, i;

        if ((tab = table) == null || (n = tab.length) == 0)

            n = (tab = resize()).length;

        if ((p = tab[i = (n - 1) & hash]) == null)

            tab[i] = newNode(hash, key, value, null);

        else {

            Node<K,V> e; K k;

            if (p.hash == hash &&

                ((k = p.key) == key || (key != null && key.equals(k))))

                e = p;

            else if (p instanceof TreeNode)

                e = ((TreeNode<K,V>)p).putTreeVal(this, tab, hash, key, value);

            else {

                for (int binCount = 0; ; ++binCount) {

                    if ((e = p.next) == null) {

                        p.next = newNode(hash, key, value, null);

                        if (binCount >= TREEIFY_THRESHOLD - 1) // -1 for 1st

                            treeifyBin(tab, hash);

                        break;

                    }

                    if (e.hash == hash &&

                        ((k = e.key) == key || (key != null && key.equals(k))))

                        break;

                    p = e;

                }

            }

            if (e != null) { // existing mapping for key

                V oldValue = e.value;

                if (!onlyIfAbsent || oldValue == null)

                    e.value = value;

                afterNodeAccess(e);

                return oldValue;

            }

        }

        ++modCount;

        if (++size > threshold)

            resize();

        afterNodeInsertion(evict);

        return null;

    }
按我们的理解,它的主题思想应该是(寻找下标->处理冲突->尾差法),让我们具体看看。
我们最常用的put(k,v)形式,实际调用的是putVal,onlyIfAbsent这个参数为true就不会改变已经存在节点的值,evict这个参数暂时没关注(注释表明它为false才生效)
putVal第一行,声明了所需要的参数:tab(指向容器的对象数组),p(指向对应位置的数组元素),n(table的length),i(下标位置)
(1)它的第一个if条件,表示如果table(持有的对象数组)为空或者长度为0,即没有初始化,它就会触发一下resize,并返回一个长度,而这个长度n,如果你传入了initialCapacity则会计算出最接近这个值的取上界的2次幂,如果未传入则使用默认的值16。
(2)好的,我们知道了第一个条件,然后它紧接着又是一个if,计算出table的对应位置是否为空,如果为空,easy,直接将这个k,v对new一个Node存储起来。
这个if的另一个分支,else,表示的是如果产生了哈希冲突,即这个位置已经存在链表结点;它在处理这个情况的时候很仔细,它先是检查头结点是否和传入的key相等(这个检查包括hash是否相等,k的值是否相等),如果相等则将数组上的元素赋予e以后使用;
它的下一个分支,表示它这个节点是个树的根节点,则将进入红黑树的插入操作(这步不仔细读了)
最后一种情况就是遍历链表,比对每一个元素,在break的时候,拿到的那个节点就是后续需要操作的e;这里有一种情况,就是链表长度达到阈值8,则将链表转化为红黑树,
在下一步,进行清算,如果e不为空,onlyIfAbsent是允许你改变值的,就将e节点的value改变为你传入的value,然后返回老的值(oldValue)。
最后几行先是将modCount加一下,然后在判定size是否大于threshold,如果大于阈值,则resize。
到此我们已经解读完毕。
接下来我们将进入另一个至关重要的方法:resize,因为它是HashMap的一个重要的过程(扩容)
    /**

     * Initializes or doubles table size.  If null, allocates in

     * accord with initial capacity target held in field threshold.

     * Otherwise, because we are using power-of-two expansion, the

     * elements from each bin must either stay at same index, or move

     * with a power of two offset in the new table.

     *

     * @return the table

     */

    final Node<K,V>[] resize() {

        Node<K,V>[] oldTab = table;

        int oldCap = (oldTab == null) ? 0 : oldTab.length;

        int oldThr = threshold;

        int newCap, newThr = 0;

        if (oldCap > 0) {

            if (oldCap >= MAXIMUM_CAPACITY) {

                threshold = Integer.MAX_VALUE;

                return oldTab;

            }

            else if ((newCap = oldCap << 1) < MAXIMUM_CAPACITY &&

                     oldCap >= DEFAULT_INITIAL_CAPACITY)

                newThr = oldThr << 1; // double threshold

        }

        else if (oldThr > 0) // initial capacity was placed in threshold

            newCap = oldThr;

        else {               // zero initial threshold signifies using defaults

            newCap = DEFAULT_INITIAL_CAPACITY;

            newThr = (int)(DEFAULT_LOAD_FACTOR * DEFAULT_INITIAL_CAPACITY);

        }

        if (newThr == 0) {

            float ft = (float)newCap * loadFactor;

            newThr = (newCap < MAXIMUM_CAPACITY && ft < (float)MAXIMUM_CAPACITY ?

                      (int)ft : Integer.MAX_VALUE);

        }

        threshold = newThr;

        @SuppressWarnings({"rawtypes","unchecked"})

            Node<K,V>[] newTab = (Node<K,V>[])new Node[newCap];

        table = newTab;

        if (oldTab != null) {

            for (int j = 0; j < oldCap; ++j) {

                Node<K,V> e;

                if ((e = oldTab[j]) != null) {

                    oldTab[j] = null;

                    if (e.next == null)

                        newTab[e.hash & (newCap - 1)] = e;

                    else if (e instanceof TreeNode)

                        ((TreeNode<K,V>)e).split(this, newTab, j, oldCap);

                    else { // preserve order

                        Node<K,V> loHead = null, loTail = null;

                        Node<K,V> hiHead = null, hiTail = null;

                        Node<K,V> next;

                        do {

                            next = e.next;

                            if ((e.hash & oldCap) == 0) {

                                if (loTail == null)

                                    loHead = e;

                                else

                                    loTail.next = e;

                                loTail = e;

                            }

                            else {

                                if (hiTail == null)

                                    hiHead = e;

                                else

                                    hiTail.next = e;

                                hiTail = e;

                            }

                        } while ((e = next) != null);

                        if (loTail != null) {

                            loTail.next = null;

                            newTab[j] = loHead;

                        }

                        if (hiTail != null) {

                            hiTail.next = null;

                            newTab[j + oldCap] = hiHead;

                        }

                    }

                }

            }

        }

        return newTab;

    }
(1)进行resize之前,我们需要准备一些材料(老的table内存地址,老数组的长度,老扩容阈值等);
(2)如果是正常扩容,则进入第一个条件;在第一个条件中,如果达到整型上界,则直接返回,不会再resize,并且threshold也会赋予上界值,如果未达上界,则进行左移位,这个时候只有当新的容量长度大于DEFAULT(也就是16)的时候才会将newThr赋值为原先的2倍;
(3)第二个条件就是将threshold赋予新容量,这种情况是init传入非零值的时候;
(4)最后一个条件是init传入0的时候,采用默认容量和threshold;
(5)接下来这个if的情况就只有这个红框if不成立的情况了,将重新计算newThr;

(6)接下来就是简单的new一个新的数组,并赋值给老的地址;
(7)如果老数组是存在的(也就是不是初次resize),这个时候需要对原数组的元素进行重新映射;
方法就是遍历原数组,分为如果是孤立节点则直接赋值,如果是红黑树则进行红黑树处理,如果是链表,则进行一些特殊的处理(这个操作骚得我闪到腰);
在讲解这个方法之前,我查阅了别人解读的文章,大体上说这个方法是推出这个链表上的元素:映射在新数组的同样位置或者同样位置加上旧数组长度的位置;
至此我做了个实验;
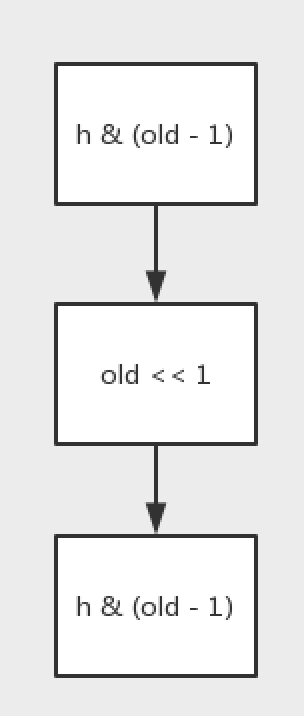
使用了一些作为案例进行计算,并不是所有的数都适用这种规则。
        int[] hashcode = {5,17,23,33};

        int old = 10;

        for(int h : hashcode){

            System.out.println(h & (old - 1));

        }

        System.out.println("rehash");

        old = old << 1;

        for (int h : hashcode){

            System.out.println(h & (old - 1));

        }

只有2的n次方才适用这种策略,因为2的n次方,在二进制中只占用1位1,举个例子会比较清楚(假设原长度为16<10000>,它的扩容16 << 1 = 32<100000>,而真正确定下标的算法是 h & len - 1,也就是决定下标的位数在于比长度最高位低的所有位;比如 5<00101> & 16-1<01111> = 00101,21<10101> & 16-1<01111> = 00101,他们产生了冲突必然成为链表;而进行扩容后16->32,5<00101> & 32-1<011111> = 00101,而21<10101> & 32-1<011111> = 10101,这个时候它相对于以前就加上了16,原因就是长度扩容之后,& 的那位数多了一位二进制1,如果原来的哈希值含有这个位1,则就会加上老数组的长度)
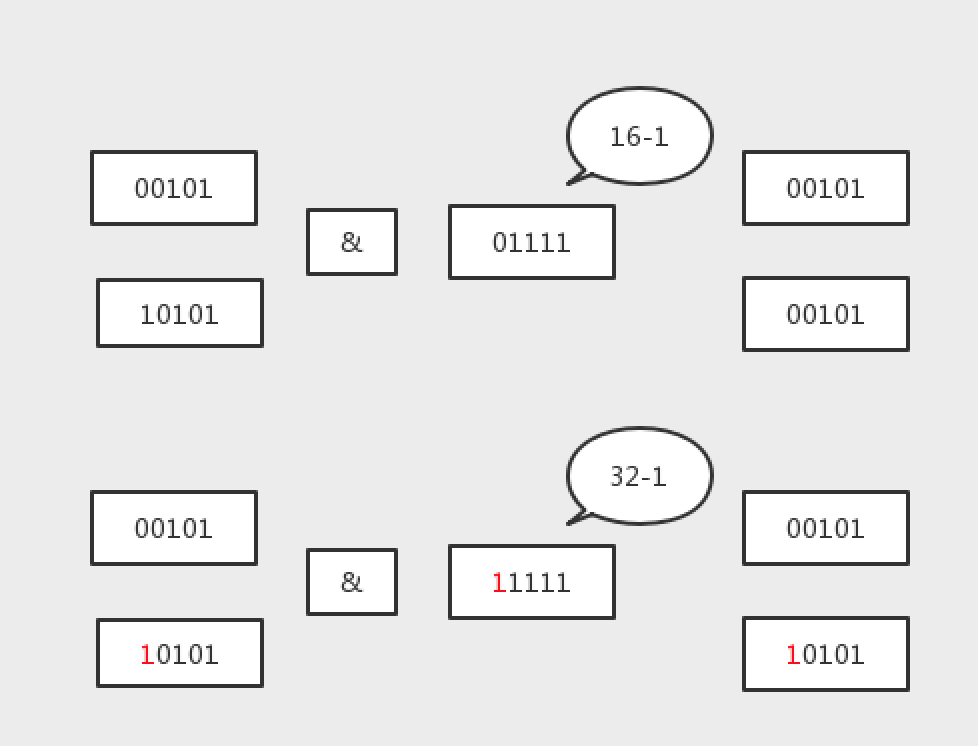
所以,它第一步就会做与原数组长度&一下,为了确定那个位是否为0,为0保持原位,为1加上原数组长度;它分别将两条链表构造完成之后,再赋值到新数组位置上,这样出来的元素就不是倒叙的了;
要说他比1.7有什么提升么,就是一个是倒置一个是顺序放置吧;复杂度应该没太大变化。(但是骚是骚了点)
至此,HashMap中最难以理解的部分全部都解析完毕。
三。ConcurrentHashMap
好,我们顺势进入CHM的阅读(HashTable那货没什么价值)----(但是这货真难啃)
(老子读了很久,最不理解的就是这些个位运算了!对sizeCtl又是一知半解,真难!)
我们就忘了1.7的segment吧,看看1.8的实现,1.8比起1.7的分段锁,它把锁的粒度变得更细了,细到获取的是头结点的对象锁。
构造方法还需要看吗?走读一下吧。
    /**

     * Creates a new, empty map with an initial table size

     * accommodating the specified number of elements without the need

     * to dynamically resize.

     *

     * @param initialCapacity The implementation performs internal

     * sizing to accommodate this many elements.

     * @throws IllegalArgumentException if the initial capacity of

     * elements is negative

     */

    public ConcurrentHashMap(int initialCapacity) {

        if (initialCapacity < 0)

            throw new IllegalArgumentException();

        int cap = ((initialCapacity >= (MAXIMUM_CAPACITY >>> 1)) ?

                   MAXIMUM_CAPACITY :

                   tableSizeFor(initialCapacity + (initialCapacity >>> 1) + 1));

        this.sizeCtl = cap;

    }
一如既往去校验init参数的合法性,并将其转化为最接近的2的n次方,真正去new数组还是在putVal里。
putVal读起来真吃力,因为里面含有多线程操作的场景(很多时候想象力有限)。
    /**

     * Maps the specified key to the specified value in this table.

     * Neither the key nor the value can be null.

     *

     * <p>The value can be retrieved by calling the {@code get} method

     * with a key that is equal to the original key.

     *

     * @param key key with which the specified value is to be associated

     * @param value value to be associated with the specified key

     * @return the previous value associated with {@code key}, or

     *         {@code null} if there was no mapping for {@code key}

     * @throws NullPointerException if the specified key or value is null

     */

    public V put(K key, V value) {

        return putVal(key, value, false);

    }

    /** Implementation for put and putIfAbsent */

    final V putVal(K key, V value, boolean onlyIfAbsent) {

        if (key == null || value == null) throw new NullPointerException();

        int hash = spread(key.hashCode());

        int binCount = 0;

        for (Node<K,V>[] tab = table;;) {

            Node<K,V> f; int n, i, fh;

            if (tab == null || (n = tab.length) == 0)

                tab = initTable();

            else if ((f = tabAt(tab, i = (n - 1) & hash)) == null) {

                if (casTabAt(tab, i, null,

                             new Node<K,V>(hash, key, value, null)))

                    break;                   // no lock when adding to empty bin

            }

            else if ((fh = f.hash) == MOVED)

                tab = helpTransfer(tab, f);

            else {

                V oldVal = null;

                synchronized (f) {

                    if (tabAt(tab, i) == f) {

                        if (fh >= 0) {

                            binCount = 1;

                            for (Node<K,V> e = f;; ++binCount) {

                                K ek;

                                if (e.hash == hash &&

                                    ((ek = e.key) == key ||

                                     (ek != null && key.equals(ek)))) {

                                    oldVal = e.val;

                                    if (!onlyIfAbsent)

                                        e.val = value;

                                    break;

                                }

                                Node<K,V> pred = e;

                                if ((e = e.next) == null) {

                                    pred.next = new Node<K,V>(hash, key,

                                                              value, null);

                                    break;

                                }

                            }

                        }

                        else if (f instanceof TreeBin) {

                            Node<K,V> p;

                            binCount = 2;

                            if ((p = ((TreeBin<K,V>)f).putTreeVal(hash, key,

                                                           value)) != null) {

                                oldVal = p.val;

                                if (!onlyIfAbsent)

                                    p.val = value;

                            }

                        }

                    }

                }

                if (binCount != 0) {

                    if (binCount >= TREEIFY_THRESHOLD)

                        treeifyBin(tab, i);

                    if (oldVal != null)

                        return oldVal;

                    break;

                }

            }

        }

        addCount(1L, binCount);

        return null;

    }
在读这些代码之前,我们需要具有自旋CAS的基础。
所谓自旋CAS,就是循环CAS的意思,直到成功,这个做法在AQS中大量使用。CAS,就是一种乐观锁的使用方法,在update值的时候,需要它的expect与内存值相等。
好的,putVal开头,先是判断这个key和value的非空性;
之后,计算一下hash(这个位运算没看懂)
接下来进入到自旋中,每次循环都会将table拷贝到工作线程tab中;情况依然分为几个:(1)表未初始化;(2)算出下标位置为空;(3)扩容中;(4)形成了链表(R-B tree);
我们先看initTable方法:
    /**

     * Initializes table, using the size recorded in sizeCtl.

     */

    private final Node<K,V>[] initTable() {

        Node<K,V>[] tab; int sc;

        while ((tab = table) == null || tab.length == 0) {

            if ((sc = sizeCtl) < 0)

                Thread.yield(); // lost initialization race; just spin

            else if (U.compareAndSwapInt(this, SIZECTL, sc, -1)) {

                try {

                    if ((tab = table) == null || tab.length == 0) {

                        int n = (sc > 0) ? sc : DEFAULT_CAPACITY;

                        @SuppressWarnings("unchecked")

                        Node<K,V>[] nt = (Node<K,V>[])new Node<?,?>[n];

                        table = tab = nt;

                        sc = n - (n >>> 2);

                    }

                } finally {

                    sizeCtl = sc;

                }

                break;

            }

        }

        return tab;

    }
依然是一个自旋CAS的思路,由于初始化只需要一个线程做就好了,如果检查到sizeCtl小于0则表示已经有线程在初始化了,则让出CPU,Thread.yield();而如果你是负责初始化的线程,首先CAS sizeCtl 的值,将其设为-1,此时sizeCtl原来是在初始化时候设置的2次幂的长度,它将它拷贝到线程工作内存sc中,将sc作为初始化长度n创造一个数组,并赋予table;sc = n - (n>>>2),不知道啥意思,不过这个会作为下次resize的阈值,最终将这个sc赋予sizeCtl;(这里面还用了双检锁的思维)初始化成功会返回tab;
    static final <K,V> boolean casTabAt(Node<K,V>[] tab, int i,

                                        Node<K,V> c, Node<K,V> v) {

        return U.compareAndSwapObject(tab, ((long)i << ASHIFT) + ABASE, c, v);

    }
它的第二段,如果tableAt对应位置取出来为null(这里还用了原子型获取对象),则会CAS设置节点值;这里的位运算,首先我们数组的内存首地址和具体值之间间隔了一个ABASE字节,这个ABASE是通过usafe的接口获取的;然后这个ASHIFT的计算,有点绕;
        ABASE = U.arrayBaseOffset(ak);

        int scale = U.arrayIndexScale(ak);

        if ((scale & (scale - 1)) != 0)

            throw new Error("data type scale not a power of two");

        ASHIFT = 31 - Integer.numberOfLeadingZeros(scale);
通过上面的计算,ASHIFT其实是指长度是2的多少次方这个次数;在二进制的乘法里,一个数乘以2的多少次方,其实就是左移多少位;在首地址+填充位+数据具体位置,就可以找到具体的元素位置了,最后CAS上去;
接下来第三种情况,就是在CMH做扩容时候,会将对应位置上的元素替换为一种特殊节点,它上面的hash值是-1,这时候会进入帮助扩容的方法;扩容我们到后边读到transfer再具体分析;
然后最后一种情况,来个双检锁,这里和hashmap就一样了,不是跟在后面就是比对节点hash值和key,更新value;如果是树节点,则做树操作;
最后在插入节点之后有一个binCount,表示当前数组位置的链表(树)长度,如果达到阈值TREEIFY_THRESHOLD,则进行扩容或者是树转换;(竟然是通过单个位置是否过长来resize)
    /* ---------------- Conversion from/to TreeBins -------------- */

    /**

     * Replaces all linked nodes in bin at given index unless table is

     * too small, in which case resizes instead.

     */

    private final void treeifyBin(Node<K,V>[] tab, int index) {

        Node<K,V> b; int n, sc;

        if (tab != null) {

            if ((n = tab.length) < MIN_TREEIFY_CAPACITY)

                tryPresize(n << 1);

            else if ((b = tabAt(tab, index)) != null && b.hash >= 0) {

                synchronized (b) {

                    if (tabAt(tab, index) == b) {

                        TreeNode<K,V> hd = null, tl = null;

                        for (Node<K,V> e = b; e != null; e = e.next) {

                            TreeNode<K,V> p =

                                new TreeNode<K,V>(e.hash, e.key, e.val,

                                                  null, null);

                            if ((p.prev = tl) == null)

                                hd = p;

                            else

                                tl.next = p;

                            tl = p;

                        }

                        setTabAt(tab, index, new TreeBin<K,V>(hd));

                    }

                }

            }

        }

    }
如码所示,如果数组长度小于64,就扩容;否则将其转换为树结构;
最后一个putVal里面的方法,就是addCount;
    /**

     * Adds to count, and if table is too small and not already

     * resizing, initiates transfer. If already resizing, helps

     * perform transfer if work is available.  Rechecks occupancy

     * after a transfer to see if another resize is already needed

     * because resizings are lagging additions.

     *

     * @param x the count to add

     * @param check if <0, don't check resize, if <= 1 only check if uncontended

     */

    private final void addCount(long x, int check) {

        CounterCell[] as; long b, s;

        if ((as = counterCells) != null ||

            !U.compareAndSwapLong(this, BASECOUNT, b = baseCount, s = b + x)) {

            CounterCell a; long v; int m;

            boolean uncontended = true;

            if (as == null || (m = as.length - 1) < 0 ||

                (a = as[ThreadLocalRandom.getProbe() & m]) == null ||

                !(uncontended =

                  U.compareAndSwapLong(a, CELLVALUE, v = a.value, v + x))) {

                fullAddCount(x, uncontended);

                return;

            }

            if (check <= 1)

                return;

            s = sumCount();

        }

        if (check >= 0) {

            Node<K,V>[] tab, nt; int n, sc;

            while (s >= (long)(sc = sizeCtl) && (tab = table) != null &&

                   (n = tab.length) < MAXIMUM_CAPACITY) {

                int rs = resizeStamp(n);

                if (sc < 0) {

                    if ((sc >>> RESIZE_STAMP_SHIFT) != rs || sc == rs + 1 ||

                        sc == rs + MAX_RESIZERS || (nt = nextTable) == null ||

                        transferIndex <= 0)

                        break;

                    if (U.compareAndSwapInt(this, SIZECTL, sc, sc + 1))

                        transfer(tab, nt);

                }

                else if (U.compareAndSwapInt(this, SIZECTL, sc,

                                             (rs << RESIZE_STAMP_SHIFT) + 2))

                    transfer(tab, null);

                s = sumCount();

            }

        }

    }
这个方法通过一堆繁琐的操作,计算元素总数,然后判断是否需要resize;(看得累,都是对sizeCtl的状态转换);
由此我们可以看出,每次新增元素的时候,会调用addCount方法判断是否扩容,所以扩容时机总的来说是在addCount的时候,当然前边判断树节点的时候,也会触发扩容,不过是length<64的时候才会。
接下来再看两个方法就能对CMH有一个清晰的轮廓了。
    /**

     * Tries to presize table to accommodate the given number of elements.

     *

     * @param size number of elements (doesn't need to be perfectly accurate)

     */

    private final void tryPresize(int size) {

        int c = (size >= (MAXIMUM_CAPACITY >>> 1)) ? MAXIMUM_CAPACITY :

            tableSizeFor(size + (size >>> 1) + 1);

        int sc;

        while ((sc = sizeCtl) >= 0) {

            Node<K,V>[] tab = table; int n;

            if (tab == null || (n = tab.length) == 0) {

                n = (sc > c) ? sc : c;

                if (U.compareAndSwapInt(this, SIZECTL, sc, -1)) {

                    try {

                        if (table == tab) {

                            @SuppressWarnings("unchecked")

                            Node<K,V>[] nt = (Node<K,V>[])new Node<?,?>[n];

                            table = nt;

                            sc = n - (n >>> 2);

                        }

                    } finally {

                        sizeCtl = sc;

                    }

                }

            }

            else if (c <= sc || n >= MAXIMUM_CAPACITY)

                break;

            else if (tab == table) {

                int rs = resizeStamp(n);

                if (sc < 0) {

                    Node<K,V>[] nt;

                    if ((sc >>> RESIZE_STAMP_SHIFT) != rs || sc == rs + 1 ||

                        sc == rs + MAX_RESIZERS || (nt = nextTable) == null ||

                        transferIndex <= 0)

                        break;

                    if (U.compareAndSwapInt(this, SIZECTL, sc, sc + 1))

                        transfer(tab, nt);

                }

                else if (U.compareAndSwapInt(this, SIZECTL, sc,

                                             (rs << RESIZE_STAMP_SHIFT) + 2))

                    transfer(tab, null);

            }

        }

    }
    /**

     * Moves and/or copies the nodes in each bin to new table. See

     * above for explanation.

     */

    private final void transfer(Node<K,V>[] tab, Node<K,V>[] nextTab) {

        int n = tab.length, stride;

        if ((stride = (NCPU > 1) ? (n >>> 3) / NCPU : n) < MIN_TRANSFER_STRIDE)

            stride = MIN_TRANSFER_STRIDE; // subdivide range

        if (nextTab == null) {            // initiating

            try {

                @SuppressWarnings("unchecked")

                Node<K,V>[] nt = (Node<K,V>[])new Node<?,?>[n << 1];

                nextTab = nt;

            } catch (Throwable ex) {      // try to cope with OOME

                sizeCtl = Integer.MAX_VALUE;

                return;

            }

            nextTable = nextTab;

            transferIndex = n;

        }

        int nextn = nextTab.length;

        ForwardingNode<K,V> fwd = new ForwardingNode<K,V>(nextTab);

        boolean advance = true;

        boolean finishing = false; // to ensure sweep before committing nextTab

        for (int i = 0, bound = 0;;) {

            Node<K,V> f; int fh;

            while (advance) {

                int nextIndex, nextBound;

                if (--i >= bound || finishing)

                    advance = false;

                else if ((nextIndex = transferIndex) <= 0) {

                    i = -1;

                    advance = false;

                }

                else if (U.compareAndSwapInt

                         (this, TRANSFERINDEX, nextIndex,

                          nextBound = (nextIndex > stride ?

                                       nextIndex - stride : 0))) {

                    bound = nextBound;

                    i = nextIndex - 1;

                    advance = false;

                }

            }

            if (i < 0 || i >= n || i + n >= nextn) {

                int sc;

                if (finishing) {

                    nextTable = null;

                    table = nextTab;

                    sizeCtl = (n << 1) - (n >>> 1);

                    return;

                }

                if (U.compareAndSwapInt(this, SIZECTL, sc = sizeCtl, sc - 1)) {

                    if ((sc - 2) != resizeStamp(n) << RESIZE_STAMP_SHIFT)

                        return;

                    finishing = advance = true;

                    i = n; // recheck before commit

                }

            }

            else if ((f = tabAt(tab, i)) == null)

                advance = casTabAt(tab, i, null, fwd);

            else if ((fh = f.hash) == MOVED)

                advance = true; // already processed

            else {

                synchronized (f) {

                    if (tabAt(tab, i) == f) {

                        Node<K,V> ln, hn;

                        if (fh >= 0) {

                            int runBit = fh & n;

                            Node<K,V> lastRun = f;

                            for (Node<K,V> p = f.next; p != null; p = p.next) {

                                int b = p.hash & n;

                                if (b != runBit) {

                                    runBit = b;

                                    lastRun = p;

                                }

                            }

                            if (runBit == 0) {

                                ln = lastRun;

                                hn = null;

                            }

                            else {

                                hn = lastRun;

                                ln = null;

                            }

                            for (Node<K,V> p = f; p != lastRun; p = p.next) {

                                int ph = p.hash; K pk = p.key; V pv = p.val;

                                if ((ph & n) == 0)

                                    ln = new Node<K,V>(ph, pk, pv, ln);

                                else

                                    hn = new Node<K,V>(ph, pk, pv, hn);

                            }

                            setTabAt(nextTab, i, ln);

                            setTabAt(nextTab, i + n, hn);

                            setTabAt(tab, i, fwd);

                            advance = true;

                        }

                        else if (f instanceof TreeBin) {

                            TreeBin<K,V> t = (TreeBin<K,V>)f;

                            TreeNode<K,V> lo = null, loTail = null;

                            TreeNode<K,V> hi = null, hiTail = null;

                            int lc = 0, hc = 0;

                            for (Node<K,V> e = t.first; e != null; e = e.next) {

                                int h = e.hash;

                                TreeNode<K,V> p = new TreeNode<K,V>

                                    (h, e.key, e.val, null, null);

                                if ((h & n) == 0) {

                                    if ((p.prev = loTail) == null)

                                        lo = p;

                                    else

                                        loTail.next = p;

                                    loTail = p;

                                    ++lc;

                                }

                                else {

                                    if ((p.prev = hiTail) == null)

                                        hi = p;

                                    else

                                        hiTail.next = p;

                                    hiTail = p;

                                    ++hc;

                                }

                            }

                            ln = (lc <= UNTREEIFY_THRESHOLD) ? untreeify(lo) :

                                (hc != 0) ? new TreeBin<K,V>(lo) : t;

                            hn = (hc <= UNTREEIFY_THRESHOLD) ? untreeify(hi) :

                                (lc != 0) ? new TreeBin<K,V>(hi) : t;

                            setTabAt(nextTab, i, ln);

                            setTabAt(nextTab, i + n, hn);

                            setTabAt(tab, i, fwd);

                            advance = true;

                        }

                    }

                }

            }

        }

    }
第一个方法tryPresize是在树转换中<64长度调用的,把n扩容n<<1长度;while中判断sizeCtl是否大于0,如果大于则开始扩容,这里又搞了一段init;然后判断下这个c和sc的关系,是否结束;最后这个有两种情况,如果存在nextTable,如果不存在(不是扩容过程)则直接返回了;(没啥耐心看sizeCtl的状态了)

这两个地方就是告诉transfer是否需要new一个nextTable;
然后我们重点看transfer方法;它的扩容数据搬运思路是,一个线程申请一个区间,从大到小(比如有64长度,默认情况下一个线程获取16个长度,那么公共变量就是64,申请了一次变为48,表示它要处理48-63区间的数据,如果为0则申请不到区间,可以退下了);占位符的意思是,如果数据迁移完成,put的时候会检查是否hash为-1,如果是就来帮助扩容;bound是处理区间的下界;
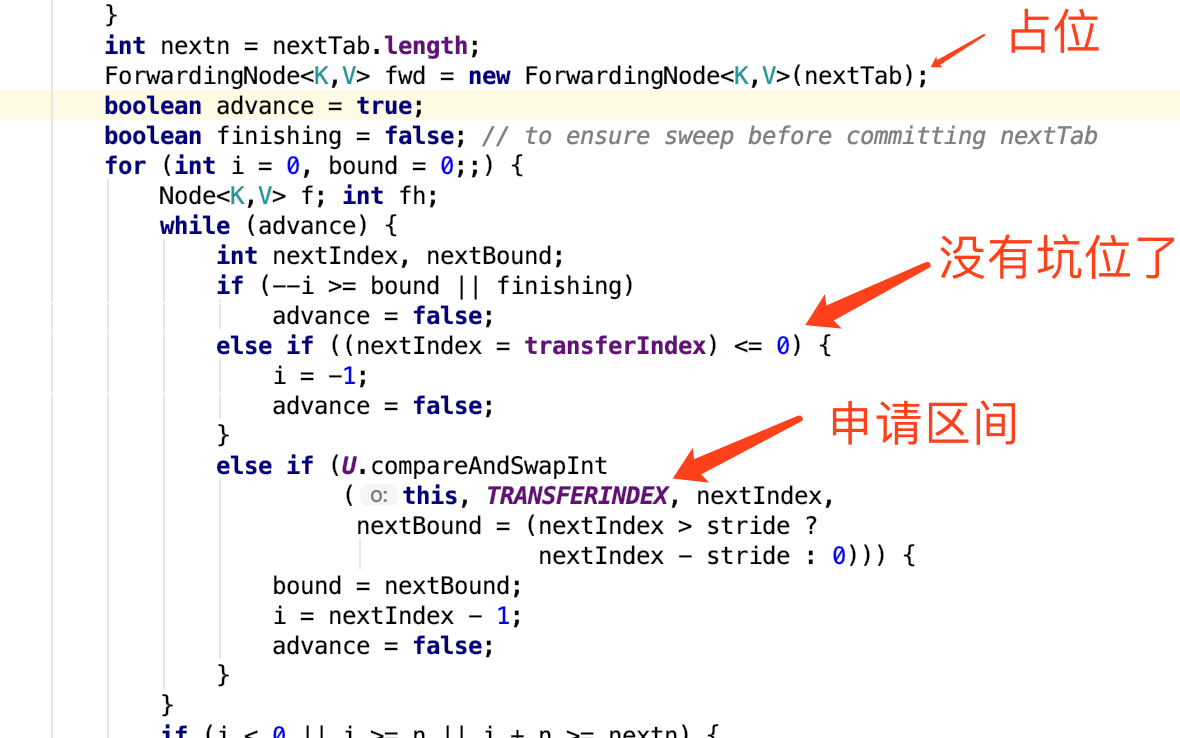
这里有根据cpu线程数来计算每个线程需要处理的数据量;

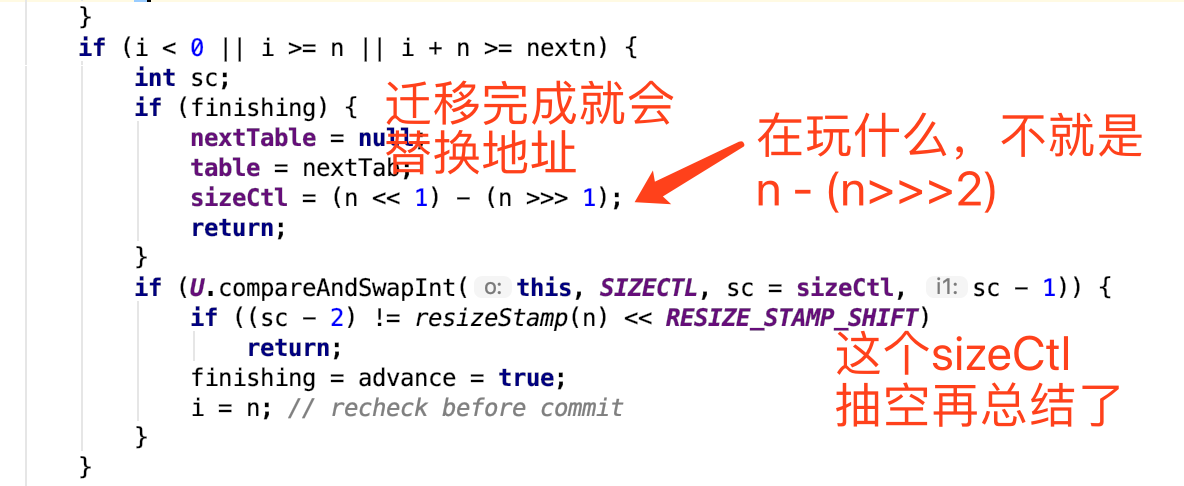

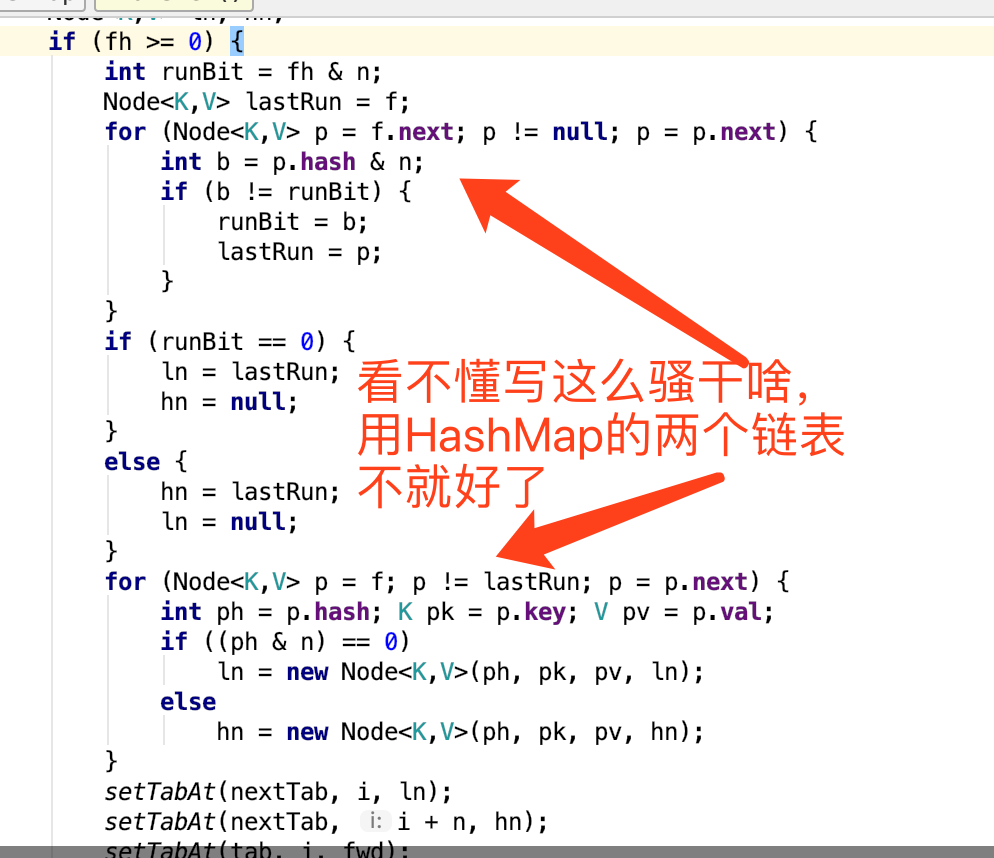
总的来说,还是以前的思路,&那个位数是0还是1,是原位还是+n,做完之后,将原来数组设置为ForwardingNode。做完之后,正在put的就知道你在扩容了,就不会往老数组写入数组了,保证了一致性;

In conclusion,1.8的CMH是通过自选CAS进行插入、扩容等操作,并通过识别sizeCtl来协调各种过程,如何保证一致性呢?在未扩容的情况,非常明朗,对象锁或者是CAS,这样有效解决了冲突;最难想象的是扩容和插入并行的时候,想象一下,你搞了一个newTable,在做数据迁移,你拿到了一个位置a(加锁的),扩容一直在申请锁,一旦申请到了,会将数据迁移到新数组a或者a+n位置,这时将老数组标记为-1(MOVE);此时putVal的自旋中,如果table还是老地址,则拿到对应位置是MOVE,则就感知到它正在扩容了,就会去帮着干,最终拿到扩容后的tab地址;再申请锁,再双检,最后才是插入链表。
四。LinkedHashMap
由此看,它是HashMap的一个子类,它的结构除了整体上是个数组+链表之外,彼此元素间还是个双端链表,它保存了插入顺序;
public class LinkedHashMap<K,V>

    extends HashMap<K,V>

    implements Map<K,V>
    /**

     * HashMap.Node subclass for normal LinkedHashMap entries.

     */

    static class Entry<K,V> extends HashMap.Node<K,V> {

        Entry<K,V> before, after;

        Entry(int hash, K key, V value, Node<K,V> next) {

            super(hash, key, value, next);

        }

    }
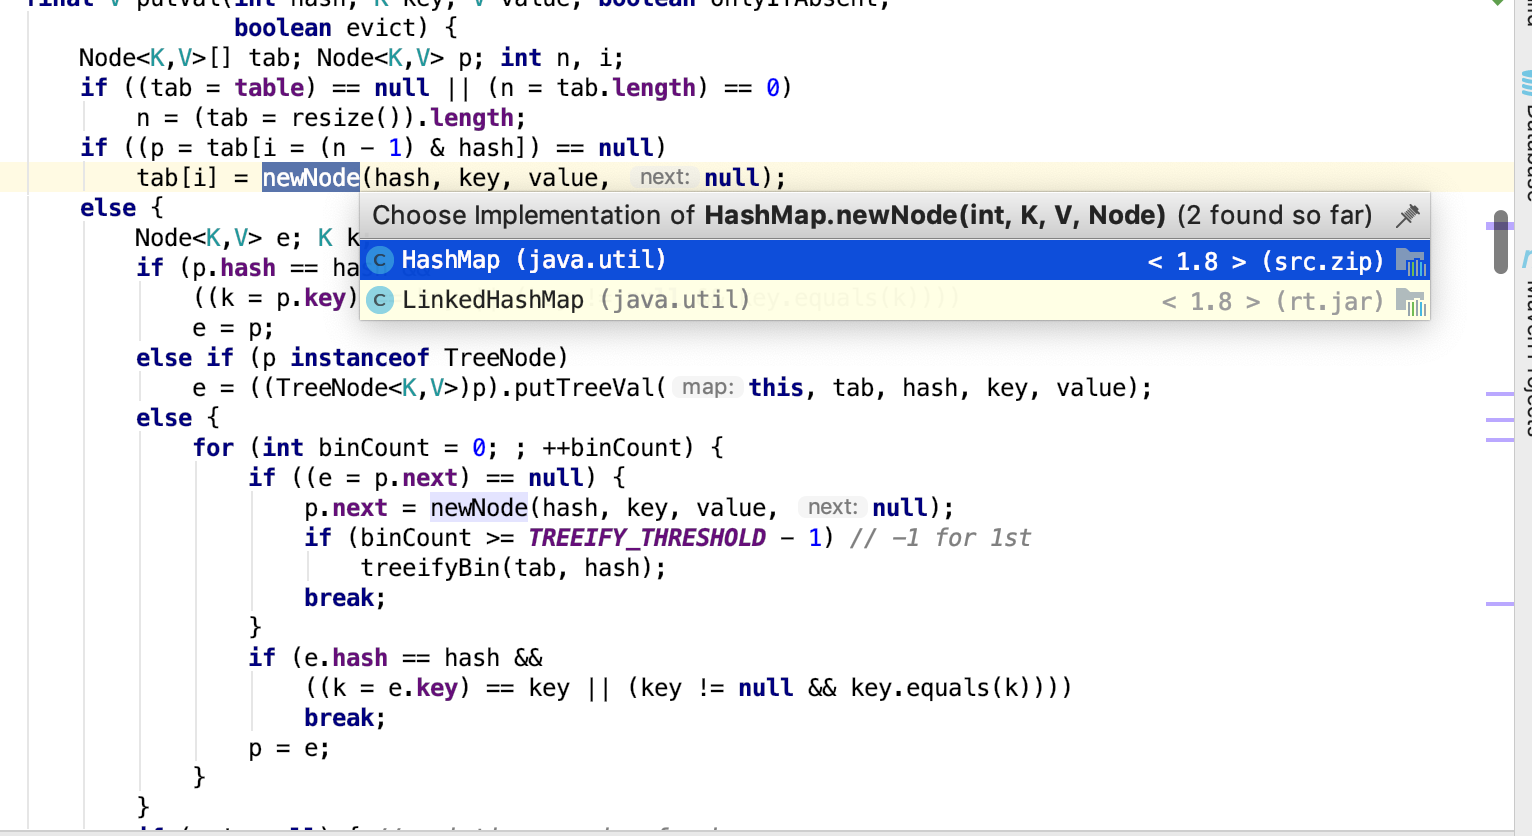

扩展性真好,只需要重写一些方法,就可以在基础上改变结构;在明白HashMap的基础上,这个数据结构也会变得更容易理解了;主要是遍历的时候不一样。
五。练习
首先我们的Map会有这样的一种结构,作为元素类的Node,以及持有数组Node[]的Map类。
public class DataStructure<K,V> implements Serializable {

    private volatile Node<K,V>[] tab;

    private final int DEFAULT_CAPACITY = 1 << 4;

    public DataStructure(){

        tab = new Node[DEFAULT_CAPACITY];

    }

}
class Node<K,V>{

    private K key;

    private V value;

    private Node next;

    private int hash;

    Node(){

    }

    Node(K key, V value, Node next, int hash) {

        this.key = key;

        this.value = value;

        this.next = next;

        this.hash = hash;

    }

    public K getKey() {

        return key;

    }

    public void setKey(K key) {

        this.key = key;

    }

    public V getValue() {

        return value;

    }

    public void setValue(V value) {

        this.value = value;

    }

    public Node getNext() {

        return next;

    }

    public void setNext(Node next) {

        this.next = next;

    }

    public int getHash() {

        return hash;

    }

    public void setHash(int hash) {

        this.hash = hash;

    }

}
而这个数据结构能循环的三个方法,put,get,以及resize;
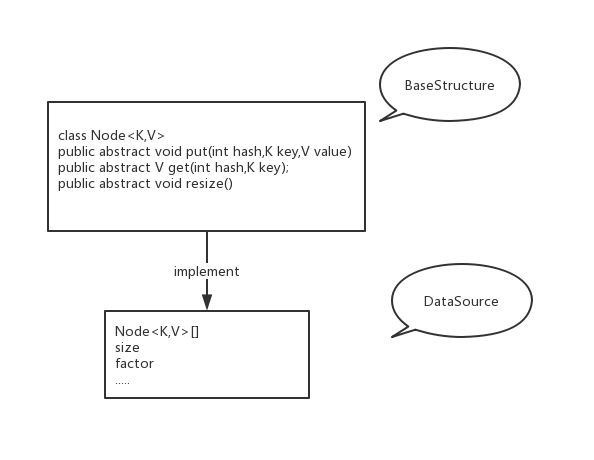
public abstract class BaseStructure<K,V> {

    class Node<K,V>{

        private K key;

        private V value;

        private Node next;

        private int hash;

        Node(){

        }

        Node(K key, V value, Node next, int hash) {

            this.key = key;

            this.value = value;

            this.next = next;

            this.hash = hash;

        }

        public K getKey() {

            return key;

        }

        public void setKey(K key) {

            this.key = key;

        }

        public V getValue() {

            return value;

        }

        public void setValue(V value) {

            this.value = value;

        }

        public Node getNext() {

            return next;

        }

        public void setNext(Node next) {

            this.next = next;

        }

        public int getHash() {

            return hash;

        }

        public void setHash(int hash) {

            this.hash = hash;

        }

    }

    public abstract void put(int hash,K key,V value);

    public abstract V get(int hash,K key);

    public abstract void resize();

}
以及真正实现的类。
import java.io.Serializable;

public class DataStructure<K,V> extends BaseStructure<K,V> implements Serializable {

    private Node<K,V>[] tab;

    private final int DEFAULT_CAPACITY = 1 << 2;

    private double factor = 0.75f;

    private int size;

    public DataStructure(){

        tab = new Node[DEFAULT_CAPACITY];

    }

    public void put(int hash,K key,V value){

        if(key == null){

            throw new NullPointerException();

        }

        int len = tab.length;

        int index;

        Node e = tab[index = (hash & (len -1))];

        // 粗略估计扩容

        if(size + 1 > (len * factor)){

            resize();

        }

        if(e == null){

            tab[index] = new Node(key,value,null,hash);

            size++;

        }else{

           while(e.getNext() != null) {

               if (e.getKey().equals(key) && e.getHash() == hash) {

                   e.setValue(value);

                   return;

               }

               e = e.getNext();

           }

           e.setNext(new Node(key,value,null,hash));

            size++;

        }

    }

    public V get(int hash,K key){

        if(key == null){

            throw new NullPointerException();

        }

        int len = tab.length;

        int i = hash & (len -1);

        Node<K,V> node = tab[hash & (len - 1)];

        while(node != null){

            if(node.getHash() == hash && node.getKey().equals(key)){

                return node.getValue();

            }

            node = node.getNext();

        }

        return null;

    }

    @Override

    public void resize() {

        int len = tab.length;

        int newLen = len << 1;

        Node<K,V>[] newTab = new Node[newLen];

        for(int i=0;i<len;i++){

            Node<K,V> node = tab[i];

            if(node == null){

                continue;

            }

            else if(node.getNext() == null){

                newTab[node.getHash() & (newLen - 1)] = node;

            }else{

                Node<K,V> loHead = null,loTail = null,hiHead = null,hiTail = null;

                Node<K,V> e = node;

                Node<K,V> next = null;

                do{

                    next = e.getNext();

                    if((node.getHash() & len) == 0){

                        if(loHead == null){

                            loHead = loTail = e;

                            loTail.setNext(null);

                        }else {

                            loTail.setNext(e);

                            loTail = e;

                            loTail.setNext(null);

                        }

                    }else {

                        if(hiHead == null){

                            hiHead = hiTail = e;

                            hiTail.setNext(null);

                        }else {

                            hiTail.setNext(e);

                            hiTail = e;

                            hiTail.setNext(null);

                        }

                    }

                }while ((e = next) != null);

                newTab[i] = loHead;

                newTab[i+len] = hiHead;

            }

        }

        tab = newTab;

    }

}
重读源码,见证HashMap以及它的朋友们的骚操作的更多相关文章
- 快来!我从源码中学习到了一招Dubbo的骚操作!
荒腔走板 大家好,我是 why,欢迎来到我连续周更优质原创文章的第 55 篇. 老规矩,先来一个简短的荒腔走板,给冰冷的技术文注入一丝色彩. 魔幻的 2020 年的上半年过去了,很多人都在朋友圈和上半 ...
- 【源码】“@Value 注入不成功”引发的一系列骚操作
目录 背景 模拟@Value成功的场景 模拟注入不成功的场景 看看为什么没有注入成功 为什么加static和不加static的加载顺序是不一样的呢 我们不加static,能不能也让它注入成功呢? 总结 ...
- jdk1.8.0_45源码解读——HashMap的实现
jdk1.8.0_45源码解读——HashMap的实现 一.HashMap概述 HashMap是基于哈希表的Map接口实现的,此实现提供所有可选的映射操作.存储的是<key,value>对 ...
- JDK源码解析---HashMap源码解析
HashMap简介 HashMap是基于哈希表实现的,每一个元素是一个key-value对,其内部通过单链表解决冲突问题,容量不足(超过了阀值)时,同样会自动增长. HashMap是非线程安全的,只是 ...
- JDK8源码解析 -- HashMap(二)
在上一篇JDK8源码解析 -- HashMap(一)的博客中关于HashMap的重要知识点已经讲了差不多了,还有一些内容我会在今天这篇博客中说说,同时我也会把一些我不懂的问题抛出来,希望看到我这篇博客 ...
- 【JDK】JDK源码分析-HashMap(2)
前文「JDK源码分析-HashMap(1)」分析了 HashMap 的内部结构和主要方法的实现原理.但是,面试中通常还会问到很多其他的问题,本文简要分析下常见的一些问题. 这里再贴一下 HashMap ...
- JDK1.8源码学习-HashMap
JDK1.8源码学习-HashMap 目录 一.HashMap简介 HashMap 主要用来存放键值对,它是基于哈希表的Map接口实现的,是常用的Java集合之一. 我们都知道在JDK1.8 之前 的 ...
- CentOS 7.2使用源码包编译安装MySQL 5.7.22及一些操作
CentOS 7.2使用源码包编译安装MySQL 5.7.22及一些操作 2018年07月05日 00:28:38 String峰峰 阅读数:2614 使用yum安装的MySQL一般版本比较旧,但 ...
- JAVA源码分析-HashMap源码分析(二)
本文继续分析HashMap的源码.本文的重点是resize()方法和HashMap中其他的一些方法,希望各位提出宝贵的意见. 话不多说,咱们上源码. final Node<K,V>[] r ...
随机推荐
- 7.20 文本框内容 超出 显示 。。 和 split
word-wrap:break-word; word-break:break-all; overflow:auto; split 去 :等 ,只要有: 就会在:两边 各生产一个值 ,所有 应习惯把最 ...
- javac 编译java文件提示: 程序包com.mysql.jdbc不存在
需要将引用的包放到:/usr/java/jdk1.7.0_75/jre/lib/ext 也就是jdk安装目录/jre/lib/ext 目录下面
- 构造函数constructor 与析构函数destructor(五)
我们知道当调用默认拷贝构造函数时,一个对象对另一个对象初始化时,这时的赋值时逐成员赋值.这就是浅拷贝,当成员变量有指针时,浅拷贝就会在析构函数那里出现问题.例如下面的例子: //test.h #ifn ...
- 用个体软件过程(PSP)记录你的工作
用个体软件过程(PSP)记录你的工作 首先,非常感谢大家对本门课程的学习所投入的时间和精力. 其次,已经进入数据时代,口说无凭,拿数据来.如果你认为你已经投入了大量精力在这门课程的学习和作业中,而且已 ...
- CSS 关键的基础知识
今晚看了 百度传课 一门关于CSS的课程, 感觉不错, 随手记了点儿笔记, 供以后查阅. =================================================== pos ...
- 2018.08.10 atcoder Median Sum(01背包)
传送门 题意简述:输入一个数组an" role="presentation" style="position: relative;">anan. ...
- 马婕 2014年MBA,mpacc备考 报刊宣读1 中国的电子商务(转)
http://blog.sina.com.cn/s/blog_3e66af4601015fxi.html 中国电子商务蓄势待发 Chinese e-commerce中国电子商务Pity the par ...
- 《Linux多线程服务端编程——使用muduo C++网络库》读书笔记
第一章 线程安全的对象生命期管理 第二章 线程同步精要 第三章 多线程服务器的适用场合与常用编程模型 第四章 C++多线程系统编程精要 1.(P84)11个常用的最基本Pthreads函数: 2个:线 ...
- @media screen
参考地址: http://www.swordair.com/blog/2010/08/431/ http://ashaochangfu.blog.163.com/blog/static/1042517 ...
- day11(多线程,唤醒机制,生产消费者模式,多线程的生命周期)
A:进程: 进程指正在运行的程序.确切的来说,当一个程序进入内存运行,即变成一个进程,进程是处于运行过程中的程序,并且具有一定独立功能. B:线程: 线程是进程中的一个执行单元,负责当前进程中程序的执 ...
