Spring MVC + Spriing + MyBatis整合,写给新人
开发环境:
开发工具:MyEclipse 8.6
数据库:MySQL
操作系统:WIN8.1
Jar包:
Spirng和SpringMVC版本:3.2.9
MyBatis版本:3.2.8
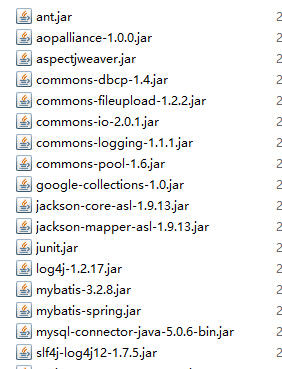
其他关联Jar包如图:

---------------------------------------------------------------------------------
OK , 准备的东西齐全了 。这就动手,先用MyEclipse新建一个网站工程,然后将所有的Jar包放到WebRoot/WEB-INF/lib文件夹下面。
首先配置web.xml文件,增加Spring的支持
  <listener>

      <listener-class>org.springframework.web.context.ContextLoaderListener</listener-class>

  </listener>

  <context-param>

      <param-name>contextConfigLocation</param-name>

    <param-value>classpath*:applicationDataSource.xml</param-value>

  </context-param>
接着在src下建立
applicationDataSource.xml
jdbc.properties文件
mybatis-config.xml
以上三个文件
mybatis-config.xml 文件自然就是MyBatis的配置了,其实只用到了拦截器,后面我们会看到。jdbc.properties文件里面配置具体的数据库信息,在applicationDataSource.xml文件中读取
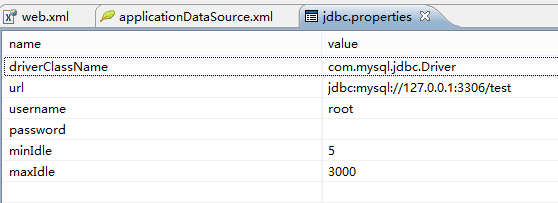
先看jdbc.properties的内容:

这里简单配置了数据库的一些信息,我们现在看applicationDataSource.xml文件中的配置
 <?xml version="1.0" encoding="UTF-8"?>

 <beans

     xmlns="http://www.springframework.org/schema/beans"

     xmlns:xsi="http://www.w3.org/2001/XMLSchema-instance"

     xmlns:p="http://www.springframework.org/schema/p"

     xmlns:aop="http://www.springframework.org/schema/aop"

     xmlns:tx="http://www.springframework.org/schema/tx"

     xmlns:mvc="http://www.springframework.org/schema/mvc"

     xsi:schemaLocation="

     http://www.springframework.org/schema/beans

     http://www.springframework.org/schema/beans/spring-beans-3.0.xsd

     http://www.springframework.org/schema/aop

     http://www.springframework.org/schema/aop/spring-aop-3.0.xsd

     http://www.springframework.org/schema/tx

     http://www.springframework.org/schema/tx/spring-tx-3.0.xsd

     ">

   <!-- 这里我用了aop:aspectj-autoproxy,如果使用aop有对类的配置的话就派上用场了。个人习惯而已 -->

     <aop:aspectj-autoproxy proxy-target-class="true"/>

     <!-- 载入jdbc.properties文件 -->

     <bean class="org.springframework.beans.factory.config.PropertyPlaceholderConfigurer">

         <property name="locations">

             <list><value>classpath:jdbc.properties</value></list>

         </property>

     </bean>

    <!-- 配置数据源 ,注意value部分的配置写法 -->

     <bean id="datasource" class="org.apache.commons.dbcp.BasicDataSource"

         destroy-method="close">

         <property name="driverClassName" value="${driverClassName}" />

         <property name="url" value="${url}" />

         <property name="username" value="${username}" />

         <property name="password" value="${password}" />

         <!-- 数据库连接池保持的最小连接数 -->

         <property name="minIdle" value="${minIdle}" />

         <!-- 数据库连接池保持的最大连接数 -->

         <property name="maxIdle" value="${maxIdle}" />

         <!--

             当数据库连接因为某种原因断掉之后,再重新从连接池中拿另外一个连接时实际上这个连接可能

             已经无效,所以为了确保所拿到的连接全都有效需要在获取连接,返回连接以及连接空闲时进行 有效性验证

             下面3个设置为ture时进行验证,默认为false

         -->

         <!-- 取得连接时是否进行有效性验证 -->

         <property name="testOnBorrow" value="true" />

         <!-- 返回连接时是否进行有效性验证 -->

         <property name="testOnReturn" value="true" />

         <!-- 连接空闲时是否进行有效性验证 -->

         <property name="testWhileIdle" value="true" />

     </bean>

   <!-- 配置sqlSessionFactory ,注意mapperLocations的配置,这个路径里面存放了MyBatis的Mapper文件,configLocation则加载了mybatis-config.xml文件,不需要的可以不配置 -->

     <bean id="sqlSessionFactory" class="org.mybatis.spring.SqlSessionFactoryBean">

         <property name="configLocation" value="classpath:mybatis-config.xml"/>

          <property name="dataSource" ref="datasource"/>

          <property name="mapperLocations">

              <list>

                  <value>classpath:org/springmvc_demo/mapper/*.xml</value>

              </list>

          </property>

     </bean>

     <!-- JDBC的事务管理 -->

     <bean id="transactionManager" class="org.springframework.jdbc.datasource.DataSourceTransactionManager">

         <property name="dataSource" ref="datasource"/>

     </bean>

     <!-- 事务管理对应的方法规则 -->

     <tx:advice transaction-manager="transactionManager" id="txAdvice">

         <tx:attributes>

             <tx:method name="add*" propagation="REQUIRED"/>

             <tx:method name="save*" propagation="REQUIRED"/>

             <tx:method name="update*" propagation="REQUIRED"/>

             <tx:method name="modify*" propagation="REQUIRED"/>

             <tx:method name="del*" propagation="REQUIRED"/>

             <tx:method name="delete*" propagation="REQUIRED"/>

             <tx:method name="find*" propagation="SUPPORTS" read-only="true"/>

             <tx:method name="query*" propagation="SUPPORTS" read-only="true"/>

             <tx:method name="*" read-only="true"/>

         </tx:attributes>

     </tx:advice>

     <aop:config>

        <!-- 这里的配置应用事务管理的包名我提前准备好了,根据自己的实际情况修改包名,但是事物管理还是建议在业务逻辑层控制 -->
         <aop:pointcut expression="execution(* org.springmvc_demo.service.impl.*.*(..))" id="transactionAop"/>

         <aop:advisor advice-ref="txAdvice" pointcut-ref="transactionAop"/>

     </aop:config>

      <!-- 我们需要一个 sqlSessionTemplate对象,使用看之后的代码配置-->
     <bean id="sqlSessionTemplate" class="org.mybatis.spring.SqlSessionTemplate">

         <constructor-arg index="0" ref="sqlSessionFactory"/>

     </bean>

 </beans>
Spring的配置到此结束,我们在来到web.xml中增加SpringMVC的配置。
这里配置文件我没有使用默认的路径,而是将springmvc的配置文件放到了src根目录下,<load-on-startup>1</load-on-startup>这个一定要加上。注意url-pattern的配置,不要修改。
 <servlet>

       <servlet-name>springMVC</servlet-name>

       <servlet-class>org.springframework.web.servlet.DispatcherServlet</servlet-class>

       <init-param>

         <param-name>contextConfigLocation</param-name>

         <param-value>classpath*:applicationContext.xml</param-value>

       </init-param>

       <load-on-startup>1</load-on-startup>

   </servlet>

   <servlet-mapping>

       <servlet-name>springMVC</servlet-name>

       <url-pattern>/</url-pattern>

   </servlet-mapping>
web.xml文件修改完毕后,我们来看SpringMVC的配置文件的内容
 <?xml version="1.0" encoding="UTF-8"?>

 <beans

     xmlns="http://www.springframework.org/schema/beans"

     xmlns:xsi="http://www.w3.org/2001/XMLSchema-instance"

     xmlns:p="http://www.springframework.org/schema/p"

     xmlns:context="http://www.springframework.org/schema/context"

     xmlns:mvc="http://www.springframework.org/schema/mvc"

     xsi:schemaLocation="

     http://www.springframework.org/schema/beans

     http://www.springframework.org/schema/beans/spring-beans-3.0.xsd

     http://www.springframework.org/schema/context

     http://www.springframework.org/schema/context/spring-context-3.0.xsd

     http://www.springframework.org/schema/mvc

     http://www.springframework.org/schema/mvc/spring-mvc-3.0.xsd

     ">

     <!-- 包扫描的配置放在了SpringMVC加载的配置文件中,否则将无法正常工作 -->

     <context:component-scan base-package="org.springmvc_demo"/>

     <mvc:annotation-driven/>

     <bean id="viewResolver" class="org.springframework.web.servlet.view.InternalResourceViewResolver">

         <property name="prefix" value="/"/>

         <property name="suffix"  value=".jsp"/>

         <property name="viewClass" value="org.springframework.web.servlet.view.JstlView"/>

     </bean>

 </beans>
OK ,这里的配置就到此为止,需要其他功能的自行配置,唯一需要注意的是我没有在这里对静态资源做配置,这样的话html,css等静态资源按照上面web.xml中的配置将无法正常使用。所以我们还需要再次返回web.xml增加对静态资源的配置。
   <servlet-mapping>

       <servlet-name>default</servlet-name>

       <url-pattern>*.html</url-pattern>

   </servlet-mapping>

   <servlet-mapping>

       <servlet-name>default</servlet-name>

       <url-pattern>*.htm</url-pattern>

   </servlet-mapping>

   <servlet-mapping>

       <servlet-name>default</servlet-name>

       <url-pattern>*.js</url-pattern>

   </servlet-mapping>

   <servlet-mapping>

       <servlet-name>default</servlet-name>

       <url-pattern>*.css</url-pattern>

   </servlet-mapping>

   <servlet-mapping>

       <servlet-name>default</servlet-name>

       <url-pattern>*.jpg</url-pattern>

   </servlet-mapping>

    <servlet-mapping>

       <servlet-name>default</servlet-name>

       <url-pattern>*.png</url-pattern>

   </servlet-mapping>

    <servlet-mapping>

       <servlet-name>default</servlet-name>

       <url-pattern>*.gif</url-pattern>

   </servlet-mapping>
加上以上的配置,静态资源就可以正常访问了。
到此为止,SpringMVC +Spring + MyBatis的配置文件就基本配置完毕了。
Spring MVC + Spriing + MyBatis整合,写给新人的更多相关文章
- 转载 Spring、Spring MVC、MyBatis整合文件配置详解
Spring.Spring MVC.MyBatis整合文件配置详解 使用SSM框架做了几个小项目了,感觉还不错是时候总结一下了.先总结一下SSM整合的文件配置.其实具体的用法最好还是看官方文档. ...
- Spring MVC、MyBatis整合文件配置详解
Spring:http://spring.io/docs MyBatis:http://mybatis.github.io/mybatis-3/ Building a RESTful Web Serv ...
- Mybaits-从零开始-Spring、Spring MVC、MyBatis整合(未万待续)
Spring.Spring MVC.MyBatis整合(未万待续)
- Spring、Spring MVC、MyBatis整合文件配置详解
原文 http://www.cnblogs.com/wxisme/p/4924561.html 主题 MVC模式MyBatisSpring MVC 使用SSM框架做了几个小项目了,感觉还不错是时候总 ...
- 【转】Spring、Spring MVC、MyBatis整合文件配置详解
见:http://www.tuicool.com/articles/eyINveF web.xml的配置 web.xml应该是整个项目最重要的配置文件了,不过servlet3.0中已经支持注解配置方式 ...
- Spring、Spring MVC、MyBatis整合文件配置详解2
使用SSM框架做了几个小项目了,感觉还不错是时候总结一下了.先总结一下SSM整合的文件配置.其实具体的用法最好还是看官方文档. Spring:http://spring.io/docs MyBatis ...
- Spring、Spring MVC、MyBatis 整合文件配置详解
使用SSM框架做了几个小项目了,感觉还不错是时候总结一下了.先总结一下SSM整合的文件配置.其实具体的用法最好还是看官方文档. Spring:http://spring.io/docs MyBatis ...
- spring mvc与mybatis整合错误提示
java.lang.AbstractMethodError: org.mybatis.spring.transaction.SpringManagedTransaction.getTimeout()L ...
- spring mvc 和mybatis整合 的异常处理
1.自定义异常信息类 通过构造函数来实现异常信息的接收 public class CustomException extends Exception { //异常信息 private String m ...
随机推荐
- USACO Section 3.3: A Game
第一次碰到博弈论题目,是很棘手,博弈论题目要考虑全局最优的解法,我第一次用了局部最优的,而且vector也没pop_front()操作.后来看了网上的用dp的方法解的. 博弈论的题目基本都得用dp法子 ...
- Java WEB安全问题及解决方案
1.弱口令漏洞 解决方案:最好使用至少6位的数字.字母及特殊字符组合作为密码.数据库不要存储明文密码,应存储MD5加密后的密文,由于目前普通的MD5加密已经可以被破解,最好可以多重MD5加密. ...
- Perl文件读写
Perl File Handling: open, read, write and close files #==================== Opening files Solution 1 ...
- jquery来跨域提交表单
说说用jquery来实现跨域提交表单 在jQuery中,我们使用json数据类型,通过getJSON方法来实现从服务端获取或发送数据,而当要向不同远程服务器端提交或者获取数据时,要采用jsonp数据类 ...
- ADB安装应用报错 Segmentation fault pm install /data...
路径一定不能有中文…… 路径一定不能有中文…… 路径一定不能有中文…… 路径一定不能有中文…… 路径一定不能有中文……
- LA 4725 (二分) Airport
题意: 有W.E两个跑道,在每个时刻每个跑道的飞机都从0开始编号,而且每个时刻都有Wi和Ei架飞机到达这两个跑道.而且每个时刻只能选择一个跑道的一架飞机起飞.问如何选择才能使得飞机的最大编号最小.(每 ...
- UVa 10859 Placing Lampposts
这种深层递归的题还是要多多体会,只看一遍是不够的 题意:有一个森林,在若干个节点处放一盏灯,灯能照亮与节点邻接的边.要求:符合要求的放置的灯最少为多少,在灯数最少的前提下,一条边同时被两盏灯照亮的边数 ...
- CodeIgniter 3之Session类库(3)(转)
本文主要讲CI2和CI3关于Session类库的区别.我们知道CI2的Session类使用了cookie来传递session数据.使用 cookie保存会话的好处在于可以节省服务器资源,但坏处也是显而 ...
- 甚是挂念学校的acmer
虽然自己一直不承认.. 今天头疼,不想工作,况且自己服务端代码也写差不多了,于是又干起了自己的本行,去信息站找退役帖看,又把3xian的文章看了一遍,这次我从文章里面读到的更多的是懊恼,恨铁不成钢.经 ...
- eclipse 工程加入ant以支持自动打war包
先在工程的根目录下建一个一builder.xml内容如下 <project basedir="." default="war" name="hb ...
