AI 让观众成为 3D 版《老友记》的导演了?
《老友记》上线 3D 版了?
允许用户旋转镜头,且从近景切换到全景观看故事?
今年出炉的 3D 方向 AI 项目 SitCom3D,能够自动补齐《老友记》原剧中的三维拍摄空间,用户可以选择主视图、侧视图等不同角度欣赏剧集。镜头的主导权在观众手中,仿佛亲临拍摄片场。
https://www.bilibili.com/video/BV1p84y1r7ye/?aid=606073788&cid=917566564&page=1
举个栗子,在原剧中只出现了以下两个画面。
看了《老友记》后,AI直接还原出画面的3D场景,构造不同角度下的镜头故事。
https://www.bilibili.com/video/BV1p84y1r7ye/?aid=606073788&cid=917566640&page=2
这流畅的运镜,仿佛就是新上线的 3D 版老友记,并且你就是导演!
项目介绍:情景喜剧的三维重构
这个项目由 UC 伯克利的 Georgios Pavlakos 等研究人员在 ECCV 2022 “The One Where They Reconstructed 3D Humans and Environments in TV Shows” 论文中提出,旨在借助 AI 完成影视剧集中的3D重建。
3D建模在很多领域都有广泛的应用,然而传统的重建方式耗时巨大,比如在制造业,一个工业级模型需要专业建模师花费数周时间。目前快速获得3D模型的方式有两种,一种是靠仪器扫描获得三维形状数据,例如点云;另一种则是基于深度学习,使用AI建模。后者更直观,且成本更低。想象一下用手机拍几张、甚至一张照片就能获得高精度的3D模型,既可以为元宇宙线上生活提供基础设施,又能在传统工业领域加速研发流程。
提到2D图像转3D模型,绕不开近两年大火的NeRF神经网络。自2020年发表以来众多高校和业界公司基于它研发了各自版本的NeRF:英伟达推出了极速版的instant NeRF;苹果的NeuMan框架等等。

NeRF为2D转3D提供了新的思路,其背后的机制,相关论文解读有很多,这里仅做简述:NeRF通过对数张2D照片的学习,使用神经辐射场的方式建立起像素点位置(x, y, z)和相机参数(θ, φ)对应图像的volume density体积密度和RGB颜色值的关系,训练完成后以此生成新的视角。通过这种方式,NeRF相较传统的3D建模方式能够生成更精细的还原。
回到TV Show的三维重建项目,如下图(fig2)所示,研究人员正是基于NeRF模型,通过分析整个剧集里的三维信息,精确感知和重建3D人体姿势和演员位置,并生成新的不存在剧集里的2D角度图像。
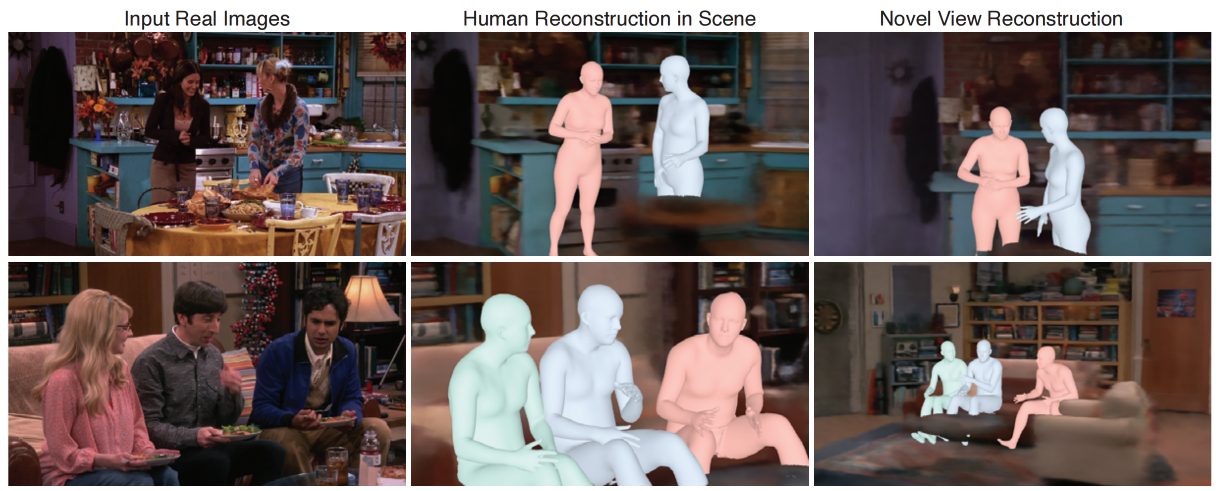
生成3D模型的原理如下图所示,首先从剧集输入中通过SfM(Structure-from-Motion)方法估计出摄像机的位置,并通过NeRF重建出精确的环境3D场景信息。接着根据多镜头和单镜头的情形,进行人体3D重建。最后基于这些信息进行更多的编辑和开发,比如在电视剧中删除一个人,或者插入一只兔子。


这个项目目前已在github上开源。
项目地址:https://github.com/ethanweber/sitcoms3D
论文地址:https://ethanweber.me/sitcoms3D
感兴趣的小伙伴可以直接在矩池云上复现这个项目,具体操作方式如下:
项目复现:用矩池云快速实现三维重构
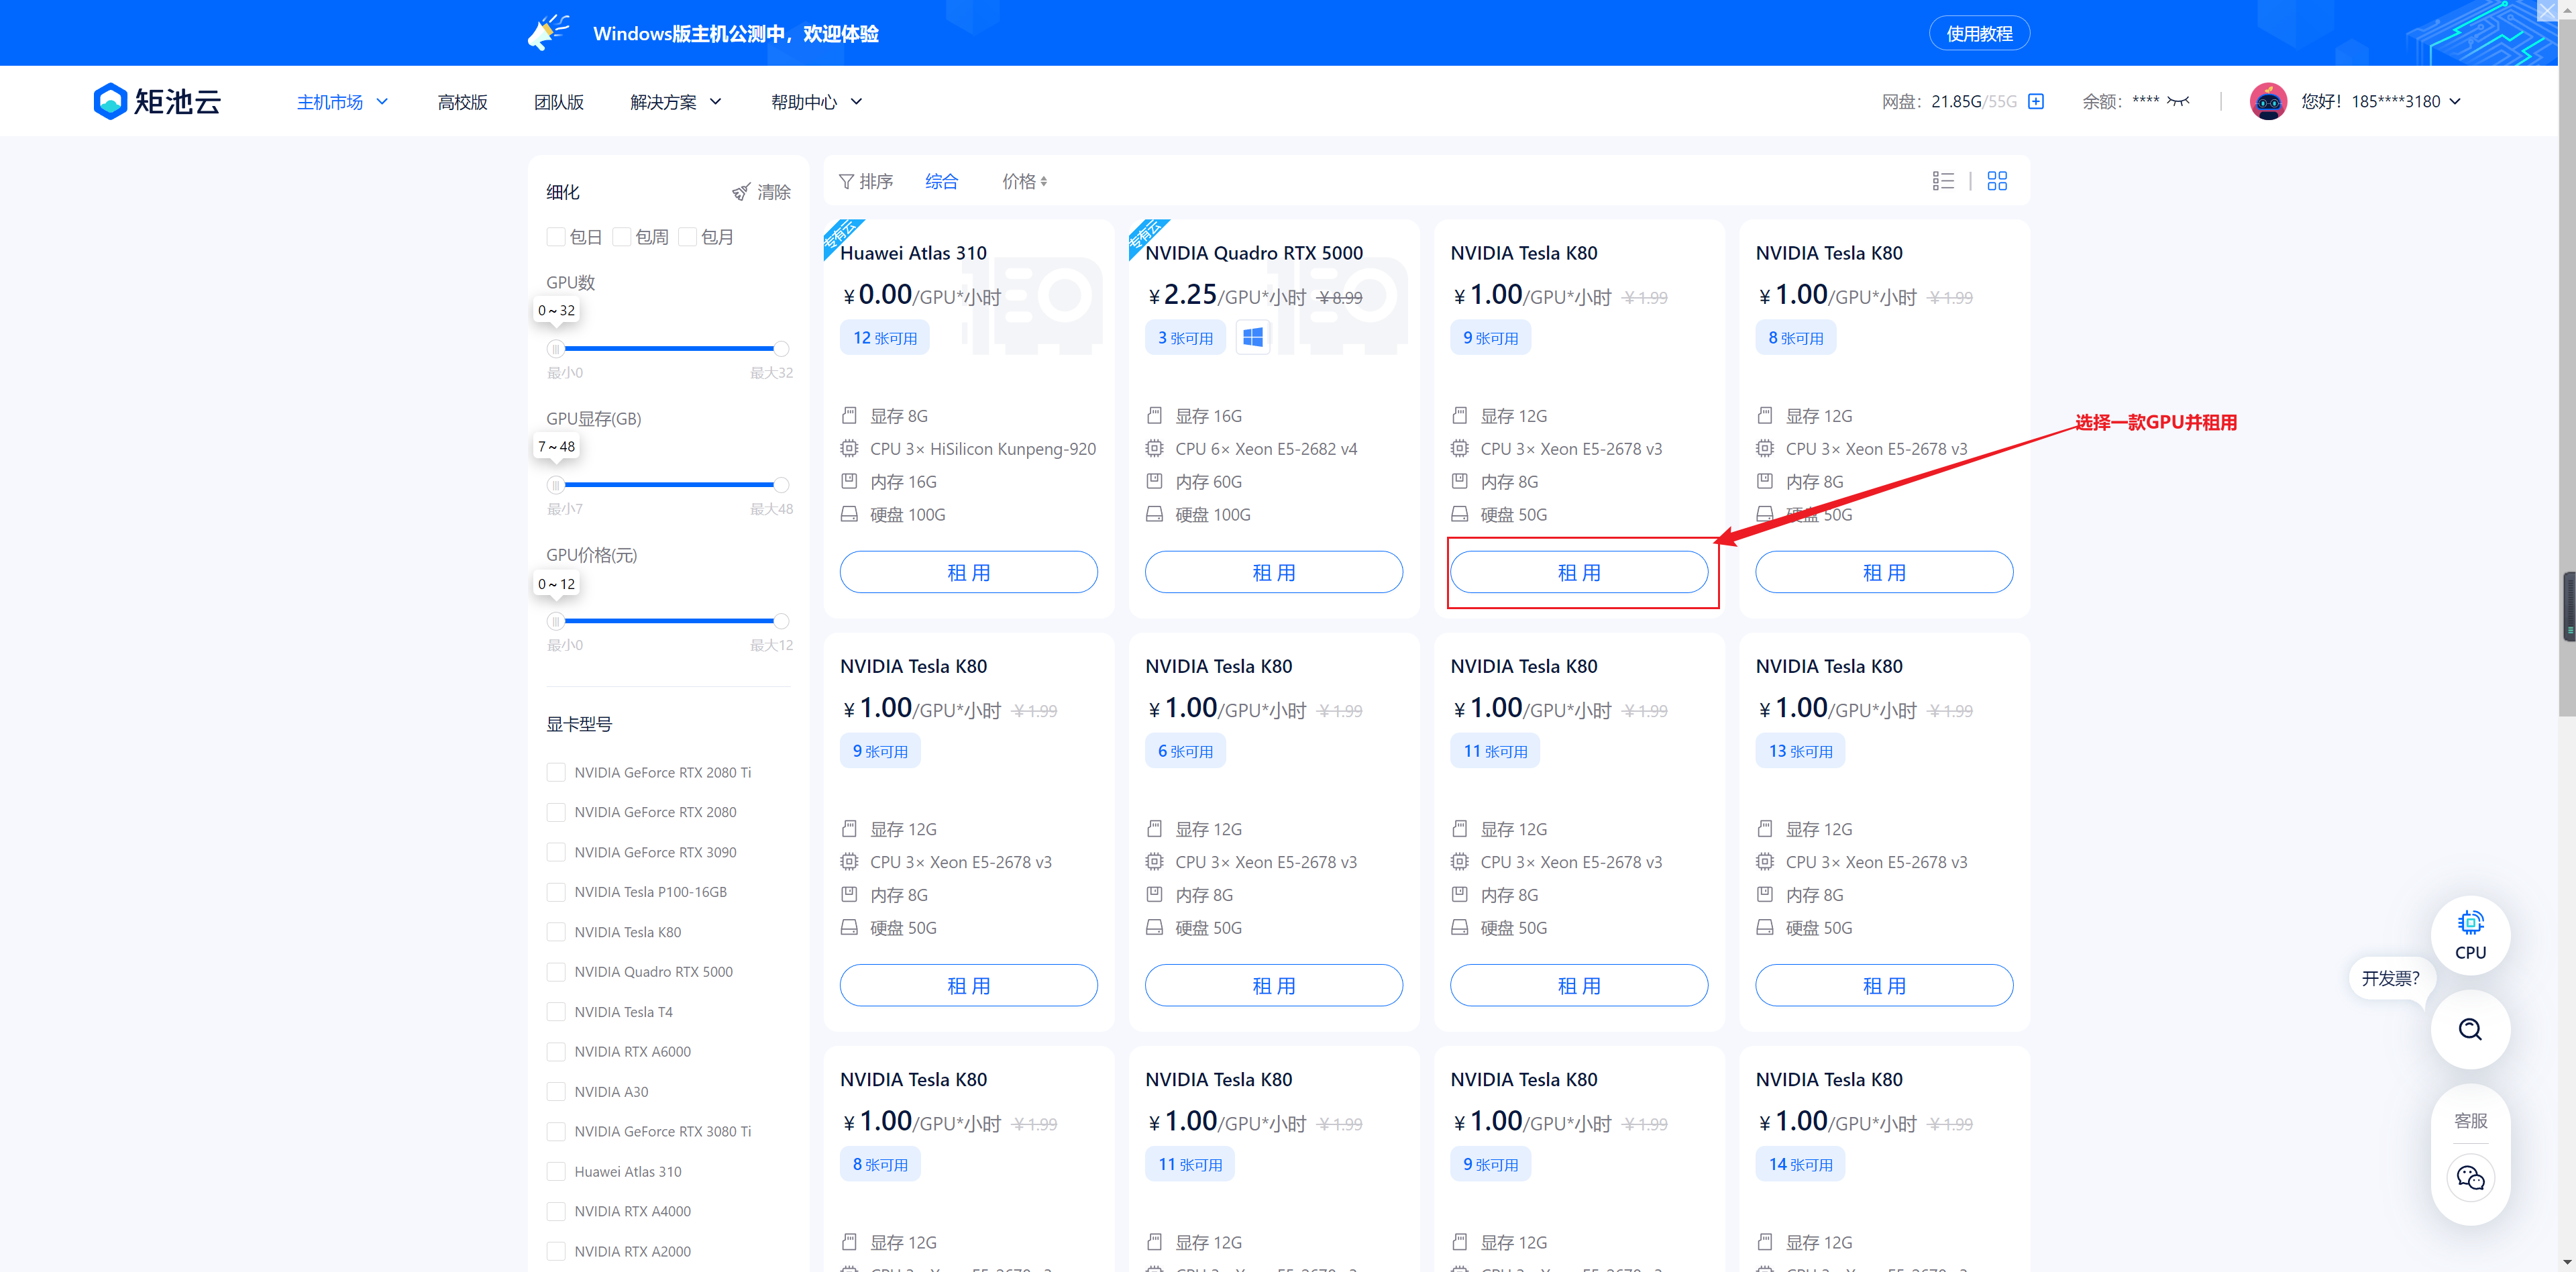
1、打开矩池云官网,进入主机市场,找到合适的机器

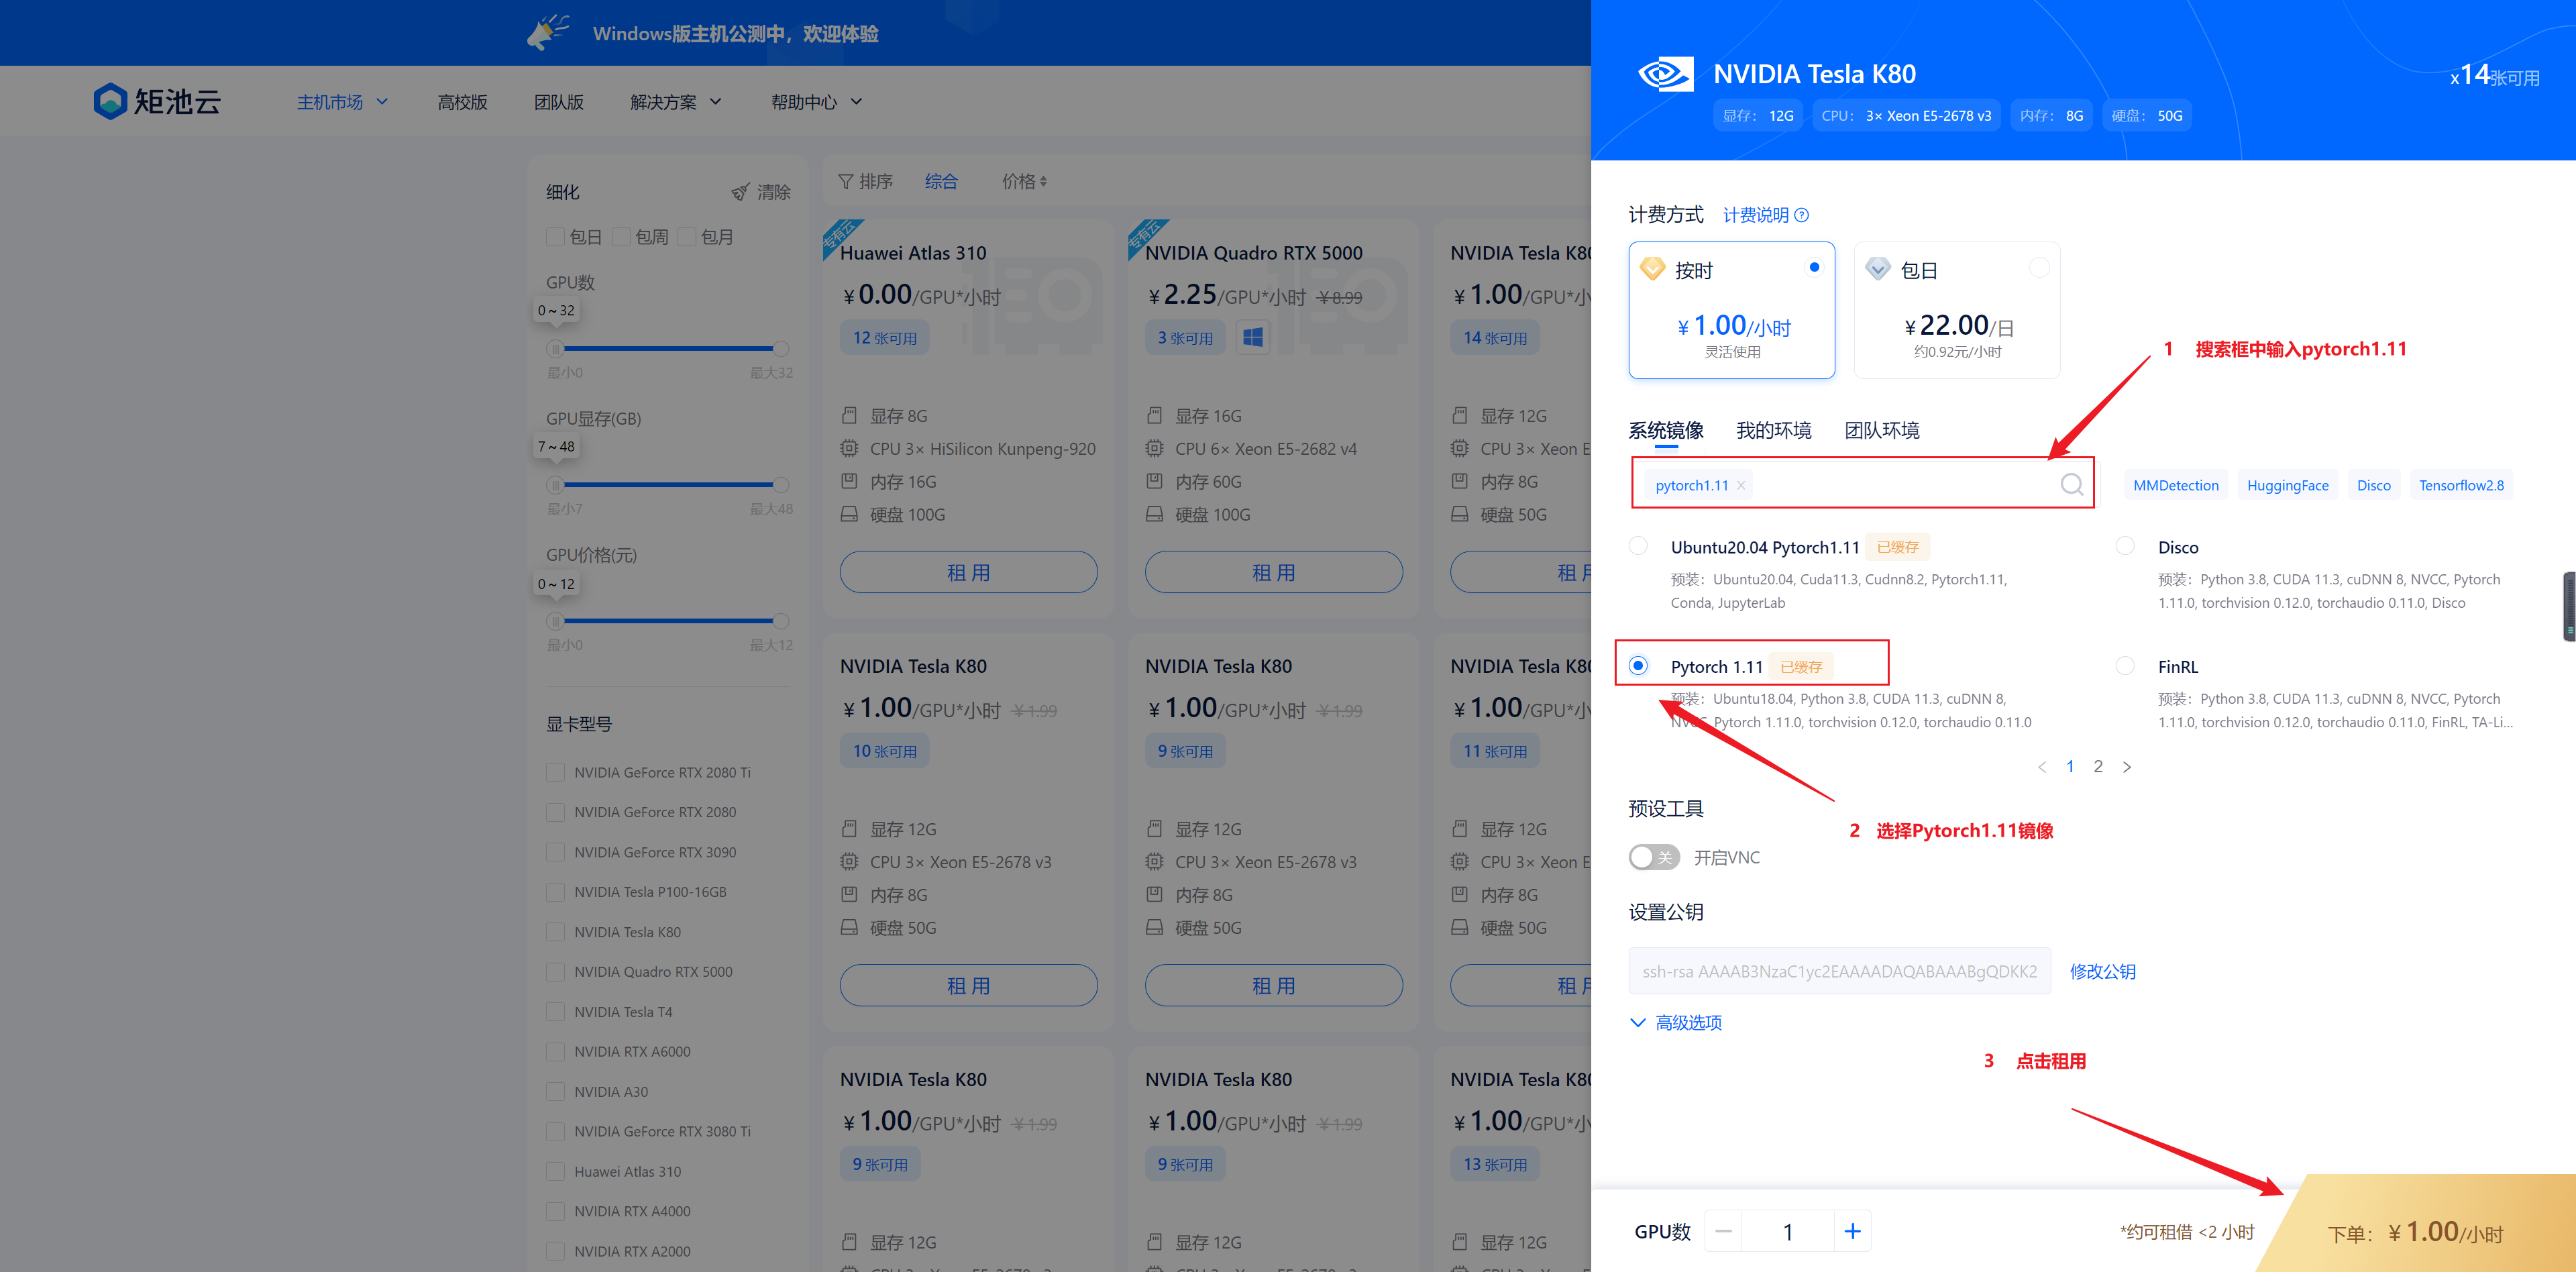
等待机器启动,启动完成界面如下,点击进入 Jupyter Notebook
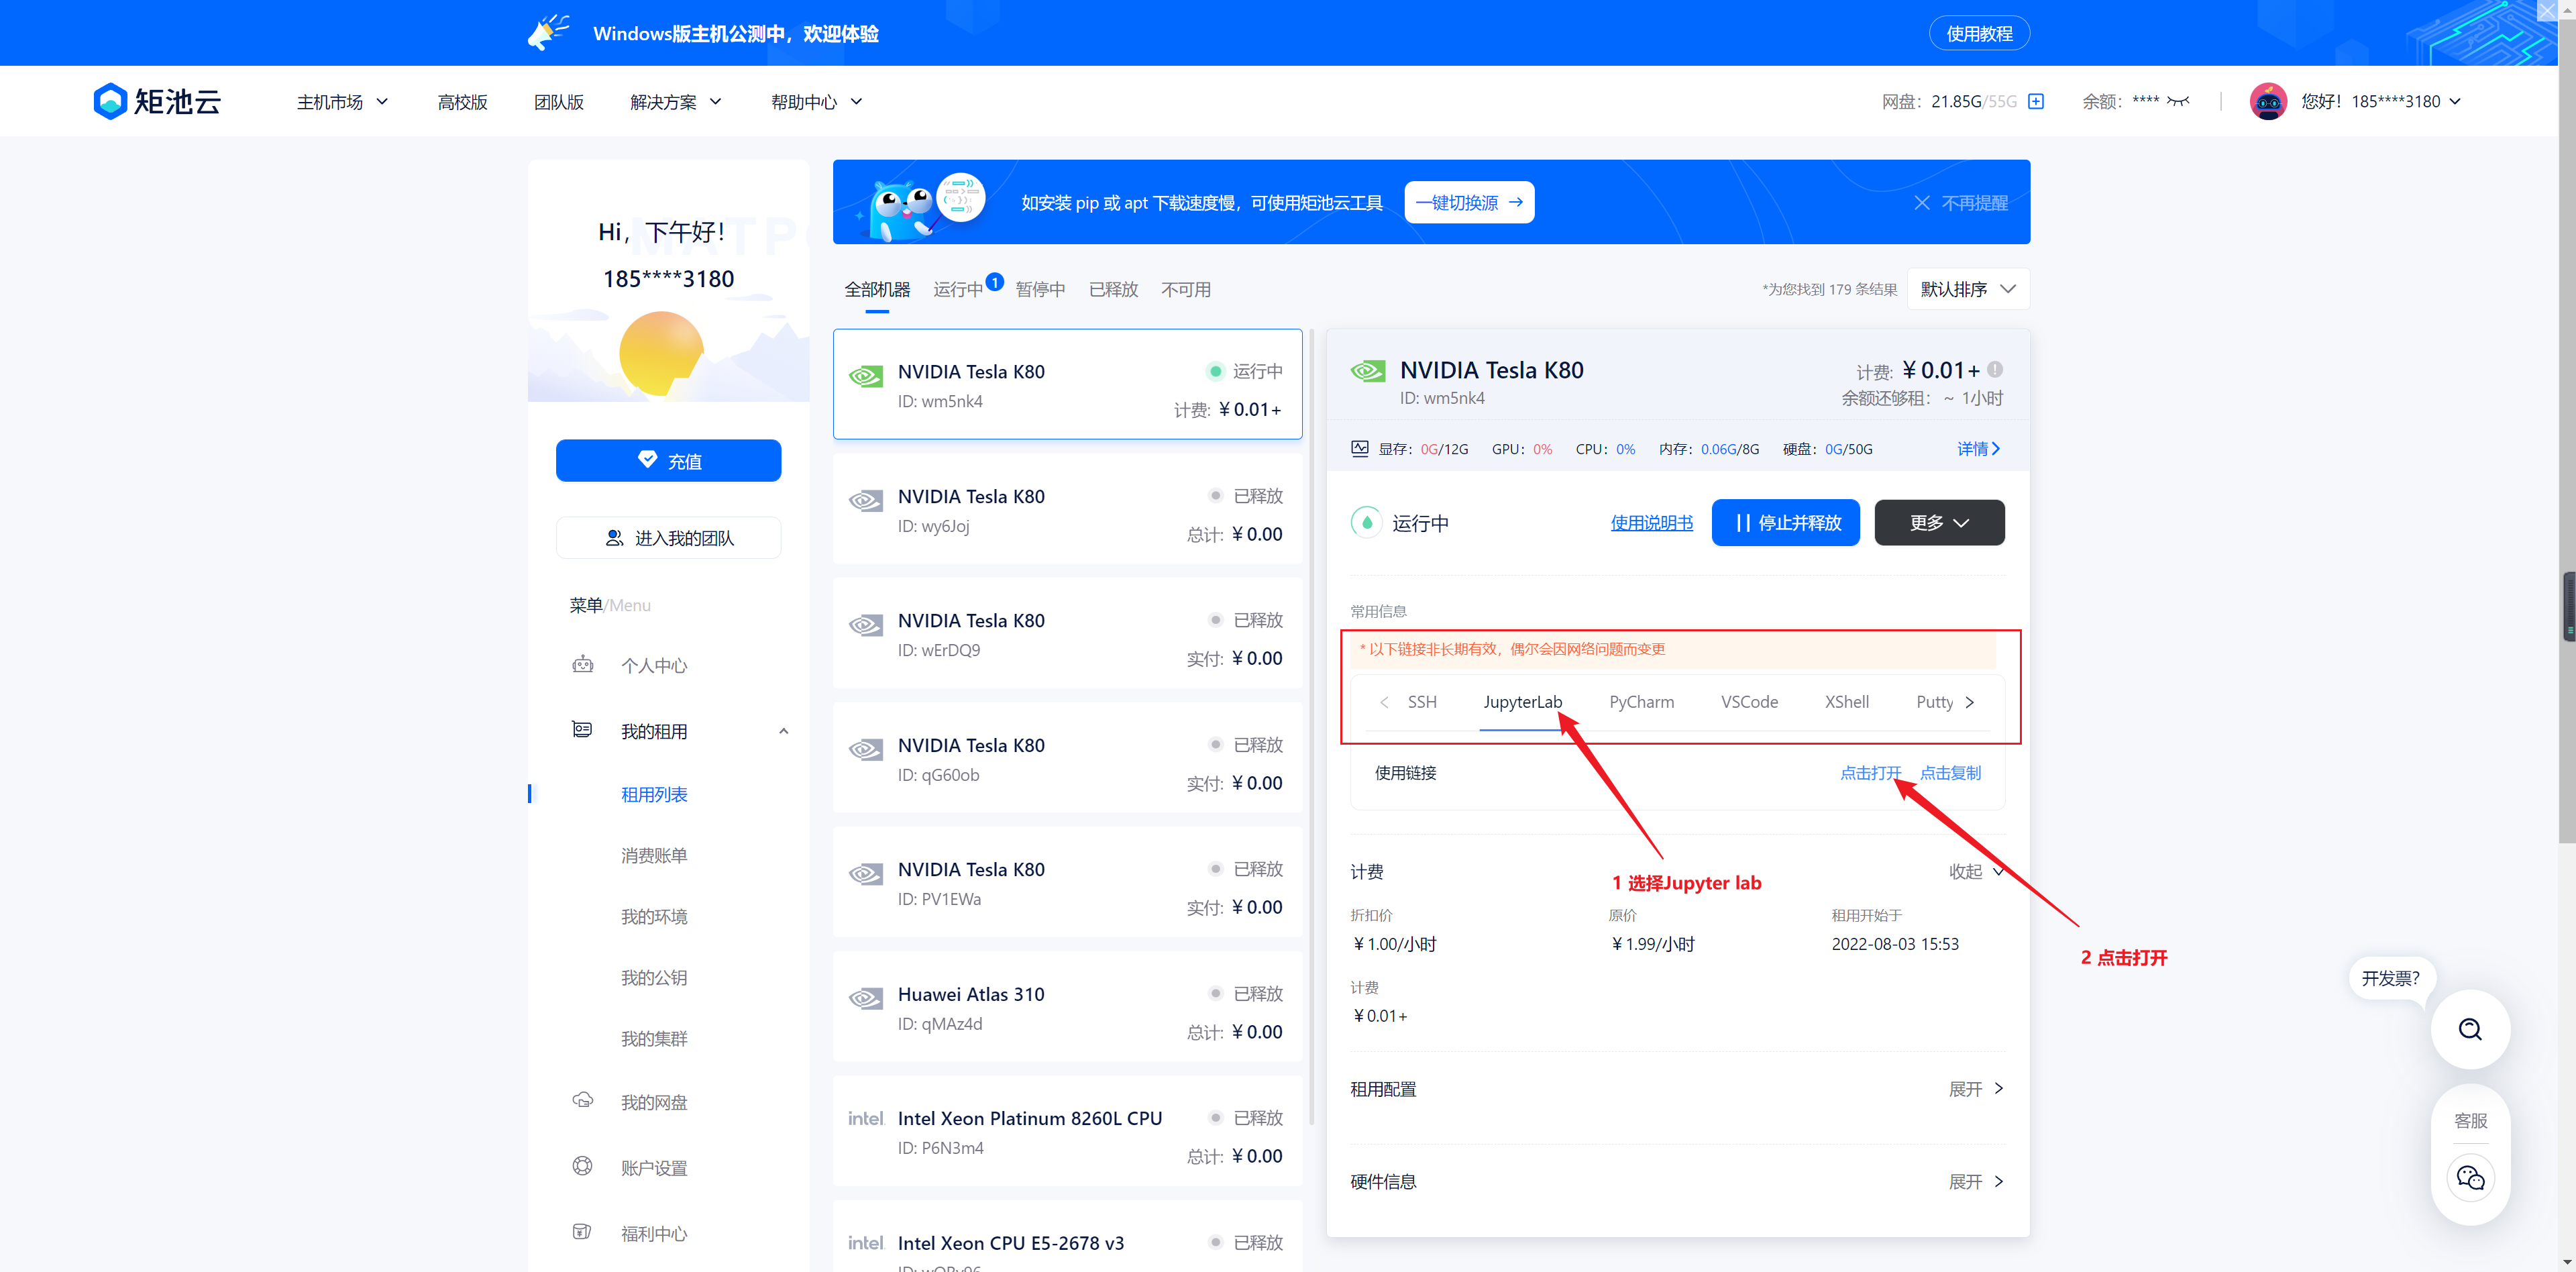
2、进入命令行,进行代码下载与安装
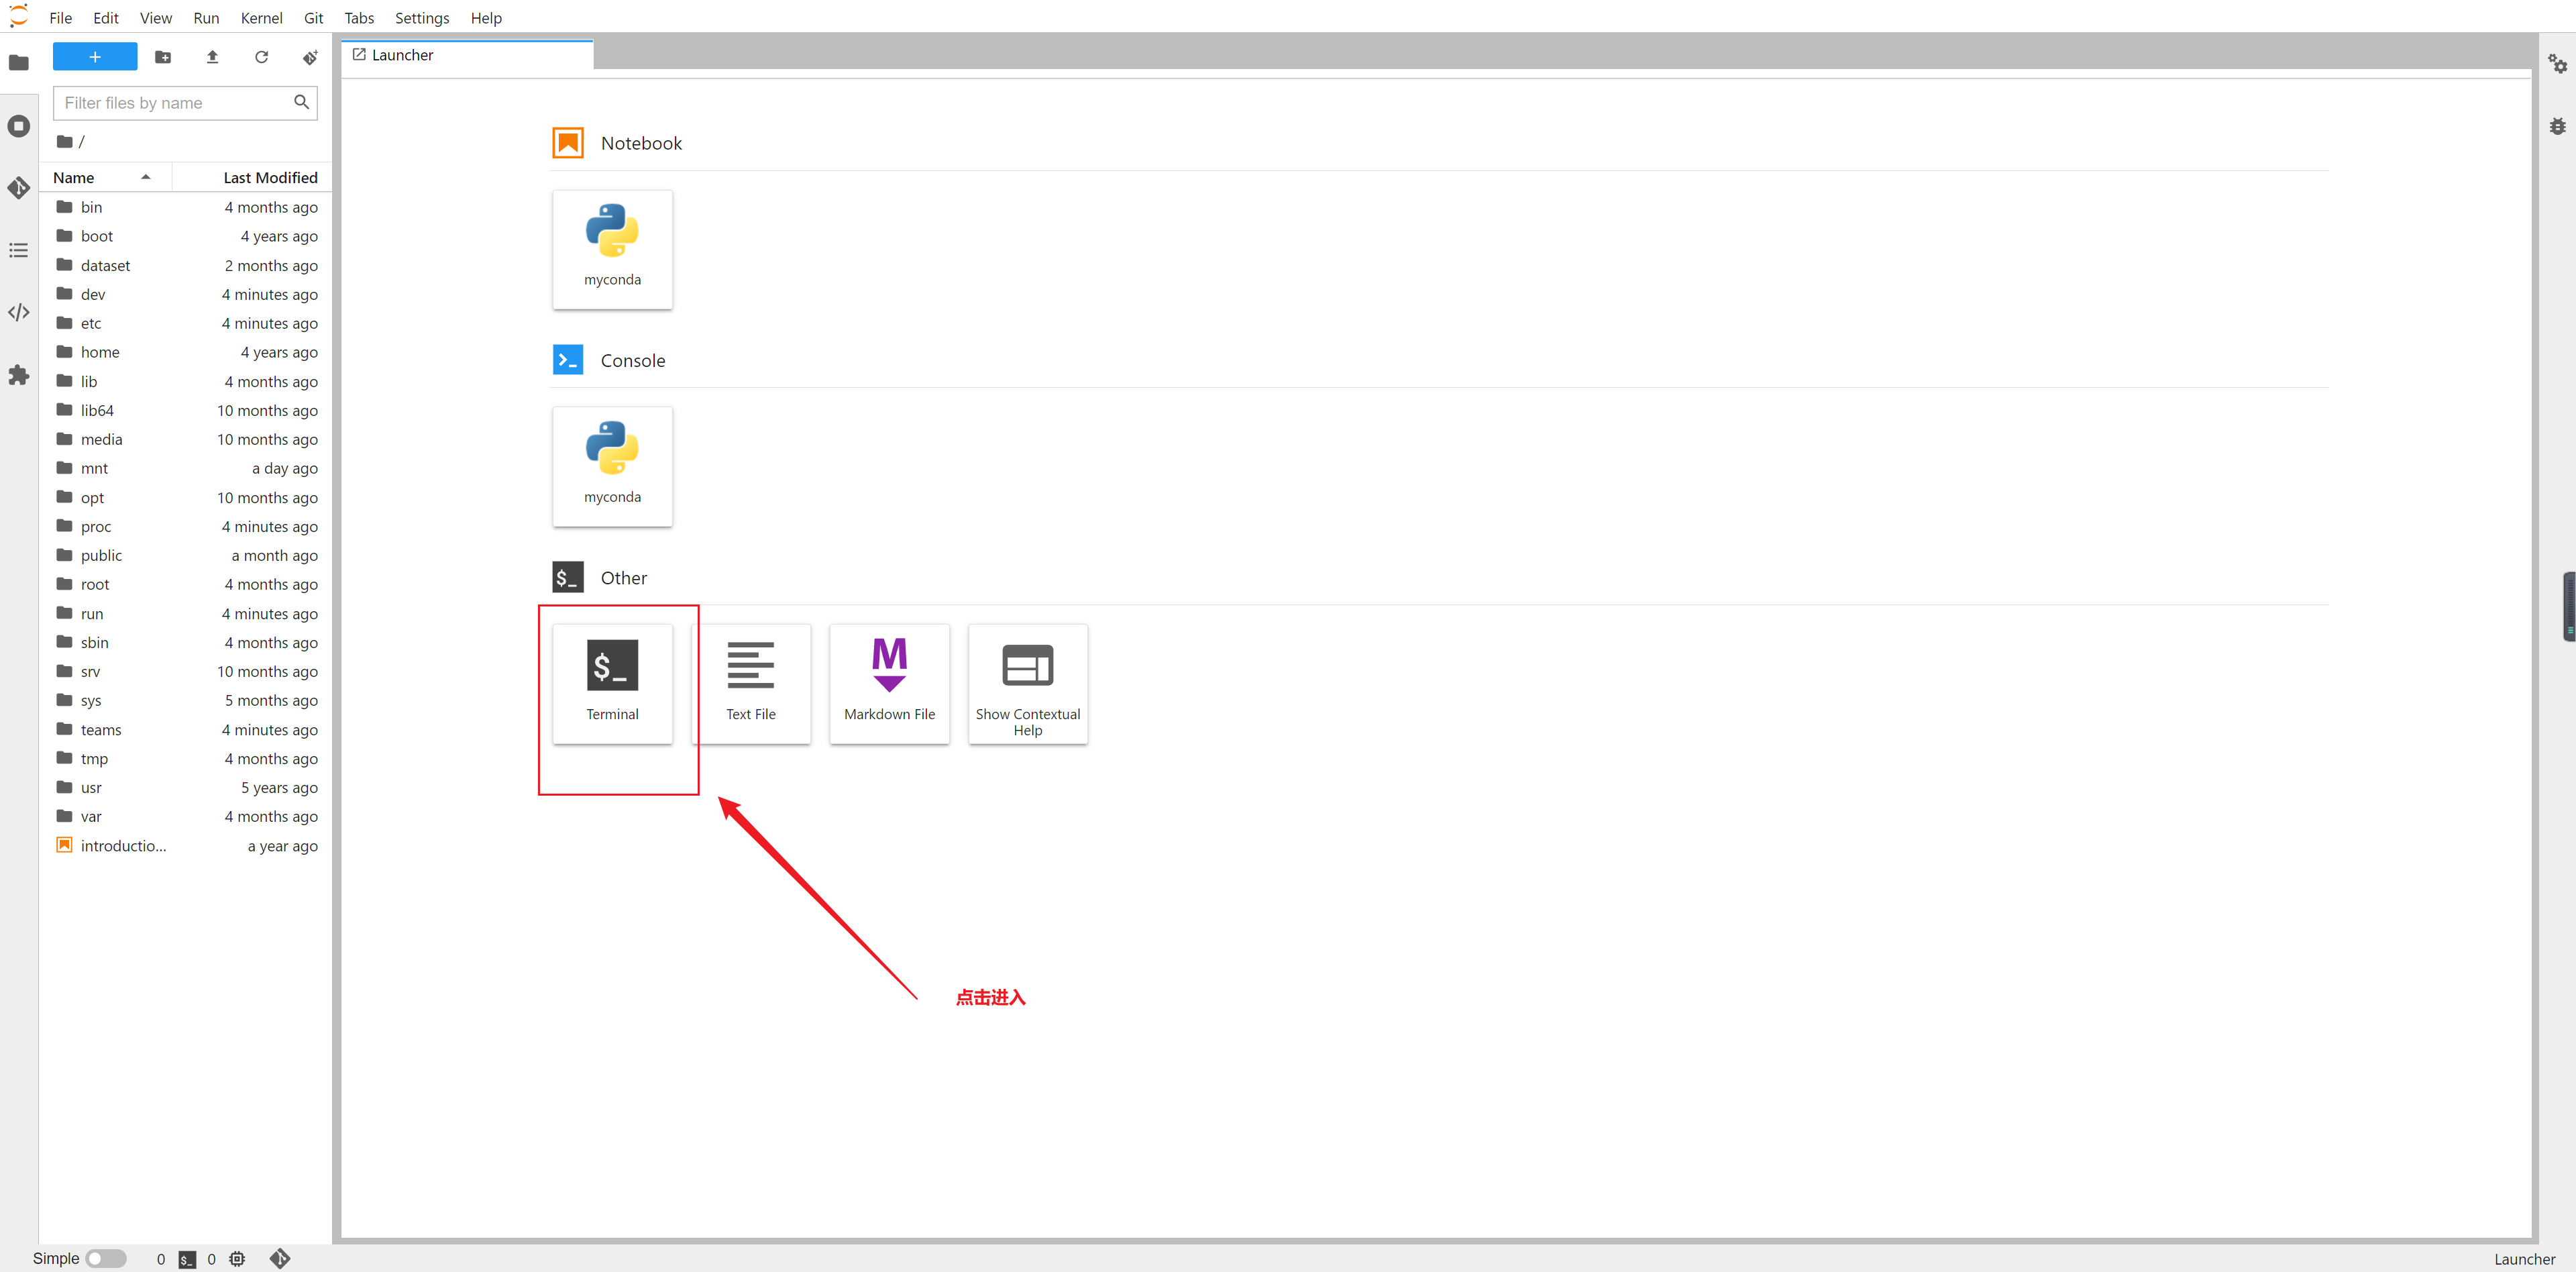
依次输入以下命令
cd /mnt

git clone https://hub.fastgit.xyz/ethanweber/sitcoms3D.git
如果下载慢可以用进入 https://hub.fastgit.xyz/ethanweber/sitcoms3D 手动下载后上传
https://github.com/CMUAbstract/cote.git
进入文件夹
cd sitcoms3D/
安装依赖
pip install -r requirements.txt

pip install tqdm
解压数据
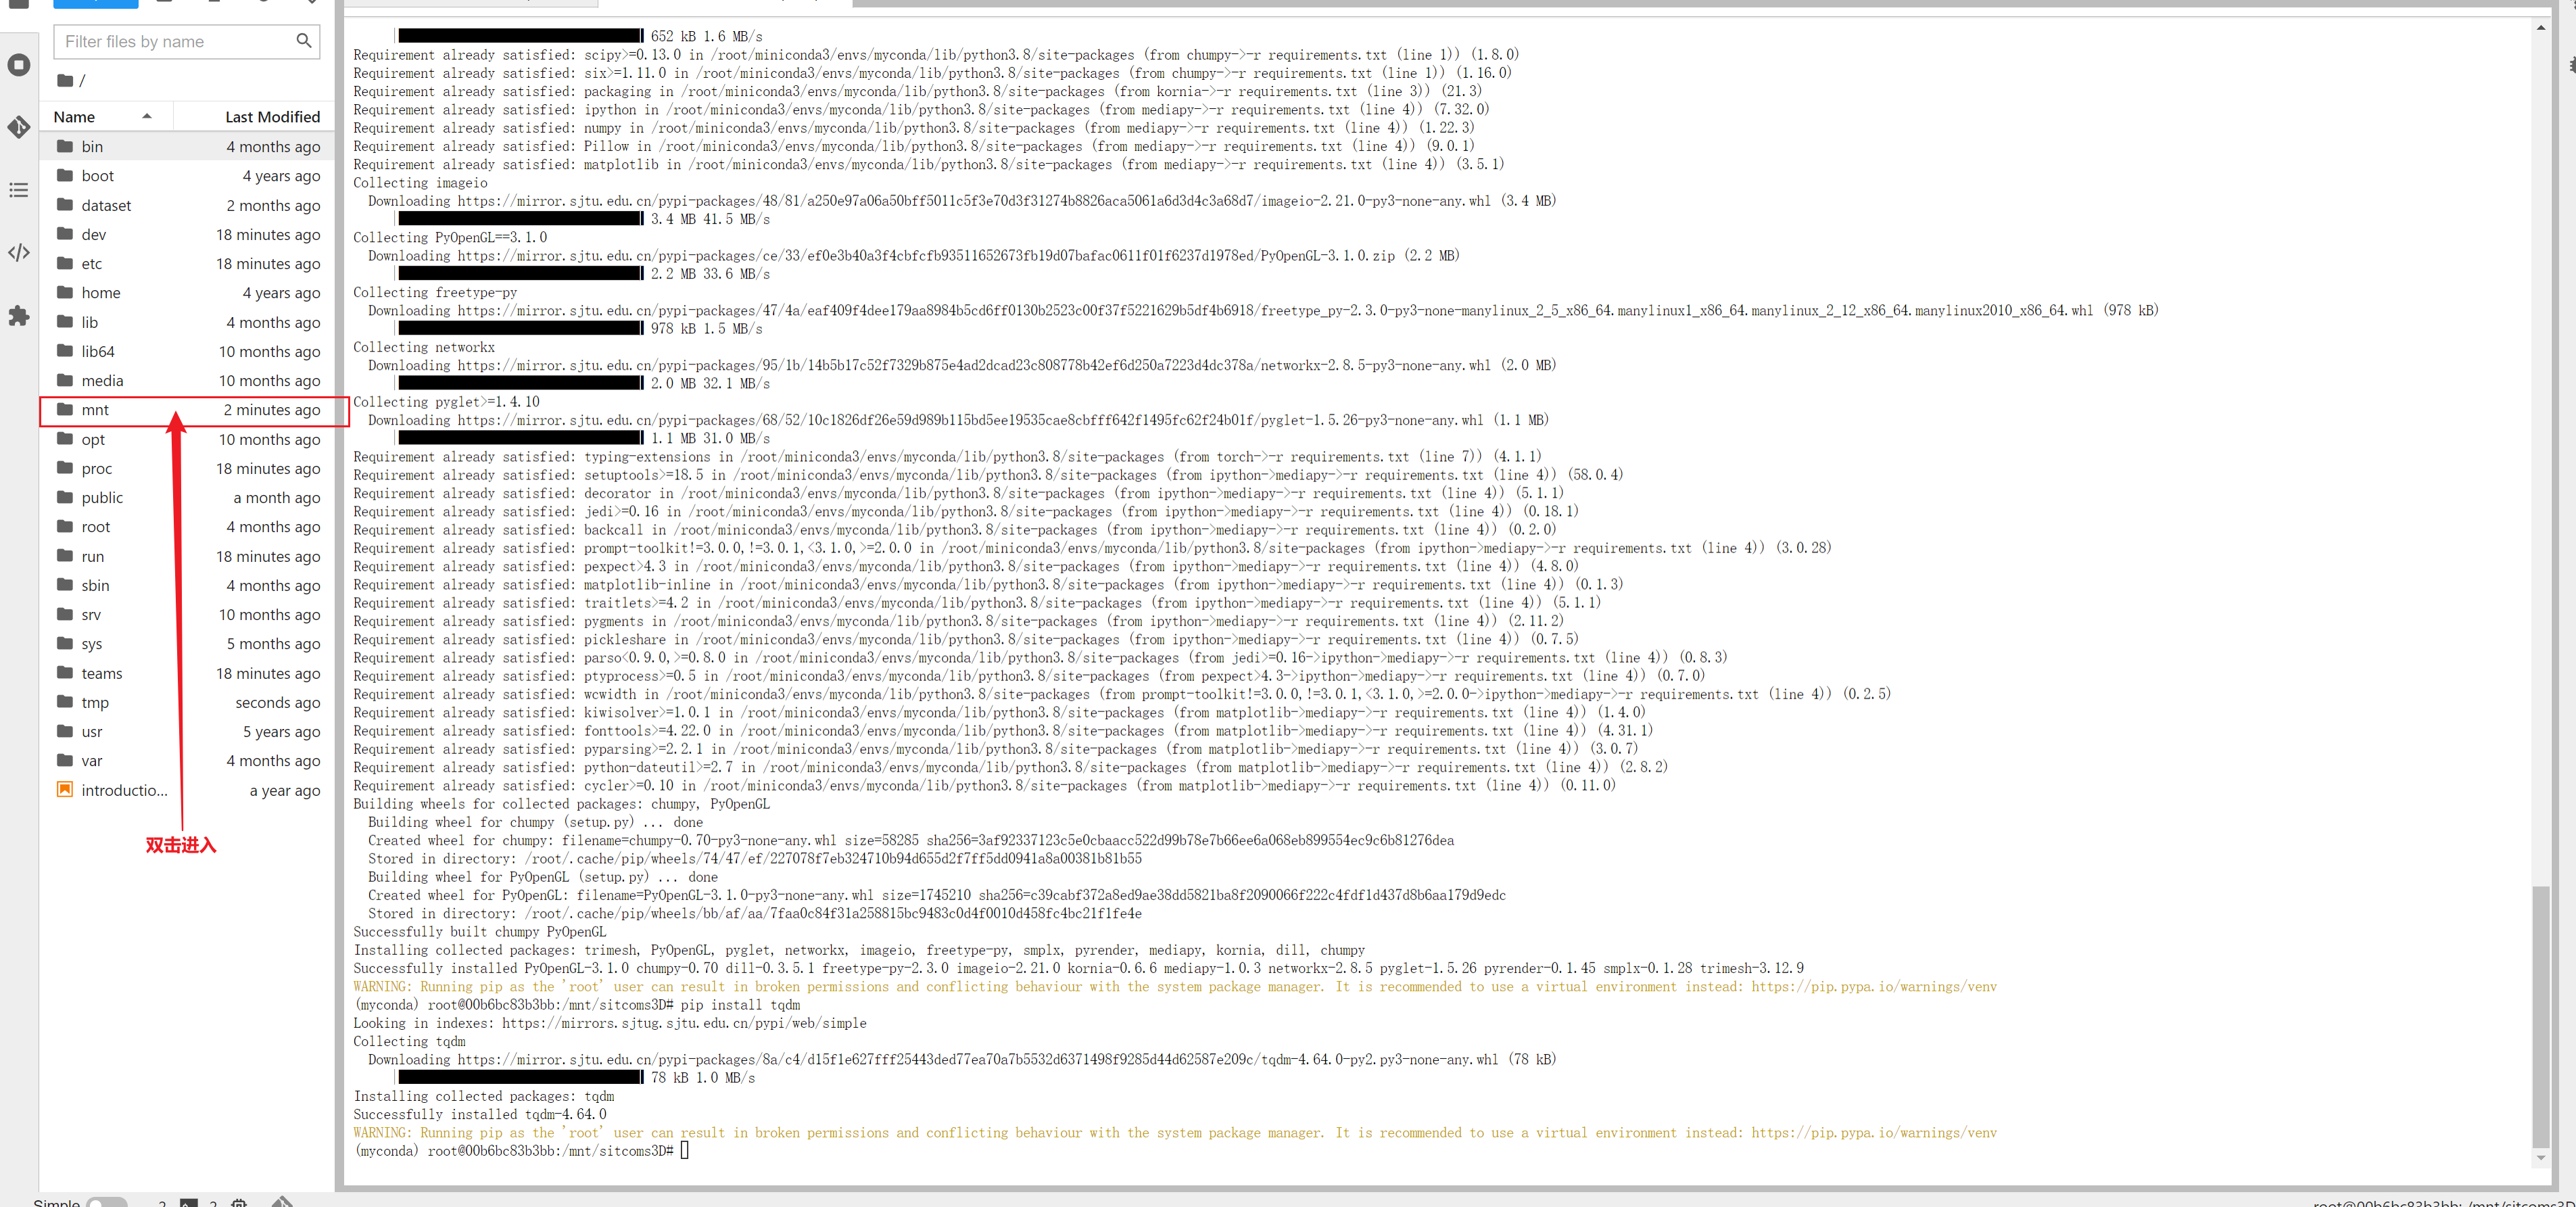
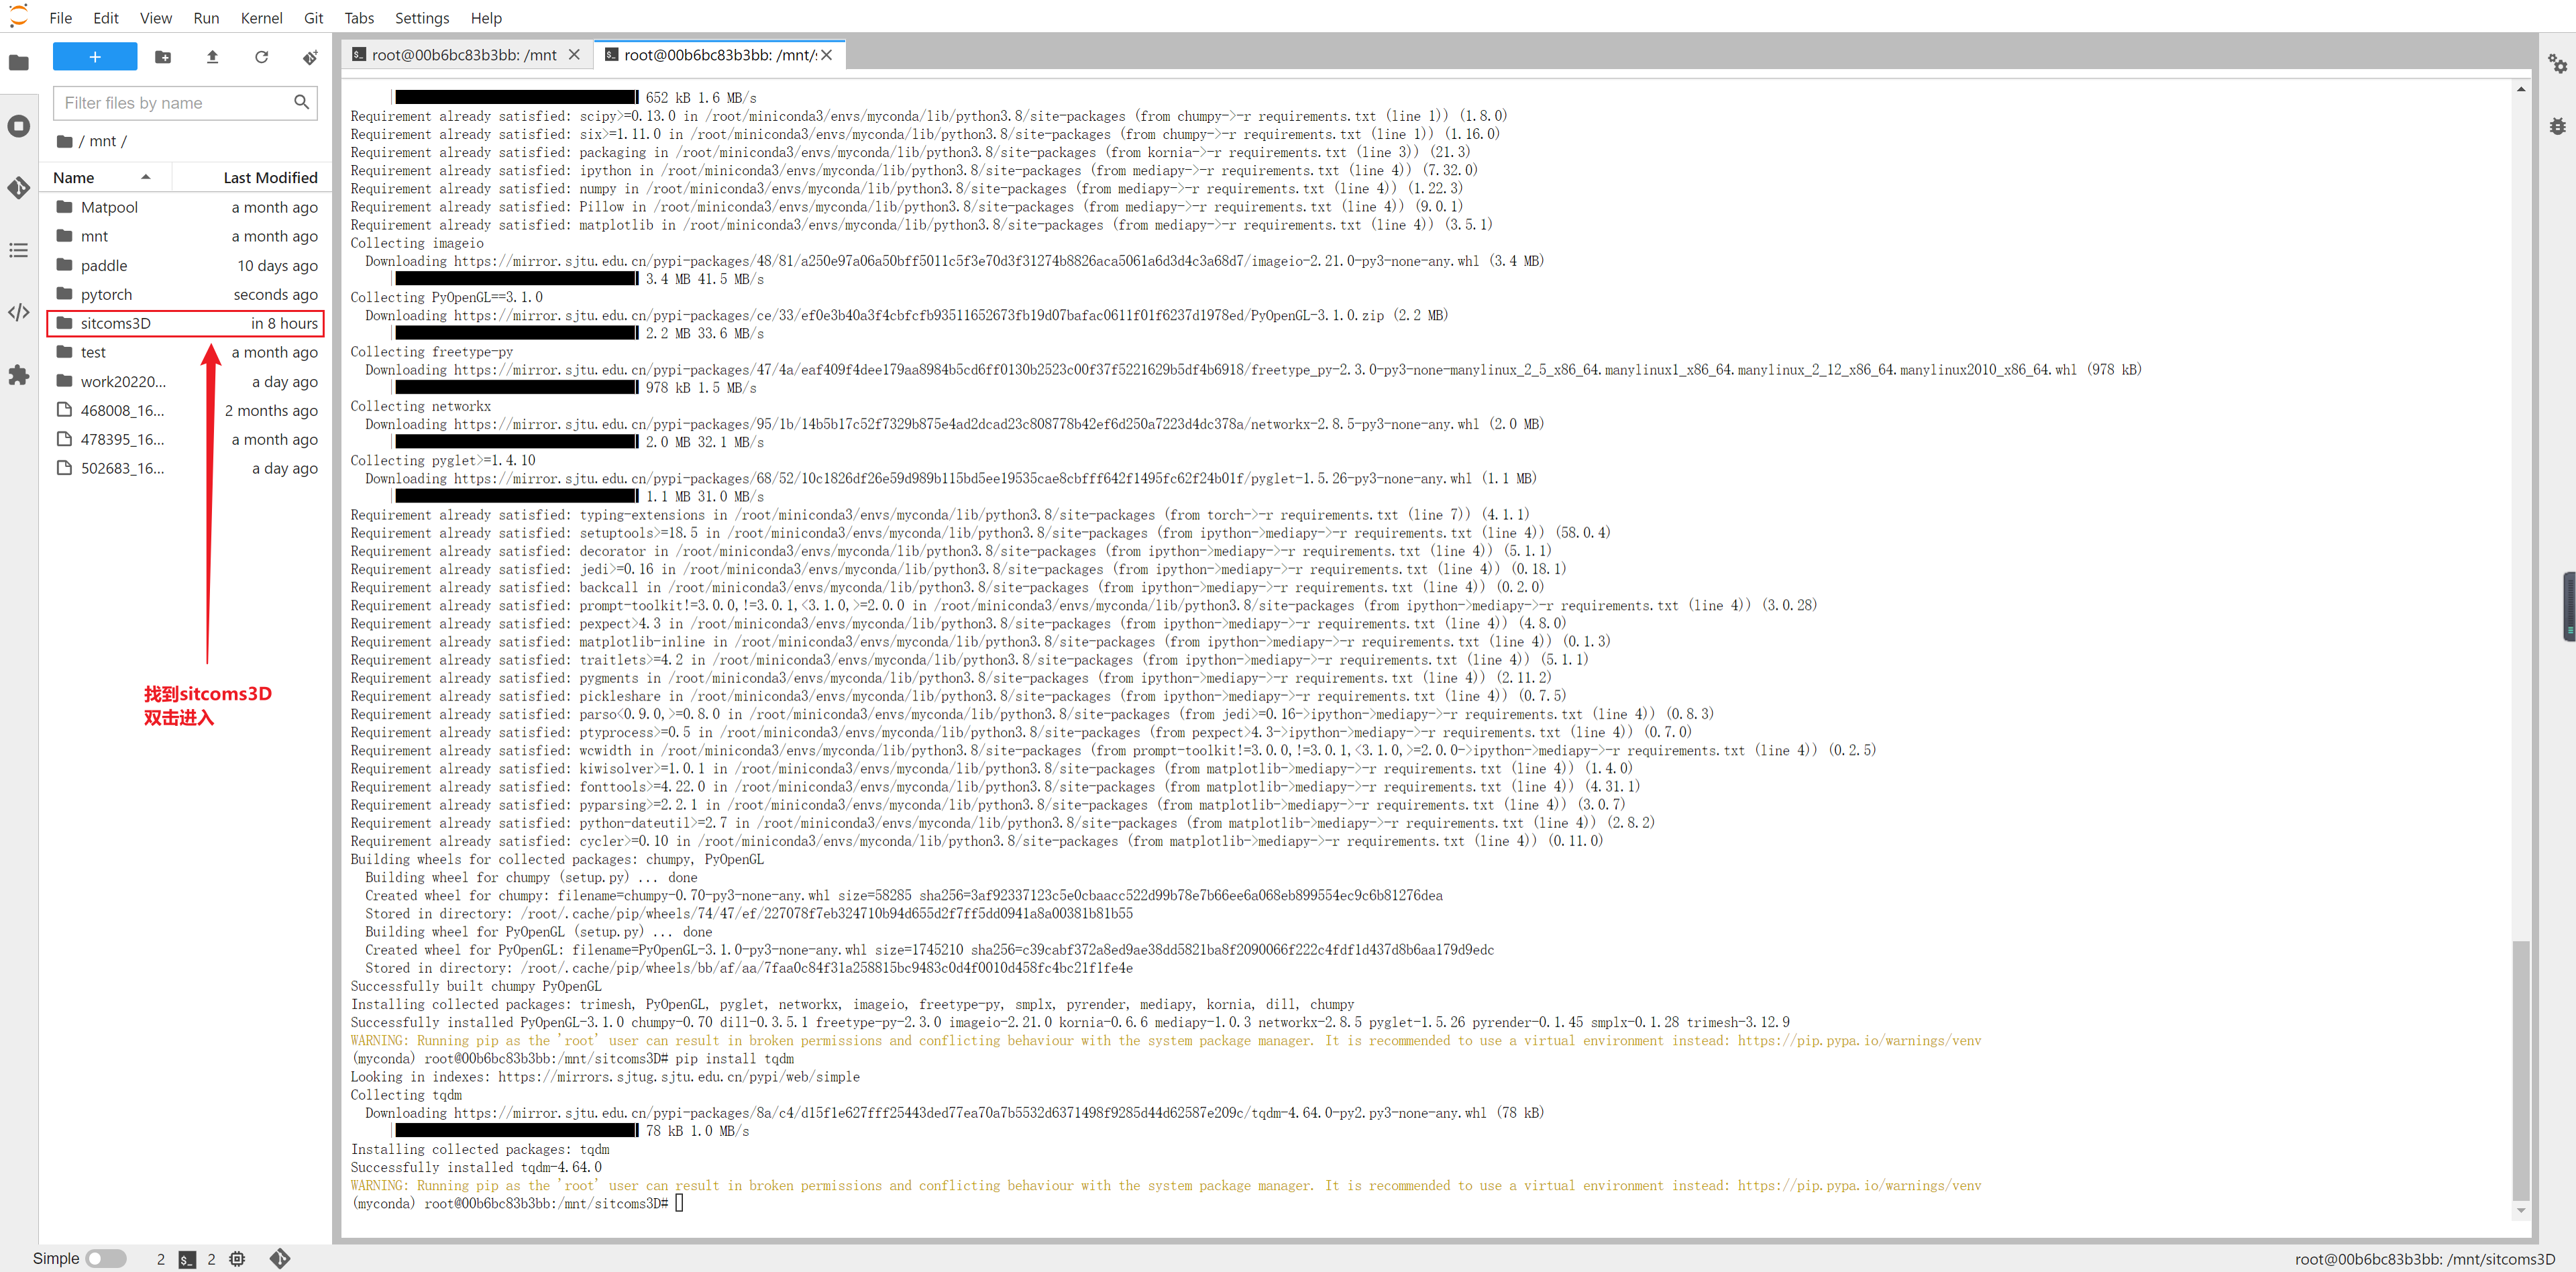
矩池云已经为大家准备好了 sitcoms3D 数据,大家直接将 /public/data/image/sitcoms3D_data.zip 解压到 sitcoms3D-master 项目文件夹中的 data 下即可
unzip /public/data/videos_and_music/sitcoms3D_data.zip -d /mnt/sitcoms3D/data
3、进入Jupyter notebook
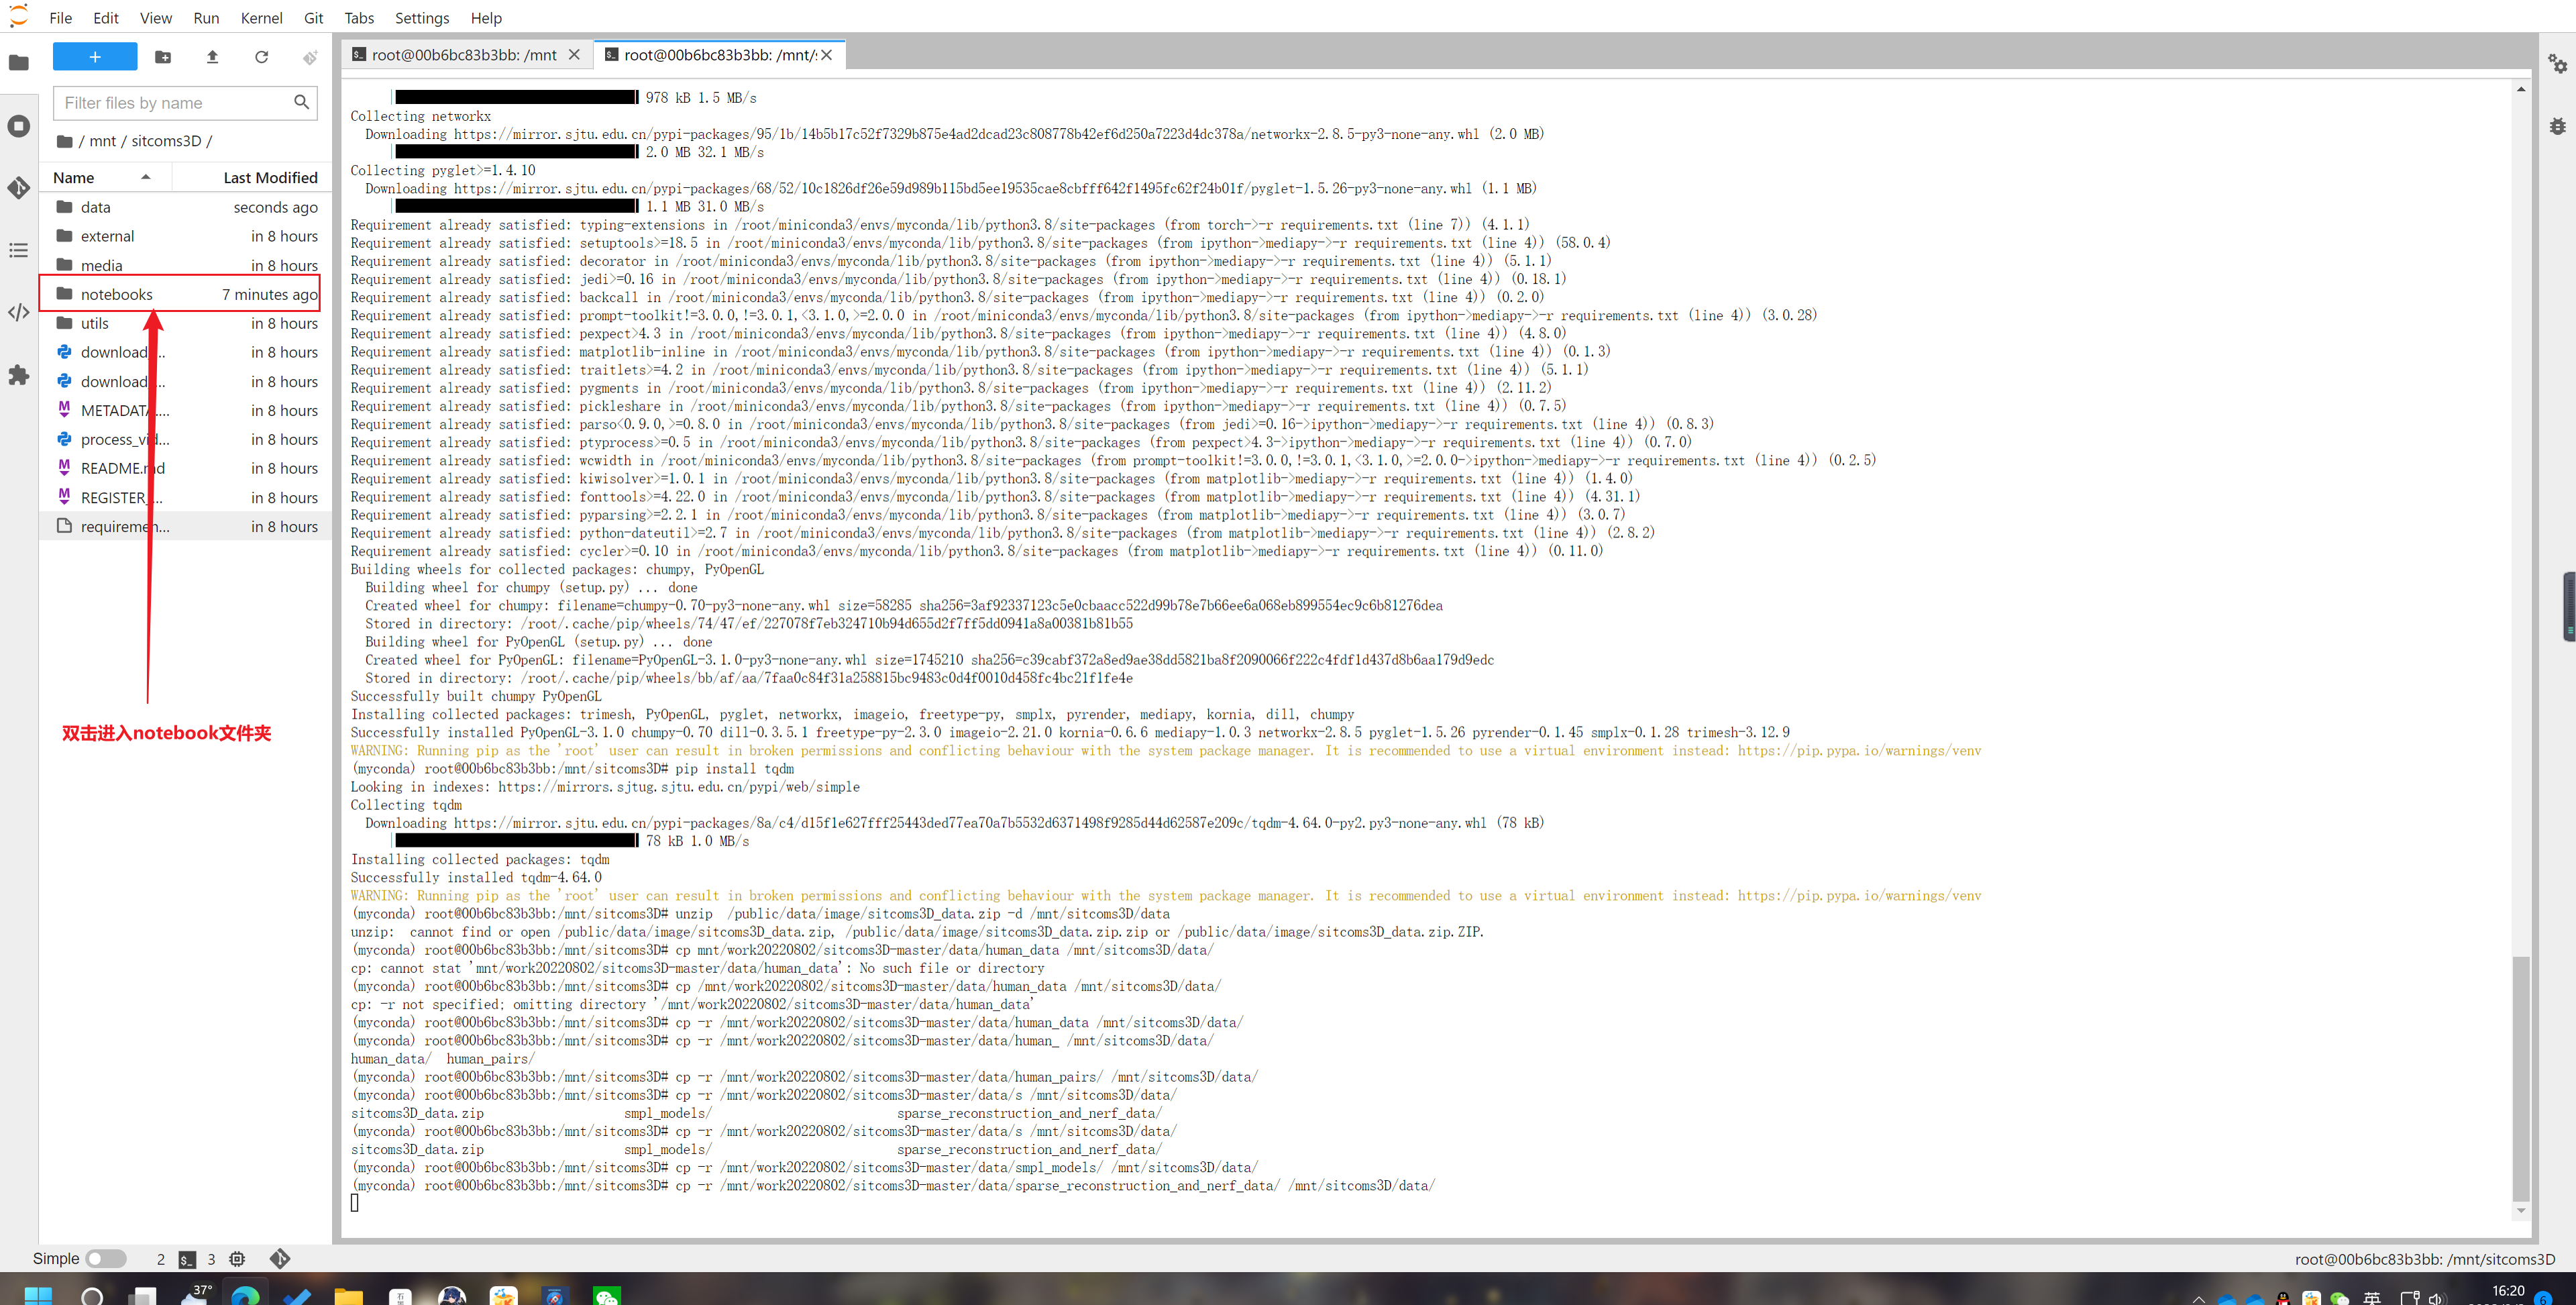
打开demo,在Jupyter中“Run all cell”即可运行官方的例程。
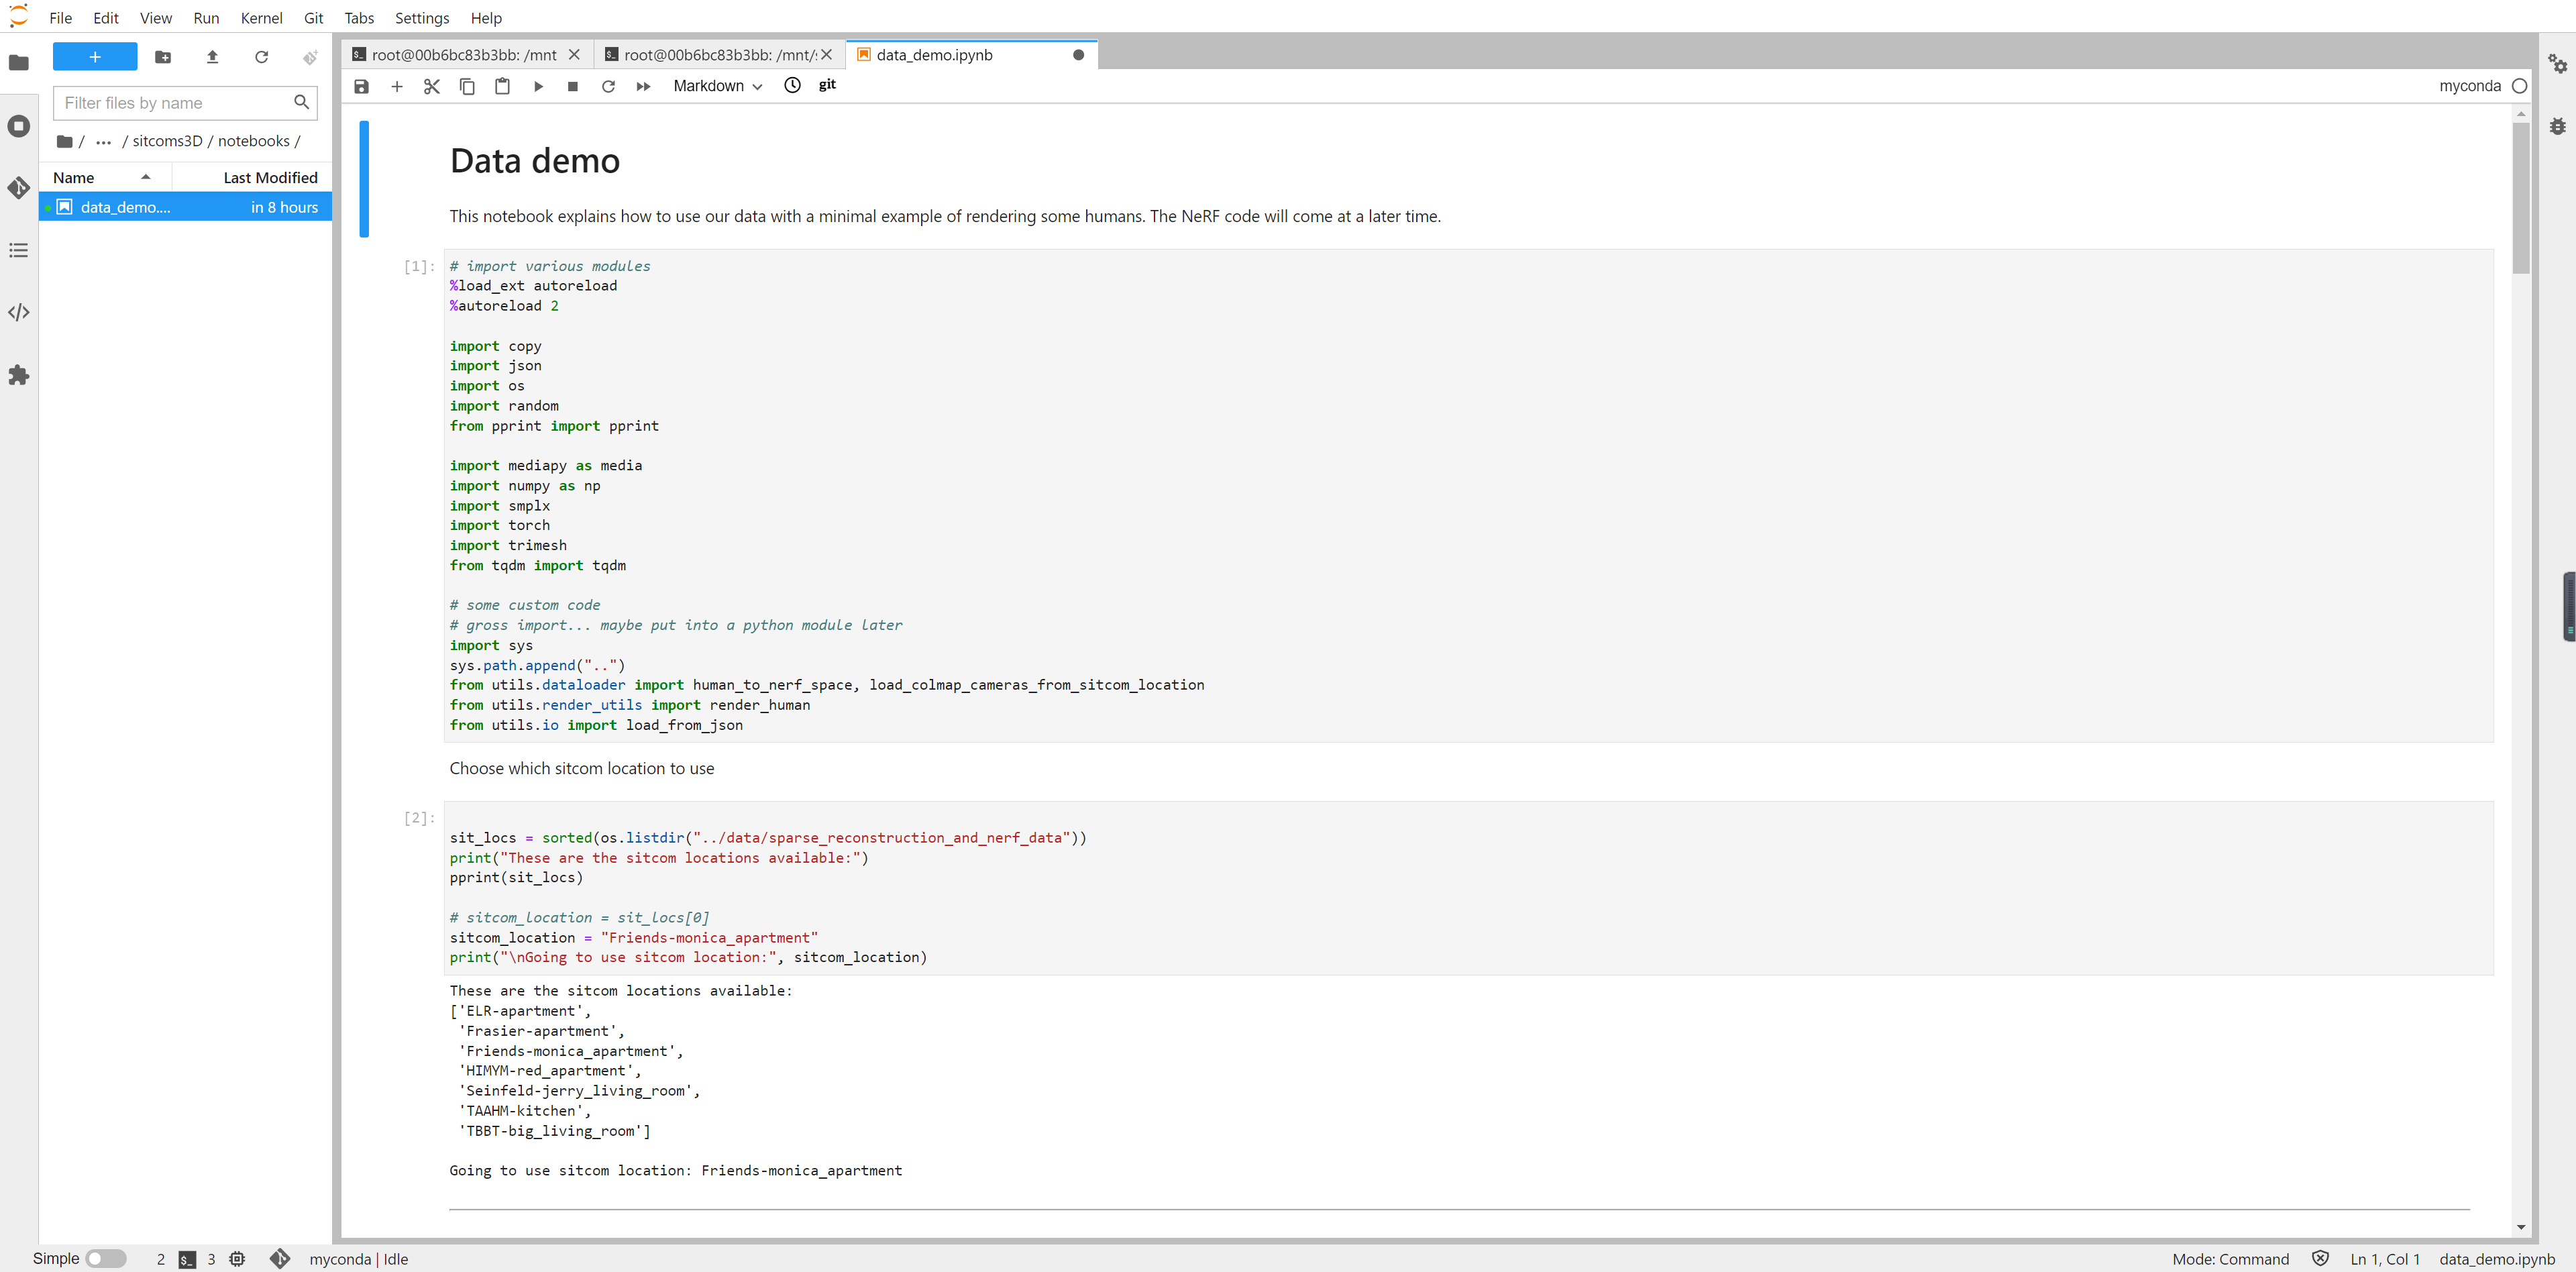
4、调整版代码
官方 Demo 码有演示性质,直接运行有可能一些变量会受到干扰,因此我们对代码进行了一定的精简,可以根据需要用以下方式进一步进行使用。
这一模型导入的数据文件有以下七个目录,应该是不同的数据,比如默认的sitcom_location = "Friends-monica_apartment" 表示从老友记里面选取数据
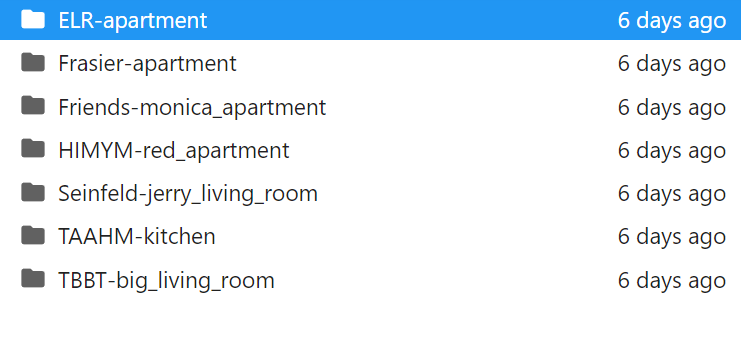
在第2个cell中更改sitcom_location 可以改变数据。
sitcom_location = sit_locs[0]

# sitcom_location = "Friends-monica_apartment"
下一步为是选择图像,原文中使用了romdom随机选择一个图像,我们可以加一行代码来指定自己的图像。
# choose a random image to work with

image_name = random.choice(list(nerf_image_name_to_info.keys()))

image_name = "ELR_S09E01_00007186.jpg"

print("Showing camera information for image:", image_name)

pprint(nerf_image_name_to_info[image_name])
更改后的代码如下:在不指定图像的情况下,每次run all cell 即可随机抽取图像。
# import various modules

%load_ext autoreload

%autoreload 2

import copy

import json

import os

import random

from pprint import pprint

import mediapy as media

import numpy as np

import smplx

import torch

import trimesh

from tqdm import tqdm

# some custom code

# gross import... maybe put into a python module later

import sys

sys.path.append("..")

from utils.dataloader import human_to_nerf_space, load_colmap_cameras_from_sitcom_location

from utils.render_utils import render_human

from utils.io import load_from_json
这一段定位了数据的路径并抽取出图像
sit_locs = sorted(os.listdir("../data/sparse_reconstruction_and_nerf_data"))

print(sit_locs)

sitcom_location = sit_locs[3]

print("load.....",sitcom_location)

cameras = load_from_json(f"../data/sparse_reconstruction_and_nerf_data/{sitcom_location}/cameras.json")

nerf_image_name_to_info = {}

for dict_ in cameras["frames"]:

    nerf_image_name_to_info[dict_["image_name"]] = {

        "intrinsics": np.array(dict_["intrinsics"]),

        "camtoworld": np.array(dict_["camtoworld"]),

    }

image_name = random.choice(list(nerf_image_name_to_info.keys()))

print("image name: ", image_name)

basedir = f"../data/sparse_reconstruction_and_nerf_data/{sitcom_location}"

colmap_image_name_to_info = load_colmap_cameras_from_sitcom_location(basedir)

point_cloud_transform = np.array(cameras["point_cloud_transform"])

scale_factor = np.array(cameras["scale_factor"])

# colmap_rescale = float(smpl_data["colmap_rescale"])
根据抽取的图像读取其中的人物数据
# the set of image names that we used for nerf

# these images are included in the sparse_reconstruction_and_nerf_data/ folder

nerf_image_names = set(nerf_image_name_to_info.keys())

# the set of image names that we have smpl parameters for

# this is wherever our method "calibrated multi-shot" was run

human_pairs = load_from_json(f"../data/human_pairs/{sitcom_location}.json")

image_name_to_shot_change_image_name = {}

calibrated_multishot_image_names = set()

for image_name_a, human_idx_a, image_name_b, human_idx_b in human_pairs:

    calibrated_multishot_image_names.add(image_name_a)

    calibrated_multishot_image_names.add(image_name_b)

    image_name_to_shot_change_image_name[image_name_a] = image_name_b

    image_name_to_shot_change_image_name[image_name_b] = image_name_a

image_names = nerf_image_names.intersection(calibrated_multishot_image_names)

print("Found {} images that are used for nerf and contain smpl parameters".format(len(image_names)))

# choose a random image name to work with and visualize

# image_name = random.choice(list(image_names))

# image_name = "Friends_S08E20_00001431.jpg"

# read data for the image and a human...

human_data = load_from_json(f"../data/human_data/{sitcom_location}.json")

image_human_data = human_data[image_name]

print("going to visualize image {} with {} humans".format(image_name, len(image_human_data)))
显示读取的图片
image = media.read_image(f"../data/sparse_reconstruction_and_nerf_data/{sitcom_location}/images/{image_name}")

media.show_image(image, height=200)
导入SMPL模型
model_folder = "../data/smpl_models"

model_type = "smpl"

gender = "neutral"

body_model = smplx.create(model_folder,

                     model_type=model_type,

                     gender=gender)
用于将人物数据加载到模型,提取出mesh的函数
def get_human_obj_mesh(image_name: str, human_idx: int):

    if "smpl" not in human_data[image_name][human_idx]:

        print(f"smpl values don't exist for {image_name} and human_idx {human_idx}")

        return None

    smpl_data = human_data[image_name][human_idx]["smpl"]

    print(smpl_data.keys())

    camera_translation = torch.tensor(smpl_data["camera_translation"])[None]

    betas = torch.tensor(smpl_data["betas"])[None]

    global_orient = torch.tensor(smpl_data["global_orient"])[None]

    body_pose = torch.tensor(smpl_data["body_pose"])[None]

    colmap_rescale = float(smpl_data["colmap_rescale"])

    output = body_model(

        betas=betas,

        global_orient=global_orient,

        body_pose=body_pose,

        return_verts=True)

    vertices = output.vertices + camera_translation

    pose_colmap = torch.from_numpy(colmap_image_name_to_info[image_name]["camtoworld"]).float()

    pose_colmap[:3,3] *= colmap_rescale

    # homogeneous coordinates

    vertices = torch.cat([vertices, torch.ones_like(vertices[..., 0:1])], dim=-1)

    vertices = vertices @ pose_colmap.T

    vertices = vertices[...,:3]

    out_mesh = trimesh.Trimesh(vertices[0].detach().numpy(), body_model.faces, process=False)

    human_obj_filename = "temp.obj"

    out_mesh.export(human_obj_filename);

    # specify the human to render

    obj_mesh_original = trimesh.load(human_obj_filename, process=False)

    obj_mesh = human_to_nerf_space(obj_mesh_original, point_cloud_transform, scale_factor, colmap_rescale)

    return obj_mesh
应用get_human_obj_mesh函数,获取图像的mesh数据
human_obj_meshes = []

for human_idx in range(len(image_human_data)):

    print("human_idx", human_idx)

    obj_mesh = get_human_obj_mesh(image_name, human_idx)

    if obj_mesh:

        human_obj_meshes.append(obj_mesh)
现实提取出模型的结果
def show_humans(human_obj_meshes, pose, K, image_name):

    image = media.read_image(f"../data/sparse_reconstruction_and_nerf_data/{sitcom_location}/images/{image_name}")

    color_h, depth_h, alpha_h = render_human(human_obj_meshes, pose, K)

    media.show_image(image, height=200, title="Image we use for camera pose and intrinsics")

    media.show_image(color_h, height=200, title="Image of humans rendered from this camera")

    composited = (color_h * alpha_h[...,None] + image * (1 - alpha_h[...,None])).astype("uint8")

    media.show_image(composited, height=200, title="Composited image")

pose = nerf_image_name_to_info[image_name]["camtoworld"]

K = nerf_image_name_to_info[image_name]["intrinsics"]

show_humans(human_obj_meshes, pose, K, image_name) # image_name to read the background image
模型的局限性
当然,Sitcoms 也受到训练模型的的一些局限性,在我们运行的案例中,有相对成功的结果,也有相对混乱的结果。
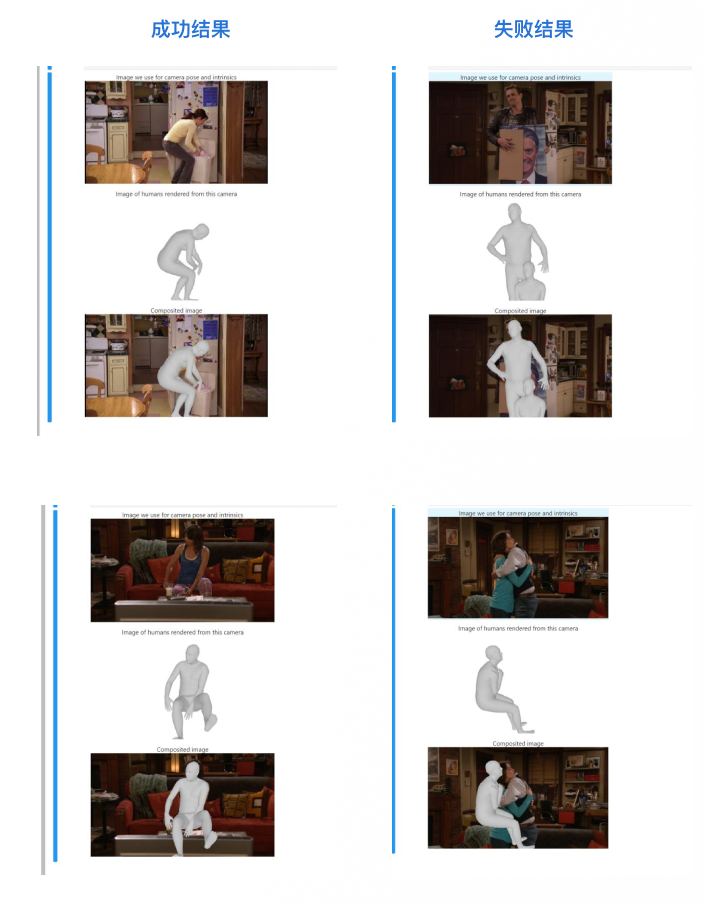
相对失败的图片可以完整地提取出三维信息,但有可能图片仅能显示出画面的一部分人,甚至会将一些物体误判为人物,Sitcom 仍存在一些鲁棒性的问题。
参考资料
论文地址:https://arxiv.org/abs/2207.14279
GitHub地址:https://github.com/ethanweber/sitcoms3D
项目主页:https://ethanweber.me/sitcoms3D/
``
AI 让观众成为 3D 版《老友记》的导演了?的更多相关文章
- Android高级图片滚动控件,编写3D版的图片轮播器
转载请注明出处:http://blog.csdn.net/guolin_blog/article/details/17482089 大家好,好久不见了,最近由于工作特别繁忙,已经有一个多月的时间没写博 ...
- 3D版翻页公告效果
代码地址如下:http://www.demodashi.com/demo/12830.html 前言: 在逛小程序蘑菇街的时候,看到一个2D版滚动的翻页公告效果.其实看到这个效果的时候,一点都不觉得稀 ...
- 高德地图3D版的使用方法
坐标拾取器: http://lbs.amap.com/console/show/picker 其经纬度与LatLng()方法中的经纬度是对调的 SDK和实例下载: http://lbs.amap.co ...
- Unity 进度条3D制作(3D版)
昨天我们一起学习了2D进度跳的制作,那么趁着我们脑海中还残存昨日的记忆,今天继续学习另一种方法: 实现思路:当鼠标悬浮Start按钮->实例化物体并显示进度->100/100->进入 ...
- 基于 HTML5 的 WebGL 3D 版俄罗斯方块
前言 摘要:2D 的俄罗斯方块已经被人玩烂了,突发奇想就做了个 3D 的游戏机,用来玩俄罗斯方块...实现的基本想法是先在 2D 上实现俄罗斯方块小游戏,然后使用 3D 建模功能创建一个 3D 街机模 ...
- [AI开发]视频多目标跟踪高级版(离自动驾驶又‘近’了一点点)
**本文恐怕不是完全的标题党** 视频多目标跟踪需要解决的关键点是前后两帧之间的Target Association,这是最难的环节(没有之一).第T帧检测到M个目标,第T+S(S>=1)帧检测 ...
- 电影AI修复,让重温经典有了新的可能
摘要:有没有一种呈现,不以追求商业为第一目的,不用花大价钱,不用翻拍,没有画蛇添足,低成本的可共赏的让经典更清晰? 本文分享自华为云社区<除了重映和翻拍,重温经典的第三种可能>,原文作者: ...
- 一个人独立开发 3D 游戏引擎可能吗?
作者:孙志超链接:https://www.zhihu.com/question/24733255/answer/42000966来源:知乎著作权归作者所有,转载请联系作者获得授权. 当然可以,但难道有 ...
- 【游戏】2048及各种变种大集合汇总【更新ing~新版Floppy2048 - 恒星聚变版 - 恶搞改数据】
threes - 鼻祖 手机版:http://asherv.com/threes/ js版:http://threesjs.com/ 2048 - 原版 http://gabrielecirulli. ...
- 火爆全球的“饺子皮”3D手办原来是这样做的!关键时刻少不了远程控制软件!
2022年卡塔尔世界杯的吉祥物最近在全球火出圈了,并且喜提中国网友给予的爱称"饺子皮"."馄饨皮"(官方名字:拉伊卜,意为"技艺高超的球员" ...
随机推荐
- Docker 安装Oracle12c的镜像修改字符集 并且进行启动的简单过程
学习来自 昨天晚上转帖的文章 这里面添加一些自己的内容 首先获取配置文件 git clone https://github.com/oracle/docker-images.git 获取之后比较容易了 ...
- Linux KVM网络处理过程
Linux KVM网络处理过程 总体解决方法 本次遇到的问题是KVM的网桥处理不小心导致系统无法连接.处理简要总结: 进入机房,给IPMI插上网线, 开机点 Del 进入bios 设置IMPI的地址 ...
- Python控制微信,实现聊天机器人
自从微信禁止网页版登陆之后,itchat 库实现的功能也就都不能用了,那现在 Python 还能操作微信吗?答案是:可以! 在Github上有一个项目叫<WeChatPYAPI>可以使用 ...
- git日志输出相关命令
git log 默认输出所有的日志 git log 默认输出所有的日志 git 日志输出--只看最近的两条或者三条 有些时候我们可能只需要看最近的2或者3条日志 git log -2 日志输出--只看 ...
- Seata分布式事务 (理论与部署相结合)
分布式事务--Seata 分布式事务 1. 本地事务与分布式事务 1.1 本地事务 本地事务,也就是传统的单机事务.在传统数据库事务中,必须要满足四个原则: 1.2 分布式事务问题 分布式事务,就是指 ...
- gRPC基本教程
原文在这里. 本教程为Go程序员提供了使用gRPC的基本介绍. 通过跟随本示例,你将学会如何: 在.proto文件中定义一个服务. 使用协议缓冲编译器生成服务器和客户端代码. 使用Go gRPC AP ...
- Go 泛型发展史与基本介绍
Go 泛型发展史与基本介绍 Go 1.18版本增加了对泛型的支持,泛型也是自 Go 语言开源以来所做的最大改变. 目录 Go 泛型发展史与基本介绍 一.为什么要加入泛型? 二.什么是泛型 三.泛型的来 ...
- 《PalWorld/幻兽帕鲁》旧电脑linux搭建服务器
关键词: PalWorld, Linux, Natapp, 内网穿透, 幻兽帕鲁 注 意 文 章 时 效 性 最近幻兽帕鲁爆火,steam一上线好友列表一串正在游玩哈哈哈,自己也是蹭一波热度,顺便试用 ...
- Map结构映射,避免每一个字段赋值
var query1 = (from fore in forecastShippingDate join ship in shipOutOfStock on fore.Id equals ship.F ...
- ABP .net Core 将日志打印在控制台
上效果图 来看一下操作流程: 一.分为.net Core 2.2 和 .net Core 3.0及以上 (一)..net Core 2.2 1.在 EntityFrameworkCore中安装Nuge ...
