Django 小实例S1 简易学生选课管理系统 10 老师课程业务实现
Django 小实例S1 简易学生选课管理系统 第10节——老师课程业务实现
点击查看教程总目录
作者自我介绍:b站小UP主,时常直播编程+红警三,python1对1辅导老师。
课程模块中,老师将要使用到的功能有:
- 创建课程
- 添加、删除课程时刻表
- 查看课程列表
- 操作课程:修改状态,给学生打分
这里一个一个实现
首先,在course/views.py中将课程的模型类全部导入,以便后面使用
from .models import Course, Schedule, StudentCourse
1 - 创建课程
首先需要实现的是创建课程的表单,
新建course/forms.py如下
from django import forms

from .models import Course, Schedule, StudentCourse

class CourseForm(forms.ModelForm):

    class Meta:

        model = Course

        exclude = ['status', 'teacher']
同时对于新建课程的请求,在constants.py中添加一个非法请求的响应如下
INVALID_REQUEST_METHOD = "Invalid request method."
新建对应模板templates/course/teacher/create_course.html如下
{% extends "course/nav.html" %}

{% block title %}创建课程{% endblock %}

{% block content %}

    <h3>创建课程</h3>

    <div class="form create-update-from">

        <form method="post">

            {% csrf_token %}

            {{form.as_p}}

            <div class="submit-button">

                <input type="submit" value="创建"/>

                <input type="button" value="返回"  onclick='window.open("{% url 'course' "teacher"%}")' />

            </div>

        </form>

    </div>

{% endblock %}
再在course/views.py中导入CourseForm类和INVALID_REQUEST_METHOD常量,然后添加代码如下
def create_course(request):

    user = get_user(request, "teacher")

    if not user:

        return redirect(reverse("login", kwargs={"kind": "teacher"}))

    info = {

        "name": user.name,

        "kind": "teacher",

    }

    if request.method == 'POST':

        form = CourseForm(request.POST)

        if form.is_valid():

            obj = form.save(commit=False)

            obj.status = 1

            obj.teacher = user

            obj.save()

            return redirect(reverse("course", kwargs={"kind": "teacher"}))

    elif request.method == 'GET':

        form = CourseForm()

    else:

        return HttpResponse(INVALID_REQUEST_METHOD)

    return render(request, 'course/teacher/create_course.html', {'info': info, 'form': form})
2 - 添加、删除课程时刻表
先需要实现的是添加课程时刻表的表单,
在course/forms.py中添加代码如下
class ScheduleForm(forms.ModelForm):

    class Meta:

        model = Schedule

        exclude = ["course"]
新建对应模板templates/course/teacher/create_schedule.html如下
{% extends "course/nav.html" %}
{% block title %}创建时刻表{% endblock %}
{% block content %}
<h3>创建时刻表: [{{ course.id }}] {{ course.name }}</h3>
<div class="form create-update-from">
<form method="post">
{% csrf_token %}
{{form.as_p}}
<div class="submit-button">
<input type="submit" value="创建"/>
<input type="button" value="返回" onclick='window.open("{% url 'view_detail' course.id%}")' />
</div>
</form>
</div>
{% endblock %}
在course/views.py中导入这个表单,
然后添加代码如下
def create_schedule(request, course_id):

    user = get_user(request, "teacher")

    if not user:

        return redirect(reverse("login", kwargs={"kind": "teacher"}))

    info = {

        "name": user.name,

        "kind": "teacher",

    }

    course = Course.objects.get(pk=course_id)

    if request.method == 'POST':

        form = ScheduleForm(request.POST)

        if form.is_valid():

            obj = form.save(commit=False)

            obj.course = course

            obj.save()

            return redirect(reverse("view_detail", kwargs={"course_id": course_id}))

    elif request.method == 'GET':

        form = ScheduleForm()

    else:

        return HttpResponse(INVALID_REQUEST_METHOD)

    return render(request, 'course/teacher/create_schedule.html', {'info': info, 'form': form, "course": course})

def delete_schedule(request, schedule_id):

    user = get_user(request, "teacher")

    if not user:

        return redirect(reverse("login", kwargs={"kind": "teacher"}))

    schedule = Schedule.objects.get(pk=schedule_id)

    course_id = request.GET.get("course_id") or schedule.course.id

    schedule.delete()

    return redirect(reverse("view_detail", kwargs={"course_id": course_id}))
3 查看课程列表
在本项目中,老师和学生的个人主页就是其课程主页,将展示其所有课程列表。
为老师的课程主页添加模板templates/course/teacher/home.html如下
{% extends "course/nav.html" %}

{% block title %}HomePage{% endblock %}

{% block content %}

    <div class="main-container">

        <div class="main-bar">

            <form class="search-form" method="post">

                {% csrf_token %}

                <input class="input" id="search-key" type="text" name="search" {% if search_key != None %}value="{{ search_key }}" {% endif %}/>

                <input class="button" type="submit" value="搜索课程" />

            </form>

            <input class="button right-button" type="button" value="创建课程"  onclick='window.open("{% url 'create_course' %}")' />

        </div>

        <table class="item-list course-list">

            <thead>

                <tr>

                    <th class="course-no">课程编号</th>

                    <th class="course-name">名称</th>

                    <th class="course-credit">学分</th>

                    <th class="course-number">当前人数<br>/总人数</th>

                    <th class="course-year">年份</th>

                    <th class="course-semester">学期</th>

                    <th class="course-status">状态</th>

                    <th class="course-operation">操作</th>

                </tr>

            </thead>

            <tbody>

                {% for course in course_list %}

                    <tr id="course-id-{{ course.id }}">

                    <td class="course-no">{{ course.id }}</td>

                    <td class="course-name">{{ course.name }}</td>

                    <td class="course-credit">{{ course.credit }}</td>

                    <td class="course-number">{{ course.get_current_count }}/{{ course.max_number }}</td>

                    <td class="course-year">{{ course.year }}</td>

                    <td class="course-semester">{{ course.get_semester_display }}</td>

                    <td class="course-status">{{ course.get_status_text }}</td>

                    <td class="course-operation">

                        {% if course.status < 4 %}

                            <input class="button right-button" type="button" value="{{ course.get_op_text }}"

                              onclick='location.href="{% url 'handle_course' course.id course.status %}"' />

                        {% endif %}

                        {% if course.status == 4 %}

                        {# 结课后给分 #}

                            <input class="button right-button" type="button" value="{{ course.get_op_text }}"

                                   onclick='location.href="{% url 'view_detail' course.id %}"' />

                        {% else %}

                            <input class="button right-button" type="button" value="查看详情"

                                   onclick='location.href="{% url 'view_detail' course.id %}"' />

                        {% endif %}

                    </td>

                    </tr>

                {% endfor %}

            </tbody>

        </table>

    </div>

{% endblock %}
查看课程列表要写在老师的主页视图中
即修改course/views.py中的teacher_home如下
def teacher_home(request):

    user = get_user(request, "teacher")

    if not user:

        return redirect(reverse("login", kwargs={"kind": "teacher"}))

    info = {

        "name": user.name,

        "kind": "teacher",

    }

    is_search = False

    search_key = ""

    if request.method == "POST":

        search_key = request.POST.get("search")

        if search_key:

            is_search = True

    context = {"info": info}

    q = Q(teacher=user)

    if is_search:

        q = q & Q(name__icontains=search_key)

        context["search_key"] = search_key

    context["course_list"] = Course.objects.filter(q).order_by('status')

    return render(request, 'course/teacher/home.html', context)
里面使用了django.db.models.Q类,所以要在开头添加代码from django.db.models import Q导入这个类
补充说明:这里面还实现了一个搜索框,能够根据关键词去搜索课程。
为了不使用js,搜索框的信息是通过post表单信息来提交的。
4 操作课程
老师在课程主页,可以进行常规的课程状态修改:
开始选课,结束选课,结课。
而打分则需要在课程详情页去给。
所以这里一方面要实现一个课程主页的操作视图,
也要实现一个课程详情页视图,打分在本文第五部分去做。
先添加一个课程详情页的模板文件templates/course/teacher/course.html如下:
{% extends "course/nav.html" %}

{% block title %}课程详情{% endblock %}

{% block content %}

    <h3>课程详情<input class="button right-button" type="button" value="返回主页"

                   onclick='window.open("{% url 'course' 'teacher'%}")'/></h3>

    <table class="item-list detail-list">

        <thead>

            <tr>

                <th>课程编号</th>

                <th>名称</th>

                <th>学分</th>

                <th>当前人数/总人数</th>

                <th>年份</th>

                <th>学期</th>

            </tr>

        </thead>

        <tbody>

            <tr>

                <td>{{ course.id }}</td>

                <td>{{ course.name }}</td>

                <td>{{ course.credit }}</td>

                <td>{{ course.get_current_count }}/{{ course.max_number }}</td>

                <td>{{ course.year }}</td>

                <td>{{ course.get_semester_display }}</td>

            </tr>

        </tbody>

    </table>

    <h3>上课时间<input class="button right-button" type="button" value="添加时间表" onclick='window.open("{% url 'create_schedule' course.id%}")'/></h3>

    <table class="item-list schedule-list">

        <thead>

            <tr>

                <th class="schedule-no">编号</th>

                <th class="schedule-no">详情</th>

                <th class="schedule-no">操作</th>

            </tr>

        </thead>

        <tbody>

            {% for schedule in schedules %}

            <tr>

                <td>{{ schedule.id }}</td>

                <td>{{ schedule }}</td>

                <td>

                    <input class="button" type="button" value="删除"

                           onclick='window.open("{% url 'delete_schedule' schedule.id%}?course_id={{ course.id }}")'/>

                </td>

            </tr>

            {% endfor %}

        </tbody>

    </table>

    <h3>学生列表

        {% if course.status == 4 %}

            <input class="button right-button" type="button" value="给分完成" onclick='location.href="{% url 'handle_course' course.id 4%}"' />

        {% endif %}

    </h3>

    <table class="item-list student-list">

        <thead>

            <tr>

                <th class="student-no">学生学号</th>

                <th class="student-name">学生姓名</th>

                <th class="student-email">学生邮箱</th>

                <th class="student-score">得分</th>

                <th class="student-comments">评价</th>

                <th class="operation">操作</th>

            </tr>

        </thead>

        <tbody>

            {% for cs in course_students %}

            <tr>

                <td>{{ cs.student.get_id}}</td>

                <td>{{ cs.student.name }}</td>

                <td>{{ cs.student.email }}</td>

                <td>

                    {% if cs.scores == None %}-{% endif %}

                    {% if cs.scores != None %}{{ cs.scores }}{% endif %}

                </td>

                <td>

                    {% if cs.scores == None %}-{% endif %}

                    {% if cs.scores != None %}{{ cs.comments }}{% endif %}

                </td>

                <td class="operation">

                    {% if course.status == 4 %}

                        {% if cs.scores == None %}

                            <input class="button right-button" type="button" value="给分"

                               onclick='location.href="{% url 'score' cs.id%}"' />

                        {% else %}

                            <input class="button right-button" type="button" value="修改成绩"

                               onclick='location.href="{% url 'score' cs.id%}?update=1"' />

                        {% endif %}

                    {% else %}

                        -

                    {% endif %}

                </td>

            </tr>

            {% endfor %}

        </tbody>

    </table>

    {% if course.status == 5 %}

    <h3>学生评价</h3>

    <table class="item-list student-list">

        <thead>

            <tr>

                <th class="student-score">学生评分</th>

                <th class="student-comments">学生评价</th>

            </tr>

        </thead>

        <tbody>

            {% for cs in sorted_course_students %}

            {% if cs.rating != None %}

            <tr>

                <td>{{ cs.rating }}</td>

                <td>{{ cs.assessment }}</td>

            </tr>

            {% endif %}

            {% endfor %}

        </tbody>

    </table>

    {% endif %}

{% endblock %}
在course/views.py中添加代码如下
def handle_course(request, course_id, handle_kind):

    """

    :param request:

    :param course_id:

    :param handle_kind:

            1: "开始选课",

            2: "结束选课",

            3: "结课",

            4: "给分完成"

    :return:

    """

    user = get_user(request, "teacher")

    if not user:

        return redirect(reverse("login", kwargs={"kind": "teacher"}))

    info = {

        "name": user.name,

        "kind": "teacher",

    }

    course = Course.objects.get(pk=course_id)

    if course.status == handle_kind and course.status < 5:

        if course.status == 4:

            scs = StudentCourse.objects.filter(course=course)

            all_given = True

            res = ""

            for sc in scs:

                if sc.scores is None:

                    all_given = False

                    res += "<div>%s 未打分</div>" % sc.student

            if all_given:

                course.status += 1

                course.save()

                return redirect(reverse("view_detail", kwargs={"course_id": course.id}))

            else:

                return HttpResponse(res)

        else:

            course.status += 1

            course.save()

    course_list = Course.objects.filter(teacher=user)

    return render(request, 'course/teacher/home.html', {'info': info, 'course_list': course_list})

def view_detail(request, course_id):

    user = get_user(request, "teacher")

    if not user:

        return redirect(reverse("login", kwargs={"kind": "teacher"}))

    info = {

        "name": user.name,

        "kind": "teacher",

    }

    course = Course.objects.get(pk=course_id)

    c_stu_list = StudentCourse.objects.filter(course=course)

    sche_list = Schedule.objects.filter(course=course)

    context = {

        "info": info,

        "course": course,

        "course_students": c_stu_list,

        "schedules": sche_list

    }

    if course.status == 5:

        sorted_cs_list = sorted(c_stu_list, key=lambda cs: cs.scores)

        context["sorted_course_students"] = sorted_cs_list

    return render(request, "course/teacher/course.html", context)
5 打分
学生的分数是记录在学生课程关系表中的,
在学生选课成功后会新建一条对应的数据。
给分,则是修改其中的分数字段,即对学生课程表模型进行更新。
这里我们首选CBVs中的UpdateView,
不过要先给这个视图建立一个表单,在course/forms.py中添加代码如下
class ScoreForm(forms.ModelForm):

    class Meta:

        model = StudentCourse

        fields = ["student", "course", "scores", "comments"]

    student = forms.CharField(label="学生", disabled=True)

    # course = forms.CharField(widget=forms.TextInput(attrs={'readonly': 'readonly'}))

    course = forms.CharField(label="课程", disabled=True)

    def __init__(self, *args, **kwargs):

        super().__init__(*args, **kwargs)

        self.initial['student'] = self.instance.student

        self.initial['course'] = self.instance.course

    def clean_student(self):

        return self.initial['student']

    def clean_course(self):

        return self.initial['course']
新建course/cbvs.py如下:
from django.views.generic.edit import DeleteView, CreateView, UpdateView

from django.views.generic.detail import DetailView

from django.shortcuts import render, reverse, redirect

# Relative import of GeeksModel

from .models import Schedule, StudentCourse

from .forms import ScoreForm

class ScoreUpdateView(UpdateView):

    model = StudentCourse

    form_class = ScoreForm

    template_name = 'course/teacher/score.html'

    def get(self, request, *args, **kwargs):

        self.object = self.get_object()

        title = "给分"

        if request.GET.get("update"):

            title = "修改成绩"

        info = {}

        return_url = reverse("course", kwargs={"kind": "teacher"})

        if self.object:

            teacher = self.object.course.teacher

            info = {

                "name": teacher.name,

                "kind": "teacher",

            }

            return_url = reverse("view_detail", kwargs={"course_id": self.object.course.id})

        return self.render_to_response(self.get_context_data(info=info, title=title, return_url=return_url))

    def get_success_url(self):

        if self.object:

            return reverse("view_detail", kwargs={"course_id": self.object.course.id})

        else:

            return reverse("course", kwargs={"kind": "teacher"})
同时补上其对应的模板文件templates/course/teacher/score.html如下
{% extends "course/nav.html" %}

{% block title %}{{ title }}{% endblock %}

{% block content %}

    <h3>{{ title }}</h3>

    <div class="form create-update-from">

        <form method="post">

            {% csrf_token %}

            {{form.as_p}}

            <div class="submit-button">

                <input type="submit" value="确定"/>

                <input type="button" value="返回"  onclick='location.href="{{ return_url }}"' />

            </div>

        </form>

    </div>

{% endblock %}
5 添加url
上面已经把老师需要的视图方法全部实现完毕了,接下来就是添加到路由里面。
修改后的course/urls.py如下
from django.urls import path

from course.views import *

from course.cbvs import ScoreUpdateView

urlpatterns = [

    path('<slug:kind>/', home, name="course"),

    path('<slug:kind>/', home, name="course"),

    path('teacher/create_course', create_course, name="create_course"),

    path('teacher/view_detail/<int:course_id>', view_detail, name="view_detail"),

    path('teacher/create_schedule/<int:course_id>', create_schedule, name="create_schedule"),

    path('teacher/delete_schedule/<int:schedule_id>', delete_schedule, name="delete_schedule"),

    path('teacher/score/<int:pk>', ScoreUpdateView.as_view(), name="score"),

    path('teacher/handle_course/<int:course_id>/<int:handle_kind>', handle_course, name="handle_course"),

]
6 效果
创建课程页面:

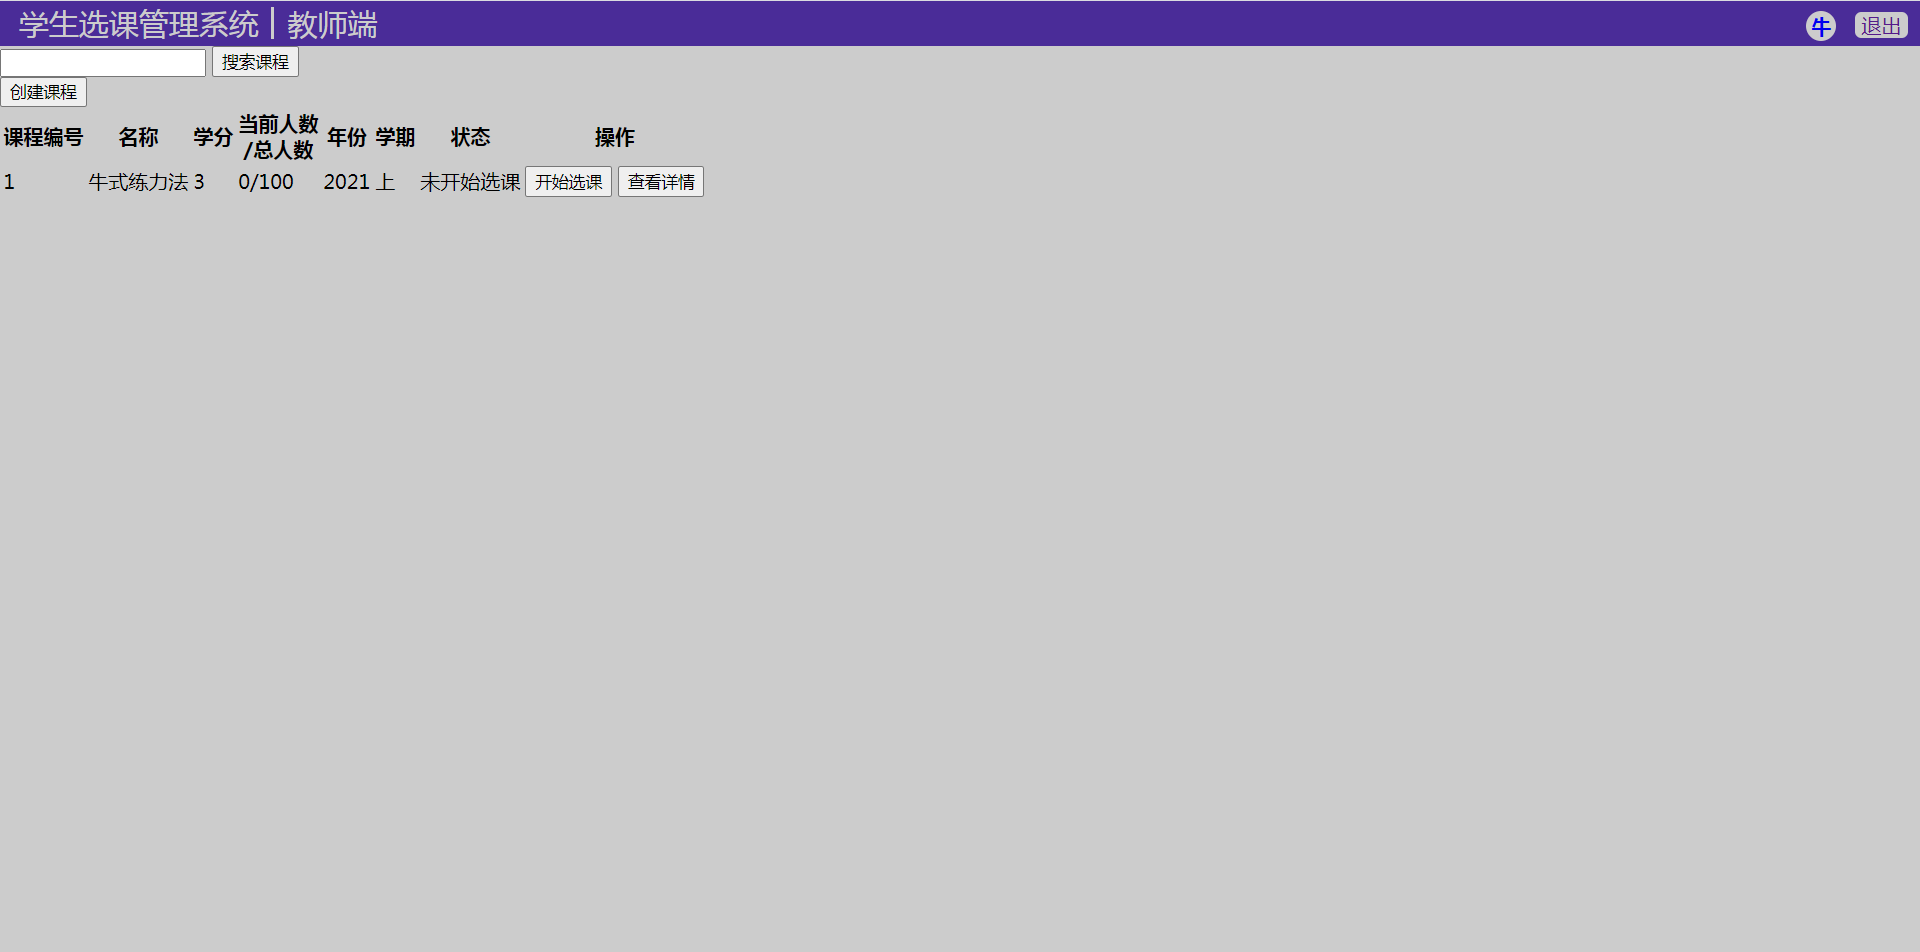
教师主页:

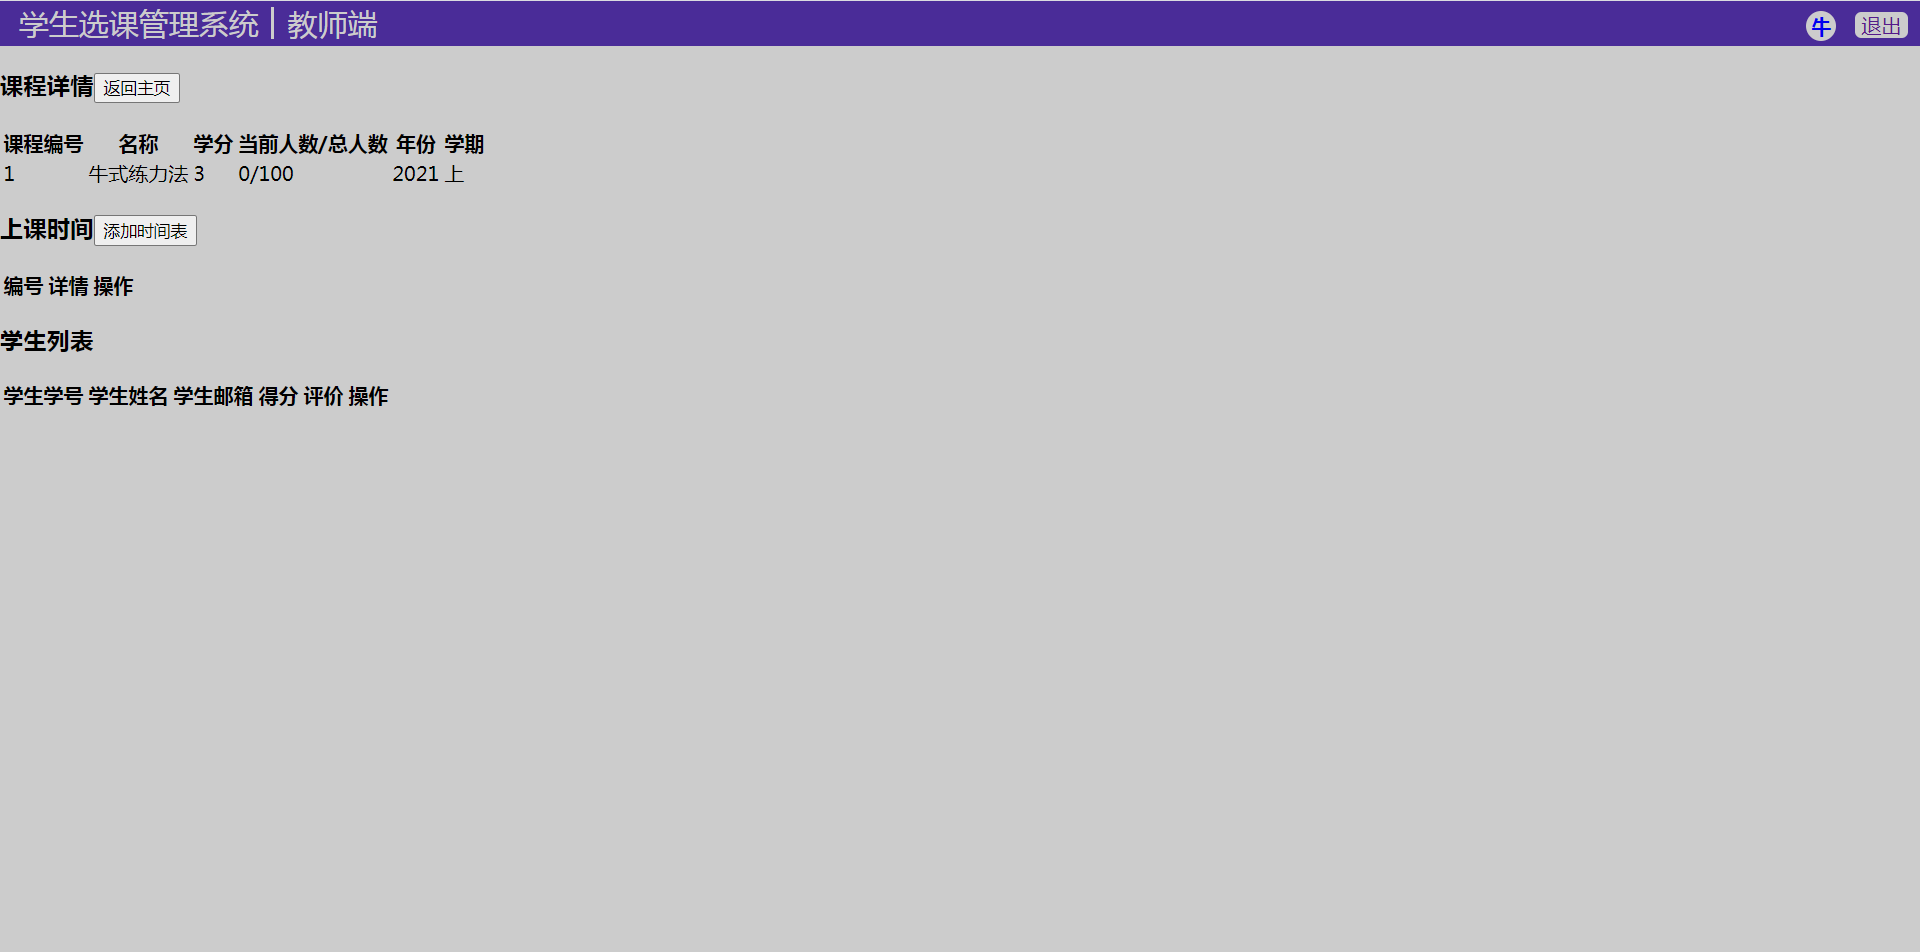
教师课程详情页:

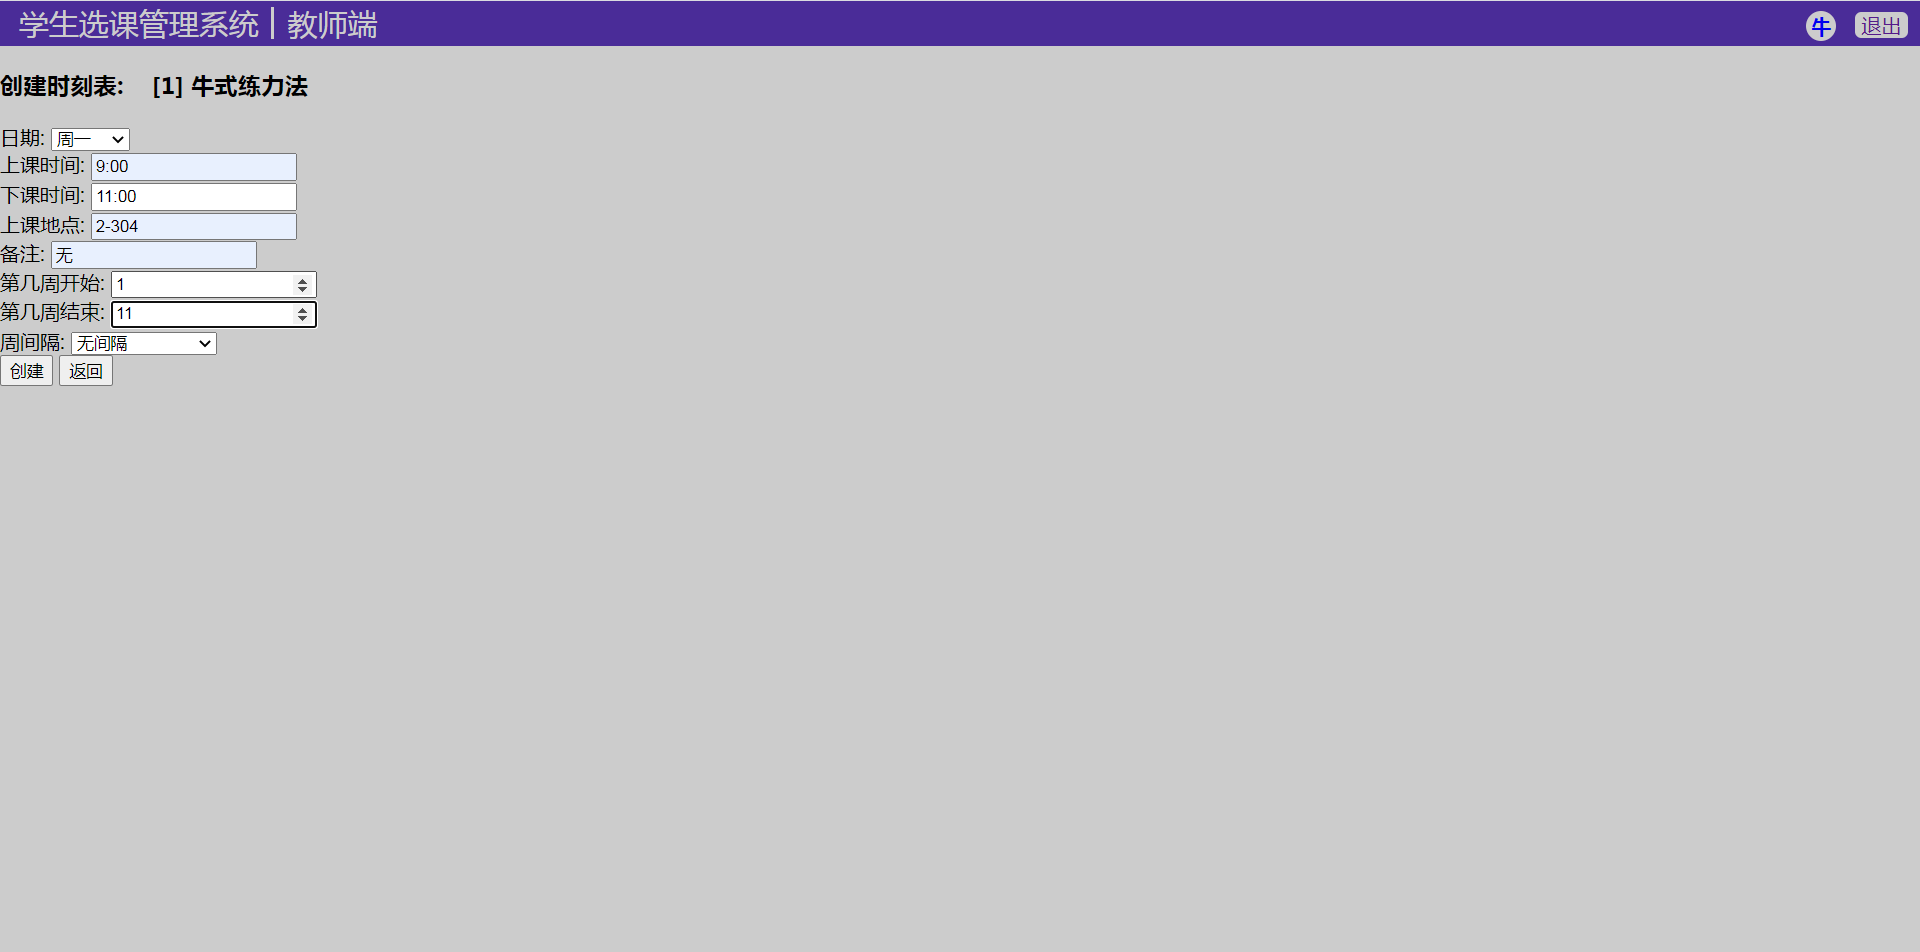
添加课程时刻表页面:

Django 小实例S1 简易学生选课管理系统 10 老师课程业务实现的更多相关文章
- Django 小实例S1 简易学生选课管理系统 9 创建课程模型(model)
Django 小实例S1 简易学生选课管理系统 第9节--创建课程模型(model) 点击查看教程总目录 作者自我介绍:b站小UP主,时常直播编程+红警三,python1对1辅导老师. 对于课程模块, ...
- Django 小实例S1 简易学生选课管理系统 12 CSS样式完善
Django 小实例S1 简易学生选课管理系统 第12节--CSS样式完善 点击查看教程总目录 作者自我介绍:b站小UP主,时常直播编程+红警三,python1对1辅导老师. 课程模块的逻辑代码到这里 ...
- Django 小实例S1 简易学生选课管理系统 11 学生课程业务实现
Django 小实例S1 简易学生选课管理系统 第11节--学生课程业务实现 点击查看教程总目录 作者自我介绍:b站小UP主,时常直播编程+红警三,python1对1辅导老师. 课程模块中,学生需要拥 ...
- Django 小实例S1 简易学生选课管理系统 8 CSS样式优化
Django 小实例S1 简易学生选课管理系统 第8节--CSS样式优化 点击查看教程总目录 作者自我介绍:b站小UP主,时常直播编程+红警三,python1对1辅导老师. 前面的几节下来,用户模块基 ...
- Django 小实例S1 简易学生选课管理系统 7 修改个人信息
Django 小实例S1 简易学生选课管理系统 第7节--修改个人信息 点击查看教程总目录 作者自我介绍:b站小UP主,时常直播编程+红警三,python1对1辅导老师. 用户模块除了注册登录之外,还 ...
- Django 小实例S1 简易学生选课管理系统 6 实现登录逻辑
Django 小实例S1 简易学生选课管理系统 第6节--实现登录逻辑 点击查看教程总目录 作者自我介绍:b站小UP主,时常直播编程+红警三,python1对1辅导老师. 1 业务逻辑 本教程第四节里 ...
- Django 小实例S1 简易学生选课管理系统 2 新建项目(project)并进行设置
Django 小实例S1 简易学生选课管理系统 第2节--新建项目(project)并进行设置 点击查看教程总目录 作者自我介绍:b站小UP主,时常直播编程+红警三,python1对1辅导老师. 0 ...
- Django 小实例S1 简易学生选课管理系统 3 创建用户模型(model)
Django 小实例S1 简易学生选课管理系统 第3节--创建用户模型(model) 点击查看教程总目录 作者自我介绍:b站小UP主,时常直播编程+红警三,python1对1辅导老师. 本文涉及到的新 ...
- Django 小实例S1 简易学生选课管理系统 4 实现登录页面
Django 小实例S1 简易学生选课管理系统 第4节--实现登录页面 点击查看教程总目录 作者自我介绍:b站小UP主,时常直播编程+红警三,python1对1辅导老师. 本文涉及到的新的额外知识点: ...
随机推荐
- Unity Event Trigger 事件响应(二维,三维)添加组件
EventTrigger 上主要的方法有PointerEnter.PointerExit.PointerDown.PointerUp.PointerClick............都会显示在面板上面 ...
- 微信小程序访问豆瓣api报403错误解决方法
通过豆瓣API可以获取很多电影.书籍的数据信息,今天在调用豆瓣正在上映电影接口的时候报403错误,原因是豆瓣设置了小程序的访问权限.如下: 解决方法是使用代理,将豆瓣API地址换成 https://d ...
- 微服务+异步工作流+ Serverless,Netflix 决定弃用稳定运行 7 年的旧平台
作者 | Frank San Miguel 策划 | 田晓旭 2021 年,Netflix 会将大部分的工作负载从 Reloaded 转移到 Cosmos 平台.Cosmos 是一个计算平台,它将微服 ...
- SphereEx 公司成立,推动 Apache ShardingSphere 社区加速发展
近日,SphereEx 商业公司在中国红杉种子基金及初心资本助力下,已完成公司及团队组建.各大媒体平台及公众号已相继报道,并抢占新闻头条.作为以 Apache ShardingSphere 核心团队组 ...
- spoj2 prime1 (区间筛)
给定t组询问,每组询问包括一个l和r,要求\([l,r]\)的素数有哪些 其中\(t \le 10,1 \le l \le r \le 1000000000 , r-l \le 100000\) Qw ...
- docker中Jenkins启动无法安装插件,版本过低
一.问题现象: 使用docker启动jenkins,在jenkins启动后却无法安装jenkins的插件,一直提示安装失败且从log看到提示信息显示为需要升级jenkins的版本 二.原因分析: 在使 ...
- NX CAM 区域轮廓铣的切削步长
从NX3.0到NX9.0,默认都是5%.可是实际计算的精确度是不一样的.到NX8.0上发现计算速度特别慢,后来东找西找,设置这个参数可以解决.PS:请慎用!请后后面的官方解释. 官方的解释是: &qu ...
- 2021-2022 20211420 《信息安全专业导论》安装Linux操作系统并学习Linux基础
作业信息 |作业属于|https://edu.cnblogs.com/campus/besti/2021-2022-1fois |作业要求|https://edu.cnblogs.com/campus ...
- 指标统计:基于流计算 Oceanus(Flink) 实现实时 UVPV 统计
作者:吴云涛,腾讯 CSIG 高级工程师导语 | 最近梳理了一下如何用 Flink 来实现实时的 UV.PV 指标的统计,并和公司内微视部门的同事交流.然后针对该场景做了简化,并发现使用 Flink ...
- 并发编程从零开始(六)-BlockingDeque+CopyOnWrite
并发编程从零开始(六)-BlockingDeque+CopyOnWrite 5.2 BlockingDeque BlockingDeque定义了一个阻塞的双端队列接口: 该接口继承了BlockingQ ...
