xv6学习笔记(4) : 进程调度
xv6学习笔记(4) : 进程
xv6所有程序都是单进程、单线程程序。要明白这个概念才好继续往下看
1. XV6中进程相关的数据结构
在XV6中,与进程有关的数据结构如下
// Per-process state

struct proc {

  uint sz;                     // Size of process memory (bytes)

  pde_t* pgdir;                // Page table

  char *kstack;                // Bottom of kernel stack for this process

  enum procstate state;        // Process state

  int pid;                     // Process ID

  struct proc *parent;         // Parent process

  struct trapframe *tf;        // Trap frame for current syscall

  struct context *context;     // swtch() here to run process

  void *chan;                  // If non-zero, sleeping on chan

  int killed;                  // If non-zero, have been killed

  struct file *ofile[NOFILE];  // Open files

  struct inode *cwd;           // Current directory

  char name[16];               // Process name (debugging)

};
与前述的两类信息的对应关系如下
- 操作系统管理进程有关的信息:内核栈
kstack,进程的状态state,进程的pid,进程的父进程parent,进程的中断帧tf,进程的上下文context,与sleep和kill有关的chan和killed变量。 - 进程本身运行所需要的全部环境:虚拟内存信息
sz和pgdir,打开的文件ofile和当前目录cwd。
额外地,proc中还有一条用于调试的进程名字name。
在操作系统中,所有的进程信息struct proc都存储在ptable中,ptable的定义如下
下面是proc结构体保存的一些重要数据结构
首先是保存了用户空间线程寄存器的trapframe字段
其次是保存了内核线程寄存器的context字段
还有保存了当前进程的内核栈的kstack字段,这是进程在内核中执行时保存函数调用的位置
state字段保存了当前进程状态,要么是RUNNING,要么是RUNABLE,要么是SLEEPING等等
lock字段保护了很多数据,目前来说至少保护了对于state字段的更新。举个例子,因为有锁的保护,两个CPU的调度器线程不会同时拉取同一个RUNABLE进程并运行它
struct {

  struct spinlock lock;

  struct proc proc[NPROC];

} ptable;
除了互斥锁lock之外,一个值得注意的一点是XV6系统中允许同时存在的进程数量是有上限的。在这里NPROC为64,所以XV6最多只允许同时存在64个进程。
要注意操作系统的资源分配的单位是进程,处理机调度的单位是线程;
2. 第一个用户进程
1. userinit函数
在 main 初始化了一些设备和子系统后,它通过调用 userinit建立了第一个进程。
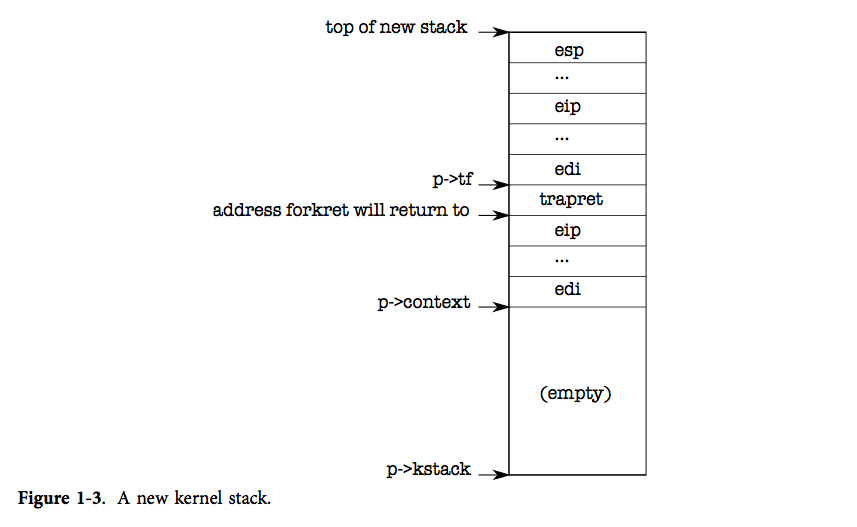
userinit 首先调用 allocproc。allocproc的工作是在页表中分配一个槽(即结构体 struct proc),并初始化进程的状态,为其内核线程的运行做准备。注意一点:userinit 仅仅在创建第一个进程时被调用,而 allocproc 创建每个进程时都会被调用。allocproc 会在 proc 的表中找到一个标记为 UNUSED的槽位。当它找到这样一个未被使用的槽位后,allocproc 将其状态设置为 EMBRYO,使其被标记为被使用的并给这个进程一个独有的 pid(2201-2219)。接下来,它尝试为进程的内核线程分配内核栈。如果分配失败了,allocproc 会把这个槽位的状态恢复为 UNUSED 并返回0以标记失败。
// Set up first user process.

void

userinit(void)

{

  struct proc *p;

  extern char _binary_initcode_start[], _binary_initcode_size[];

  p = allocproc();

  initproc = p;

  if((p->pgdir = setupkvm()) == 0)

    panic("userinit: out of memory?");

  inituvm(p->pgdir, _binary_initcode_start, (int)_binary_initcode_size);

  p->sz = PGSIZE;

  memset(p->tf, 0, sizeof(*p->tf));

  p->tf->cs = (SEG_UCODE << 3) | DPL_USER;

  p->tf->ds = (SEG_UDATA << 3) | DPL_USER;

  p->tf->es = p->tf->ds;

  p->tf->ss = p->tf->ds;

  p->tf->eflags = FL_IF;

  p->tf->esp = PGSIZE;

  p->tf->eip = 0;  // beginning of initcode.S

  safestrcpy(p->name, "initcode", sizeof(p->name));

  p->cwd = namei("/");

  // this assignment to p->state lets other cores

  // run this process. the acquire forces the above

  // writes to be visible, and the lock is also needed

  // because the assignment might not be atomic.

  acquire(&ptable.lock);

  p->state = RUNNABLE;

  release(&ptable.lock);

}
2. allocproc函数
- 在ptable中找到一个没有被占用的槽位
- 找到之后分配pid然后把他的状态设置为
EMBRYO
static struct proc*

allocproc(void)

{

  struct proc *p;

  char *sp;

  acquire(&ptable.lock);

  for(p = ptable.proc; p < &ptable.proc[NPROC]; p++)

    if(p->state == UNUSED)

      goto found;

  release(&ptable.lock);

  return 0;

found:

  p->state = EMBRYO;

  p->pid = nextpid++;

  release(&ptable.lock);

  // Allocate kernel stack.

  if((p->kstack = kalloc()) == 0){

    p->state = UNUSED;

    return 0;

  }

  sp = p->kstack + KSTACKSIZE;

  // Leave room for trap frame.

  sp -= sizeof *p->tf;

  p->tf = (struct trapframe*)sp;

  // Set up new context to start executing at forkret,

  // which returns to trapret.

  sp -= 4;

  *(uint*)sp = (uint)trapret;

  sp -= sizeof *p->context;

  p->context = (struct context*)sp;

  memset(p->context, 0, sizeof *p->context);

  p->context->eip = (uint)forkret;

  return p;

}
这里进行调用完之后得到的状态如下图所示
3. mpmain函数
// Common CPU setup code.

static void

mpmain(void)

{

  cprintf("cpu%d: starting %d\n", cpuid(), cpuid());

  idtinit();       // load idt register

  xchg(&(mycpu()->started), 1); // tell startothers() we're up

  scheduler();     // start running processes

}
1. scheduler()函数
这个函数是非常重要的,进行进程之间的调度,在上面我们创建了第一个用户进程但是还没有进行执行。
void

scheduler(void)

{

  struct proc *p;

  struct cpu *c = mycpu();

  c->proc = 0;

  for(;;){

    // Enable interrupts on this processor.

    sti();

    // Loop over process table looking for process to run.

    acquire(&ptable.lock);

    for(p = ptable.proc; p < &ptable.proc[NPROC]; p++){

      if(p->state != RUNNABLE)

        continue;

      // Switch to chosen process.  It is the process's job

      // to release ptable.lock and then reacquire it

      // before jumping back to us.

      c->proc = p;

      switchuvm(p);

      p->state = RUNNING;

      swtch(&(c->scheduler), p->context);

      switchkvm();

      // Process is done running for now.

      // It should have changed its p->state before coming back.

      c->proc = 0;

    }

    release(&ptable.lock);

  }

}
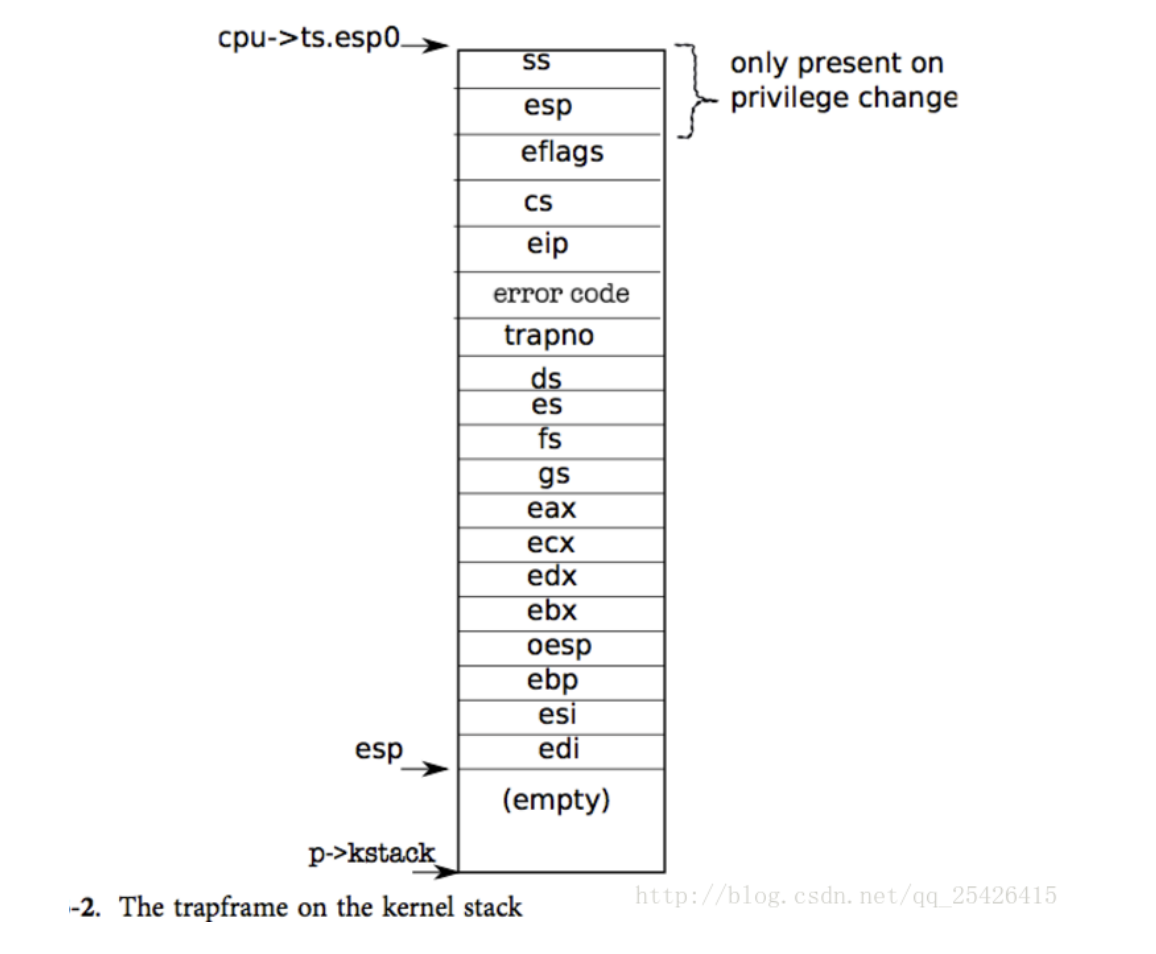
2. switchuvm函数
- 这里要设置当前cpu的taskstate。关于taskstate的知识补充
taskstate的知识补充
- 对于cpu而言是没有进程或者线程的概念,对于cpu只有任务的概念
- 对于ss0是存储的0环的栈段选择子
- 对于
esp是存储的0环的栈指针 - 而对于ring的概念也就是环的概念这里可以简单理解成特权集参考博客
// Switch TSS and h/w page table to correspond to process p.

void

switchuvm(struct proc *p)

{

  if(p == 0)

    panic("switchuvm: no process");

  if(p->kstack == 0)

    panic("switchuvm: no kstack");

  if(p->pgdir == 0)

    panic("switchuvm: no pgdir");

  pushcli();

  mycpu()->gdt[SEG_TSS] = SEG16(STS_T32A, &mycpu()->ts,

                                sizeof(mycpu()->ts)-1, 0);

  mycpu()->gdt[SEG_TSS].s = 0;

  mycpu()->ts.ss0 = SEG_KDATA << 3;

  mycpu()->ts.esp0 = (uint)p->kstack + KSTACKSIZE;

  // setting IOPL=0 in eflags *and* iomb beyond the tss segment limit

  // forbids I/O instructions (e.g., inb and outb) from user space

  mycpu()->ts.iomb = (ushort) 0xFFFF;

  ltr(SEG_TSS << 3);

  lcr3(V2P(p->pgdir));  // switch to process's address space

  popcli();

}
3. 第一个程序Initcode.S
第一个程序会在虚拟地址[0-pagesize]这一段
# exec(init, argv)

.globl start

start:

  pushl $argv

  pushl $init

  pushl $0  // where caller pc would be

  movl $SYS_exec, %eax

  int $T_SYSCALL

# for(;;) exit();

exit:

  movl $SYS_exit, %eax

  int $T_SYSCALL

  jmp exit

# char init[] = "/init\0";

init:

  .string "/init\0"

# char *argv[] = { init, 0 };

.p2align 2

argv:

  .long init

  .long 0
这里是调用了exec执行init函数
这个其实更像什么,更像shell终端的启动
int

main(void)

{

  int pid, wpid;

  if(open("console", O_RDWR) < 0){

    mknod("console", 1, 1);

    open("console", O_RDWR);

  }

  dup(0);  // stdout

  dup(0);  // stderr

  for(;;){

    printf(1, "init: starting sh\n");

    pid = fork();

    if(pid < 0){

      printf(1, "init: fork failed\n");

      exit();

    }

    if(pid == 0){

      exec("sh", argv);

      printf(1, "init: exec sh failed\n");

      exit();

    }

    while((wpid=wait()) >= 0 && wpid != pid)

      printf(1, "zombie!\n");

  }

}
4. 进程切换
进程切换解决之后,对于xv6的进程调度就会有一个比较清晰的分析了
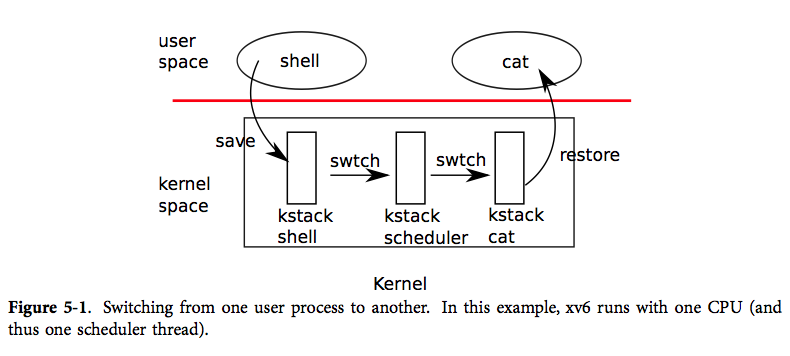
这里有几个重要的概念就是
每一个进程都有一个对应的内核线程(也就是scheduler thread)线程。
在xv6中想要从一个进程(当然这里叫线程也是无所谓的)切换到另一个线程中,必须要先从当前进程-->当前进程的内核线程-->目的线程的内核线程-->目的线程的用户进程。这样一个过程才能完成调度
1. 先从yied和sched开始
其实yield函数并没有干很多事情,关于的操作后面会单独来讲一下,这里就先跳过去
这个函数就是当前进程要让出cpu。所以把当前proc()的状态设置成RUNNABLE
最后调用sched()
// Give up the CPU for one scheduling round.

void

yield(void)

{

  acquire(&ptable.lock);  //DOC: yieldlock

  myproc()->state = RUNNABLE;

  sched();

  release(&ptable.lock);

}
这里先进行一些状态判断,如果出问题就会panic。
2. 随后调用swtch函数
其实这个函数就是switch这里为了不与c语言中的库函数同名
void

sched(void)

{

  int intena;

  struct proc *p = myproc();

  if(!holding(&ptable.lock))

    panic("sched ptable.lock");

  if(mycpu()->ncli != 1)

    panic("sched locks");

  if(p->state == RUNNING)

    panic("sched running");

  if(readeflags()&FL_IF)

    panic("sched interruptible");

  intena = mycpu()->intena;

  swtch(&p->context, mycpu()->scheduler);

  mycpu()->intena = intena;

}
swtch函数就是传说中的上下文切换。只不过和之前说的用户状态的上下文切换不一样
这里是把当前cpu的内核线程的寄存器保存到p->context中
这里的(esp + 4)存储的就是edi寄存器的值。而(esp + 8)存储的就是esi寄存器的值,也就是第一个参数和第二个参数
.globl swtch

swtch:

  movl 4(%esp), %eax

  movl 8(%esp), %edx

  # Save old callee-saved registers

  pushl %ebp

  pushl %ebx

  pushl %esi

  pushl %edi

  # Switch stacks

  movl %esp, (%eax)

  movl %edx, %esp

  # Load new callee-saved registers

  popl %edi

  popl %esi

  popl %ebx

  popl %ebp

  ret
所以这里最后就会把mycpu()->scheduler中保存的context信息弹出到寄存器中。同时把esp寄存器更换成mycpu()->scheduler那里。所以这里的ret的返回地址就是mycpu()->scheduler保存的eip的值。也就会返回到
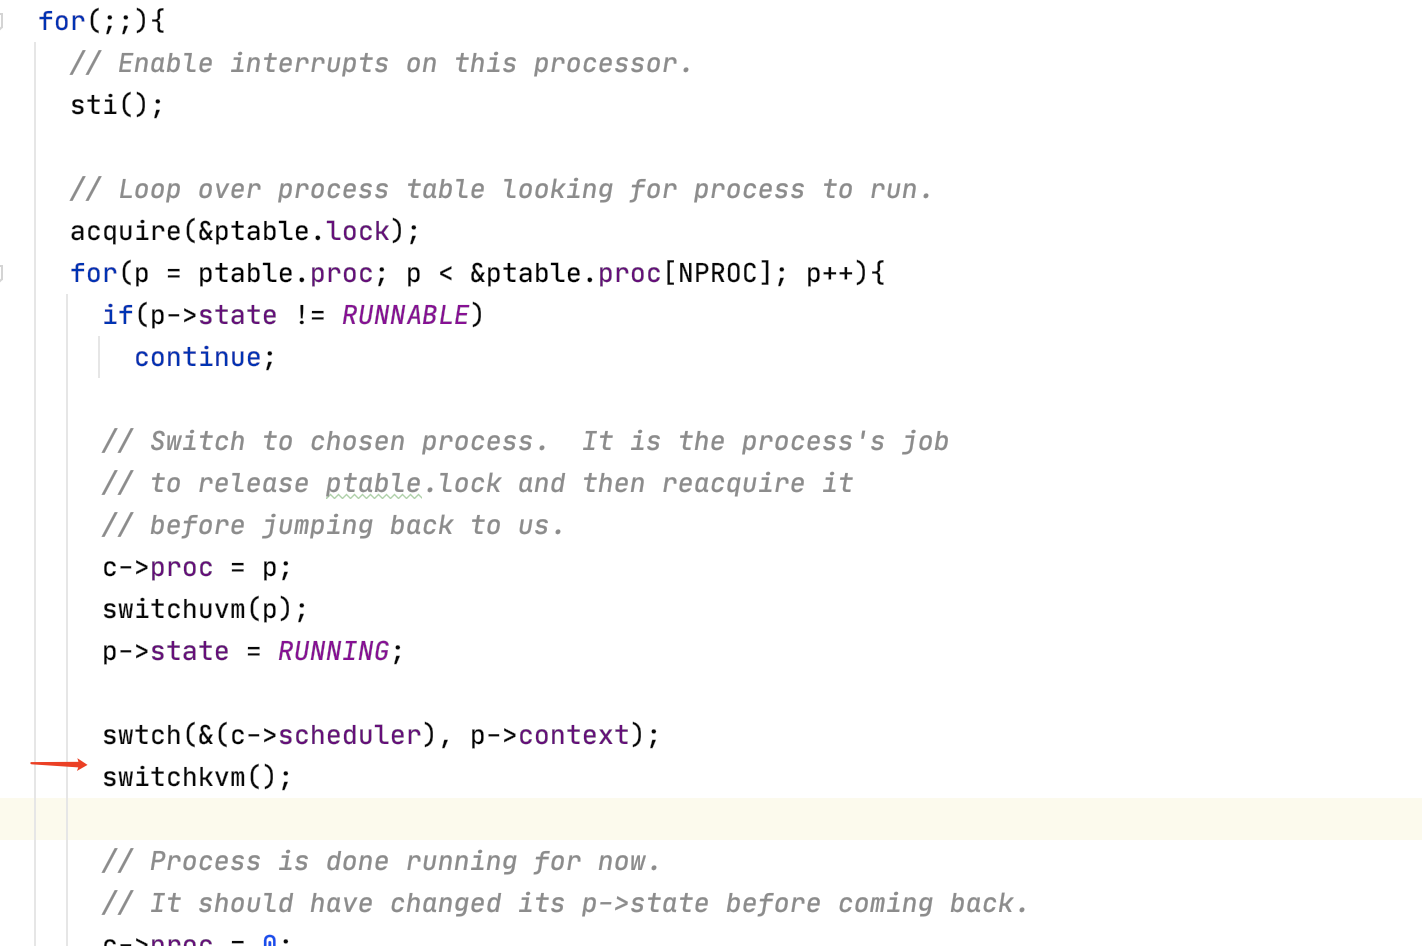
红色箭头所指向的一行。
3. 回到scheduler函数
现在我们在scheduler函数的循环中,代码会检查所有的进程并找到一个来运行。随后再来调用swtch函数
又调用了swtch函数来保存调度器线程的寄存器,并恢复目标进程的寄存器(注,实际上恢复的是目标进程的内核线程)
这里有件事情需要注意,调度器线程调用了swtch函数,但是我们从swtch函数返回时,实际上是返回到了对于switch的另一个调用,而不是调度器线程中的调用。我们返回到的是pid为目的进程的进程在很久之前对于switch的调用。这里可能会有点让人困惑,但是这就是线程切换的核心。
4. 回到用户空间
最后的返回是利用了trapret
# Return falls through to trapret...

.globl trapret

trapret:

  popal

  popl %gs

  popl %fs

  popl %es

  popl %ds

  addl $0x8, %esp  # trapno and errcode

  iret
这个函数把保存的trapframe恢复。最后通过iret恢复到用户空间
5. 看一下fork、wait、exit函数
1. fork函数
- 创建一个进程
- 把父进程的页表copy过来(这里还不是cow方式的)
- 这里比较重要的点是先加锁。然后把子进程的状态设置成runnable。如果在解锁之前子进程就被调度的话。那返回值就是利用tf->eax来获取
- 否则的话解锁return父进程的pid,表示从父进程返回
// Create a new process copying p as the parent.

// Sets up stack to return as if from system call.

// Caller must set state of returned proc to RUNNABLE.

int

fork(void)

{

  int i, pid;

  struct proc *np;

  struct proc *curproc = myproc();

  // Allocate process.

  if((np = allocproc()) == 0){

    return -1;

  }

  // Copy process state from proc.

  if((np->pgdir = copyuvm(curproc->pgdir, curproc->sz)) == 0){

    kfree(np->kstack);

    np->kstack = 0;

    np->state = UNUSED;

    return -1;

  }

  np->sz = curproc->sz;

  np->parent = curproc;

  *np->tf = *curproc->tf;

  // Clear %eax so that fork returns 0 in the child.

  np->tf->eax = 0;

  for(i = 0; i < NOFILE; i++)

    if(curproc->ofile[i])

      np->ofile[i] = filedup(curproc->ofile[i]);

  np->cwd = idup(curproc->cwd);

  safestrcpy(np->name, curproc->name, sizeof(curproc->name));

  pid = np->pid;

  acquire(&ptable.lock);

  np->state = RUNNABLE;

  release(&ptable.lock);

  return pid;

}
2. wait函数
- 如果找到了处于
ZOMBIE状态子进程会把他释放掉。(分别释放对于的pid、内核栈、页表) - 否则如果没有子进程则return -1
- 否则调用slepp函数等待
// Wait for a child process to exit and return its pid.

// Return -1 if this process has no children.

int

wait(void)

{

  struct proc *p;

  int havekids, pid;

  struct proc *curproc = myproc();

  acquire(&ptable.lock);

  for(;;){

    // Scan through table looking for exited children.

    havekids = 0;

    for(p = ptable.proc; p < &ptable.proc[NPROC]; p++){

      if(p->parent != curproc)

        continue;

      havekids = 1;

      if(p->state == ZOMBIE){

        // Found one.

        pid = p->pid;

        kfree(p->kstack);

        p->kstack = 0;

        freevm(p->pgdir);

        p->pid = 0;

        p->parent = 0;

        p->name[0] = 0;

        p->killed = 0;

        p->state = UNUSED;

        release(&ptable.lock);

        return pid;

      }

    }

    // No point waiting if we don't have any children.

    if(!havekids || curproc->killed){

      release(&ptable.lock);

      return -1;

    }

    // Wait for children to exit.  (See wakeup1 call in proc_exit.)

    sleep(curproc, &ptable.lock);  //DOC: wait-sleep

  }

}
sleep函数会在后面讲锁的时候去看
3. exit函数
- 首先exit函数关闭了所有已打开的文件。这里可能会很复杂,因为关闭文件系统中的文件涉及到引用计数,虽然我们还没学到但是这里需要大量的工作。不管怎样,一个进程调用exit系统调用时,会关闭所有自己拥有的文件。
- 进程有一个对于当前目录的记录,这个记录会随着你执行cd指令而改变。在exit过程中也需要将对这个目录的引用释放给文件系统。
- 如果这个想要退出的进程,它又有自己的子进程,接下来需要设置这些子进程的父进程为init进程。我们接下来会看到,每一个正在exit的进程,都有一个父进程中的对应的wait系统调用。父进程中的wait系统调用会完成进程退出最后的几个步骤。所以如果父进程退出了,那么子进程就不再有父进程,当它们要退出时就没有对应的父进程的wait。所以在exit函数中,会为即将exit进程的子进程重新指定父进程为init进程,也就是PID为1的进程。
- 最后把要exit的进程状态设置成
ZOMBIE - 执行
sched函数重新回到内核线程。。。找新的线程去执行
void

exit(void)

{

  struct proc *curproc = myproc();

  struct proc *p;

  int fd;

  if(curproc == initproc)

    panic("init exiting");

  // Close all open files.

  for(fd = 0; fd < NOFILE; fd++){

    if(curproc->ofile[fd]){

      fileclose(curproc->ofile[fd]);

      curproc->ofile[fd] = 0;

    }

  }

  begin_op();

  iput(curproc->cwd);

  end_op();

  curproc->cwd = 0;

  acquire(&ptable.lock);

  // Parent might be sleeping in wait().

  wakeup1(curproc->parent);

  // Pass abandoned children to init.

  for(p = ptable.proc; p < &ptable.proc[NPROC]; p++){

    if(p->parent == curproc){

      p->parent = initproc;

      if(p->state == ZOMBIE)

        wakeup1(initproc);

    }

  }

  // Jump into the scheduler, never to return.

  curproc->state = ZOMBIE;

  sched();

  panic("zombie exit");

}
4. kill函数
最后我想看的是kill系统调用。Unix中的一个进程可以将另一个进程的ID传递给kill系统调用,并让另一个进程停止运行。如果我们不够小心的话,kill一个还在内核执行代码的进程,会有风险,比如我们想要杀掉的进程的内核线程还在更新一些数据,比如说更新文件系统,创建一个文件。如果这样的话,我们不能就这样杀掉进程,因为这样会使得一些需要多步完成的操作只执行了一部分。所以kill系统调用不能就直接停止目标进程的运行。实际上,在XV6和其他的Unix系统中,kill系统调用基本上不做任何事情。
// Kill the process with the given pid.

// Process won't exit until it returns

// to user space (see trap in trap.c).

int

kill(int pid)

{

  struct proc *p;

  acquire(&ptable.lock);

  for(p = ptable.proc; p < &ptable.proc[NPROC]; p++){

    if(p->pid == pid){

      p->killed = 1;

      // Wake process from sleep if necessary.

      if(p->state == SLEEPING)

        p->state = RUNNABLE;

      release(&ptable.lock);

      return 0;

    }

  }

  release(&ptable.lock);

  return -1;

}
xv6学习笔记(4) : 进程调度的更多相关文章
- XV6学习笔记(1) : 启动与加载
XV6学习笔记(1) 1. 启动与加载 首先我们先来分析pc的启动.其实这个都是老生常谈了,但是还是很重要的(也不知道面试官考不考这玩意), 1. 启动的第一件事-bios 首先启动的第一件事就是运行 ...
- XV6学习笔记(2) :内存管理
XV6学习笔记(2) :内存管理 在学习笔记1中,完成了对于pc启动和加载的过程.目前已经可以开始在c语言代码中运行了,而当前已经开启了分页模式,不过是两个4mb的大的内存页,而没有开启小的内存页.接 ...
- xv6学习笔记(3):中断处理和系统调用
xv6学习笔记(3):中断处理和系统调用 1. tvinit函数 这个函数位于main函数内 表明了就是设置idt表 void tvinit(void) { int i; for(i = 0; i & ...
- xv6学习笔记(5) : 锁与管道与多cpu
xv6学习笔记(5) : 锁与管道与多cpu 1. xv6锁结构 1. xv6操作系统要求在内核临界区操作时中断必须关闭. 如果此时中断开启,那么可能会出现以下死锁情况: 进程A在内核态运行并拿下了p ...
- Linux System Programming 学习笔记(六) 进程调度
1. 进程调度 the process scheduler is the component of a kernel that selects which process to run next. 进 ...
- 《Linux内核设计与实现》第四章学习笔记——进程调度
<Linux内核设计与实现>第四章学习笔记——进程调 ...
- 操作系统学习笔记(五)--CPU调度
由于第四章线程的介绍没有上传视频,故之后看书来补. 最近开始学习操作系统原理这门课程,特将学习笔记整理成技术博客的形式发表,希望能给大家的操作系统学习带来帮助.同时盼望大家能对文章评论,大家一起多多交 ...
- Android动画学习笔记-Android Animation
Android动画学习笔记-Android Animation 3.0以前,android支持两种动画模式,tween animation,frame animation,在android3.0中 ...
- MIT 6.828 JOS学习笔记2. Lab 1 Part 1.2: PC bootstrap
Lab 1 Part 1: PC bootstrap 我们继续~ PC机的物理地址空间 这一节我们将深入的探究到底PC是如何启动的.首先我们看一下通常一个PC的物理地址空间是如何布局的: ...
随机推荐
- leetcode第156场周赛5205
思路分析:先用哈希表统计各个数字的次数,再将每个值放进set集合中,之后如果有重复得,说明比原个数少了,如果都是独一无二的,那么个数是相同的 这波把collection集合,强转成set是真的灵性.想 ...
- WPF教程九:理解WPF中的对象资源
在WPF中,所有继承自FrameworkElement的元素都包含一个Resources属性,这个属性就是我们这篇要讲的资源. 这一篇讲解的资源是不是上一篇的程序集资源(那个是在编译过程中打包到程序集 ...
- 从源码角度谈谈MySQL "Too many open files"错误的根本原因
"Too many open files"是一个比较常见的错误,不仅仅是在 MySQL 中.只要是在 Linux 中启动的进程,都有可能遇到这个错误. 究其原因,是进程打开的文件描 ...
- 团队开发day03
完成安卓的登录和注册界面的设计,进行服务器端的开发,设计javabean实体 映射,零售商 ,商品,品牌商,订单类的构建 遇到问题:安卓发起网络请求,客户端回应请求,数据处理设置. 使用传统的方法 / ...
- VSCode 如何远程连接其他主机的 WSL2
VSCode 如何远程连接其他主机的 WSL2 VSCode 的 Remote Deployment 插件对 WSL2 直接提供了支持,能够很方便的连接本机的 WSL2 ,但是并没有提供一个连接远程 ...
- Dubbo的优雅下线原理分析
文/朱季谦 Dubbo如何实现优雅下线? 这个问题困扰了我一阵,既然有优雅下线这种说法,那么,是否有非优雅下线的说法呢? 这,还真有. 可以从linux进程关闭说起,其实,我们经常使用到杀进程的指令背 ...
- P4494 [HAOI2018]反色游戏
P4494 [HAOI2018]反色游戏 题意 给你一个无向图,图上每个点是黑色或者白色.你可以将一条边的两个端点颜色取反.问你有多少种方法每个边至多取反一次使得图上全变成白色的点. 思路 若任意一个 ...
- 【Lucas组合数定理】组合-FZU 2020
组合 FZU-2020 题目描述 给出组合数C(n,m), 表示从n个元素中选出m个元素的方案数.例如C(5,2) = 10, C(4,2) = 6.可是当n,m比较大的时候,C(n,m)很大!于是x ...
- lis分析之一一批处理(任务)如何连接数据库的
public class ZFBCheckAccountTask extends TaskThread { } 这个类运行时候自动加载了数据库连接,不明白是如何提前加载的,开始用static { } ...
- NODEJS对象
1.全局对象 Node.js: global 交互模式下var声明的变量都属于全局下的变量,可以使用global访问,例如global.a 脚本模式下var声明的变量不属于全局下的变量.不能使用glo ...